YuvalMandel/BadUSBDetection
GitHub: YuvalMandel/BadUSBDetection
基于击键生物特征侧信道分析,集成三种AI引擎实时检测BadUSB键盘攻击的防御工具,附带完整的攻击模拟平台。
Stars: 1 | Forks: 1
# BadUSB 键盘检测器
针对 BadUSB 风格键盘攻击的侧信道检测器,使用按键生物特征(按键持续时间、飞行时间、QWERTY 距离统计)。三个独立的 AI 引擎被集成到一个实时 GUI 应用程序中:
| 引擎 | 架构 | 特征 |
|--------|-------------|---------|
| MLP | 前馈(17 特征窗口) | 按键/飞行统计数据 + 多项式 Fitts 定律误差 |
| GRU | 2 层循环(序列) | 原始按键持续时间 + 飞行时间序列 |
| HTM | 层级时序记忆(异常检测) | 21 维统计 SDR + 最后按键标识 SDR |
## 数据集
本项目使用 **布法罗大学 (UB) 按键生物特征数据集**。
必须向数据集维护者请求访问权限:
**https://www.buffalo.edu/cubs/research/datasets/ub-dataset.html**
下载并将其放置在本代码库根目录相对路径的 `../UB_keystroke_dataset/` 中,目录结构如下:
```
parent_dir/
BadUSBDetection/ ← this repo
UB_keystroke_dataset/
s0/rotation/
s1/rotation/
s2/rotation/
```
## 安装
### 选项 A — Python venv(推荐)
**Windows** (cmd 或 PowerShell):
```
py -3 -m venv .venv
.venv\Scripts\activate
pip install -r requirements.txt
```
**Linux / macOS / WSL:**
```
# Ubuntu/Debian — 如果缺失则安装 venv 支持(需要 sudo)
sudo apt update && sudo apt install -y python3-venv python3-pip
python3 -m venv .venv
source .venv/bin/activate
# 仅限 Ubuntu 24.04 / Debian 12+:如果 venv 中没有 pip 则引导安装 pip
python3 -m ensurepip --upgrade
pip install -r requirements.txt
```
**GPU PyTorch(可选 — 仅使用 CPU 可跳过):**
```
pip install torch --index-url https://download.pytorch.org/whl/cu121
```
### 选项 B — Conda
```
# 1. 创建并激活 conda 环境
conda create -n badusb python=3.10
conda activate badusb
# 2. 安装所有依赖项
pip install -r requirements.txt
# 3. GPU PyTorch(可选)
pip install torch --index-url https://download.pytorch.org/whl/cu121
```
### HTM Core(从源码编译 — pip 无法运行)
HTM 引擎需要 `htm.core`,必须从 Numenta 社区源码编译。
**不要**使用 `pip install htm.core` —— PyPI 包已过时且缺少 C++ 绑定。
```
# 构建依赖项
# venv: pip install cmake 或 系统: sudo apt install cmake libboost-all-dev
# conda: conda install -c conda-forge cmake boost
git clone https://github.com/htm-community/htm.core.git
cd htm.core
pip install . # compiles C++ bindings (~5–15 min)
cd ..
```
如果构建失败,请参阅 [htm.core 构建文档](https://github.com/htm-community/htm.core#building-from-source)。
MLP 和 GRU 引擎可以在没有 HTM 的情况下工作 —— 如果导入失败,GUI 会正常禁用 HTM 按钮。
### 验证
```
python3 -c "import torch; print('PyTorch:', torch.__version__)"
python3 -c "from htm.bindings.sdr import SDR; print('HTM OK')"
```
## 运行实时检测器(现有模型)
预训练模型已通过 **Git LFS** 包含在代码库中(`.pth`, `.npy`, `.npz`, `.pkl` 文件)。
在克隆之前必须安装 Git LFS,否则模型文件将作为小的指针文本文件下载,而不是实际的二进制文件。
**安装 Git LFS**(每台机器执行一次):
- Windows:从 https://git-lfs.com 下载并运行安装程序
- Linux/WSL:`sudo apt install git-lfs`
- macOS:`brew install git-lfs`
**克隆并拉取 LFS 文件:**
```
git lfs install # enable LFS for your git
git clone https://github.com/YuvalMandel/BadUSBDetection.git
cd BadUSBDetection
git lfs pull # download binary model files
```
**启动 GUI:**
```
# Windows
python BadUSBDetector/detector.py
# Linux / macOS / WSL
python3 BadUSBDetector/detector.py
```
GUI 显示一个交通灯指示器:
- **绿色** —— 检测到人类打字
- **黄色** —— 异常分数升高(可疑)
- **红色** —— 检测到 BadUSB;点击 "RESET ALARM" 恢复监控
使用单选按钮在 MLP、GRU 和 HTM 引擎之间进行运行时切换。
## 在 SLURM 集群上训练
所有 SLURM 脚本都位于 `slurm/` 中。它们假定使用 `htm_keyboard_1` conda 环境和 Newton 风格的路径。请根据您的集群调整 `ENV_NAME` 以及 partition/account 相关行。
### 完整流水线(数据 → 训练所有三个模型)
```
cd
bash slurm/full_pipeline.sh [--mode full] [--search] [--n-configs 128]
```
选项:
- `--mode full` —— 使用所有按键数据(推荐;默认为 `partial`)
- `--search` —— 为 MLP 和 GRU 运行 Optuna HP 搜索(各约 50 次试验)
- `--n-configs N` —— 要搜索的随机 HTM 配置数量(默认 128)
流水线通过 SLURM 依赖链自动提交作业。
### Fullkey 训练(已知最佳 HP,推荐)
如果您已拥有 HP 搜索结果:
```
# MLP
sbatch slurm/fullkey_mlp.sh
# GRU
sbatch slurm/fullkey_gru.sh
# HTM(在所有数据上训练最佳配置)
sbatch slurm/fullkey_htm.sh
```
### HP 搜索后收集 HTM 结果
```
sbatch slurm/collect_htm_fullkey.sh
```
这会评估所有已完成的 HTM 配置,对它们进行排名,并写入 `results/HTM/leaderboard_fullkey.txt`。
## 单模型训练(本地或交互式)
### MLP
```
# 1. 生成数据
cd dataset_generator
python bot_generator.py -o Synthetic_Bots -f 100 -e 200
python bot_generator.py -o Synthetic_Bots_test -f 20 -e 200
python human_generator.py -o Balanced_Humans -f 124 -l 80 -e 1
python human_generator.py -o Balanced_Humans_test -f 24 -l 80 -e 0
cd ..
python split_persons.py --bots-dir dataset_generator/Synthetic_Bots \
--ub-dir ../UB_keystroke_dataset --sessions s0 s1 s2 --tasks 1
# 2. 训练回归器
cd MLP/regressor
python regressor_train.py -hu ../../dataset_generator/Balanced_Humans -m poly_regressor.pkl
cp poly_regressor.pkl ../
cd ..
# 3. 特征提取
python dataset_csv_generator.py --split-json ../data_split.json --mode full --tag fullkey
# 4. HP 搜索(可选,约 50 次试验)
python model_training.py --split-json ../data_split.json --mode full --tag fullkey --search --n-configs 50
# 5. 使用最佳 HP 进行最终训练
python model_training.py --split-json ../data_split.json --mode full --tag fullkey \
--hps-json ../results/MLP/mlp_best_hps_fullkey.json
```
### GRU
```
# 从 repo 根目录 — 需要 data_split.json(参见上方 MLP 步骤 1)
cd GRU
python translate_to_tensors.py --split-json ../data_split.json --mode full --tag fullkey
# HP 搜索(可选)
python train_gru.py --split-json ../data_split.json --mode full --tag fullkey \
--search --n-configs 50
# 使用最佳 HP 进行最终训练
python train_gru.py --split-json ../data_split.json --mode full --tag fullkey \
--hps-json ../results/GRU/gru_best_hps_fullkey.json
```
### HTM
HTM 训练使用两步随机 HP 搜索:
```
# 1. 准备数据(windows 缓存 — 运行一次)
python HTM/htm_prepare_data.py --tag fullkey
# 2. 生成随机配置
python HTM/htm_generate_configs.py --n-configs 128 --tag fullkey --cache HTM/windows_cache_fullkey.pkl
# 3. 提交生成的 SLURM array(每个配置运行一个作业)
sbatch slurm/train_htm_fullkey_array.sh
# 4. 所有作业完成后,收集结果并在测试集上评估最佳模型
python HTM/htm_collect_results.py --tag fullkey --top 20
# 5. (可选)使用无限数据重新训练单一最佳配置
python HTM/htm_train.py \
--config HTM/configs/config_NNNN.json \
--cache HTM/windows_cache_fullkey.pkl \
--tag fullkey
```
`htm_collect_results.py` 脚本在测试集上评估最佳的 val-F1 配置,并写入 `results/HTM/final_test_results_fullkey.json` 和一张混淆矩阵图。
## 结果(预训练 fullkey 模型)
| 模型 | 验证 F1 | 测试 F1 |
|-------|--------|---------|
| MLP | 0.8817 | 0.8657 |
| GRU | 0.9474 | 0.9524 |
| HTM (cfg_0449) | 0.7333 | 0.7143 |
## BadUSB 模拟器
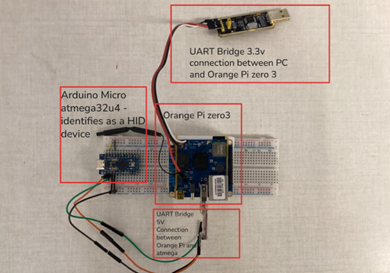
`BadUSBemulator/` 目录包含一个用于模拟恶意 USB HID 攻击的软硬件平台。它用于在没有真实 BadUSB 设备的情况下,针对真实的攻击配置文件测试检测器。
### 硬件
| 组件 | 作用 |
|-----------|------|
| **Orange Pi Zero 3** (主控) | 运行 `BadUSBemulator.py` —— 解析载荷脚本,生成按键时序数组,并通过 UART 发送按下/释放命令。通过 SSH 访问。 |
| **Arduino Pro Micro** (ATmega32U4) | 通过 USB 连接到目标 PC。接收来自 Orange Pi 的 UART 命令,并使用 Arduino `Keyboard.h` 库将其作为真实的 HID 键盘事件注入。 |
Orange Pi 以 3.3V 逻辑电平运行;Arduino 以 5V 逻辑电平运行。它们之间的 UART 链路(TX/RX/GND)桥接了这两种电压电平。目标 PC 会将 Arduino 的 USB 端口识别为标准键盘。
### 设置
**1. 烧录 Arduino 固件**
在 Arduino IDE(或 `arduino-cli`)中打开 `BadUSBemulator/AtmegaKeyboard.cpp`,选择开发板 **Arduino Pro Micro (ATmega32U4)**,然后上传。该程序以 115200 波特率监听 `Serial1`,等待 `P,`(按下)和 `R,`(释放)命令。
**2. 连线 Orange Pi → Arduino**
```
Orange Pi TX → Arduino RX (Serial1)
Orange Pi RX → Arduino TX (Serial1)
GND → GND
```
将 Arduino 的 USB 连接到**目标 PC**(受监控的机器)。
**3. 在 Orange Pi 上安装 Python 依赖**
```
pip install pyserial numpy
```
**4. 调整串口**
编辑 `BadUSBemulator/BadUSBemulator.py` 并将 `UART_PORT` 设置为与您的 Orange Pi 上的设备匹配(默认:`/dev/ttyUSB0`):
```
UART_PORT = "/dev/ttyUSB0"
```
### 运行攻击
```
python3 BadUSBemulator/BadUSBemulator.py BadUSBemulator/attack_example.txt
```
系统将提示您选择一个攻击配置文件:
| # | 配置文件 | 描述 |
|---|---------|-------------|
| 1 | Machine Gun | 接近零延迟,方差极小 —— 极致速度 |
| 2 | The Robot | 每次击键之间的时序完美均匀 |
| 3 | Gaussian Faker | 符合正态分布的延迟,模拟人类打字 |
| 4 | Uniform Jitter | 在设定范围内均匀分布的随机延迟 |
| 5 | Burst Mode | 快速爆发的击键,中间伴有较长停顿 |
选择配置文件后,您可以使用随机参数(按 `n`)或输入自定义值(按 `y`)。
### 载荷脚本语法
攻击脚本(如 `attack_example.txt`)使用一种简单的格式:
| 语法 | 含义 | 示例 |
|--------|---------|---------|
| 纯文本 | 使用攻击时序逐字输入的字符 | `whoami` |
| `delay(X)` | 硬性暂停 X 毫秒(操作系统等待,例如等待应用启动) | `delay(1500)` |
| `[KEY]` | 特殊键或修饰键 | `[ENTER]`, `[TAB]`, `[ESC]`, `[F5]` |
| `[KEY1+KEY2]` | 组合键(同时按下所有键) | `[CTRL+ALT+t]`, `[CTRL+c]` |
支持的特殊键:`[ENTER]`, `[SPACE]`, `[TAB]`, `[ESC]`, `[DELETE]`, `[PTRSCR]`, `[CTRL]`, `[ALT]`, `[SHIFT]`, `[WINDOW]`, `[F1]`–`[F12]`。
**示例载荷** (`attack_example.txt`):
```
[CTRL+ALT+t]
delay(1500)
echo "hello from BadUSB"
[ENTER]
```
标签:Apex, BadUSB, Bash脚本, GRU, GUI应用程序, HTM, MLP, Python, PyTorch, QWERTY距离, Trivy, USB安全, 侧信道分析, 凭据扫描, 击键动态, 前馈神经网络, 子域名枚举, 层级时序记忆, 异常检测, 循环神经网络, 数据科学, 无后门, 时间序列分析, 机器学习, 深度学习, 硬件安全, 端点保护, 系统安全, 网络安全, 菲茨定律, 行为生物特征, 资源验证, 逆向工具, 键盘击键生物特征识别, 隐私保护, 飞行时间, 驻留时间