# doc-engine-cli
**零配置 Markdown → PDF 文档引擎**
[](https://opensource.org/licenses/MIT)
[](https://www.python.org/downloads/)
[](https://pypi.org/project/doc-engine-cli/)
[](https://pepy.tech/projects/doc-engine-cli)
[](https://typst.app/)
[](https://github.com/psf/black)
将任何 `README.md` 转换为优质的、可打印的 PDF 报告 —— 无需配置,无需模板,无需 LaTeX。
```
pipx install doc-engine-cli
```
## 概述
**doc-engine-cli** 是一款开发者优先的 CLI 工具,它使用 [Typst](https://typst.app/) 作为渲染后端,将 Markdown 文件转换为具有专业排版的 PDF 文档。它专为需要高质量文档产物的团队和个人开发者设计,免去了 LaTeX 的复杂性或手动排版的工作。
该工具会自动检测你的 `README.md`,从 Git 提取元数据,并在单一命令中生成一份受 IEEE 启发的技术文档 —— 包含封面、目录和高级排版。
```
doc-engine build
```
就是这样。无需任何配置。
## 功能
| 功能 | 描述 |
|---|---|
| **零配置** | 自动检测 `README.md`、Git 作者和文档标题。无需设置文件。 |
| **五种模板** | 包含 academic、modern、minimal、technical 和 book 布局,每种都可配置强调色。通过 `--template` 指向你自己的 `.typ` 文件可进一步定制。 |
| **Front Matter** | 可选的 `---` 元数据块可直接在文件中设置标题、副标题、作者、模板和强调色。 |
| **Watch Mode** | 每次保存源文件时,`--watch` 都会重新构建 PDF。 |
| **丰富的 Markdown** | 支持嵌入本地图片,将 GitHub 任务列表渲染为真实的复选框,并将 `[^1]` 脚注转换为原生的 Typst 脚注。 |
| **错误检查** | 在编译前报告源文件中的问题及其行号和列号。`--dry-run` 模式可单独运行此检查。 |
| **非破坏性** | 从不覆盖现有的 PDF —— 除非你传入 `--force`,否则会写入 `report (1).pdf`、`report (2).pdf` 等。 |
| **高级排版** | 带有备选字体链的 Inter 字体家族,两端对齐文本以及优化的行间距。 |
| **纯 Python** | 无需外部二进制文件(无需 Pandoc,无需 LaTeX)。通过单个 `pip install` 发布。 |
| **跨平台** | 兼容 Windows、macOS 和 Linux,需 Python 3.10+。 |
## 🎓 学术功能 (v0.1.2+)
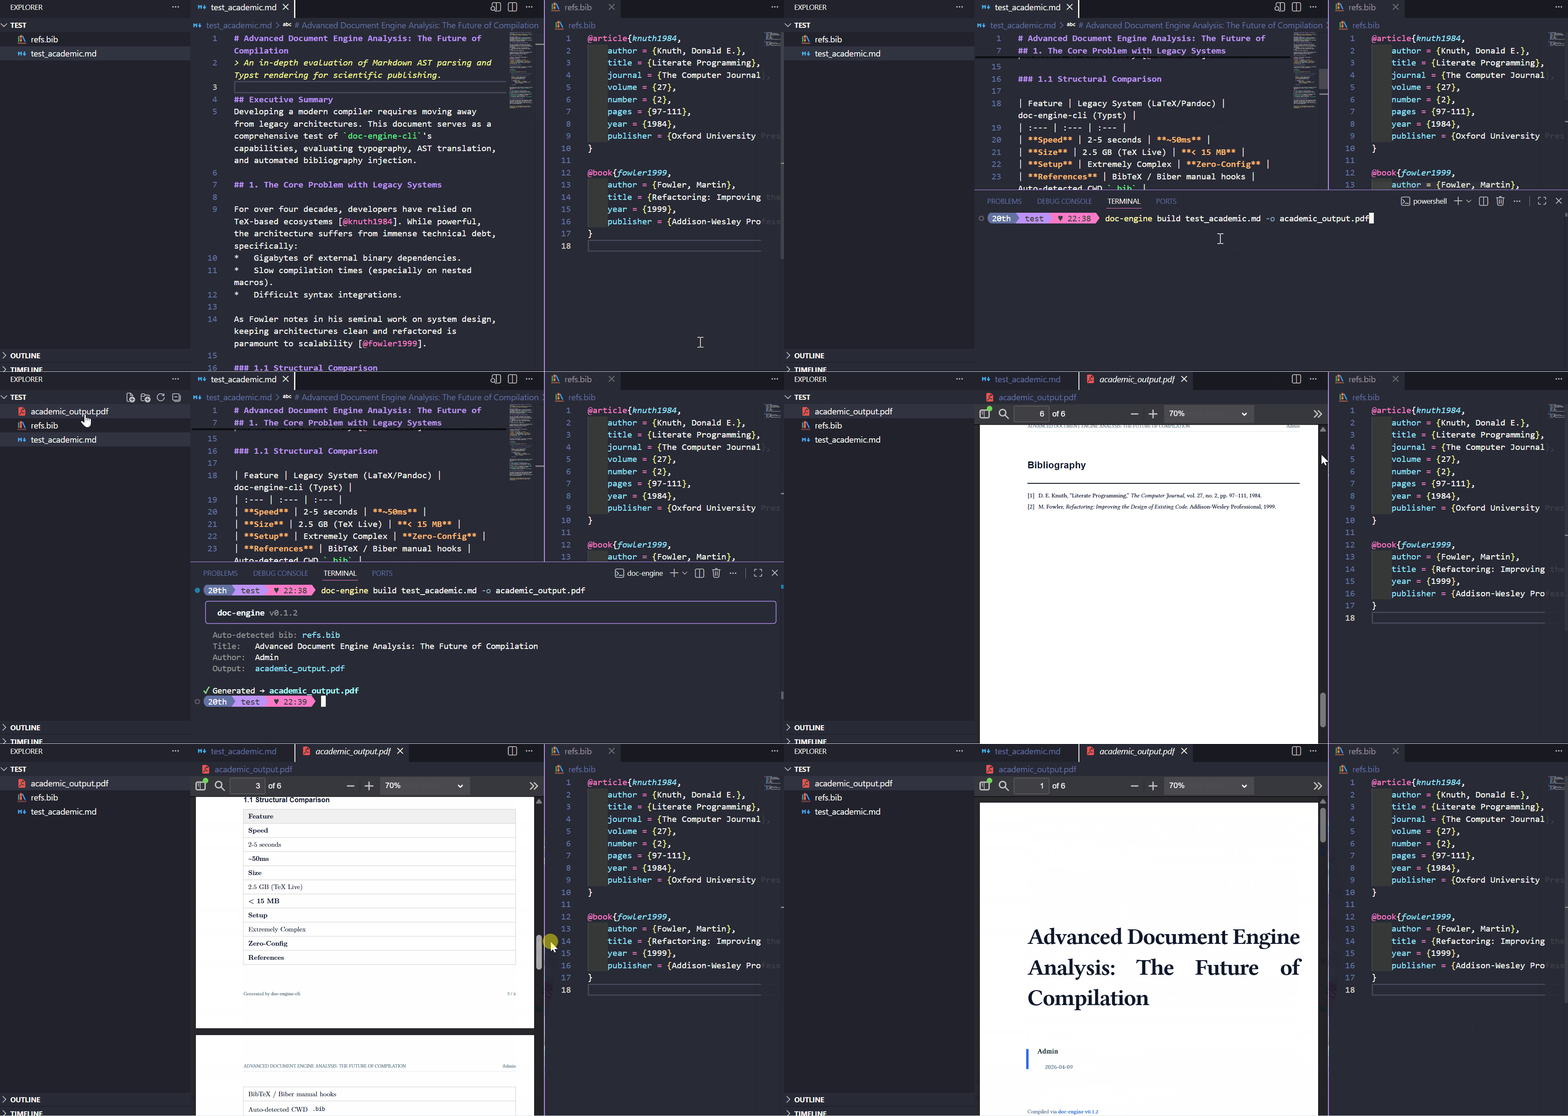
`doc-engine-cli` 自带高级科学布局(使用 Linux Libertine 和 Inter 字体家族)以及**零配置参考文献**处理功能。
要为你的 PDF 添加 IEEE 风格的参考文献:
1. 在你的代码仓库中创建一个 `refs.bib`、`references.bib` 或 `bibliography.bib` 文件。
2. 在你的 `README.md` 中,使用标准语法引用:`[@citation-key]`。
当你运行 `doc-engine build` 时,CLI 会自动检测你的 `.bib` 文件,将其安全地绑定到沙盒中,并在文档末尾注入一个格式化的参考文献页面。
## 快速开始
### 安装
```
pipx install doc-engine-cli
```
*(如果你没有 `pipx`,可以通过 `pip install pipx` 安装)*
### 生成你的第一个 PDF
导航到任何包含 `README.md` 的项目目录并运行:
```
doc-engine build
```
该工具将会:
1. 自动检测当前目录下的 `README.md`
2. 从第一个 `# heading` 提取文档标题
3. 读取你的 Git `user.name` 作为作者字段
4. 生成一个包含封面、目录和格式化内容的 `README_doc.pdf`
### 显式选项
```
doc-engine build path/to/file.md -o output.pdf -t "Custom Title" -a "Author Name"
```
## 用法
 Switching templates, recoloring the accent, and checking a file for errors.
### 命令
```
doc-engine build [INPUT_FILE] Convert a Markdown file into a PDF
doc-engine info Show version, repository, and templates
doc-engine --version Print the version and exit
doc-engine --help Show all commands and flags
```
### `build` 标志
| 标志 | 默认值 | 描述 |
|---|---|---|
| `INPUT_FILE` | 自动检测 `README.md` | 要转换的 Markdown 文件的路径。 |
| `-o, --output` | `
_doc.pdf` | 输出的 PDF 路径。 |
| `-t, --title` | 第一个 `# heading` | 覆盖文档标题。 |
| `-s, --subtitle` | 无 | 封面上标题下方显示的副标题。 |
| `-a, --author` | `git config user.name` | 覆盖作者名称。 |
| `--date` | 今天 | 封面上显示的日期。 |
| `--template` | `academic` | 内置布局(`academic`、`modern`、`minimal`、`technical`、`book`)或你自己的 `.typ` 文件路径。 |
| `--accent` | 模板默认值 | 十六进制值(`#2563eb`)或名称(`blue`、`teal`、`rose` 等)表示的强调色。 |
| `--bib` | 自动检测 `refs.bib` | 用于参考文献的自定义 `.bib` 文件的路径。 |
| `--no-branding` | 关闭 | 在 PDF 中隐藏 `doc-engine` 的署名。 |
| `--dry-run` | 关闭 | 检查 Markdown 错误并在不生成 PDF 的情况下退出。 |
| `-w, --watch` | 关闭 | 每当源文件更改时自动重新构建。 |
| `-f, --force` | 关闭 | 覆盖输出文件,而不是写入带有编号的副本。 |
| `--open` | 关闭 | 在生成 PDF 后将其打开。 |
任何标志也都可以在 front matter 中设置(见下文);命令行上的标志始终具有最高优先级。
### 示例
**基础 —— 零配置模式:**
```
cd my-project
doc-engine build
# → 生成 README_doc.pdf
```
**指定输入和输出:**
```
doc-engine build CONTRIBUTING.md -o contributing_guide.pdf
```
**覆盖元数据:**
```
doc-engine build -t "API Reference v2.0" -a "Engineering Team"
```
**选择模板和强调色:**
```
doc-engine build --template modern --accent teal
doc-engine build --template technical --accent "#7c3aed"
```
**在构建前检查错误:**
```
doc-engine build --dry-run
```
**从 PDF 中移除引擎署名:**
```
doc-engine build --no-branding
```
**生成后立即打开:**
```
doc-engine build --open
```
**每次保存时重新构建:**
```
doc-engine build --watch
```
**作为 Python 模块使用:**
```
python -m doc_engine build README.md
```
## Front Matter
任何 Markdown 文件都可以通过在开头添加一个 `---` 块来携带自身的设置,这样文档对每个人渲染出来的效果都是一样的 —— 无需记忆任何标志:
```
---
title: Payments API
subtitle: Integration Guide
author: Platform Team
template: technical
accent: teal
---
# Payments API
...
```
支持的键有:`title`、`subtitle`、`author`、`date`、`template`、`accent` 和 `bib`。命令行传入的标志会覆盖相应的 front matter 键,而后者又会覆盖自动检测到的值。
## Watch Mode
传入 `--watch` 可保持 `doc-engine` 运行,并在你每次保存源文件时重新构建 PDF。这是微调模板或强调色并实时查看结果的最快方法:
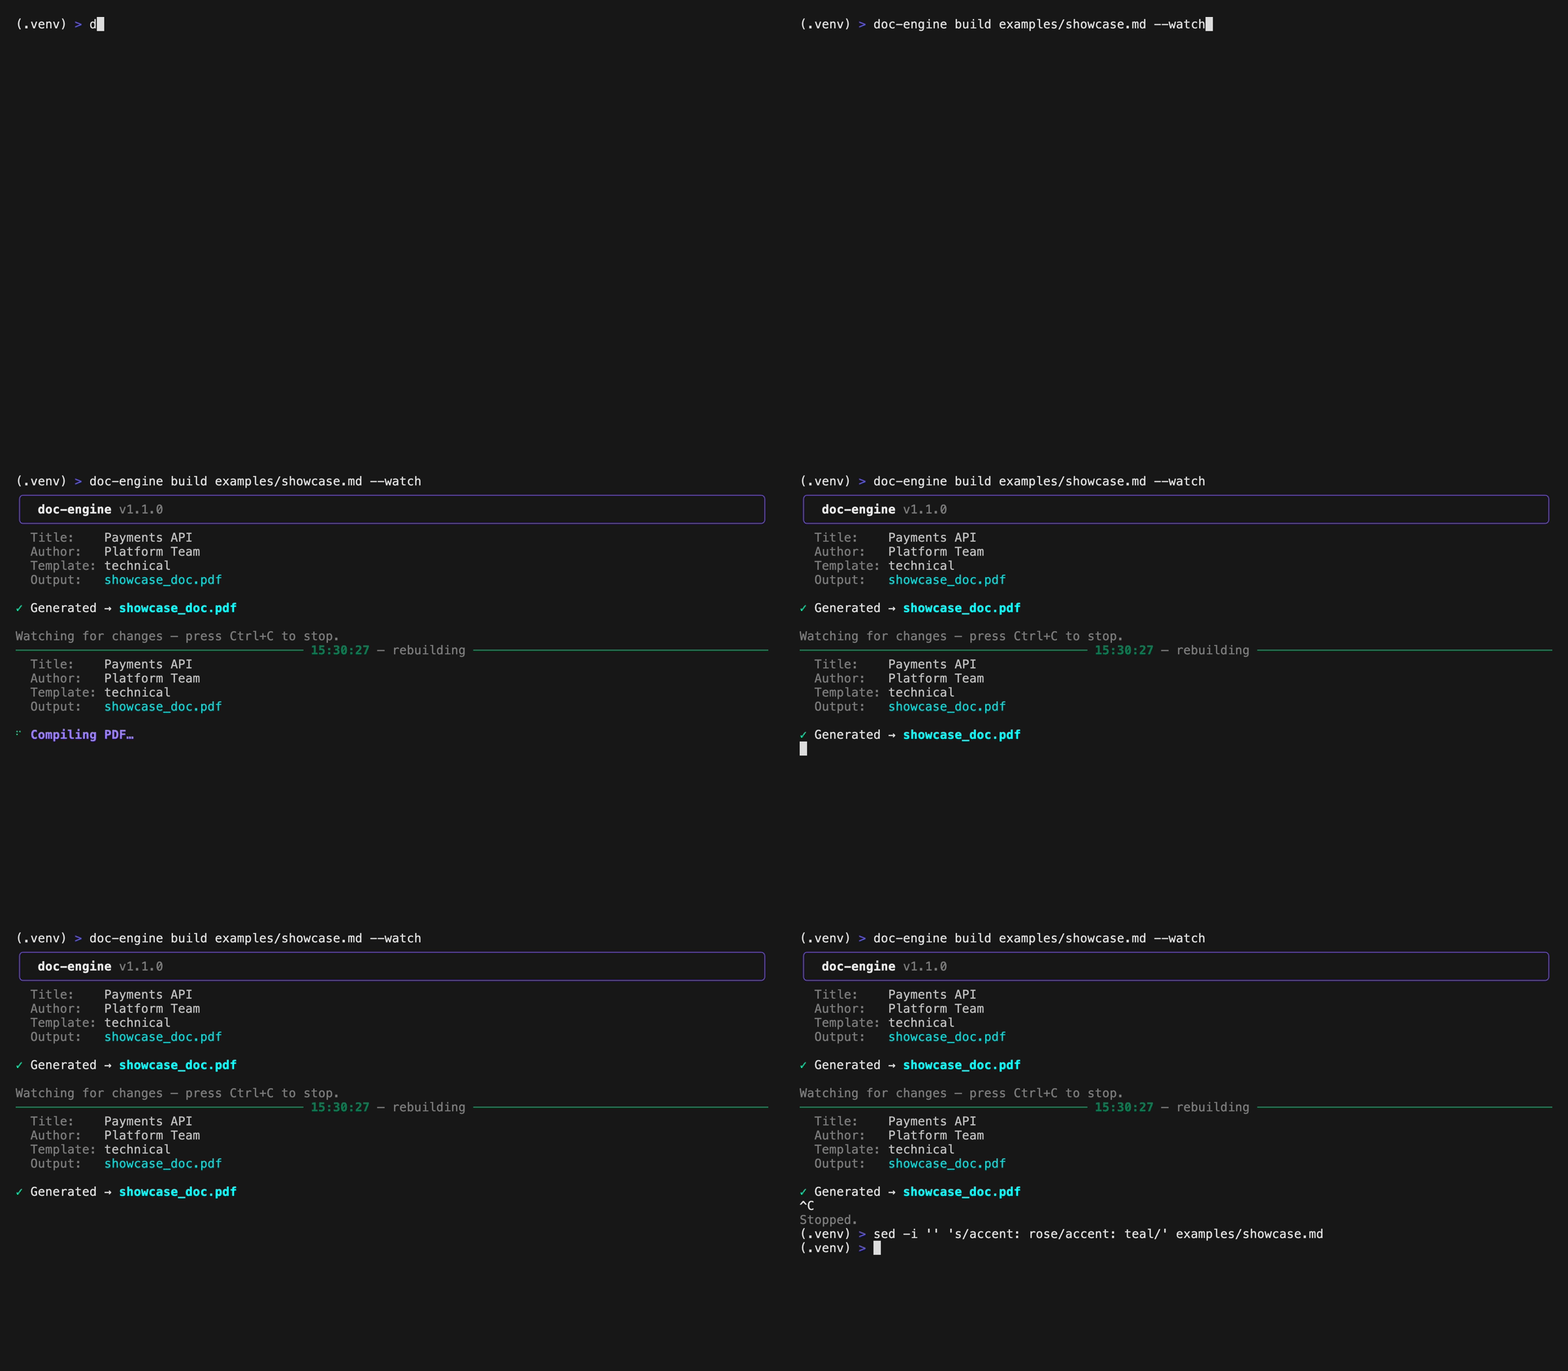 Metadata read from front matter, rebuilt live on every save.
```
doc-engine build --watch --template modern --accent teal
```
输出路径在 watch 启动时选择一次,随后每次更改时都会原地重写。按 `Ctrl+C` 停止。
## 模板
`doc-engine` 自带五种布局。通过 `--template
` 切换,并使用 `--accent` 为其中任何一种重新着色。
| 模板 | 外观 |
|---|---|
| `academic` | 衬线体 IEEE 风格报告,包含封面、目录和页眉。默认模板。 |
| `modern` | 简洁的无衬线体布局,具有宽敞的间距和左对齐的封面。 |
| `minimal` | 无封面或目录 —— 紧凑的标题块,然后直接进入正文。 |
| `technical` | 粗体布局,带有填充的强调色横幅和章节标记。适用于工程文档。 |
| `book` | 经典的居中标题页,带有章节式的分节符。 |
```
doc-engine build --template book
doc-engine build --template modern --accent rose
```
强调色接受十六进制值(`#0ea5e9`)或以下名称之一:`blue`、`sky`、`indigo`、`violet`、`purple`、`red`、`rose`、`orange`、`amber`、`green`、`emerald`、`teal`、`slate`、`black`。
### 自带模板
`--template` 也接受一个 `.typ` 文件的路径,因此你无需派生该项目即可发布内部风格:
```
doc-engine build --template ./corporate.typ
```
最快的上手方法是复制 [`doc_engine/templates/`](doc_engine/templates) 中的其中一个文件并进行编辑。模板会暴露一个单一的 `setup_doc` 入口点,编译器会将文档元数据传递给它:
```
#let setup_doc(
title: "",
subtitle: "",
author: "Anonymous",
date: datetime.today().display(),
bibliography_file: none,
accent: none,
branding: true,
version: "",
body,
) = { ... }
```
## 检查错误
在编译之前,`doc-engine` 会扫描 Markdown 中的问题,并报告准确的行号和列号,以便你可以直接跳转到需要修复的地方:
```
README.md:42:8: error: link URL must not be empty
README.md:51:1: warning: image source is empty
```
错误会终止构建;警告则不会。使用 `--dry-run` 可在不生成 PDF 的情况下单独运行检查 —— 这在 CI 中非常实用:
```
doc-engine build --dry-run
```
## 架构
```
┌─────────────┐
│ README.md │
└──────┬──────┘
│
┌──────▼──────┐
│ CLI Layer │ click + rich
│ (cli.py) │ arg parsing, git detection
└──────┬──────┘
│
┌────────────┼────────────┐
│ │
┌──────▼──────┐ ┌───────▼──────┐
│ Converter │ │ Compiler │
│(converter.py)│ │(compiler.py) │
│ │ │ │
│ Markdown AST │ │ Typst → PDF │
│ → Typst │ │ via typst-py│
└──────┬──────┘ └───────┬──────┘
│ │
│ ┌──────────────┐ │
└────► templates/ ◄─────┘
│ *.typ │
└──────┬──────┘
│
┌──────▼──────┐
│ output.pdf │
└─────────────┘
```
### 流水线
| 阶段 | 模块 | 职责 |
|---|---|---|
| **1. 输入解析** | `cli.py` | 定位 Markdown 文件,检测 Git 元数据 |
| **2. 源码检查** | `linter.py` | 报告空链接和未闭合的代码块,并附带行号/列号 |
| **3. Markdown 解析** | `converter.py` | 通过 `mistune` 解析 Markdown AST,生成 Typst 标记 |
| **4. 模板注入** | `compiler.py` | 将转换后的内容与所选模板合并 |
| **5. PDF 编译** | `compiler.py` | 通过 `typst` Python 绑定进行编译 |
## 工作原理
### Markdown → Typst 转换
转换器模块使用 [`mistune`](https://github.com/lepture/mistune) 解析 Markdown 并生成等效的 Typst 标记:
| Markdown | Typst 输出 |
|---|---|
| `# Heading` | `= Heading` |
| `**bold**` | `*bold*` |
| `*italic*` | `_italic_` |
| `` `code` `` | `` `code` `` |
| `[text](url)` | `#link("url")[text]` |
| `- item` | `- item` |
| `1. item` | `+ item` |
| `- [x] task` | 渲染的复选框 |
| `text[^1]` | `#footnote[...]` |
| `` | `#image("local.png")` |
| `> blockquote` | `#block(...)` |
| `---` | `#line(...)` |
特殊字符(`#`、`$`、`@`、`*`、`_` 等)会被自动转义,以防止被 Typst 解释。
### PDF 模板
每个模板都位于 `doc_engine/templates/` 中,并暴露相同的 `setup_doc` 入口点,因此编译器可以通过 `--template` 在它们之间进行切换。默认的 `academic` 模板提供:
- **封面**包含标题、作者和日期
- **目录**提供深度为 3 的导航
- **页眉**包含文档标题和作者
- **页脚**包含页码和引擎署名
- **代码块**具有圆角和细微的边框
- **标题层级**具有强调色的 H2 章节
其他模板(`modern`、`minimal`、`technical`、`book`)保持相同的内容,但更改字体、布局和封面。强调色是在编译时注入的,因此 `--accent` 可以为其中任何一个重新着色。
## 项目结构
```
doc-engine-cli/
├── doc_engine/
│ ├── __init__.py # Package version
│ ├── __main__.py # python -m doc_engine entrypoint
│ ├── cli.py # Click-based CLI + Git detection
│ ├── converter.py # Markdown → Typst transpiler
│ ├── compiler.py # Typst → PDF compilation engine
│ ├── linter.py # Source checks (line/column reporting)
│ └── templates/
│ ├── academic.typ # Default IEEE-style report
│ ├── modern.typ # Clean sans-serif layout
│ ├── minimal.typ # Compact, no cover page
│ ├── technical.typ # Accent banner + section markers
│ └── book.typ # Centered title page, chapter breaks
├── tests/
│ ├── __init__.py
│ ├── test_converter.py # Unit tests for the converter
│ ├── test_linter.py # Unit tests for the linter
│ └── test_cli.py # CLI and template/accent tests
├── pyproject.toml # Package configuration + dependencies
├── LICENSE # MIT License
├── .gitignore
└── README.md
```
## 依赖
| 包 | 用途 | 许可证 |
|---|---|---|
| [`click`](https://click.palletsprojects.com/) | CLI 框架 | BSD-3 |
| [`rich`](https://github.com/Textualize/rich) | 终端格式化和进度指示器 | MIT |
| [`mistune`](https://github.com/lepture/mistune) | Markdown 解析器(纯 Python) | BSD-3 |
| [`typst`](https://github.com/messense/typst-py) | Typst 编译器绑定 | Apache-2.0 |
所有依赖项都是纯 Python 的 —— 无需外部二进制文件(Pandoc、LaTeX 等)。
## 开
### 设置
```
git clone https://github.com/leonardosalasd/doc-engine-cli.git
cd doc-engine-cli
pip install -e ".[dev]"
```
### 运行测试
```
python -m pytest tests/ -v
```
### 项目命令
```
# 从该项目的 README 生成 PDF
python -m doc_engine build
# 运行并输出详细的错误信息
python -m doc_engine build README.md -o docs_output.pdf
```
## Docker
每次发布时都会将容器镜像发布到 GitHub Container Registry。将你的项目挂载到 `/workspace` 并像往常一样运行 `build`:
```
docker run --rm -v "$PWD:/workspace" ghcr.io/leonardosalasd/doc-engine-cli build
```
入口点是 `doc-engine`,因此你可以传递任何命令或标志:
```
docker run --rm -v "$PWD:/workspace" ghcr.io/leonardosalasd/doc-engine-cli build --template modern --accent teal
```
## 支持的 Markdown 元素
- [x] 标题 (H1–H6)
- [x] 粗体、斜体、删除线
- [x] 行内代码和围栏代码块(带有语言提示)
- [x] 链接
- [x] 有序列表和无序列表
- [x] 嵌套列表
- [x] 引用块
- [x] 表格
- [x] 水平分割线
- [x] 换行符 (`
`)
- [x] 任务列表 (`- [x]` / `- [ ]`)
- [x] 脚注 (`[^1]`)
- [x] 本地图片(远程图片仍渲染为 alt 文本)
- [ ] 数学块
## 路线图
- [x] 通过 `--template` 标志选择模板
- [x] 通过 `--accent` 配置强调色
- [x] 带有行号/列号的源码错误检查和 `--dry-run`
- [x] 用户提供模板文件(将 `--template` 指向某个路径)
- [x] 用于覆盖元数据的 YAML front matter 支持
- [x] 本地图片嵌入
- [x] 用于持续重新构建的 Watch mode
- [ ] 数学表达式 (LaTeX 风格的 `$...$`)
- [ ] 多文件文档合并
- [ ] Mermaid 图表渲染
- [ ] 针对远程 URL 的图片下载和嵌入
- [ ] 用于存档的 PDF/A 合规性
## 贡献
欢迎贡献。请遵循以下准则:
1. 派生该仓库
2. 创建功能分支 (`git checkout -b feature/your-feature`)
3. 为新功能编写测试
4. 确保所有测试通过 (`python -m pytest tests/ -v`)
5. 提交 pull request
## 许可证
该项目基于 [MIT License](LICENSE) 授权。
**使用 [Typst](https://typst.app/) 构建 · 使用 [mistune](https://github.com/lepture/mistune) 解析 · 使用 [Rich](https://github.com/Textualize/rich) 排版**