MISP/misp-feedback
GitHub: MISP/misp-feedback
一个高性能的警告列表查询引擎,通过将IOC与MISP的120多个已知良性基础设施列表进行匹配来识别误报。
Stars: 14 | Forks: 1
# MISP 反馈
一个高性能的警告列表查询引擎,用于检查妥协指标(IOC)是否与 [MISP 警告列表](https://github.com/MISP/misp-warninglists) 匹配。它通过将值与 120 多个已知良好基础设施的精选列表进行匹配来识别误报:云提供商 IP 范围、顶级域名排名、公共 DNS 解析器、证书颁发机构等。
MISP 反馈作为守护进程(`misp-fbd`)运行,一次性将所有警告列表加载到内存中,并通过 Unix 套接字和/或 HTTP 提供亚毫秒级查询。CLI 工具(`misp-fb`)提供便捷的命令行访问。
## 安装
### 前置条件
- Rust 工具链(1.70+)— 通过 [rustup](https://rustup.rs/) 安装
- Git(用于克隆和 warninglists 子模块)
### 从源码构建
```
git clone --recurse-submodules https://github.com/MISP/misp-feedback.git
cd misp-feedback
cargo build --release
```
二进制文件位于 `target/release/misp-fbd`(守护进程)和 `target/release/misp-fb`(CLI)。
如果克隆时没有使用 `--recurse-submodules`,请单独获取 warninglists:
```
git submodule update --init
```
复制示例配置文件:
```
cp config.toml.example config.toml
```
### 配置
交互式生成配置文件:
```
$ misp-fb config
MISP Feedback configuration
Unix socket path [/tmp/misp-fbd.sock]:
Enable HTTP listener? [y/N]: y
HTTP bind address [127.0.0.1:3000]:
Warninglists directory [./misp-warninglists/lists]:
Which warninglists to load?:
> All lists
Only selected lists
All except selected lists
--- Generated config ---
[daemon]
socket_path = "/tmp/misp-fbd.sock"
http_bind = "127.0.0.1:3000"
warninglists_path = "./misp-warninglists/lists"
[warninglists]
lists = []
Config written to config.toml
```
使用 `--output` 写入不同路径,如果列表目录在其他位置则使用 `--warninglists-path`:
```
$ misp-fb config --output /etc/misp-feedback/config.toml --warninglists-path /opt/misp-warninglists/lists
```
选择"仅选中的列表"或"除选中列表外的所有列表"时,工具会扫描 warninglists 目录并呈现一个多选列表,供您选择所有可用的 warninglists。
或直接编辑 `config.toml`(如果还没有,请从 `config.toml.example` 复制):
```
[daemon]
socket_path = "/tmp/misp-fbd.sock"
# http_bind = "127.0.0.1:3000" # 取消注释以启用 HTTP 监听器
warninglists_path = "./misp-warninglists/lists"
[warninglists]
# 空列表 = 加载所有 warninglists
# Include 模式: lists = ["amazon-aws", "google-gcp", "cloudflare"]
# Exclude 模式: lists = ["!alexa", "!tranco", "!cisco_top1000"]
lists = []
```
| 选项 | 默认值 | 描述 |
|--------|---------|-------------|
| `daemon.socket_path` | `/tmp/misp-fbd.sock` | Unix 域套接字路径 |
| `daemon.http_bind` | *(禁用)* | HTTP 监听器的 TCP 地址(例如 `127.0.0.1:3000`) |
| `daemon.warninglists_path` | `./misp-warninglists/lists` | warninglists 目录路径 |
| `warninglists.lists` | `[]`(全部) | 筛选要加载的列表。使用 `!` 前缀排除。 |
### 启动守护进程
```
# 使用当前目录中的默认 config.toml 启动
./target/release/misp-fbd
# 使用特定的配置文件启动
./target/release/misp-fbd --config /etc/misp-feedback/config.toml
```
守护进程向 stderr 记录日志。使用 `RUST_LOG` 环境变量控制详细程度:
```
RUST_LOG=debug ./target/release/misp-fbd
```
守护进程监视 warninglists 目录的变化,并在文件添加、修改或删除时自动重新加载。
## 使用方法(CLI)
CLI 工具(`misp-fb`)通过 Unix 套接字与运行的 `misp-fbd` 守护进程通信。
### 检查单个值
```
$ misp-fb check 8.8.8.8
8.8.8.8: 2 match(es)
- public-dns-v4 (List of known IPv4 public DNS resolvers)
- vpn-ipv4 (Specialized list of vpn-ipv4 addresses belonging to common VPN providers and datacenters)
```
### 检查多个值
```
$ misp-fb check 8.8.8.8 google.com abuse@example.com
8.8.8.8: 2 match(es)
- public-dns-v4 (List of known IPv4 public DNS resolvers)
- vpn-ipv4 (Specialized list of vpn-ipv4 addresses belonging to common VPN providers and datacenters)
google.com: 11 match(es)
- cisco_top1000 (Top 1000 websites from Cisco Umbrella)
- cisco_top10k (Top 10 000 websites from Cisco Umbrella)
- ...
abuse@example.com: 1 match(es)
- common-contact-emails (Common contact e-mail addresses)
```
### 按类别筛选
Warninglists 有一个 `category` 字段,值为 `false-positive`(默认)或 `known`。误报列表包含已知良好的基础设施,不应被标记为恶意(例如公共 DNS、云 IP 范围、顶级域名)。已知标识符列表提供关于值的上下文(例如,该值属于特定组织),但不一定意味着它是良性的。
默认情况下,查询会匹配所有类别的 warninglists。使用 `--false-positives-only` 将结果限制为仅误报列表:
```
$ misp-fb check --false-positives-only 8.8.8.8
```
### 从文件批量检查
```
$ misp-fb check --batch indicators.txt
```
或从 stdin 管道输入:
```
$ cat indicators.txt | misp-fb check
$ echo -e "8.8.8.8\ngoogle.com\nabuse@example.com" | misp-fb check
```
管道传输和 `--batch` 都会向守护进程发送单个批量请求,因此比在循环中调用 `misp-fb check` 更快。对于任何批量工作负载,请使用这些方式。
### 与其他工具集成
CLI 旨在融入标准 Unix 管道。以下是一些示例:
```
# 从 Web 服务器日志中提取唯一 IP 并检查它们
grep -oP '\d+\.\d+\.\d+\.\d+' access.log | sort -u | misp-fb check
# 检查域名列表,只保留不在任何 warninglist 上的域名
cat domains.txt | misp-fb -f csv check | grep ",false," | cut -d, -f1
# 检查指标,只保留命中项,以 JSON 格式供进一步处理
cat iocs.txt | misp-fb -f json check | jq 'select(.matched)'
# 用 warninglist 上下文丰富指标 CSV
cat indicators.txt | misp-fb -f csv check > enriched.csv
# 通过 API 从 MISP 事件中提取指标并检查它们
curl -s -H "Authorization: YOUR_API_KEY" \
https://misp.example.com/attributes/restSearch -d '{"eventid": 1234}' \
| jq -r '.response.Attribute[].value' \
| misp-fb check
# 检查 IOCs 从 Zeek (Bro) 连接日志
zeek-cut id.resp_h < conn.log | sort -u | misp-fb check
# 对比两次运行以发现新标记的指标
comm -13 <(cat baseline.txt | misp-fb -f csv check | sort) \
<(cat current.txt | misp-fb -f csv check | sort)
```
### 输出格式
使用 `--format`(`-f`)在 `table`(默认)、`json` 和 `csv` 之间切换:
```
# JSON 输出
$ misp-fb -f json check 8.8.8.8
{
"value": "8.8.8.8",
"matched": true,
"matches": [
{
"slug": "public-dns-v4",
"name": "List of known IPv4 public DNS resolvers",
"list_type": "cidr",
"category": "false-positive",
"matching_attributes": ["ip-src", "ip-dst", "domain|ip", ...]
}
]
}
# CSV 输出
$ misp-fb -f csv check 8.8.8.8 google.com nothing.zzz
8.8.8.8,true,public-dns-v4,List of known IPv4 public DNS resolvers
8.8.8.8,true,vpn-ipv4,Specialized list of vpn-ipv4 addresses belonging to common VPN providers and datacenters
google.com,true,cisco_top1000,Top 1000 websites from Cisco Umbrella
...
nothing.zzz,false,,
```
### 列出已加载的 warninglists
```
$ misp-fb lists
SLUG TYPE ENTRIES NAME
----------------------------------------------------------------------------------------------------
akamai cidr 268 List of known Akamai IP ranges
alexa hostname 1000 Top 1000 website from Alexa
amazon-aws cidr 3602 List of known Amazon AWS IP address ranges
...
----------------------------------------------------------------------------------------------------
120 warninglists loaded
```
### 检查守护进程健康状态
```
$ misp-fb health
Status: ok
Lists loaded: 120
```
### CLI 选项
```
Usage: misp-fb [OPTIONS]
Commands:
check Check one or more values against warninglists
lists List all loaded warninglists
health Check daemon health
config Interactively generate a config.toml file
Options:
-s, --socket Path to the daemon Unix socket [default: /tmp/misp-fbd.sock]
-f, --format Output format [default: table] [possible values: table, json, csv]
-h, --help Print help
```
## 使用方法(HTTP)
通过取消注释 `config.toml` 中的 `http_bind` 来启用 HTTP 监听器:
```
[daemon]
http_bind = "127.0.0.1:3000"
```
HTTP API 也始终通过 Unix 套接字可用(CLI 在内部使用此方式)。
### 端点
#### `GET /health`
返回守护进程状态。
```
$ curl http://localhost:3000/health
```
```
{
"status": "ok",
"lists_loaded": 120
}
```
#### `POST /lookup`
检查单个值是否匹配所有 warninglists。
```
$ curl -X POST http://localhost:3000/lookup \
-H 'Content-Type: application/json' \
-d '{"value": "8.8.8.8"}'
```
```
{
"value": "8.8.8.8",
"matched": true,
"matches": [
{
"slug": "public-dns-v4",
"name": "List of known IPv4 public DNS resolvers",
"description": "Event contains one or more public IPv4 DNS resolvers as attribute with an IDS flag set",
"list_type": "cidr",
"category": "false-positive",
"matching_attributes": ["ip-src", "ip-dst", "domain|ip", "ip-src|port", "ip-dst|port"]
}
]
}
```
要仅匹配误报 warninglists,请在请求体中添加 `"false_positives_only": true`:
```
$ curl -X POST http://localhost:3000/lookup \
-H 'Content-Type: application/json' \
-d '{"value": "8.8.8.8", "false_positives_only": true}'
```
#### `POST /lookup/batch`
在单个请求中检查多个值(最多 10,000 个)。
```
$ curl -X POST http://localhost:3000/lookup/batch \
-H 'Content-Type: application/json' \
-d '{"values": ["8.8.8.8", "google.com", "abuse@example.com"]}'
```
`false_positives_only` 标志也支持批量请求:
```
$ curl -X POST http://localhost:3000/lookup/batch \
-H 'Content-Type: application/json' \
-d '{"values": ["8.8.8.8", "google.com"], "false_positives_only": true}'
```
```
{
"results": [
{
"value": "8.8.8.8",
"matched": true,
"matches": [...]
},
{
"value": "google.com",
"matched": true,
"matches": [...]
},
{
"value": "abuse@example.com",
"matched": true,
"matches": [...]
}
]
}
```
#### `GET /lists`
返回所有已加载 warninglists 的元数据。
```
$ curl http://localhost:3000/lists
```
```
{
"count": 120,
"lists": [
{
"slug": "amazon-aws",
"name": "List of known Amazon AWS IP address ranges",
"description": "Amazon AWS IP address ranges...",
"version": 20260403,
"list_type": "cidr",
"category": "false-positive",
"entry_count": 3602,
"matching_attributes": ["ip-src", "ip-dst", "domain|ip"]
}
]
}
```
#### `GET /openapi.json`
以 JSON 格式返回 OpenAPI 3.1 规范。
#### `GET /docs`
由 [Swagger UI](https://swagger.io/tools/swagger-ui/) 提供支持的交互式 API 文档。访问 `http://localhost:3000/docs` 以浏览所有端点并直接从浏览器执行测试查询。
### Web UI
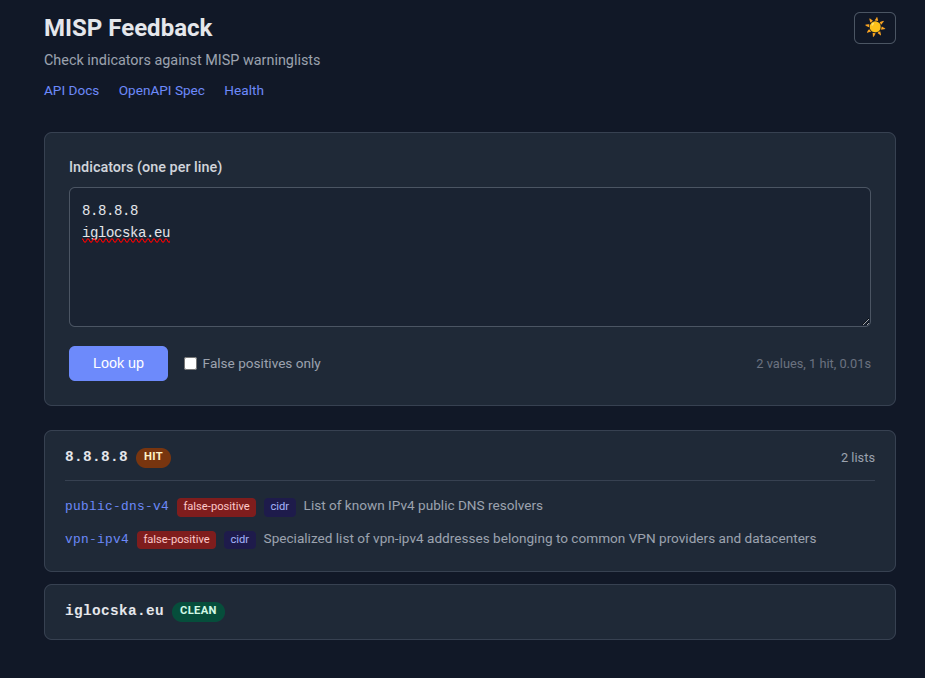 轻量级查询界面位于根 URL(`http://localhost:3000/`)。它提供:
- 用于输入指标的文本区域,每行一个
- "仅误报"开关按类别筛选
- 结果以卡片形式显示命中/清洁状态、匹配的 warninglist slug、类别和匹配器类型(cidr、hostname、string、substring、regex)
- 浅色/深色模式开关(跨会话持久化,默认为 OS 偏好)
- Ctrl+Enter 键盘快捷键提交
Web UI 在底层使用 `/lookup/batch` 端点,因此性能与批量 API 相同。
### 通过 Unix 套接字使用 HTTP API
所有端点也可通过 Unix 套接字获得,无需启用 `http_bind`:
```
$ curl --unix-socket /tmp/misp-fbd.sock http://localhost/lookup \
-X POST -H 'Content-Type: application/json' \
-d '{"value": "8.8.8.8"}'
```
## 使用反向代理实现 HTTPS
守护进程提供纯 HTTP。要使用 TLS,请在其前面放置反向代理。本指南介绍如何通过 Let's Encrypt 获取证书并配置 Nginx 或 Apache。
### 前置条件
在 `config.toml` 中启用 HTTP 监听器(仅绑定到 localhost — 反向代理处理外部流量):
```
[daemon]
http_bind = "127.0.0.1:3000"
```
### 通过 Let's Encrypt 获取证书
安装 [Certbot](https://certbot.eff.org/) 并为您的域名请求证书:
```
# Debian/Ubuntu
sudo apt install certbot
# 对于 Nginx
sudo apt install python3-certbot-nginx
# 对于 Apache
sudo apt install python3-certbot-apache
```
如果您已经配置了 Nginx 或 Apache(见下文),Certbot 可以自动获取并安装证书:
```
# Nginx
sudo certbot --nginx -d misp-feedback.example.com
# Apache
sudo certbot --apache -d misp-feedback.example.com
```
或者,先以独立模式获取证书,然后手动配置 Web 服务器:
```
sudo certbot certonly --standalone -d misp-feedback.example.com
```
证书存储在 `/etc/letsencrypt/live/misp-feedback.example.com/`。Certbot 通过 systemd 计时器或 cron 作业设置自动续订。
### Nginx
创建 `/etc/nginx/sites-available/misp-feedback`:
```
server {
listen 443 ssl;
server_name misp-feedback.example.com;
ssl_certificate /etc/letsencrypt/live/misp-feedback.example.com/fullchain.pem;
ssl_certificate_key /etc/letsencrypt/live/misp-feedback.example.com/privkey.pem;
# Recommended TLS settings
ssl_protocols TLSv1.2 TLSv1.3;
ssl_ciphers HIGH:!aNULL:!MD5;
ssl_prefer_server_ciphers on;
# Increase body size for large batch requests
client_max_body_size 10m;
location / {
proxy_pass http://127.0.0.1:3000;
proxy_set_header Host $host;
proxy_set_header X-Real-IP $remote_addr;
proxy_set_header X-Forwarded-For $proxy_add_x_forwarded_for;
proxy_set_header X-Forwarded-Proto $scheme;
}
}
# 重定向 HTTP 到 HTTPS
server {
listen 80;
server_name misp-feedback.example.com;
return 301 https://$host$request_uri;
}
```
启用并重启:
```
sudo ln -s /etc/nginx/sites-available/misp-feedback /etc/nginx/sites-enabled/
sudo nginx -t
sudo systemctl reload nginx
```
您也可以直接代理到 Unix 套接字而不是 TCP 监听器(这样不需要启用 `http_bind`):
```
location / {
proxy_pass http://unix:/tmp/misp-fbd.sock;
proxy_set_header Host $host;
proxy_set_header X-Real-IP $remote_addr;
proxy_set_header X-Forwarded-For $proxy_add_x_forwarded_for;
proxy_set_header X-Forwarded-Proto $scheme;
}
```
### Apache
启用所需的模块:
```
sudo a2enmod ssl proxy proxy_http headers
```
创建 `/etc/apache2/sites-available/misp-feedback.conf`:
```
轻量级查询界面位于根 URL(`http://localhost:3000/`)。它提供:
- 用于输入指标的文本区域,每行一个
- "仅误报"开关按类别筛选
- 结果以卡片形式显示命中/清洁状态、匹配的 warninglist slug、类别和匹配器类型(cidr、hostname、string、substring、regex)
- 浅色/深色模式开关(跨会话持久化,默认为 OS 偏好)
- Ctrl+Enter 键盘快捷键提交
Web UI 在底层使用 `/lookup/batch` 端点,因此性能与批量 API 相同。
### 通过 Unix 套接字使用 HTTP API
所有端点也可通过 Unix 套接字获得,无需启用 `http_bind`:
```
$ curl --unix-socket /tmp/misp-fbd.sock http://localhost/lookup \
-X POST -H 'Content-Type: application/json' \
-d '{"value": "8.8.8.8"}'
```
## 使用反向代理实现 HTTPS
守护进程提供纯 HTTP。要使用 TLS,请在其前面放置反向代理。本指南介绍如何通过 Let's Encrypt 获取证书并配置 Nginx 或 Apache。
### 前置条件
在 `config.toml` 中启用 HTTP 监听器(仅绑定到 localhost — 反向代理处理外部流量):
```
[daemon]
http_bind = "127.0.0.1:3000"
```
### 通过 Let's Encrypt 获取证书
安装 [Certbot](https://certbot.eff.org/) 并为您的域名请求证书:
```
# Debian/Ubuntu
sudo apt install certbot
# 对于 Nginx
sudo apt install python3-certbot-nginx
# 对于 Apache
sudo apt install python3-certbot-apache
```
如果您已经配置了 Nginx 或 Apache(见下文),Certbot 可以自动获取并安装证书:
```
# Nginx
sudo certbot --nginx -d misp-feedback.example.com
# Apache
sudo certbot --apache -d misp-feedback.example.com
```
或者,先以独立模式获取证书,然后手动配置 Web 服务器:
```
sudo certbot certonly --standalone -d misp-feedback.example.com
```
证书存储在 `/etc/letsencrypt/live/misp-feedback.example.com/`。Certbot 通过 systemd 计时器或 cron 作业设置自动续订。
### Nginx
创建 `/etc/nginx/sites-available/misp-feedback`:
```
server {
listen 443 ssl;
server_name misp-feedback.example.com;
ssl_certificate /etc/letsencrypt/live/misp-feedback.example.com/fullchain.pem;
ssl_certificate_key /etc/letsencrypt/live/misp-feedback.example.com/privkey.pem;
# Recommended TLS settings
ssl_protocols TLSv1.2 TLSv1.3;
ssl_ciphers HIGH:!aNULL:!MD5;
ssl_prefer_server_ciphers on;
# Increase body size for large batch requests
client_max_body_size 10m;
location / {
proxy_pass http://127.0.0.1:3000;
proxy_set_header Host $host;
proxy_set_header X-Real-IP $remote_addr;
proxy_set_header X-Forwarded-For $proxy_add_x_forwarded_for;
proxy_set_header X-Forwarded-Proto $scheme;
}
}
# 重定向 HTTP 到 HTTPS
server {
listen 80;
server_name misp-feedback.example.com;
return 301 https://$host$request_uri;
}
```
启用并重启:
```
sudo ln -s /etc/nginx/sites-available/misp-feedback /etc/nginx/sites-enabled/
sudo nginx -t
sudo systemctl reload nginx
```
您也可以直接代理到 Unix 套接字而不是 TCP 监听器(这样不需要启用 `http_bind`):
```
location / {
proxy_pass http://unix:/tmp/misp-fbd.sock;
proxy_set_header Host $host;
proxy_set_header X-Real-IP $remote_addr;
proxy_set_header X-Forwarded-For $proxy_add_x_forwarded_for;
proxy_set_header X-Forwarded-Proto $scheme;
}
```
### Apache
启用所需的模块:
```
sudo a2enmod ssl proxy proxy_http headers
```
创建 `/etc/apache2/sites-available/misp-feedback.conf`:
```
ServerName misp-feedback.example.com
Redirect permanent / https://misp-feedback.example.com/
ServerName misp-feedback.example.com
SSLEngine on
SSLCertificateFile /etc/letsencrypt/live/misp-feedback.example.com/fullchain.pem
SSLCertificateKeyFile /etc/letsencrypt/live/misp-feedback.example.com/privkey.pem
# Recommended TLS settings
SSLProtocol all -SSLv3 -TLSv1 -TLSv1.1
SSLCipherSuite HIGH:!aNULL:!MD5
ProxyPreserveHost On
ProxyPass / http://127.0.0.1:3000/
ProxyPassReverse / http://127.0.0.1:3000/
RequestHeader set X-Forwarded-Proto "https"
```
启用并重启:
```
sudo a2ensite misp-feedback
sudo apache2ctl configtest
sudo systemctl reload apache2
```
要代理到 Unix 套接字(需要 `mod_proxy_unix`,Apache 2.4.7+ 可用):
```
ProxyPass / unix:/tmp/misp-fbd.sock|http://localhost/
ProxyPassReverse / unix:/tmp/misp-fbd.sock|http://localhost/
```
### 限制访问
对于生产部署,请考虑在反向代理级别添加身份验证或基于 IP 的访问控制:
```
# Nginx: 限制特定 IP 范围
location / {
allow 10.0.0.0/8;
allow 192.168.0.0/16;
deny all;
proxy_pass http://127.0.0.1:3000;
}
```
```
# Apache: 限制特定 IP 范围
` | 536ms / 200 次调用 | 2.7ms | **373 调用/秒** |
| 批量 `misp-fb check --batch` | 134ms / 10k 值 | 13µs | **74,400 值/秒** |
单独的 CLI 调用主要由进程启动开销(fork/exec、运行时初始化、套接字连接)主导,而不是查询时间。对于批量工作负载,请使用 `--batch` 或通过 stdin 管道传输以获得批量级吞吐量。
### 运行基准测试
```
# 引擎级基准测试(无需守护进程)
cargo test --release --package misp-fb-core perf_10k -- --nocapture
# 完整堆栈基准测试(启动守护进程,测试 HTTP + CLI)
cargo build --release --workspace
cargo test --release --package misp-fbd bench_10k -- --nocapture --ignored
```
## 许可证
MIT 许可证 — 详见 [LICENSE](LICENSE)。
* 版权所有(C)2026 Andras Iklody
轻量级查询界面位于根 URL(`http://localhost:3000/`)。它提供:
- 用于输入指标的文本区域,每行一个
- "仅误报"开关按类别筛选
- 结果以卡片形式显示命中/清洁状态、匹配的 warninglist slug、类别和匹配器类型(cidr、hostname、string、substring、regex)
- 浅色/深色模式开关(跨会话持久化,默认为 OS 偏好)
- Ctrl+Enter 键盘快捷键提交
Web UI 在底层使用 `/lookup/batch` 端点,因此性能与批量 API 相同。
### 通过 Unix 套接字使用 HTTP API
所有端点也可通过 Unix 套接字获得,无需启用 `http_bind`:
```
$ curl --unix-socket /tmp/misp-fbd.sock http://localhost/lookup \
-X POST -H 'Content-Type: application/json' \
-d '{"value": "8.8.8.8"}'
```
## 使用反向代理实现 HTTPS
守护进程提供纯 HTTP。要使用 TLS,请在其前面放置反向代理。本指南介绍如何通过 Let's Encrypt 获取证书并配置 Nginx 或 Apache。
### 前置条件
在 `config.toml` 中启用 HTTP 监听器(仅绑定到 localhost — 反向代理处理外部流量):
```
[daemon]
http_bind = "127.0.0.1:3000"
```
### 通过 Let's Encrypt 获取证书
安装 [Certbot](https://certbot.eff.org/) 并为您的域名请求证书:
```
# Debian/Ubuntu
sudo apt install certbot
# 对于 Nginx
sudo apt install python3-certbot-nginx
# 对于 Apache
sudo apt install python3-certbot-apache
```
如果您已经配置了 Nginx 或 Apache(见下文),Certbot 可以自动获取并安装证书:
```
# Nginx
sudo certbot --nginx -d misp-feedback.example.com
# Apache
sudo certbot --apache -d misp-feedback.example.com
```
或者,先以独立模式获取证书,然后手动配置 Web 服务器:
```
sudo certbot certonly --standalone -d misp-feedback.example.com
```
证书存储在 `/etc/letsencrypt/live/misp-feedback.example.com/`。Certbot 通过 systemd 计时器或 cron 作业设置自动续订。
### Nginx
创建 `/etc/nginx/sites-available/misp-feedback`:
```
server {
listen 443 ssl;
server_name misp-feedback.example.com;
ssl_certificate /etc/letsencrypt/live/misp-feedback.example.com/fullchain.pem;
ssl_certificate_key /etc/letsencrypt/live/misp-feedback.example.com/privkey.pem;
# Recommended TLS settings
ssl_protocols TLSv1.2 TLSv1.3;
ssl_ciphers HIGH:!aNULL:!MD5;
ssl_prefer_server_ciphers on;
# Increase body size for large batch requests
client_max_body_size 10m;
location / {
proxy_pass http://127.0.0.1:3000;
proxy_set_header Host $host;
proxy_set_header X-Real-IP $remote_addr;
proxy_set_header X-Forwarded-For $proxy_add_x_forwarded_for;
proxy_set_header X-Forwarded-Proto $scheme;
}
}
# 重定向 HTTP 到 HTTPS
server {
listen 80;
server_name misp-feedback.example.com;
return 301 https://$host$request_uri;
}
```
启用并重启:
```
sudo ln -s /etc/nginx/sites-available/misp-feedback /etc/nginx/sites-enabled/
sudo nginx -t
sudo systemctl reload nginx
```
您也可以直接代理到 Unix 套接字而不是 TCP 监听器(这样不需要启用 `http_bind`):
```
location / {
proxy_pass http://unix:/tmp/misp-fbd.sock;
proxy_set_header Host $host;
proxy_set_header X-Real-IP $remote_addr;
proxy_set_header X-Forwarded-For $proxy_add_x_forwarded_for;
proxy_set_header X-Forwarded-Proto $scheme;
}
```
### Apache
启用所需的模块:
```
sudo a2enmod ssl proxy proxy_http headers
```
创建 `/etc/apache2/sites-available/misp-feedback.conf`:
```
标签:DNS解析器, HTTP服务, IOC, IP范围, masscan, Rust, Unix Socket, 可视化界面, 域名排名, 妥协指标, 威胁情报, 威胁情报平台, 守护进程, 开发者工具, 开源安全工具, 快速查询, 网络安全, 网络流量审计, 证书管理, 误报识别, 误报过滤, 逆向工程平台, 隐私保护