KULeuven-COSIC/WhisperPair
GitHub: KULeuven-COSIC/WhisperPair
WhisperPair 是一款针对 Google Fast Pair 协议漏洞(CVE-2025-36911)的安全测试套件,用于验证消费级蓝牙设备在配对状态谓词、nonce 重用及无效曲线攻击等方面的安全实现缺陷。
Stars: 70 | Forks: 9
# WhisperPair:Google Fast Pair 的测试套件
[](https://sp2026.ieee-security.org/)
[](https://creativecommons.org/licenses/by/4.0/)
[](#环境配置与要求)
[](#环境配置与要求)
[](https://whisperpair.eu)
本仓库提供了 WhisperPair 测试套件,这是一款用于评估 Google Fast Pair 设备安全性的工具。它旨在帮助研究人员和从业者复现我们的发现并测试他们自己的设备。
如需了解项目概述、受影响的设备以及更多背景信息,请访问[我们的网站](https://whisperpair.eu)。
本仓库还包含了发表于 [IEEE S&P 2026](https://sp2026.ieee-security.org/) 的论文《One Tap to Hijack Them All: A Security Analysis of the Google Fast Pair Protocol》的相关制品。
## 引用
论文的完整版本可以在[此处](https://cosicdatabase.esat.kuleuven.be/backend/publications/files/conferencepaper/4189)找到。如果您认为这项工作对您有帮助,请考虑引用该论文:
```
@inproceedings{whisperpair2026,
title = {One Tap to Hijack Them All: A Security Analysis of the Google Fast Pair Protocol},
author = {Duttagupta, Sayon and Wyns, Seppe and Antonijević, Nikola and Singelée, Dave and Preneel, Bart},
booktitle = {2026 IEEE Symposium on Security and Privacy (S\&P)},
year = {2026},
}
```
## 免责声明与合理使用
提供这些材料是为了实现我们评估的可复现性,并协助研究人员进行防御性测试。请仅在您拥有或获得明确测试授权的设备上,将这些材料用于授权的安全研究和防御性验证。由于本仓库中的代码演示了消费类配件中的漏洞,未经明确的书面许可,请勿使用它攻击第三方设备。作者进行的所有实验均使用项目团队拥有的设备,或在知情同意下捐赠的设备。运行这些工具即表示您同意仅将其用于防御性研究、复现我们的结果或设备自查。
## 环境配置与要求
本仓库包含一个测试套件,用于评估目标设备是否正确实现了 Google Fast Pair 的某些安全要求。
该套件可以测试是否正确实现了配对状态谓词、是否拒绝了重用 nonce 的消息,以及设备是否容易受到无效曲线攻击。
该套件由后端服务器和前端 Web UI 组成。
该工具包由两部分组成:[服务器](./toolkit-server/)和 [UI](./toolkit-ui/)。
服务器需要在 Linux 系统上运行,并且已经在 Raspberry Pi 4 上进行了测试。
UI 是一个可用于控制服务器的 Next.js 前端,它可以在任何支持 Node.js 的地方运行。
UI 必须能够通过网络连接到服务器。
我们使用 Raspberry Pi OS Lite (64-bit) (6.12.47+rpt-rpi-v8) 和 BlueZ 5.82 版本对该套件进行了测试。
### 前置条件
一台安装了 [BlueZ](https://www.bluez.org)、[Node.js](https://nodejs.org/en/download) 和 [pnpm](https://pnpm.io/installation) 的 Linux 机器。
#### Node.js
我们强烈推荐使用当前的 Node.js 长期支持 (LTS) 版本。
我们已确保该工具包在此版本下能够正常运行。
v18 及其之前的版本也许能正常运行,但更旧的版本很可能会崩溃或产生意外结果。
##### `nvm.sh`
如果您使用 [nvm](https://github.com/nvm-sh/nvm/tree/master) 来管理已安装的 Node.js 版本,您必须确保 `root` 用户也能访问由 `nvm` 管理的 Node.js 版本。
正如[这篇 StackOverflow 帖子](https://stackoverflow.com/a/40078875)中所解释的那样,您可能需要创建一个新的符号链接。
```
# 来源 - https://stackoverflow.com/a/40078875
# 由 SimpleJ 发布,由社区修改。查看帖子 'Timeline' 以了解更改历史记录
# 检索于 2026-03-30,许可证 - CC BY-SA 4.0
sudo ln -s "$NVM_DIR/versions/node/$(nvm version)/bin/node" "/usr/local/bin/node"
sudo ln -s "$NVM_DIR/versions/node/$(nvm version)/bin/npm" "/usr/local/bin/npm"
sudo ln -s "$NVM_DIR/versions/node/$(nvm version)/bin/npx" "/usr/local/bin/npx"
```
如果 Node.js 也是通过外部包管理器安装的,那么 `sudo` 可用的版本可能与 `nvm` 使用的版本不同。
您可以通过比较 `node -v` 和 `sudo node -v` 的输出来检查这一点。
虽然我们推荐使用 Node.js LTS v24 版本,但服务器在 v18 及其之前的版本上应该也能正常运行。
##### `pnpm`
如果已安装 Node.js v24 LTS,您应该可以使用以下命令启用 `pnpm`:
```
corepack enable
```
#### 其他工具
该套件还需要 `hcitool` 和 `l2ping`。
根据您的 Linux 发行版,`hcitool` 可能不可用。您可能需要安装 `bluez-deprecated-tools`。
在撰写本文时(2025年10月1日),它仍然预装在最新的 Raspberry Pi OS Lite 版本中。
如果蓝牙适配器未开启,服务器将尝试使用 `rfkill` 将其打开。
测试 Audio Switch 扩展需要 `rfcomm`。
复现结果需要对存在漏洞的设备进行物理访问。
请注意,大多数供应商已经发布了针对 WhisperPair 的软件更新,因此您可能需要使用具有过时固件的设备。
有关我们在评估中使用的设备的更多信息,请参阅[选择设备](#selecting-a-device)。
### 快速配置
如果您想在同一台(Linux)机器上运行 UI 和服务器,可以使用 `build.sh` 和 `start.sh` 脚本。
首先,安装所需的依赖并使用以下命令构建组件:
```
bash build.sh
```
确保已启用蓝牙:
```
sudo rfkill unblock bluetooth
```
然后,使用以下命令运行 UI 和服务器:
```
bash start.sh
```
现在应该可以通过 [http://localhost:3000](http://localhost:3000) 访问 UI 了。
### 在不同主机上运行 UI 和服务器
您可以在不同的主机上运行 UI 和服务器。
这允许您在 Linux 机器上运行服务器,同时在本地运行 UI。
虽然不推荐这样做,但您可以按照以下步骤进行操作:
1. 确保该 Linux 机器上存在 `toolkit-server` 目录
2. 通过运行 `bash build.sh` 来构建 `toolkit-server`
3. 更新 `toolkit-ui` 目录中的 `.env` 文件,以便将 `SERVER_URL` 变量设置为服务器的 URL。
您可以运行 `bash update_server_url.sh ` 来自动更新 .env 文件。
4. 通过运行 `bash build.sh` 来构建 `toolkit-ui`
5. 通过运行 `bash start.sh` 来启动 `toolkit-server`
6. 通过运行 `bash start.sh` 来启动 `toolkit-ui`
现在应该可以通过 [http://localhost:3000](http://localhost:3000) 访问 UI 了。
### 手动配置服务器
作为使用 `build.sh` 和 `start.sh` 脚本的替代方案,您也可以手动构建和启动服务器。
有关如何执行这些步骤的详细说明,请参阅 [`toolkit-server` README](./toolkit-server/README.md)
### 手动配置 UI
作为使用 `build.sh` 和 `start.sh` 脚本的替代方案,您也可以手动构建和启动 UI。
有关如何执行这些步骤的详细说明,请参阅 [`toolkit-ui` README](./toolkit-ui/README.md)
## 用法
### 选择设备
您需要拥有一款支持 Fast Pair 的配件才能执行攻击并使用该工具包。
我们评估了来自 16 个供应商的 25 款设备,如下表所示。
如果您拥有其中一款设备,并且其固件自 2025 年 9 月以来未进行过更新,您就可以复现我们的结果。
您也可以使用该工具包来评估我们未测试过的设备。
但是,根据目标设备蓝牙芯片组的可靠性,您可能会遇到一些意外错误。
在执行攻击时,请确保了解目标设备是否处于配对模式。
某些攻击要求设备_不_处于配对模式,否则可能会产生误报。
其他攻击则要求设备处于配对模式,否则可能无法工作。
如果您正在寻找兼容 Fast Pair 的设备,可以使用 [Model IDs 列表](./model_ids.csv) 查看所有通过 Fast Pair 认证的设备。
#### `Model not included in test set` 警告消息
如果您选择的设备未包含在我们的测试集中,UI 将显示一条警告消息。
此消息是基于 Model ID 显示的,对于同一设备,该 ID 可能因颜色和地区的不同而有所差异。
例如,一副蓝色的 Sony WH-1000XM6 耳机使用的 Model ID 与一副黑色的 Sony WH-1000XM6 耳机不同。
由于这些设备很可能具有相同的固件(即使它们的 Model ID 不同),因此您可以安全地忽略此警告消息。
#### `No device with Model ID was found` 错误消息
由于 Fast Pair gRPC API 实施了更严格的速率限制,某些针对模型数据的请求可能会返回成功响应但响应体为空。
这将导致 UI 显示 `No device with Model ID was found`。
如果您确定您输入的 Model ID 存在,请等待几分钟然后重试。
### UI 手册
UI 会在启动时尝试连接服务器。
连接成功后,屏幕右下角将显示“Connected to the server”(已连接到服务器)消息。
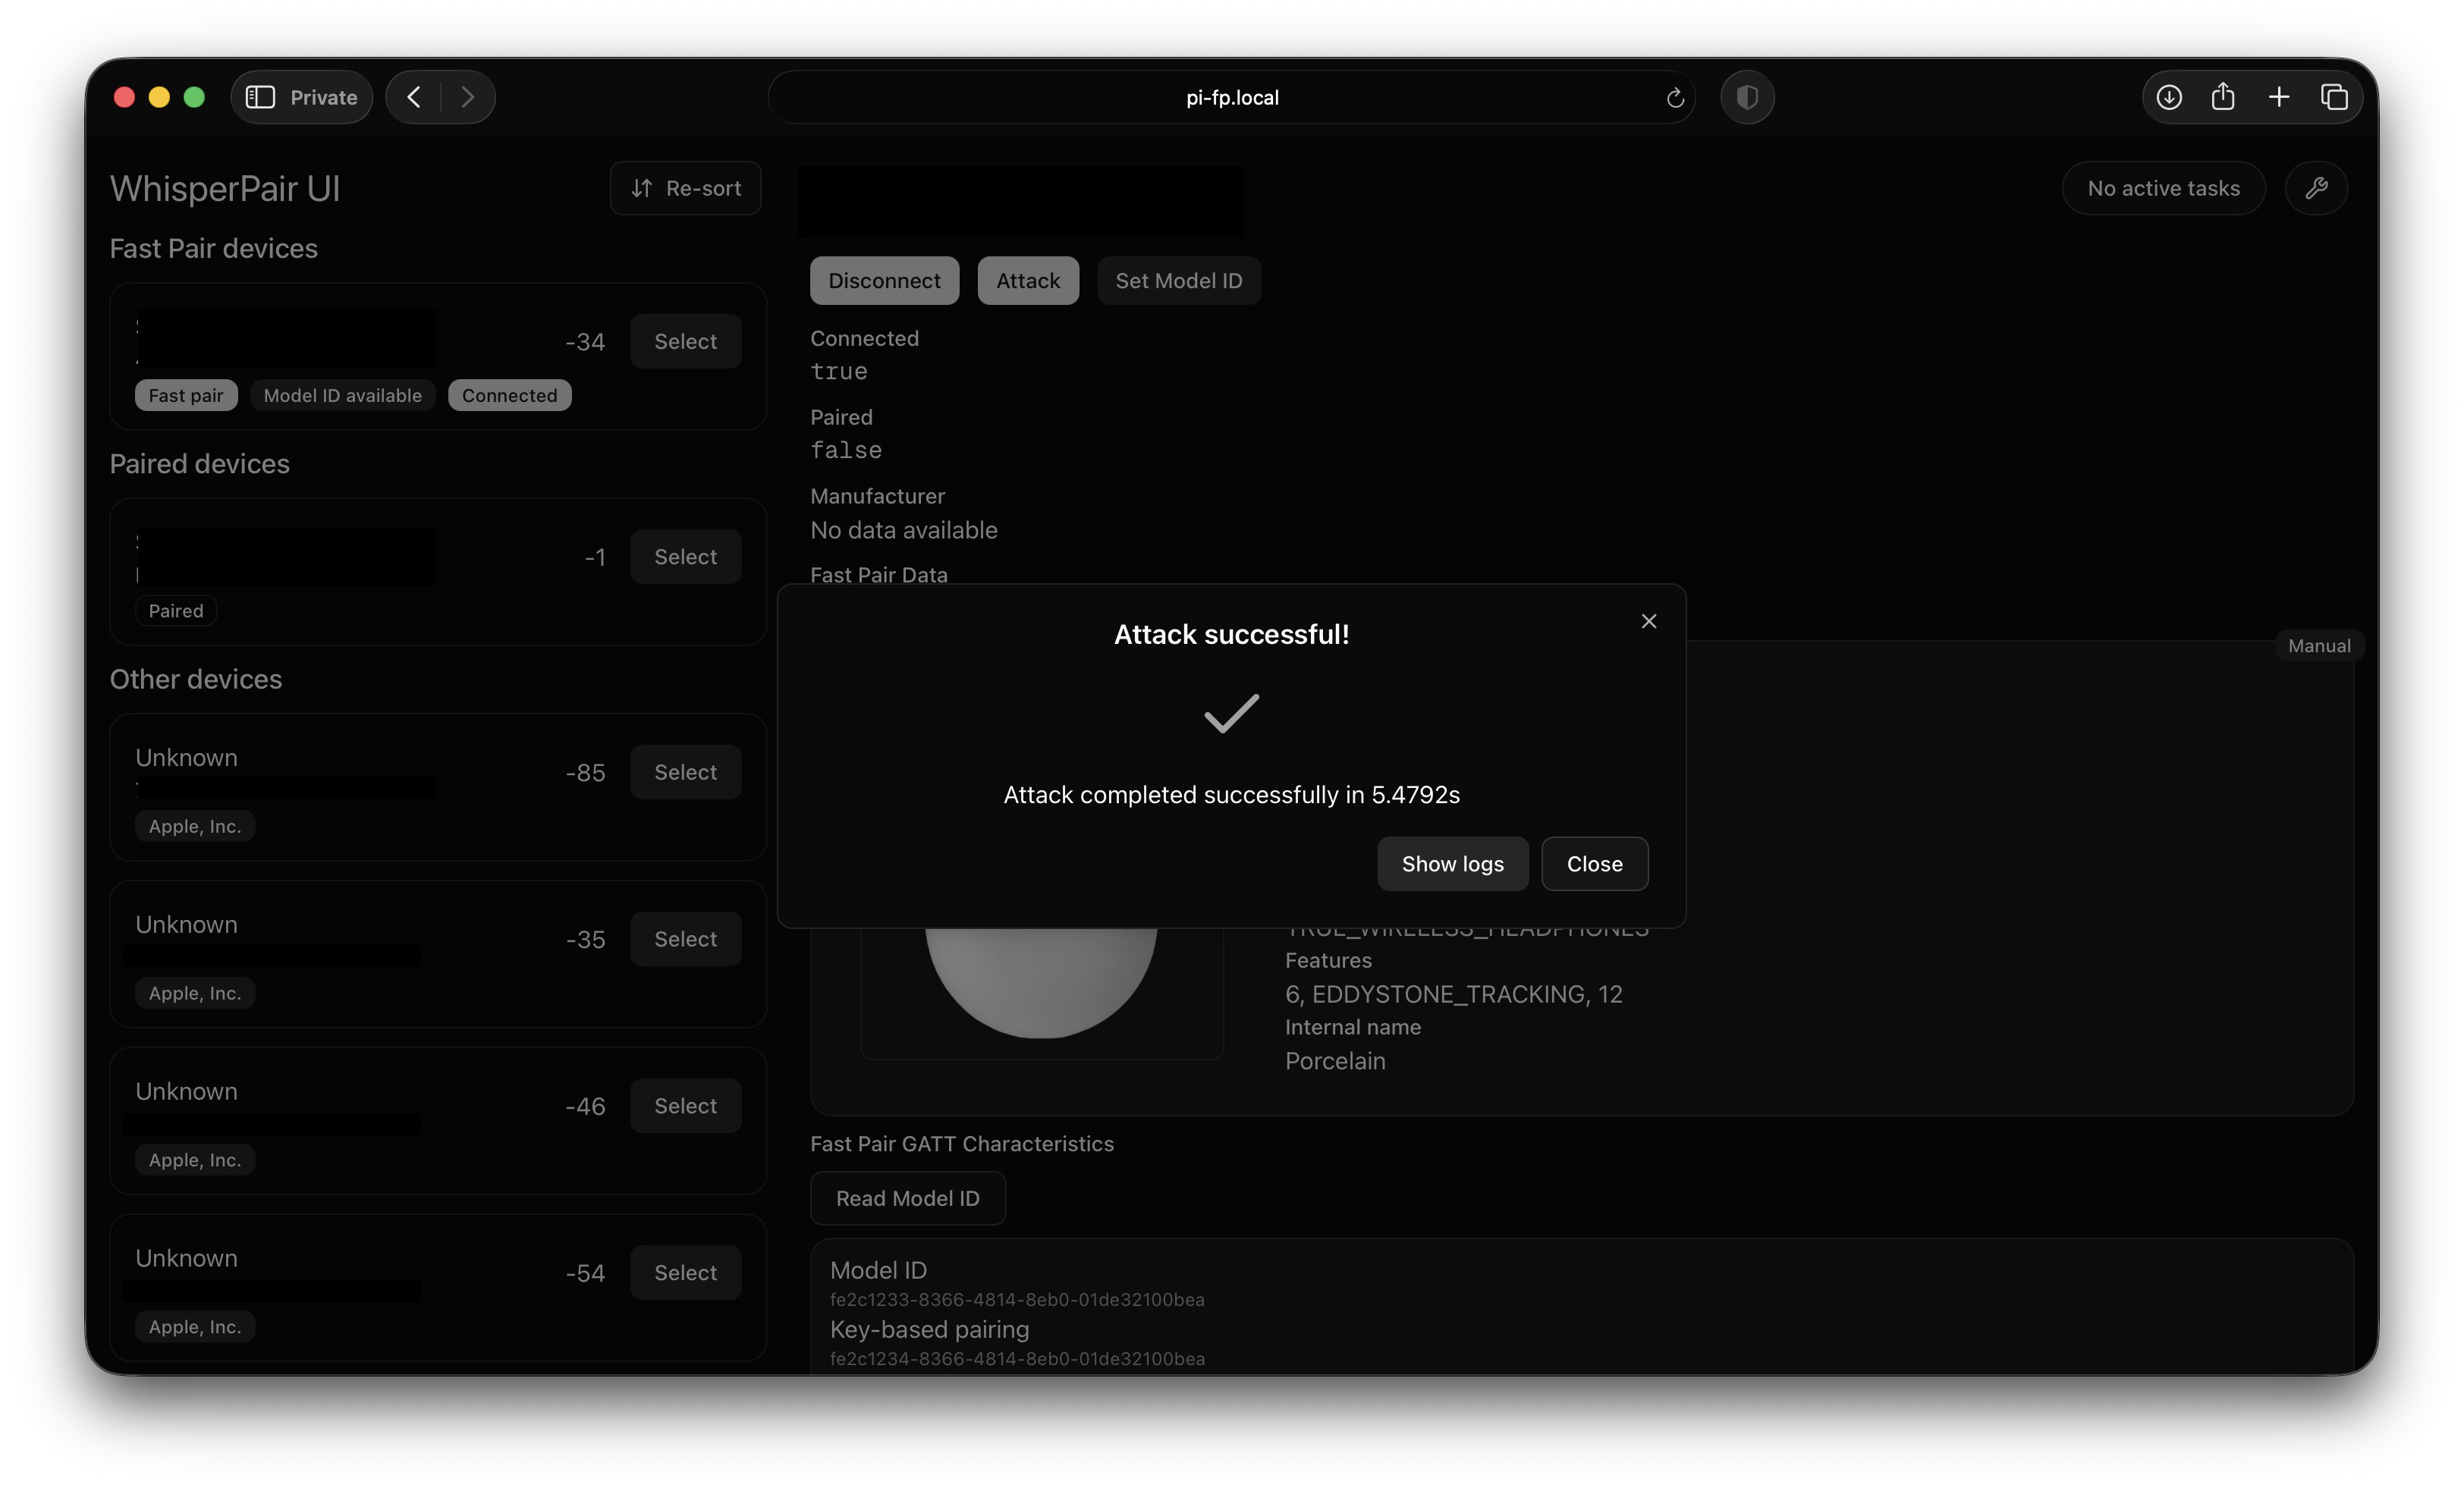
评估设备是否存在漏洞需要三个步骤:发现设备、设置其 Model ID 以及运行攻击。
#### 1. 发现设备
该套件会持续扫描 Bluetooth Low Energy 设备,并将它们显示在屏幕的左侧。
广播 Fast Pair 数据的设备显示在顶部。
在设备上点击“Select”(选择)后,设备详情将显示在屏幕的右侧。
#### 2. 设置 Model ID
运行论文中描述的测试需要为设备设置一个 Model ID。
如果设备公开了 Fast Pair GATT 特征,设备详情中将显示一个“Read Model ID”(读取 Model ID)按钮。
点击此按钮将尝试读取 Model ID。
请注意,许多设备并未正确实现此特征,因此会返回无效的 Model ID。
或者,您可以通过按下“Set Model ID”(设置 Model ID)按钮并手动输入值来手动设置设备的 Model ID。
您可以选择我们在测试期间评估过的设备,也可以输入自定义值。
本仓库的根目录中包含了兼容 Fast Pair 的设备的完整列表。
设置好 Model ID 后,设备详情中将显示关于该设备的元数据。
#### 3. 运行攻击
要运行攻击,请点击设备详情窗格中的“Attack”(攻击)按钮。
目前实现了三种攻击:配对状态谓词强制执行、nonce 重用以及无效曲线攻击。
如果您已经连接到设备,勾选“Reconnect”(重新连接)复选框将会在执行攻击之前断开并重新连接设备。
配对状态谓词强制执行检查提供了一些额外的配置选项:
- **Switch back**:如果支持,尝试使用 Audio Switch 功能切换回原始主机。
- **Bond**:如果未强制执行配对状态谓词,则执行 BR/EDR 配对。
- **Write account key**:在配对过程之后写入一个(硬编码的)account key。
在攻击进行期间,日志将在 UI 中实时显示。
攻击完成后,将显示其持续时间。
#### 任务管理
有时,攻击或配对可能会比预期花费更长的时间。
您可以通过点击相应对话框中的“Cancel”(取消)按钮来取消攻击或配对。
如果您在攻击或配对期间重新加载了 UI,您可以改用任务管理器来取消。
在屏幕的右上角,从右数第二个按钮将显示任务状态。
如果没有活动的任务,它将显示“No active tasks”(没有活动任务)。
否则,它将显示“Task in progress”(任务进行中)。
要取消任务,请点击“Task in progress”按钮,然后按“Cancel”按钮。
如果服务器因为无法取消的待处理任务而卡死,请尝试[重置蓝牙适配器](#troubleshooting)。
#### 故障排除
在某些情况下,蓝牙适配器可能会“卡”在“不良状态”中。
解决此问题最简单的方法是重置蓝牙适配器。
要执行重置,请按屏幕右上角的扳手图标打开故障排除菜单。
然后,选择“Reset BLE adapter”(重置 BLE 适配器),并通过在对话框中点击“Reset”(重置)来确认重置。
如果发生致命错误导致服务器必须关闭,`start.sh` 脚本将自动重启服务器。
在附近存在大量 BLE 设备的场景中,服务器可能会由于 D-Bus 错误而意外关闭。
这种情况非常罕见,如果发生这种情况,`./start.sh` 脚本应该会自动重启服务器。
## 结果与评估的设备
| _制造商_ | _设备名称_ | _Model ID_ | _存在被劫持漏洞_ | _劫持耗时 (s)_ | _存在 nonce 重用漏洞_ | _存在无效曲线攻击漏洞_ |
| -------------- | ------------------ | ---------- | ---------------------- | -------------------- | --------------------------- | ------------------------------------ |
| Apple | Beats Solo Buds | 6980580 | 否 | | 是 | 否 |
| Google | Pixel Buds Pro 2 | 12934265 | 是 | 6.89 | 否 | 否 |
| Jabra | Elite 8 Active | 3778746 | 是 | 32.01 | 否 | 否 |
| JBL | Tune Beam | 3293323 | 是 | 6.91 | 仅在同一会话中 | 否 |
| Marshall | MOTIF II A.N.C. | 15473012 | 是 | 9.49 | 是 | 否 |
| Nothing | Ear (a) | 8625818 | 是 | 38.80 | 仅在同一会话中 | 否 |
| OnePlus | Nord Buds Pro 3 | 13394952 | 是 | 10.19 | 仅在同一会话中 | 否 |
| HP | Poly VFree 60 | 15984097 | 否 | | 否 | 否 |
| Redmi | Buds5 Pro | 11155060 | 是 | 8.32 | 仅在同一会话中 | 否 |
| Soundcore | Liberty 4 NC | 5409858 | 是 | 15.27 | 是 | 否 |
| Sony | WF-1000XM5 | 12499626 | 是 | 9.43 | 是 | 否 |
| Audio-Technica | ATH-M20xBT | 13285048 | 否 | | 仅在同一会话中 | 否 |
| Bose | QuietComfort Ultra | 5723549 | 否 | | 否 | 否 |
| JBL | Live 775 NC | 14502233 | 是 | 7.62 | 仅在同一会话中 | 否 |
| Marshall | Major V | 12915160 | 是 | 11.70 | 仅在同一会话中 | 否 |
| Sonos | Ace V | 7340495 | 否 | | 否 | 否 |
| Sony | WH-1000XM4 | 13386638 | 是 | 9.69 | 是 | 否 |
| Sony | WH-1000XM5 | 13911719 | 是 | 12.38 | 是 | 否 |
| Sony | WH-1000XM6 | 6360443 | 是 | 12.94 | 仅在同一会话中 | 否 |
| Sony | WH-CH720N | 16003068 | 是 | 7.46 | 是 | 否 |
| Bang & Olufsen | Beosound A1 | 2431472 | 否 | | 否 | 否 |
| Jabra | Speak2 55 UC | 9888885 | 否 | | 否 | 否 |
| JBL | Clip 5 | 1917389 | 是 | 36.19 | 是 | 否 |
| JBL | Flip 6 | 7278954 | 否 | | 否 | 否 |
| Logitech | Wonderboom 4 | 11575855 | 是 | 11.96 | 仅在同一会话中 | 否 |
如果您正在寻找兼容 Fast Pair 的设备,可以使用 [Model IDs 列表](./model_ids.csv) 查看所有通过 Fast Pair 认证的设备。
## 致谢
This work was supported by the Flemish Government through the Cybersecurity Research Program with grant number VOEWICS02.
标签:BlueZ, Google Fast Pair, MITM代理, 安全漏洞验证, 数据可视化, 自动化攻击, 蓝牙安全