erayerturk/shadowplug
GitHub: erayerturk/shadowplug
ShadowPlug 是一个由 Raspberry Pi Zero 2 W 驱动的 USB 隐私加密狗,插入电脑后将所有网络流量通过 WireGuard VPN 或住宅代理路由,并提供 Web 仪表板进行统一管理。
Stars: 13 | Forks: 0
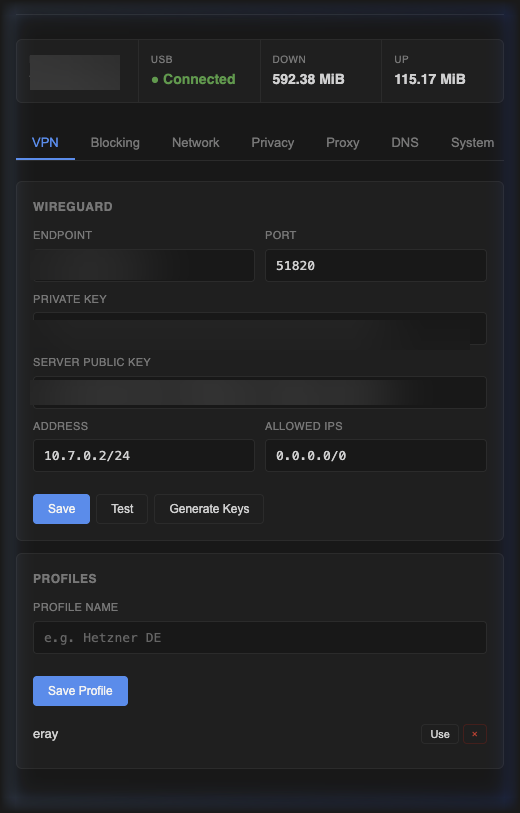
 shadowplug
即插即用的 USB 隐私加密狗,由 Raspberry Pi Zero 2 W 驱动。
无需应用。无需驱动。只需插入,关闭 WiFi,即可通过 VPN 或住宅代理匿名浏览。





## ✨ 功能
| 功能 | 描述 |
|---------|-------------|
| ⌁ **即插即用** | 在 Windows (RNDIS) 和 macOS (ECM) 上自动识别为以太网 |
| 🛡️ **WireGuard VPN** | 快速、现代的 VPN,支持多配置 |
| 🌍 **住宅代理** | 通过住宅 IP 进行透明代理,并提取 SNI |
| 🚫 **广告与追踪器拦截** | DNS 层面的拦截(StevenBlack, AdAway, 恶意软件列表) |
| 🔀 **分流** | 将特定 IP 路由到 VPN 之外 |
| 🎲 **MAC 随机化** | 每次开机时 WiFi MAC 自动更改。也可从仪表板手动更改 |
| 📊 **带宽监控** | 实时传输统计和速度测量 |
| 🔒 **泄漏保护** | DNS 泄漏防护、WebRTC 拦截、终止开关 |
| 🌐 **DNS 管理** | Google、Cloudflare、Quad9 预设或自定义服务器 |
| 🖥️ **Web 仪表板** | 通过 `192.168.7.1` 管理一切 |
### 软件 VPN 与 ShadowPlug 对比
| | 软件 VPN | ShadowPlug |
|---|---|---|
| **安装方式** | 每台设备都需要安装应用 | 插入 USB 即可完成 |
| **作用范围** | 按应用或按设备 | 所有流量,操作系统级别 |
| **泄漏风险** | 应用崩溃 = IP 暴露 | 硬件级别,无泄漏 |
| **可检测性** | VPN 进程可被检测 | 对操作系统不可见 |
| **便携性** | 绑定于设备安装 | 可在任何电脑间携带使用 |
| **广告拦截** | 需要单独的工具 | 内置 |
| **住宅代理** | 不支持 | 内置轮换 |
| **终止开关** | 基于软件,可能失效 | 网络级别,始终开启 |
| **速度** | 全速运行 | VPN 约 30-40 Mbps / 代理约 12-15 Mbps |
## 🧰 要求
### 硬件
- Raspberry Pi Zero 2 W
- microSD 卡(4 GB+)
- USB 数据线:
- Windows:micro-USB 转 USB-A
- Mac:micro-USB 转 USB-C(直接使用数据线,不使用转接头)
### 软件
- [OpenWrt 25.x](https://firmware-selector.openwrt.org/?version=SNAPSHOT&target=bcm27xx%2Fbcm2710&id=rpi-3)(适用于 Pi Zero 2 W 的 bcm2710 镜像)
### VPN 服务器
需要一台运行 WireGuard 的服务器。任何 VPS 提供商均可(Hetzner、DigitalOcean、Vultr 等),或任何兼容 WireGuard 的商业 VPN。
### 住宅代理 *(可选)*
要进行住宅 IP 掩码,您需要一个支持带身份验证的 HTTP CONNECT 的代理服务。兼容任何支持此功能的服务提供商。
## 🚀 快速开始
### 1. 将 OpenWrt 刷入 SD 卡
下载 [Raspberry Pi Zero 2 W 镜像](https://firmware-selector.openwrt.org/?target=bcm27xx%2Fbcm2710&id=rpi-3) 并进行刷入:
```
gunzip -c openwrt-*.img.gz | sudo dd of=/dev/sdX bs=4M status=progress
```
### 2. 通过 SSH 登录并运行安装程序
```
ssh root@192.168.1.1
wget -O- https://raw.githubusercontent.com/erayerturk/shadowplug/main/setup/install.sh | sh
```
该脚本将以交互方式引导您完成所有操作:
```
⌁ shadowplug Installer
[1/8] WiFi Setup
WiFi SSID: MyHomeWiFi
WiFi Password: supersecret123
Connected!
[2/8] Installing packages...
[3/8] Installing Python dependencies...
[4/8] Setting up USB gadget...
[5/8] Configuring network...
[6/8] Configuring firewall...
[7/8] Setting up WireGuard...
Your Pi's public key (add this to your VPN server):
aBcDeFgHiJkLmNoPqRsTuVwXyZ1234567890abcdefg=
Configure VPN server now? (y/n): y
Server IP: 49.13.x.x
Server Port [51820]: 51820
Server Public Key: xYzAbCdEfGhIjKlMnOpQrStUvWxYz1234567890xyz=
Client Address [10.7.0.2/24]: 10.7.0.2/24
VPN configured!
[8/8] Setting up ShadowPlug web UI...
✅ Installation complete!
1. Plug the Pi into your computer via USB
2. Open http://192.168.7.1
3. Configure your VPN server
```
### 3. 使用
1. 通过 USB 将 Pi 插入您的电脑
2. **关闭电脑上的 WiFi**
3. 打开 `http://192.168.7.1` 并配置 VPN 或代理
4. 验证:`curl ifconfig.me` 应显示您的 VPN/代理 IP
需要 VPN 服务器?在任何 VPS 上运行此命令
```
wget -O- https://raw.githubusercontent.com/erayerturk/shadowplug/main/setup/server-setup.sh | sudo sh
```
## 🏗️ 架构
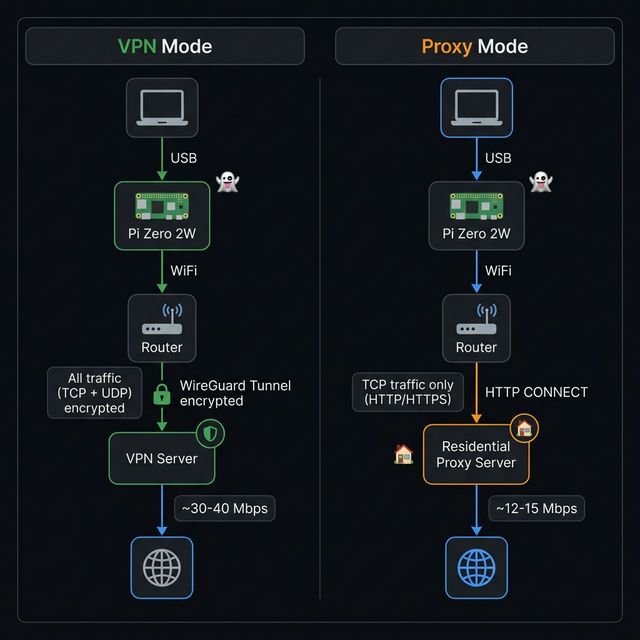
### 项目结构
```
shadowplug/
├── README.md
├── setup/
│ ├── install.sh # Pi-side automated installer
│ ├── server-setup.sh # VPN server setup script
│ └── configs/
│ ├── usb-gadget # USB RNDIS+ECM composite init
│ ├── wg0.conf.template # WireGuard config template
│ ├── hotplug-usb-ip # Carrier-based IP assignment
│ └── shadowplug-service # Web UI init script
└── web/
├── app.py # Flask API backend
├── proxy_server.py # Transparent proxy engine
├── requirements.txt
└── static/
├── index.html # Dashboard SPA
├── style.css # Dark theme
└── app.js # Frontend logic
```
### 透明代理流程
```
Mac/PC TCP traffic
→ iptables PREROUTING (REDIRECT to :12345)
→ proxy_server.py
→ SO_ORIGINAL_DST (recovers real destination IP)
→ TLS Client Hello SNI extraction (recovers domain name)
→ HTTP CONNECT with auth to upstream proxy
→ Residential proxy exit
```
- **QUIC (UDP 443)** 被自动拦截,以强制浏览器使用 TCP
- **DNS** 由 Pi 本地的 dnsmasq 提供服务,并使用 MASQUERADE 处理上游
- **无 redsocks** - 通过 `SO_ORIGINAL_DST` 实现内核到 Python socket 的直接交接
## 🖥️ 仪表板
| 选项卡 | 描述 |
|-----|-------------|
| **VPN** | WireGuard 配置、密钥生成、连接测试、配置切换 |
| **拦截** | 具有自定义域名的 DNS 级广告/追踪器/恶意软件拦截 |
| **网络** | MAC 随机化、带宽统计、分流、防火墙 |
| **隐私** | DNS 泄漏保护、WebRTC 拦截、终止开关 |
| **代理** | 住宅代理配置和透明代理管理 |
| **DNS** | 带有快速预设的 DNS 服务器设置 |
| **系统** | CPU 温度、RAM、平均负载、重启 |
## 🔧 故障排除
| 问题 | 解决方案 |
|-------|----------|
| Windows:出现未知设备 | 设备管理器 → 更新驱动程序 → 网络 → Microsoft → Remote NDIS |
| Mac:未出现以太网 | 使用直接的 micro-USB 转 USB-C 数据线(不要通过转接头) |
| 无法访问仪表板 | 检查 Flask 是否正在运行:`ps \| grep python` |
| VPN 未连接 | 验证服务器和 Pi 上的密钥是否匹配 |
| 拦截不起作用 | 重启 dnsmasq:`/etc/init.d/dnsmasq restart` |
| 代理:仍然看到 VPN IP | 启用代理后重启 Chrome(清除 QUIC 缓存) |
| 代理:403 Forbidden | 某些非标准端口(8080 等)被住宅代理阻止 |
| 关闭 WiFi 后无法上网 | 验证 DHCP DNS 是否设置为 `192.168.7.1` |
## 📬 联系方式
如有问题、反馈或合作:**contact@erayerturk.com**
## 📄 许可证
MIT
标签:Cutter, OpenWrt, VPN, Web管理面板, WireGuard, 代理, 数据可视化, 无文件攻击, 网络安全, 逆向工具, 隐私保护