通过MCP协议将大语言模型连接到Elasticsearch/OpenSearch的AI驱动威胁狩猎与事件响应框架,支持自然语言查询、多源数据关联和6000+条检测规则。

# CrowdSentinel MCP 服务器
### AI 驱动的威胁狩猎与事件响应框架
[](https://pypi.org/project/crowdsentinel-mcp-server/)
[](https://pypi.org/project/crowdsentinel-mcp-server/)
[](https://pypi.org/project/crowdsentinel-mcp-server/)
[](LICENSE)
[](https://modelcontextprotocol.io/)
[](https://github.com/thomasxm/CrowdSentinels-AI-MCP)
[](https://github.com/thomasxm/CrowdSentinels-AI-MCP)
[](https://pypi.org/project/crowdsentinel-mcp-server/)
[MCP 官方注册表](https://registry.modelcontextprotocol.io/v0/servers?search=io.github.thomasxm/crowdsentinel-mcp-server) · [PyPI 包](https://pypi.org/project/crowdsentinel-mcp-server/)
**开源威胁狩猎协调器,通过模型上下文协议 (MCP) 将 LLM 连接到企业安全数据**
[快速开始](#quick-start) · [安装](#installation) · [CLI 用法](#cli-usage) · [功能](#key-features) · [架构](#architecture) · [文档](#documentation) · [示例](#usage-examples)
## 演示
[](https://github.com/thomasxm/CrowdSentinels-AI-MCP/blob/main/demo.mp4)
## 什么是 CrowdSentinel?
**CrowdSentinel** 将传统的 SIEM 查询转变为使用自然语言的、智能的、框架驱动的调查。它作为一个统一的安全情报层,将大型语言模型连接到企业安全数据源,从而实现:
- **自然语言威胁狩猎** — 使用简单的英语查询 Elasticsearch
- **AI 引导的调查工作流** — 内置提示引导代理通过正确的 IR(事件响应)方法论
- **持久的调查状态** — 内存管理的 IoC 跟踪、取证时间线和跨会话持久化的跨查询关联(8GB FIFO 存储)
- **跨工具 IoC 关联** — 在一个工具中发现的 IoC 会自动对所有其他工具可用
- **多源分析** — Elasticsearch、EVTX 日志、PCAP 文件
- **独立 CLI** — 无需 MCP 客户端即可在终端进行完整的威胁狩猎
## 安装
### 从 PyPI 安装(推荐)
```
# 使用 pip 安装
pip install crowdsentinel-mcp-server
# 或者使用 uv 安装
uv pip install crowdsentinel-mcp-server
# 下载检测规则、Chainsaw 和 Sigma 规则(一次性)
crowdsentinel setup
```
检测规则(6,060 条 Lucene + EQL + ES|QL)**随包捆绑** — 无需下载。`setup` 命令会下载额外的工具:
- 用于 EVTX 分析的 Chainsaw 二进制文件
- 3,000+ 条用于 Chainsaw 的 Sigma 规则
下载的工具存储在 `~/.crowdsentinel/` 中,并在包升级后保留。
**用于 PCAP 分析的系统依赖:**
```
# 网络流量分析和跨工具 IoC 关联所需
sudo apt install tshark # Debian/Ubuntu/Kali
sudo dnf install wireshark-cli # Fedora/RHEL
brew install wireshark # macOS
```
### 使用 uvx 直接运行(无需安装)
```
# Elasticsearch 8.x(默认)
uvx crowdsentinel-mcp-server
# 其他后端
uvx crowdsentinel-mcp-server-es7 # Elasticsearch 7.x
uvx crowdsentinel-mcp-server-es9 # Elasticsearch 9.x
uvx opensearch-mcp-server # OpenSearch 1.x/2.x/3.x
```
### 从源码安装
```
git clone https://github.com/thomasxm/CrowdSentinels-AI-MCP.git
cd CrowdSentinels-AI-MCP
chmod +x setup.sh && ./setup.sh
```
安装脚本将:
- 安装依赖(如果需要,包括 pipx, uv, Claude Code CLI)
- 捆绑 6,060 条检测规则并下载 Chainsaw 二进制文件
- 提示输入 Elasticsearch 凭证(绝不硬编码)
- 使用 Claude Code 配置 MCP server
- 验证您的连接
### 安装大小
CrowdSentinel 捆绑了 6,060 条检测规则并集成了外部分析工具。以下是完整的磁盘空间明细,以便您进行规划。
**核心包(通过 `pip` 或 `uvx`):**
| 组件 | 大小 | 备注 |
|---|---|---|
| **CrowdSentinel 包** | **49 MB** | 服务器本身 |
| — 捆绑的 Sigma 规则 (`src/rules/`) | 30 MB | 6,060 条预转换的检测规则 |
| — Elastic TOML 规则 (`src/detection-rules/`) | 17 MB | 原始 TOML 格式规则 + 狩猎查询 |
| — Python 代码(客户端、工具等) | 2 MB | 实际应用程序代码 |
| **依赖项** | **64 MB** | 所有传递依赖 |
| — `cryptography` | 14 MB | 最大的依赖项 (TLS) |
| — `elasticsearch` | 8.3 MB | ES Python 客户端 |
| — `pygments` | 5.2 MB | 语法高亮 |
| — `pydantic_core` | 5 MB | 验证引擎 |
| — `opensearchpy` | 3.6 MB | OpenSearch 客户端 |
| — 其他(27 个包) | ~28 MB | mcp, fastmcp, httpx, anthropic 等 |
| **核心总计** | **113 MB** | `pip install crowdsentinel-mcp-server` |
**额外工具(通过 `crowdsentinel setup`):**
| 组件 | 下载 | 已安装 | 备注 |
|---|---|---|---|
| Chainsaw 二进制文件 (v2.13.1) | ~3 MB | ~15 MB | EVTX 日志分析引擎 |
| Sigma 规则 | ~3 MB | ~30 MB | 3,000+ 条用于 Chainsaw 的 Sigma 规则 |
| Chainsaw 映射 | — | <1 MB | 事件日志源映射 |
| **Setup 总计** | **~6 MB** | **~46 MB** | 存储在 `~/.crowdsentinel/` |
**系统依赖(通过包管理器):**
| 组件 | 已安装 | 安装命令 | 备注 |
|---|---|---|---|
| tshark + Wireshark 库 | ~132 MB | `sudo apt install tshark` | PCAP 网络分析 — 跨工具 IoC 关联所需 |
**完整安装摘要:**
| 场景 | 总磁盘空间 |
|---|---|
| 仅核心 (`pip install`) | ~113 MB |
| 核心 + setup (`crowdsentinel setup`) | ~159 MB |
| 完整平台 (+ tshark) | **~291 MB** |
## 快速开始
### 1. 设置环境变量
```
export ELASTICSEARCH_HOSTS="https://localhost:9200"
export ELASTICSEARCH_API_KEY="your_api_key"
# 或者使用用户名/密码:
# export ELASTICSEARCH_USERNAME="elastic"
# export ELASTICSEARCH_PASSWORD="your_password"
export VERIFY_CERTS="false"
```
### 2. 连接到 MCP 客户端
CrowdSentinel 适用于任何兼容 MCP 的 AI 代理。在下方选择您的客户端:
Claude Code (CLI)
```
claude mcp add crowdsentinel \
-e ELASTICSEARCH_HOSTS="https://localhost:9200" \
-e ELASTICSEARCH_API_KEY="your_api_key" \
-e VERIFY_CERTS="false" \
-- uvx crowdsentinel-mcp-server
```
Claude Desktop
编辑 `~/.config/Claude/claude_desktop_config.json` (Linux) 或 `~/Library/Application Support/Claude/claude_desktop_config.json` (macOS):
```
{
"mcpServers": {
"crowdsentinel": {
"command": "uvx",
"args": ["crowdsentinel-mcp-server"],
"env": {
"ELASTICSEARCH_HOSTS": "https://localhost:9200",
"ELASTICSEARCH_API_KEY": "your_api_key",
"VERIFY_CERTS": "false"
}
}
}
}
```
VS Code Copilot
您可以在工作区创建 `.vscode/mcp.json`:
```
{
"servers": {
"crowdsentinel": {
"command": "uvx",
"args": ["crowdsentinel-mcp-server"],
"env": {
"ELASTICSEARCH_HOSTS": "https://localhost:9200",
"ELASTICSEARCH_API_KEY": "your_api_key",
"VERIFY_CERTS": "false"
}
}
}
}
```
然后在 VS Code 设置中启用 MCP:`"chat.mcp.enabled": true`
Cursor
创建或编辑 `~/.cursor/mcp.json`:
```
{
"mcpServers": {
"crowdsentinel": {
"command": "uvx",
"args": ["crowdsentinel-mcp-server"],
"env": {
"ELASTICSEARCH_HOSTS": "https://localhost:9200",
"ELASTICSEARCH_API_KEY": "your_api_key",
"VERIFY_CERTS": "false"
}
}
}
}
```
Roo Code (VS Code 扩展)
您可以在工作区创建 `.roo/mcp.json`:
```
{
"mcpServers": {
"crowdsentinel": {
"command": "uvx",
"args": ["crowdsentinel-mcp-server"],
"env": {
"ELASTICSEARCH_HOSTS": "https://localhost:9200",
"ELASTICSEARCH_API_KEY": "your_api_key",
"VERIFY_CERTS": "false"
}
}
}
}
```
或通过 Roo Code 设置面板进行配置:Settings > MCP Servers > Add Server。
5ire
在 5ire 设置 (v0.15.0+) 中,添加一个 MCP server,配置如下:
- **Command**: `uvx`
- **Arguments**: `crowdsentinel-mcp-server`
- **Environment Variables**:
- `ELASTICSEARCH_HOSTS` = `https://localhost:9200`
- `ELASTICSEARCH_API_KEY` = `your_api_key`
- `VERIFY_CERTS` = `false`
任意 MCP 客户端(通用)
**stdio 传输**(默认 — 适用于大多数客户端):
```
{
"mcpServers": {
"crowdsentinel": {
"command": "uvx",
"args": ["crowdsentinel-mcp-server"],
"env": {
"ELASTICSEARCH_HOSTS": "https://localhost:9200",
"ELASTICSEARCH_API_KEY": "your_api_key",
"VERIFY_CERTS": "false"
}
}
}
}
```
**SSE 传输**(用于基于 Web 的客户端):
```
crowdsentinel-mcp-server --transport sse --port 8001
# 连接到:http://localhost:8001/sse/
```
**HTTP 传输**(用于 REST API 客户端):
```
crowdsentinel-mcp-server --transport streamable-http --port 8001
# 连接到:http://localhost:8001/mcp/
```
### 3. 或直接使用 CLI
```
# 下载规则和工具(一次性)
crowdsentinel setup
# 检查集群健康状况
crowdsentinel health
# 搜寻威胁
crowdsentinel hunt "powershell encoded" -i winlogbeat-*
# 运行检测规则
crowdsentinel rules -p windows --tactic credential_access
crowdsentinel detect windows_builtin_win_alert_mimikatz_keywords_lucene -i winlogbeat-*
# 分析 PCAP 文件
crowdsentinel pcap overview capture.pcap
crowdsentinel pcap beaconing capture.pcap
# 使用 Chainsaw 搜寻 EVTX 日志
crowdsentinel chainsaw hunt /path/to/evtx/ --sigma-rules /path/to/sigma/
```
## CLI 用法
CrowdSentinel 提供了一个完整的 CLI,用于从终端进行威胁狩猎:
```
pip install crowdsentinel-mcp-server
crowdsentinel setup # Download rules, Chainsaw, Sigma (one-time)
crowdsentinel --help
```
### 可用命令
| 命令 | 描述 | 示例 |
|:--------|:------------|:--------|
| `setup` | 下载检测规则、Chainsaw 和 Sigma 规则 | `crowdsentinel setup` |
| `health` | 显示集群健康状况 | `crowdsentinel health` |
| `indices` | 列出所有索引 | `crowdsentinel indices` |
| `hunt` | 专注于 IR 的威胁狩猎与 IoC 提取 | `crowdsentinel hunt "powershell" -i winlogbeat-*` |
| `eql` | 执行 EQL 查询 | `crowdsentinel eql "process where process.name == 'cmd.exe'" -i winlogbeat-*` |
| `esql` | 执行 ES\|QL 查询 | `crowdsentinel esql "FROM logs-* \| LIMIT 10"` |
| `detect` | 按 ID 执行检测规则 | `crowdsentinel detect win_susp_logon -i winlogbeat-*` |
| `rules` | 列出可用的检测规则 | `crowdsentinel rules -p windows --tactic credential_access --type eql` |
| `schema` | 检测索引模式的 schema | `crowdsentinel schema -i winlogbeat-*` |
| `ioc` | 狩猎特定的失陷指标 | `crowdsentinel ioc 203.0.113.42 --type ip -i winlogbeat-*` |
| `analyse` | 从 stdin (JSON) 分析搜索结果 | `cat results.json \| crowdsentinel analyse -c "context"` |
| `analyse --mcp` | 使用所有 97 个 MCP 工具进行 AI 代理分析 | `crowdsentinel hunt "query" \| crowdsentinel analyse --mcp -c "context"` |
| `auth` | 管理 Agent 模式的 LLM 身份验证 | `crowdsentinel auth login` |
| `pcap` | 分析 PCAP 文件(概览、信标、横向移动) | `crowdsentinel pcap beaconing capture.pcap` |
| `chainsaw` | 使用 Chainsaw 和 Sigma 规则狩猎 EVTX 日志 | `crowdsentinel chainsaw hunt /path/to/evtx/` |
### 输出格式
所有命令支持带有三种格式的 `--output/-o`:
```
crowdsentinel hunt "failed login" -i winlogbeat-* -o json # Structured JSON (default)
crowdsentinel hunt "failed login" -i winlogbeat-* -o table # Human-readable table
crowdsentinel hunt "failed login" -i winlogbeat-* -o summary # Condensed summary
```
### Agent 模式 (`--mcp`)
`analyse --mcp` 标志用 AI 代理取代了确定性分析,该代理会自主使用所有 97 个 MCP 工具进行调查。该代理遵循 4 阶段 IR 方法论:hunt(狩猎)、analyse(分析)、correlate(关联)、report(报告)。
**身份验证:**
```
# 选项 1:浏览器登录(ChatGPT 订阅 — 无 API 计费)
crowdsentinel auth login
# 选项 2:Anthropic(setup-token 或 API key)
crowdsentinel auth login --provider anthropic
# 选项 3:环境变量
export ANTHROPIC_API_KEY="sk-ant-..." # or OPENAI_API_KEY
# 选项 4:本地模型(Ollama, vLLM — 免费)
crowdsentinel analyse --mcp --model-url http://localhost:11434/v1 --model llama3.1
# 检查认证状态
crowdsentinel auth status
```
**Agent 标志:**
| 标志 | 默认值 | 描述 |
|:-----|:--------|:------------|
| `--mcp` | off | 启用带有 MCP 工具的 AI 代理 |
| `--mcp-server NAME:CMD` | none | 添加外部 MCP server(例如 VirusTotal) |
| `--model` | auto-detect | 要使用的 LLM 模型 |
| `--model-url` | none | OpenAI 兼容的 API endpoint |
| `--max-steps` | 30 | 最大工具调用次数 |
| `--timeout` | 300 | 最大秒数 |
### 管道示例
**确定性分析(无需 API 密钥):**
```
# 搜寻然后分析
crowdsentinel hunt "powershell encoded" -i winlogbeat-* -o json | \
crowdsentinel analyse -c "Encoded PowerShell commands" -o summary
# 调查失败的认证尝试
crowdsentinel hunt "event.code:4625" -i winlogbeat-* -o json | \
crowdsentinel analyse -c "Failed login brute force investigation" -o summary
# 分类流程执行和权限提升
crowdsentinel hunt "event.code:4688 OR event.code:4672 OR event.code:1" -i winlogbeat-* -o json | \
crowdsentinel analyse -c "Process execution and privilege escalation" -o summary
```
**AI 代理调查(需要身份验证):**
```
# 凭据转储调查 — 代理搜寻,分析杀伤链,检查相邻阶段
crowdsentinel hunt "mimikatz OR lsass OR procdump" -i winlogbeat-* -o json | \
crowdsentinel analyse --mcp -c "Credential dumping tools investigation" --max-steps 15 -o summary
# 编码的 PowerShell — 完整 IR 工作流及杀伤链和相邻阶段搜寻
crowdsentinel hunt "powershell -enc OR FromBase64String" -i winlogbeat-* -o json | \
crowdsentinel analyse --mcp -c "Full IR workflow: encoded PowerShell" --max-steps 30 -o table
# 使用检测规则进行流程执行
crowdsentinel hunt "event.code:4688" -i winlogbeat-* -o json | \
crowdsentinel analyse --mcp -c "Execute detection rules against process creation" --max-steps 20 -o summary
# PCAP 信标 — 代理生成 IoC 并映射到杀伤链
crowdsentinel pcap beaconing capture.pcap -o json | \
crowdsentinel analyse --mcp -c "Investigate beaconing for C2 infrastructure" --max-steps 10 -o summary
# 反取证调查
crowdsentinel hunt "event.code:1102" -i winlogbeat-* -o json | \
crowdsentinel analyse --mcp -c "Security log cleared - anti-forensics" --max-steps 10 -o summary
# 使用外部 MCP 服务器(例如,VirusTotal)
crowdsentinel hunt "powershell" -i winlogbeat-* -o json | \
crowdsentinel analyse --mcp --mcp-server "vt:uvx virustotal-mcp-server" \
-c "Check IoCs against VirusTotal" -o summary
```
## 主要功能
|
### 79 个 MCP 工具
威胁狩猎、检测规则、取证、网络分析 — 均可通过自然语言访问
### 6,060 条检测规则
预置的 Lucene、EQL 和 ES|QL 规则,带有自动 MITRE ATT&CK 映射
### 调查状态
通过 FIFO 存储实现跨工具和会话的持久 IoC 跟踪
|
### 4 种安全框架
- Cyber Kill Chain(7 个阶段)
- Pyramid of Pain(6 个层级)
- Diamond Model(4 个顶点)
- MITRE ATT&CK(自动映射)
### 3 种数据源
- Elasticsearch /Search
- EVTX 日志 (Chainsaw + Sigma)
- PCAP 文件
|
## 架构
```
┌─────────────────────────────────────────────────────────────────┐
│ LLM Client / Claude Code CLI │
└─────────────────────────────┬───────────────────────────────────┘
│ MCP Protocol (stdio/SSE/HTTP)
▼
┌─────────────────────────────────────────────────────────────────┐
│ CrowdSentinel MCP Server │
│ ┌───────────────┐ ┌───────────────┐ ┌───────────────────────┐ │
│ │ 79 Tools │ │ 6,060 Rules │ │ Security Frameworks │ │
│ │ - Hunting │ │ - Lucene │ │ - Cyber Kill Chain │ │
│ │ - Detection │ │ - EQL │ │ - Pyramid of Pain │ │
│ │ - Forensics │ │ - Sigma │ │ - Diamond Model │ │
│ │ - Network │ │ │ │ - MITRE ATT&CK │ │
│ └───────────────┘ └───────────────┘ └───────────────────────┘ │
│ ┌─────────────────────────────────────────────────────────────┐│
│ │ Investigation State (Persistent) ││
│ │ Cross-tool IoC sharing, timeline, reporting ││
│ └─────────────────────────────────────────────────────────────┘│
└─────────────────────────────┬───────────────────────────────────┘
│
┌─────────────────────┼─────────────────────┐
▼ ▼ ▼
┌───────────────┐ ┌───────────────┐ ┌───────────────┐
│ Elasticsearch │ │ Chainsaw │ │ Wireshark │
│ /OpenSearch │ │ (EVTX/Sigma) │ │ (PCAP) │
└───────────────┘ └───────────────┘ └───────────────┘
│
▼ (Roadmap)
┌───────────────┐ ┌───────────────┐ ┌───────────────┐
│ Splunk │ │ Velociraptor │ │ Zeek │
│ │ │ (EDR/DFIR) │ │ (NSM/IDS) │
└───────────────┘ └───────────────┘ └───────────────┘
```
## 包含内容
### 工具类别(79 个工具)
| 类别 | 工具数 | 描述 |
|:---------|:-----:|:------------|
| **Elasticsearch 核心** | 18 | 索引、文档、集群、别名、数据流操作 |
| **威胁狩猎** | 12 | 攻击模式检测、IoC 狩猎、时间线分析 |
| **检测规则** | 9 | 6,060 条规则库 — 列出、执行、验证、建议 |
| **Kill Chain 分析** | 5 | 阶段狩猎、进展跟踪、相邻阶段预测 |
| **调查提示** | 5 | 快速分类主干 — 10 个关键 IR 问题 |
| **Chainsaw (EVTX)** | 6 | Sigma 规则狩猎、迭代式 IoC 发现 |
| **Wireshark (PCAP)** | 11 | 网络取证、信标、横向移动检测 |
| **调查状态** | 13 | 持久 IoC、跨工具共享、导出、报告 |
### 安全框架
| 框架 | 用途 |
|:----------|:--------|
| **Cyber Kill Chain** | 按攻击阶段(7 个阶段)狩猎,预测对手的下一步行动 |
| **Pyramid of Pain** | 按攻击者更改的难度对 IoC 进行优先级排序(6 个层级) |
| **Diamond Model** | 映射对手、能力、基础设施、受害者关系 |
| **MITRE ATT&CK** | 所有检测的自动技术映射 |
### 检测规则(6,060 条规则)
| 类型 | 数量 | 来源 | 描述 |
|:-----|------:|:-------|:------------|
| **Lucene** | 1,966 | Sigma 转换 | 快速模式匹配查询 |
| **EQL** | 3,963 | Sigma 转换 + Elastic | 事件序列和关联 |
| **ES\|QL** | 131 | Elastic TOML 规则 | 基于管道的查询语言 (ES 8.11+) |
**平台:** Windows, Linux, macOS, Cloud (AWS/Azure/GCP), Network, Identity
**日志来源:** PowerShell, Sysmon, Security Events, Process Creation, Audit logs
## 配置
### 环境变量
```
# 连接(必填 — 选择一项)
ELASTICSEARCH_HOSTS="https://localhost:9200" # Self-hosted
# 或
ELASTICSEARCH_CLOUD_ID="deployment:base64..." # Elastic Cloud
# 认证 — 选择一项(按优先顺序):
ELASTICSEARCH_BEARER_TOKEN="service_token_here" # Service/bearer token
ELASTICSEARCH_API_KEY="your_api_key" # API key (recommended)
ELASTICSEARCH_USERNAME="elastic" # Basic auth
ELASTICSEARCH_PASSWORD="your_password"
# TLS / 证书验证
VERIFY_CERTS="true" # Verify against system CA bundle
# VERIFY_CERTS="/path/to/ca.crt" # 根据自定义 CA 证书进行验证
# ELASTICSEARCH_CA_CERT="/path/to/ca.crt" # 显式 CA 证书路径
# ELASTICSEARCH_CLIENT_CERT="/path/to/client.crt" # 客户端证书 (mTLS)
# ELASTICSEARCH_CLIENT_KEY="/path/to/client.key" # 客户端私钥 (mTLS)
# 选项
REQUEST_TIMEOUT="30" # Request timeout in seconds
DISABLE_HIGH_RISK_OPERATIONS="true" # Block all write operations
```
### 生产环境配置示例
Elastic Cloud
```
ELASTICSEARCH_CLOUD_ID="my-deployment:dXMtY2VudHJhbC0x..."
ELASTICSEARCH_API_KEY="your_cloud_api_key"
VERIFY_CERTS="true"
```
使用自定义 CA 的自托管环境
```
ELASTICSEARCH_HOSTS="https://es-cluster.internal:9200"
ELASTICSEARCH_API_KEY="your_api_key"
ELASTICSEARCH_CA_CERT="/etc/elasticsearch/certs/ca.crt"
VERIFY_CERTS="true"
```
双向 TLS (mTLS)
```
ELASTICSEARCH_HOSTS="https://es-cluster.internal:9200"
ELASTICSEARCH_CA_CERT="/etc/elasticsearch/certs/ca.crt"
ELASTICSEARCH_CLIENT_CERT="/etc/elasticsearch/certs/client.crt"
ELASTICSEARCH_CLIENT_KEY="/etc/elasticsearch/certs/client.key"
VERIFY_CERTS="true"
```
开发 / 测试(不安全)
```
ELASTICSEARCH_HOSTS="http://localhost:9200"
ELASTICSEARCH_USERNAME="elastic"
ELASTICSEARCH_PASSWORD="test123"
VERIFY_CERTS="false"
```
### 传输模式
| 模式 | 用例 | 命令 |
|:-----|:---------|:--------|
| **stdio** (默认) | MCP 客户端 (Claude Code 等) | 由 setup.sh 自动配置 |
| **SSE** | Web/流式客户端 | `--transport sse --port 8000` |
| **HTTP** | REST API 访问 | `--transport streamable-http` |
### 禁用写操作
用于只读访问(生产环境推荐):
```
DISABLE_HIGH_RISK_OPERATIONS="true"
```
这将隐藏破坏性工具:`create_index`、`delete_index`、`index_document`、`delete_document`、`delete_by_query`、`create_data_stream`、`delete_data_stream`、`put_alias`、`delete_alias`、`general_api_request`
## 使用示例
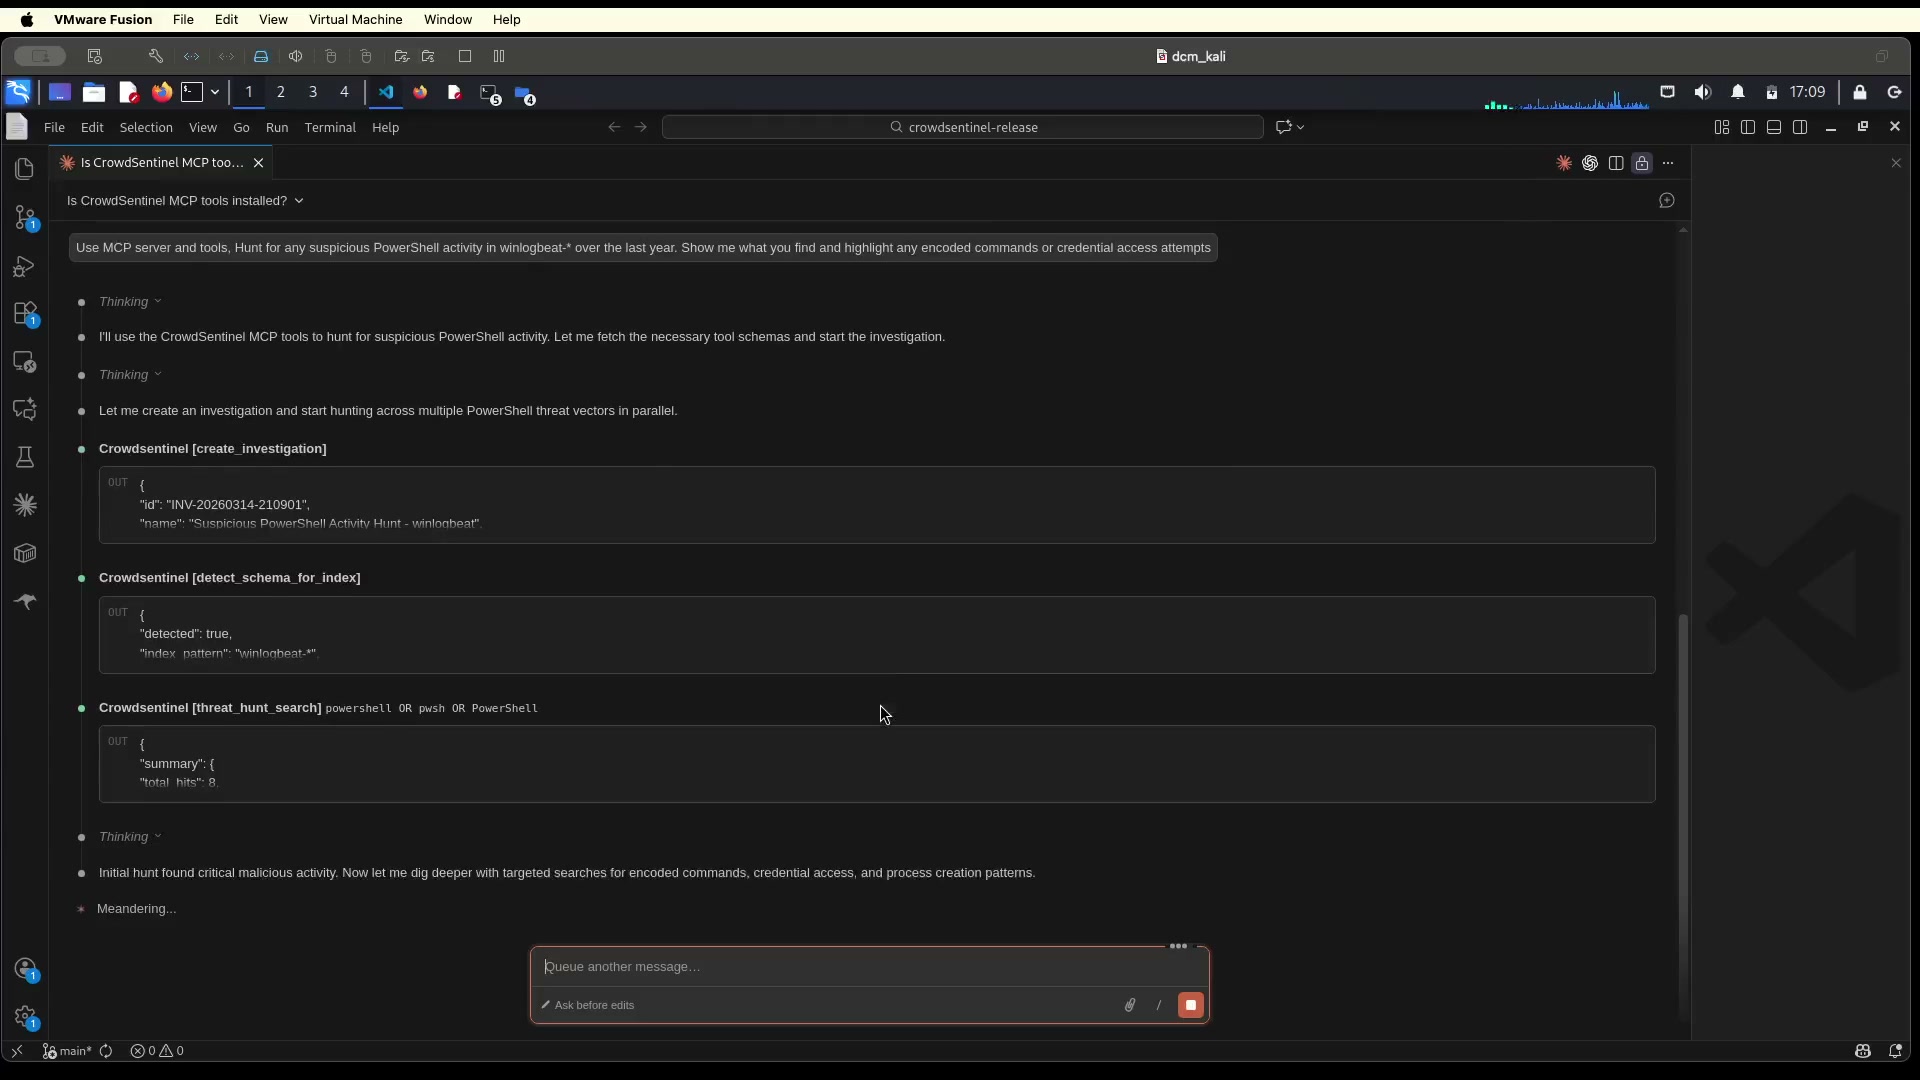
### 示例 1:狩猎暴力破解攻击
```
You: Hunt for brute force attacks in the last hour
CrowdSentinel: Searching for failed authentication attempts...
[Calls hunt_by_timeframe with attack_types=["brute_force"]]
Found 47 failed login attempts from 3 source IPs targeting the "admin" account.
Top sources:
- 192.168.1.105: 28 attempts
- 10.0.0.42: 15 attempts
- 172.16.0.8: 4 attempts
```
### 示例 2:调查可疑主机
```
You: Show me all activity on host DESKTOP-ABC123 in the last 24 hours
CrowdSentinel: Generating a forensic timeline for that host...
[Calls get_host_activity_timeline]
Timeline shows:
- 09:15: User "jsmith" logged in (Event 4624)
- 09:17: PowerShell executed encoded command
- 09:18: New scheduled task created "WindowsUpdate"
- 09:22: Outbound connection to 203.0.113.42:443
- 09:25: LSASS memory access detected
```
### 示例 3:Kill Chain 分析
```
You: We found C2 beaconing. What should we hunt for next?
CrowdSentinel: Hunting adjacent kill chain stages...
[Calls hunt_adjacent_stages with current_stage="COMMAND_AND_CONTROL"]
Looking backwards (Installation stage):
- Found scheduled task persistence on 3 hosts
- Registry Run key modifications detected
Looking forwards (Actions on Objectives):
- Lateral movement to 2 additional hosts via SMB
- Credential dumping attempts detected
```
### 示例 4:网络流量分析
```
You: Analyse this PCAP for C2 beaconing
CrowdSentinel: Checking for regular connection intervals...
[Calls detect_beaconing on the PCAP file]
Detected beaconing pattern:
- Host: 192.168.1.50 → 203.0.113.100:443
- Interval: 60 seconds (±2s jitter)
- Duration: 4 hours
- Confidence: HIGH
Recommend blocking 203.0.113.100 and investigating 192.168.1.50.
```
### 示例 5:CLI 威胁狩猎
```
# 搜寻编码的 PowerShell
crowdsentinel hunt "powershell -enc" -i winlogbeat-* --timeframe 1440 -o json
# 将结果管道传输到分析
crowdsentinel hunt "event.code:4625" -i winlogbeat-* -o json | \
crowdsentinel analyse -c "Failed authentication investigation"
# 搜索横向移动检测规则
crowdsentinel rules --tactic lateral_movement -p windows
```
## 兼容性
| 包 | 后端 | 安装 |
|:--------|:--------|:--------|
| `crowdsentinel-mcp-server` | Elasticsearch 8.x (默认) | `pip install crowdsentinel-mcp-server` |
| `crowdsentinel-mcp-server-es7` | Elasticsearch 7.x | `pip install crowdsentinel-mcp-server-es7` |
| `crowdsentinel-mcp-server-es9` | Elasticsearch 9.x | `pip install crowdsentinel-mcp-server-es9` |
| `opensearch-mcp-server` | OpenSearch 1.x, 2.x, 3.x | `pip install opensearch-mcp-server` |
## 面向开发者
项目结构
```
crowdsentinel-mcp-server/
├── src/
│ ├── server.py # MCP server entry point
│ ├── version.py # Version constant
│ ├── risk_config.py # Write operation controls
│ │
│ ├── cli/ # Standalone CLI
│ │ └── main.py # CLI entry point (argparse)
│ │
│ ├── clients/ # Backend logic layer
│ │ ├── base.py # Base client, authentication
│ │ ├── exceptions.py # Exception handling decorators
│ │ └── common/
│ │ ├── client.py # Unified SearchClient (multiple inheritance)
│ │ ├── threat_hunting.py # Threat hunting queries
│ │ ├── ioc_analysis.py # IoC extraction & analysis
│ │ ├── cyber_kill_chain.py # Kill chain logic
│ │ ├── rule_loader.py # Detection rule loading
│ │ └── chainsaw_client.py # EVTX/Sigma integration
│ │
│ ├── tools/ # MCP tool interfaces (thin wrappers)
│ │ ├── register.py # Dynamic tool registration
│ │ ├── threat_hunting.py # Hunting tool definitions
│ │ ├── rule_management.py # Rule management tools
│ │ ├── chainsaw_hunting.py # Chainsaw tools
│ │ ├── wireshark_tools.py # Network analysis tools
│ │ └── investigation_state_tools.py # State management tools
│ │
│ ├── storage/ # Persistent investigation state
│ │ ├── investigation_state.py # Core state management
│ │ ├── storage_manager.py # File system storage (8GB FIFO)
│ │ └── models.py # Pydantic models (IoC, Investigation)
│ │
│ └── wireshark/ # Network traffic analysis
│ ├── core/ # TShark execution, PCAP parsing
│ ├── hunting/ # Beaconing, lateral movement, IoC hunting
│ ├── baseline/ # Traffic baseline creation
│ ├── extraction/ # File carving from traffic
│ └── reporting/ # NCSC-style reports, timelines
│
├── rules/ # 6,060 detection rules (EQL + Lucene)
├── chainsaw/ # Chainsaw binary + 3,000+ Sigma rules
├── skills/ # Claude Code agent skills
└── tests/ # Test suites
```
设计模式
| 模式 | 用法 |
|:--------|:------|
| **多重继承** | `SearchClient` 组合了所有专门的客户端 |
| **装饰器** | 通过 `@handle_exceptions` 进行异常处理 |
| **工厂** | `create_search_client()` 创建适当的客户端 |
| **插件架构** | 工具通过 `ToolsRegister` 动态注册 |
| **自动捕获** | 工具结果自动分析 IoC |
添加新工具
1. **在 `src/clients/common/your_module.py` 中创建客户端方法**:
```
class YourClient(SearchClientBase):
def your_method(self, param: str) -> dict:
# Implementation
return results
```
2. **在 `src/clients/common/client.py` 中添加到 SearchClient**:
```
class SearchClient(YourClient, OtherClients, ...):
pass
```
3. **在 `src/tools/your_tools.py` 中创建工具包装器**:
```
class YourTools:
def __init__(self, client, mcp):
self.client = client
self.mcp = mcp
def register_tools(self):
@self.mcp.tool()
def your_tool(param: str) -> str:
"""Tool description for LLM."""
result = self.client.your_method(param)
return json.dumps(result)
```
4. **在 `src/server.py` 中注册**:
```
from src.tools.your_tools import YourTools
def _register_tools(self):
# ... existing tools ...
YourTools(self.client, self.mcp).register_tools()
```
运行测试
```
# 所有测试
uv run pytest
# 特定模块
uv run pytest tests/test_investigation_state.py
# 带有覆盖率
uv run pytest --cov=src
```
本地测试环境
```
# 启动 Elasticsearch
docker-compose -f docker-compose-elasticsearch.yml up -d
# 启动 OpenSearch
docker-compose -f docker-compose-opensearch.yml up -d
```
**默认凭证(仅限测试):**
- Elasticsearch: `elastic` / `test123`
- OpenSearch: `admin` / `admin`
## 路线图
| 功能 | 状态 | 描述 |
|:--------|:------:|:------------|
| **Velociraptor 集成** | 计划中 | 通过 Velociraptor API 进行 EDR/DFIR artifact 收集和实时响应 |
| **Zeek 集成** | 计划中 | 网络安全监控 — 解析 Zeek 日志 (conn, dns, http, ssl, x509) 用于威胁狩猎 |
| **Splunk 集成** | 计划中 | 添加 Splunk 作为 Elasticsearch 之外的数据源 |
| **Sigma 规则转换器** | 计划中 | 将 Sigma 规则转换为原生 ES/Splunk 查询 |
| **威胁情报源** | 计划中 | 来自 MISP、OTX 等的自动 IoC 丰富 |
| **案例管理** | 计划中 | 将调查导出到 TheHive、JIRA |
| **自定义规则构建器** | 计划中 | 通过自然语言创建检测规则 |
有关详细的版本历史,请参阅 [CHANGELOG.md](CHANGELOG.md)。
## 文档
### 用户指南
| 文档 | 描述 |
|:---------|:------------|
| [FIRST_TIME_SETUP.md](FIRST_TIME_SETUP.md) | 详细的首次设置说明 |
| [HOW_TO_USE.md](HOW_TO_USE.md) | 全面的使用指南 |
| [QUICK_START.md](QUICK_START.md) | 5 分钟快速入门 |
| [TRANSPORT_MODES.md](TRANSPORT_MODES.md) | stdio、SSE、HTTP 配置 |
### 功能指南
| 文档 | 描述 |
|:---------|:------------|
| [THREAT_HUNTING_GUIDE.md](THREAT_HUNTING_GUIDE.md) | 威胁狩猎工作流 |
| [DETECTION_RULES_GUIDE.md](DETECTION_RULES_GUIDE.md) | 使用 6,060 条检测规则 |
| [CYBER_KILL_CHAIN_GUIDE.md](CYBER_KILL_CHAIN_GUIDE.md) | Kill Chain 分析 |
| [CHAINSAW_GUIDE.md](CHAINSAW_GUIDE.md) | 使用 Sigma 进行 EVTX 日志分析 |
| [INVESTIGATION_PROMPTS_GUIDE.md](INVESTIGATION_PROMPTS_GUIDE.md) | 快速分类主干 |
| [AI_AGENT_INTEGRATION.md](AI_AGENT_INTEGRATION.md) | AI 代理的工作流指导 |
### 开发者指南
| 文档 | 描述 |
|:---------|:------------|
| [ARCHITECTURE.md](ARCHITECTURE.md) | 详细的架构文档 |
| [CONTRIBUTING.md](CONTRIBUTING.md) | 贡献指南 |
## 贡献
欢迎贡献!请参阅 [CONTRIBUTING.md](CONTRIBUTING.md) 了解指南。
## 许可证
GNU General Public Licence v3.0 — 详情请参阅 [LICENSE](LICENSE)。
## 致谢
- **MCP 框架:** Anthropic 的 [Model Context Protocol](https://modelcontextprotocol.io/)
- **Chainsaw:** [WithSecure Labs](https://github.com/WithSecureLabs/chainsaw) 的 EVTX 日志分析器
- **检测规则:** 社区贡献的 Sigma 和自定义规则
- **框架:** Cyber Kill Chain (Lockheed Martin)、Pyramid of Pain (David J. Bianco)、Diamond Model、MITRE ATT&CK
**由 [medjedtxm](https://github.com/thomasxm) 为安全社区打造**
[](https://github.com/thomasxm/CrowdSentinels-AI-MCP)
[](https://pypi.org/project/crowdsentinel-mcp-server/)