pho5nix/TraceMarshal-SOC-Agent
GitHub: pho5nix/TraceMarshal-SOC-Agent
面向 SOC 团队的 AI 智能体,在隔离网络环境中将大语言模型与 Elasticsearch SIEM 集成,实现智能化的威胁狩猎与安全日志分析。
Stars: 0 | Forks: 0
# Red-Threat-Redemption - TraceMarshal SOC Agent
## 架构概览
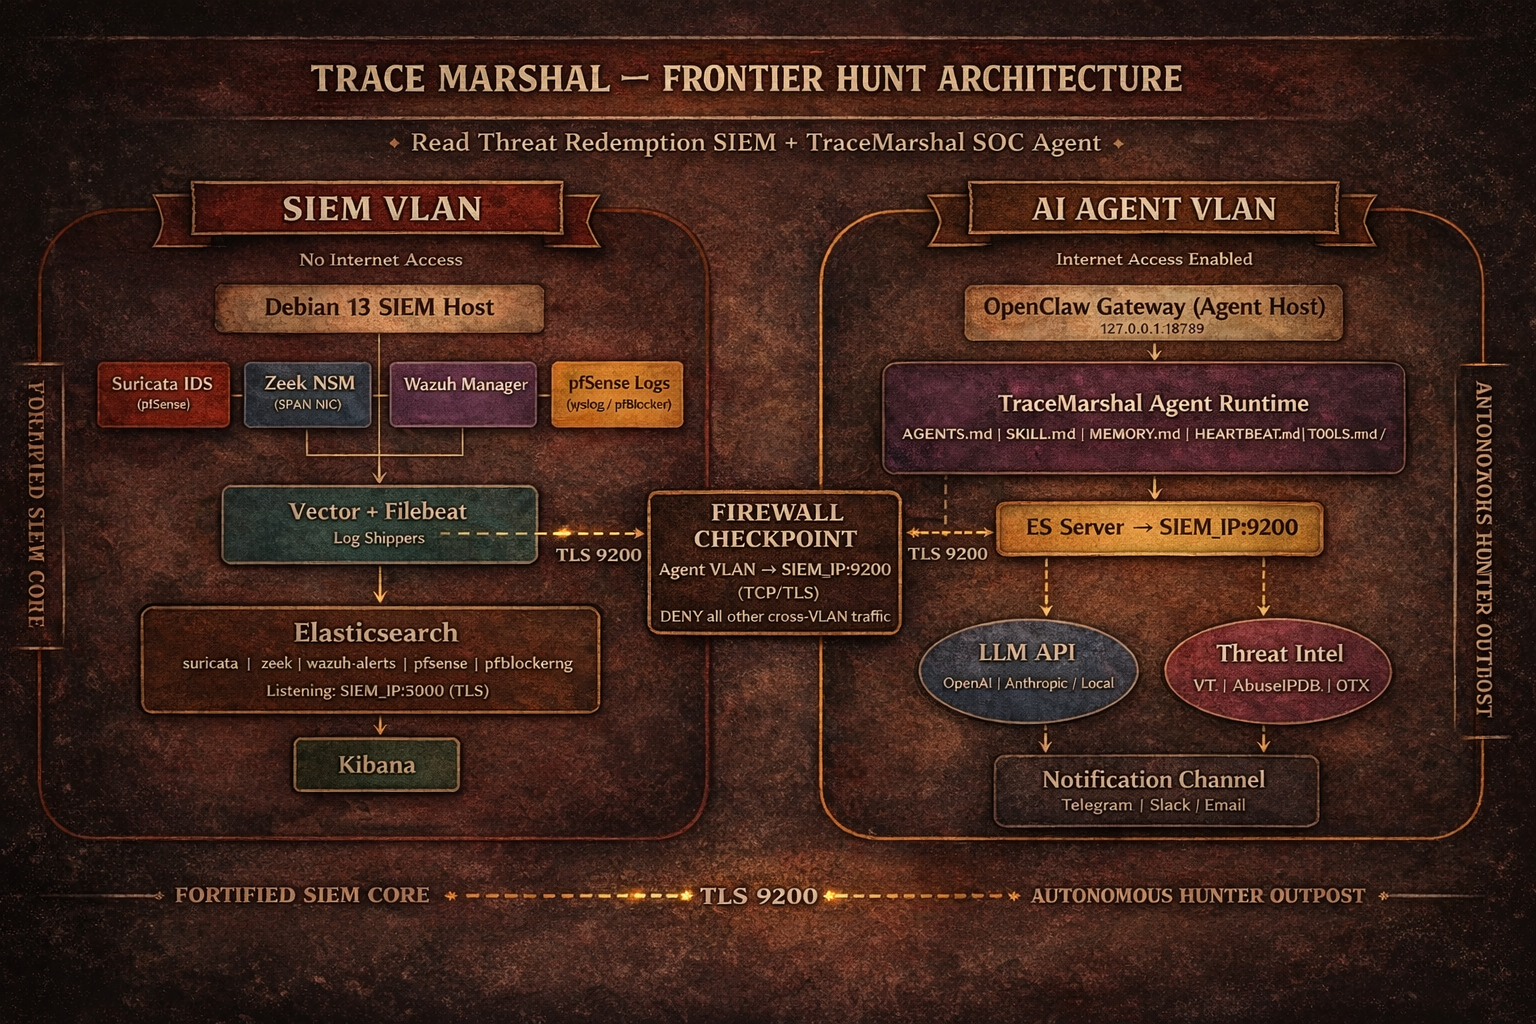 TraceMarshal agent 运行在**专用 VLAN 中的独立设备**上,通过跨 VLAN 防火墙规则连接到 Red Dead Redemption SIEM 主机上的 Elasticsearch。该 SIEM **无法访问互联网**。Agent 设备具有互联网访问权限,用于 LLM API 调用、IOC 丰富化和软件包安装。
## 网络需求
### 防火墙规则
|规则|源地址|目标地址|端口|协议|用途|
|---|---|---|---|---|---|
|ALLOW|Agent 主机 (Agent VLAN)|SIEM 主机 (SIEM VLAN)|9200|TCP/TLS|Elasticsearch 查询|
|ALLOW|Agent 主机|互联网|443|TCP|LLM API, 威胁情报, npm|
SIEM 主机上的 Elasticsearch 必须绑定到其 VLAN IP(而不仅仅是 localhost),并接受来自 agent 主机的 TLS 连接。Elasticsearch CA 证书必须手动复制到 agent 主机。
# 部署步骤
### 1. SIEM 主机:将 Elasticsearch 暴露给 Agent VLAN
在 SIEM 主机上编辑 `/etc/elasticsearch/elasticsearch.yml`:
```
# 绑定到 SIEM VLAN IP
network.host: ["127.0.0.1", "
TraceMarshal agent 运行在**专用 VLAN 中的独立设备**上,通过跨 VLAN 防火墙规则连接到 Red Dead Redemption SIEM 主机上的 Elasticsearch。该 SIEM **无法访问互联网**。Agent 设备具有互联网访问权限,用于 LLM API 调用、IOC 丰富化和软件包安装。
## 网络需求
### 防火墙规则
|规则|源地址|目标地址|端口|协议|用途|
|---|---|---|---|---|---|
|ALLOW|Agent 主机 (Agent VLAN)|SIEM 主机 (SIEM VLAN)|9200|TCP/TLS|Elasticsearch 查询|
|ALLOW|Agent 主机|互联网|443|TCP|LLM API, 威胁情报, npm|
SIEM 主机上的 Elasticsearch 必须绑定到其 VLAN IP(而不仅仅是 localhost),并接受来自 agent 主机的 TLS 连接。Elasticsearch CA 证书必须手动复制到 agent 主机。
# 部署步骤
### 1. SIEM 主机:将 Elasticsearch 暴露给 Agent VLAN
在 SIEM 主机上编辑 `/etc/elasticsearch/elasticsearch.yml`:
```
# 绑定到 SIEM VLAN IP
network.host: ["127.0.0.1", ""]
```
重启 Elasticsearch:
```
sudo systemctl restart elasticsearch
```
### 2. 为 TraceMarshal 查询创建只读 API 密钥:
**Kibana - Dev Tools**
```
POST /_security/api_key
{
"name": "tracemarshal-direct",
"role_descriptors": {
"siem-readonly": {
"cluster": ["monitor"],
"indices": [
{
"names": ["logs-*", "zeek-*"],
"privileges": ["read", "view_index_metadata"]
}
]
}
}
}
```
### 3. 将 Elasticsearch CA 证书复制到 agent 主机:
```
# 通过 SCP 或手动从 SIEM 主机
scp /etc/elasticsearch/certs/http_ca.crt user@:/path/http-ca.crt
```
阻止这两个 VLAN 之间的所有其他跨 VLAN 流量。
### 4. Agent 主机:安装 OpenClaw
```
Follow the latest OpenClaw official instructions for the installation.
```
**按照 Openclaw 初始向导设置:**
1. Agent 工作区
2. LLM 认证和模型
3. Telegram(或任何其他渠道)
### 5. Agent 主机:部署工作区文件
```
git clone repository or mannually copy/edit the workspace files at ~/.openclaw/workspace directory
```
### 6. Agent 主机:将机密信息添加到 .env 文件
**请记得在每次更新后或运行 openclaw doctor 后,使用 .env 变量更新 openclaw.json**
**在 ~/.openclaw/ 目录下创建 .env 文件并设置机密信息,以便稍后在 openclaw.json 中设置它们**
```
touch ~/.openclaw/.env
chmod 600 ~/.openclaw/.env
```
**添加机密信息并保存**
```
# Telegram
TELEGRAM_BOT_TRACEMARSHAL=telegram_token
# Brave search
BRAVE_API_KEY=brave_api__key
# Gateway
OPENCLAW_GATEWAY_TOKEN=openclaw_gw_token
# Elasticsearch
ES_HOST=https://SIEM-IP:9200
ES_API_KEY=your_key
ES_CA_CERT=the path you copied Elasticsearch CA certificate
```
### 7. 配置 openclaw.json
**使用 openai-codex 和 .env 变量的示例**
```
{
"auth": {
"profiles": {
"openai-codex:default": {
"provider": "openai-codex",
"mode": "oauth"
}
}
},
"agents": {
"defaults": {
"model": {
"primary": "openai-codex/gpt-5.3-codex",
"fallbacks": [
"openai-codex/gpt-5.2",
"openai-codex/gpt-5.2-codex"
]
},
"models": {
"openai-codex/gpt-5.3-codex": {},
"openai-codex/gpt-5.2": {},
"openai-codex/gpt-5.2-codex": {}
},
"workspace": "/home/user/.openclaw/workspace",
"compaction": {
"mode": "safeguard"
},
"maxConcurrent": 4,
"subagents": {
"maxConcurrent": 8
}
},
"list": [
{
"id": "main",
"name": "TraceMarshal",
"workspace": "/home/user/.openclaw/workspace",
"agentDir": "/home/user/.openclaw/agents/main/agent",
"model": {
"primary": "openai-codex/gpt-5.3-codex",
"fallbacks": [
"openai-codex/gpt-5.2",
"openai-codex/gpt-5.2-codex"
]
},
"subagents": {
"allowAgents": []
},
"tools": {
"profile": "coding",
"allow": ["web_search", "web_fetch"]
}
}
]
},
"bindings": [
{
"agentId": "main",
"match": {
"channel": "telegram",
"accountId": "default"
}
}
],
"tools": {
"web": {
"search": {
"enabled": true,
"provider": "brave",
"apiKey": "${BRAVE_API_KEY}"
},
"fetch": {
"enabled": true
}
},
"exec": {
"host": "gateway",
"security": "full",
"ask": "off"
}
},
"messages": {
"ackReactionScope": "group-mentions"
},
"commands": {
"native": "auto",
"nativeSkills": "auto",
"restart": true,
"ownerDisplay": "raw"
},
"session": {
"dmScope": "per-channel-peer"
},
"hooks": {
"internal": {
"enabled": true,
"entries": {
"boot-md": { "enabled": true },
"session-memory": { "enabled": true },
"command-logger": { "enabled": true }
}
}
},
"channels": {
"telegram": {
"enabled": true,
"accounts": {
"default": {
"botToken": "${TELEGRAM_BOT_TRACEMARSHAL}",
"dmPolicy": "pairing",
"groupPolicy": "allowlist",
"streaming": "off"
}
}
}
},
"gateway": {
"port": 18789,
"mode": "local",
"bind": "loopback",
"auth": {
"mode": "token",
"token": "${OPENCLAW_GATEWAY_TOKEN}"
},
"tailscale": {
"mode": "off",
"resetOnExit": false
},
"nodes": {
"denyCommands": [
"camera.snap",
"camera.clip",
"screen.record",
"calendar.add",
"contacts.add",
"reminders.add"
]
}
},
"skills": {
"install": {
"nodeManager": "npm"
}
},
"plugins": {
"entries": {
"telegram": { "enabled": true }
}
}
}
```
### 8. 重启 OpenClaw Gateway 并执行健康检查
```
openclaw gateway restart
openclaw gateway status
openclaw status
openclaw logs --follow
openclaw doctor
openclaw doctor --fix
```
TraceMarshal agent 运行在**专用 VLAN 中的独立设备**上,通过跨 VLAN 防火墙规则连接到 Red Dead Redemption SIEM 主机上的 Elasticsearch。该 SIEM **无法访问互联网**。Agent 设备具有互联网访问权限,用于 LLM API 调用、IOC 丰富化和软件包安装。
## 网络需求
### 防火墙规则
|规则|源地址|目标地址|端口|协议|用途|
|---|---|---|---|---|---|
|ALLOW|Agent 主机 (Agent VLAN)|SIEM 主机 (SIEM VLAN)|9200|TCP/TLS|Elasticsearch 查询|
|ALLOW|Agent 主机|互联网|443|TCP|LLM API, 威胁情报, npm|
SIEM 主机上的 Elasticsearch 必须绑定到其 VLAN IP(而不仅仅是 localhost),并接受来自 agent 主机的 TLS 连接。Elasticsearch CA 证书必须手动复制到 agent 主机。
# 部署步骤
### 1. SIEM 主机:将 Elasticsearch 暴露给 Agent VLAN
在 SIEM 主机上编辑 `/etc/elasticsearch/elasticsearch.yml`:
```
# 绑定到 SIEM VLAN IP
network.host: ["127.0.0.1", "标签:BurpSuite集成, Elasticsearch, HTTP/HTTPS抓包, LLM, MITM代理, OpenClaw, Rootkit, TraceMarshal, Unmanaged PE, Zeek, 安全运营, 底层编程, 异常检测, 态势感知, 扫描框架, 数据展示, 红队, 网络安全, 自动化响应, 越狱测试, 跨VLAN, 隐私保护