ChikoDoe/sentinel-waf
GitHub: ChikoDoe/sentinel-waf
基于 Claude AI 的智能 WAF 系统,实时监控 Nginx 日志并自动生成 Cloudflare 和 iptables 双层防护规则。
Stars: 1 | Forks: 0
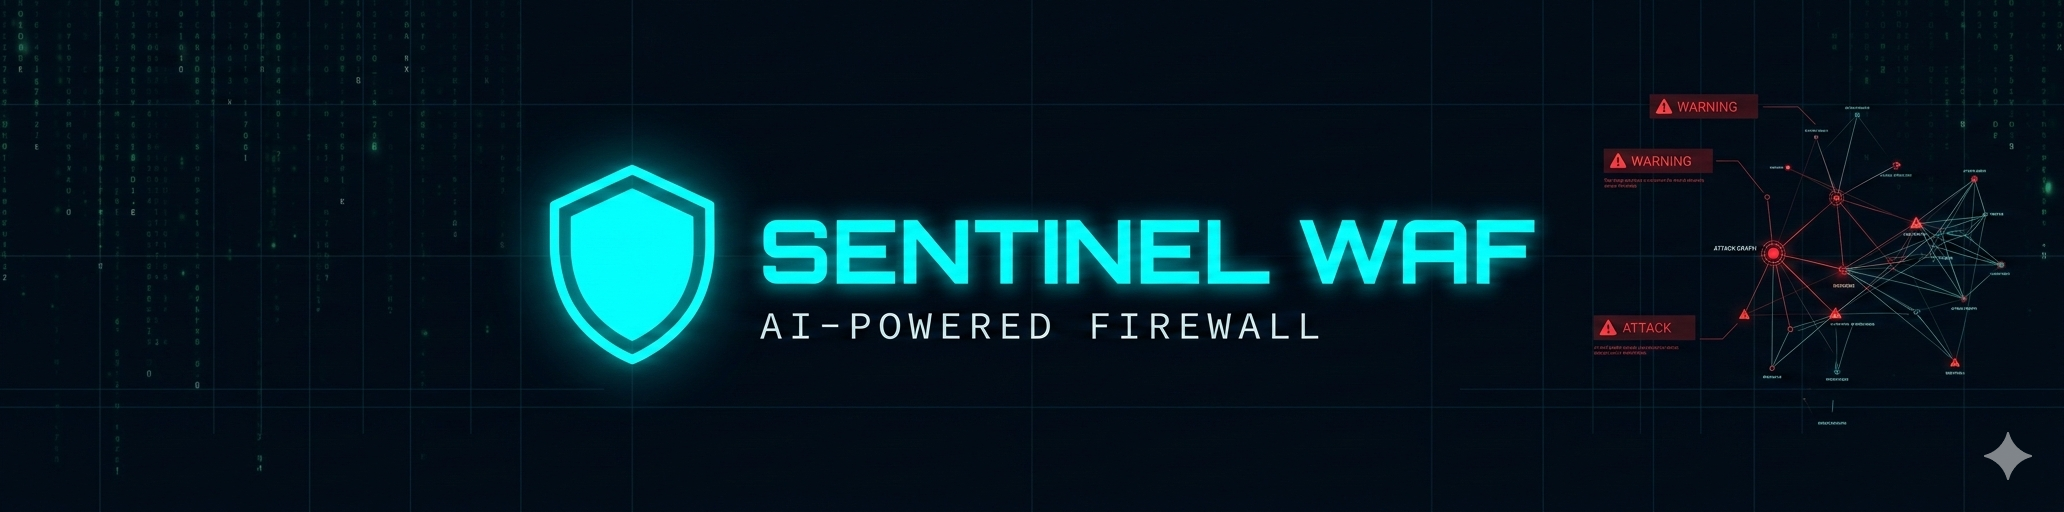 # 🛡️ Sentinel WAF
**AI 驱动的 Web Application Firewall,全自动运行。**
监控 nginx 日志,检测攻击,并自动生成 Cloudflare + iptables/nftables 规则 —— 全部由 Claude AI 提供支持。
[](https://nodejs.org)
[](https://cloudflare.com)
[](https://anthropic.com)
[](LICENSE)
[](https://ubuntu.com)
[演示](#demo) · [快速安装](#-instalasi-cepat) · [配置](#-konfigurasi) · [API 文档](#-rest-api) · [贡献](#-kontribusi)
# 🛡️ Sentinel WAF
**AI 驱动的 Web Application Firewall,全自动运行。**
监控 nginx 日志,检测攻击,并自动生成 Cloudflare + iptables/nftables 规则 —— 全部由 Claude AI 提供支持。
[](https://nodejs.org)
[](https://cloudflare.com)
[](https://anthropic.com)
[](LICENSE)
[](https://ubuntu.com)
[演示](#demo) · [快速安装](#-instalasi-cepat) · [配置](#-konfigurasi) · [API 文档](#-rest-api) · [贡献](#-kontribusi)
### 实时威胁信息流
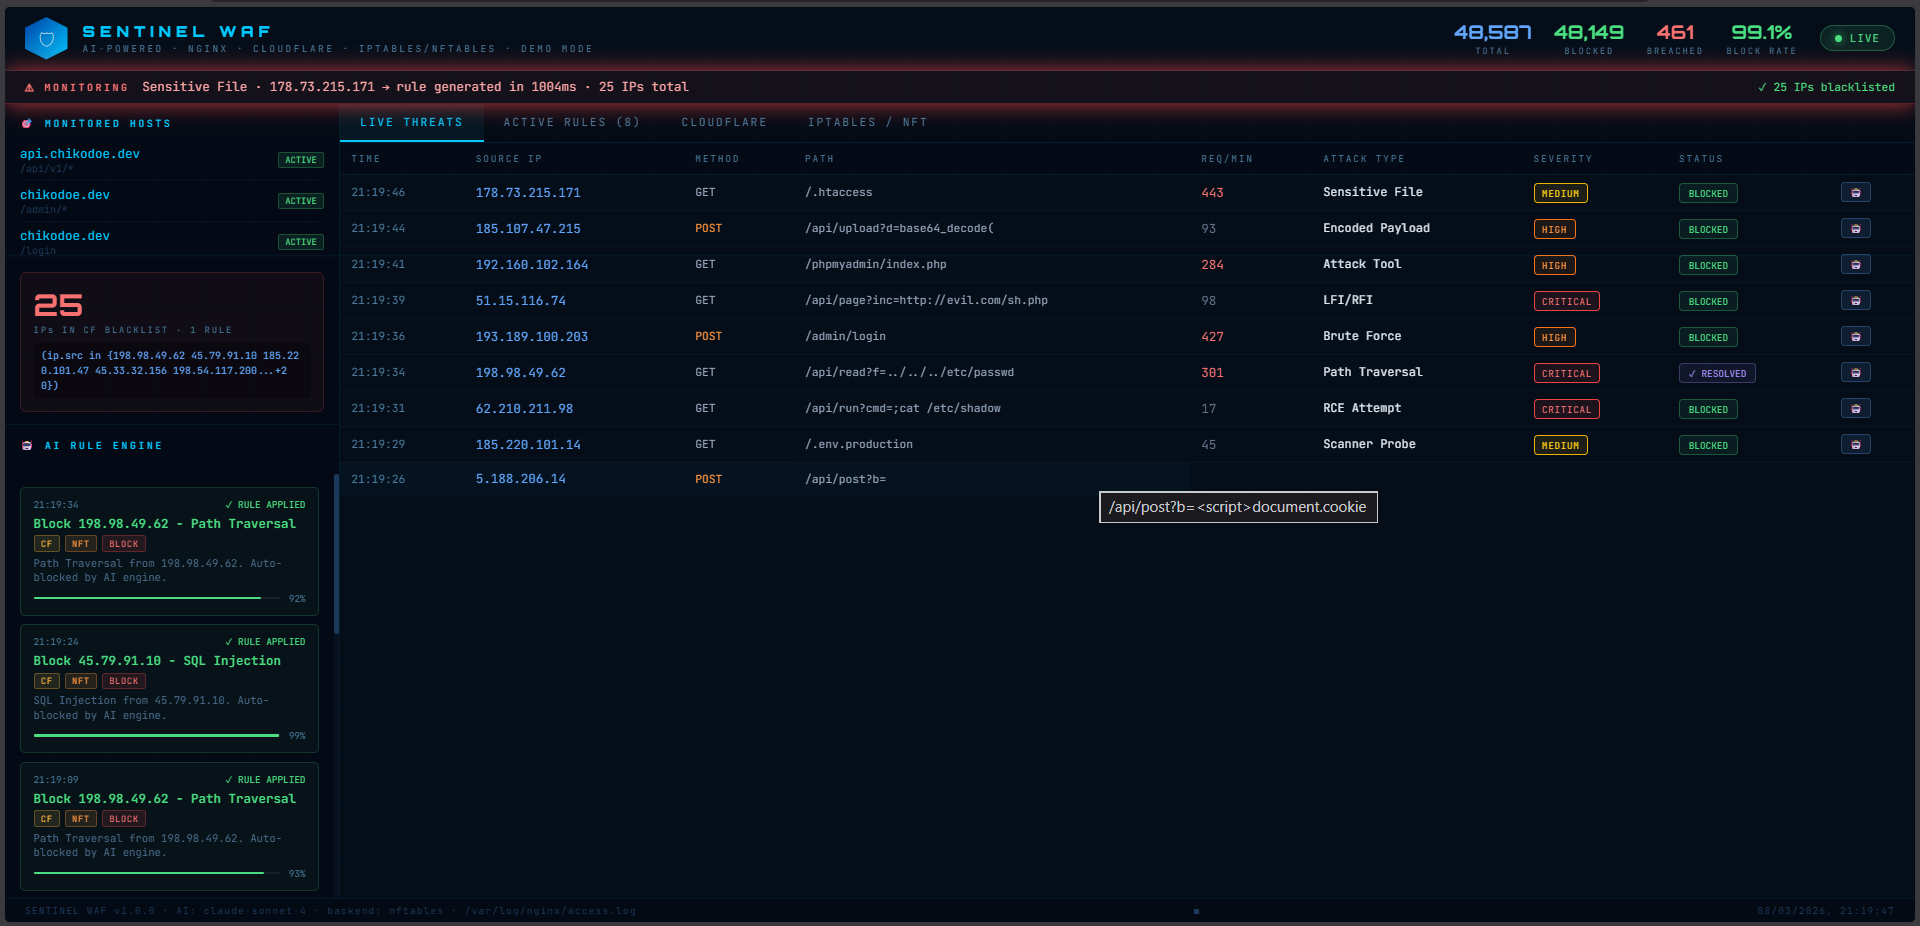 ### AI 规则生成器
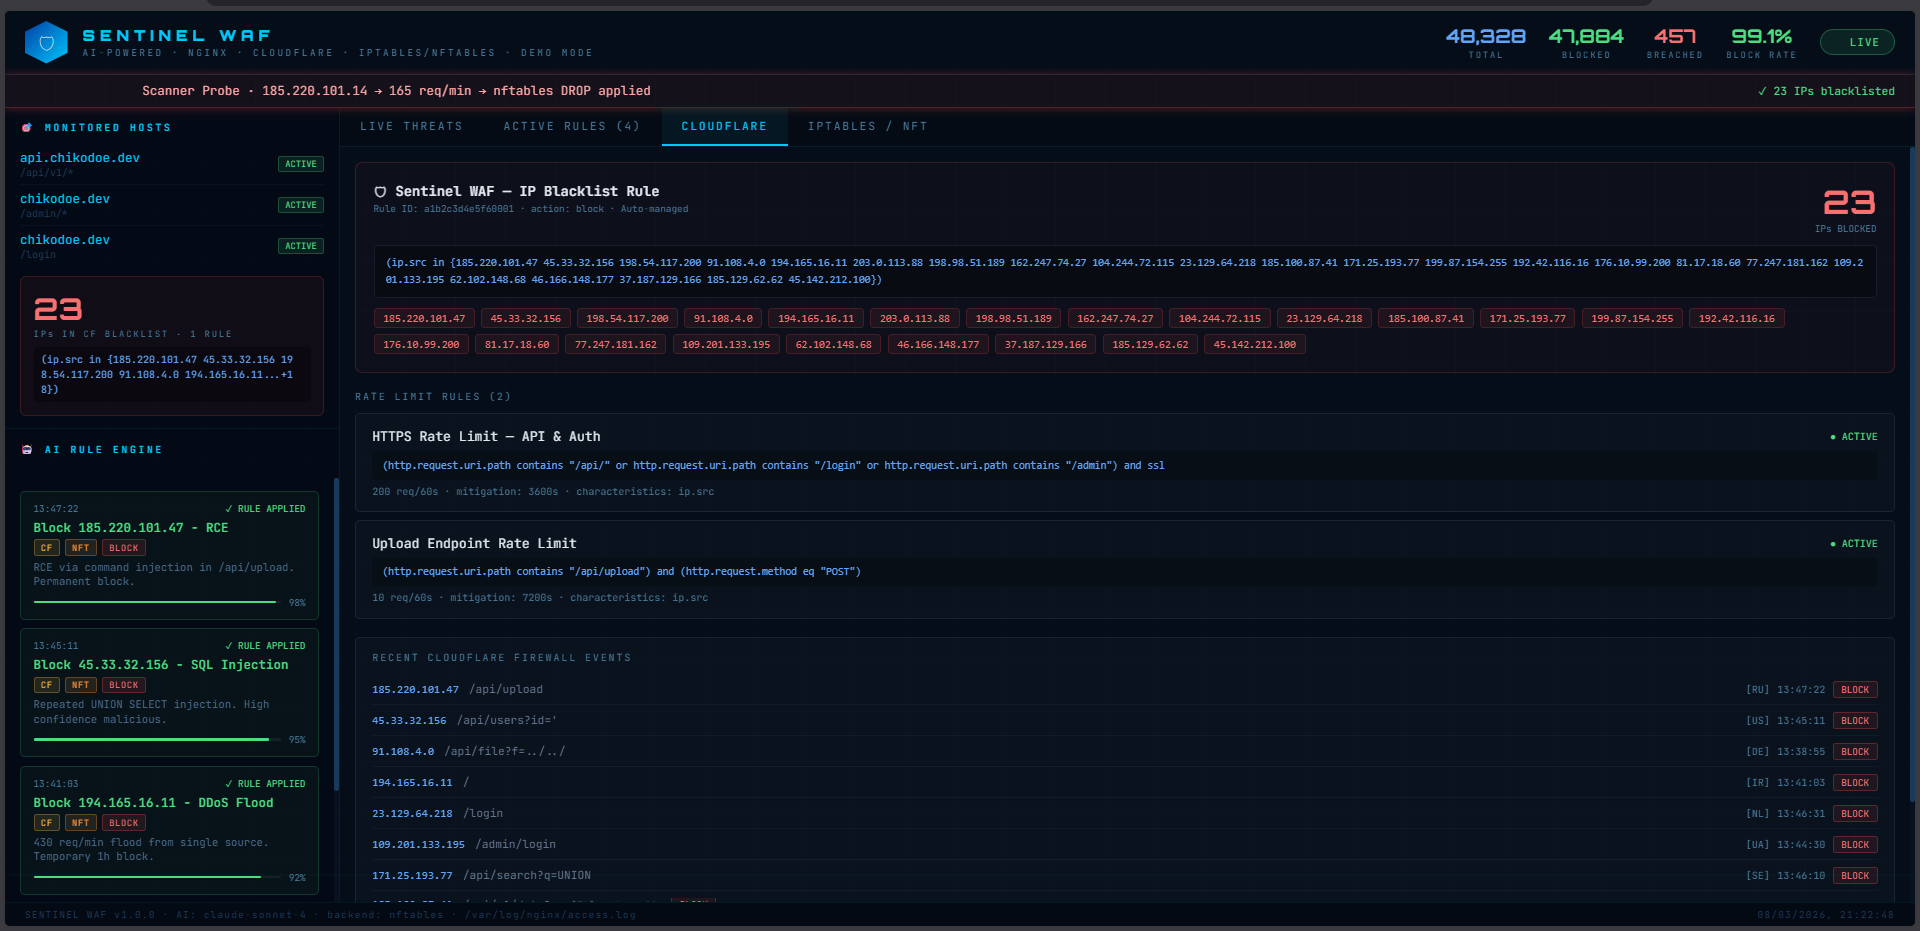
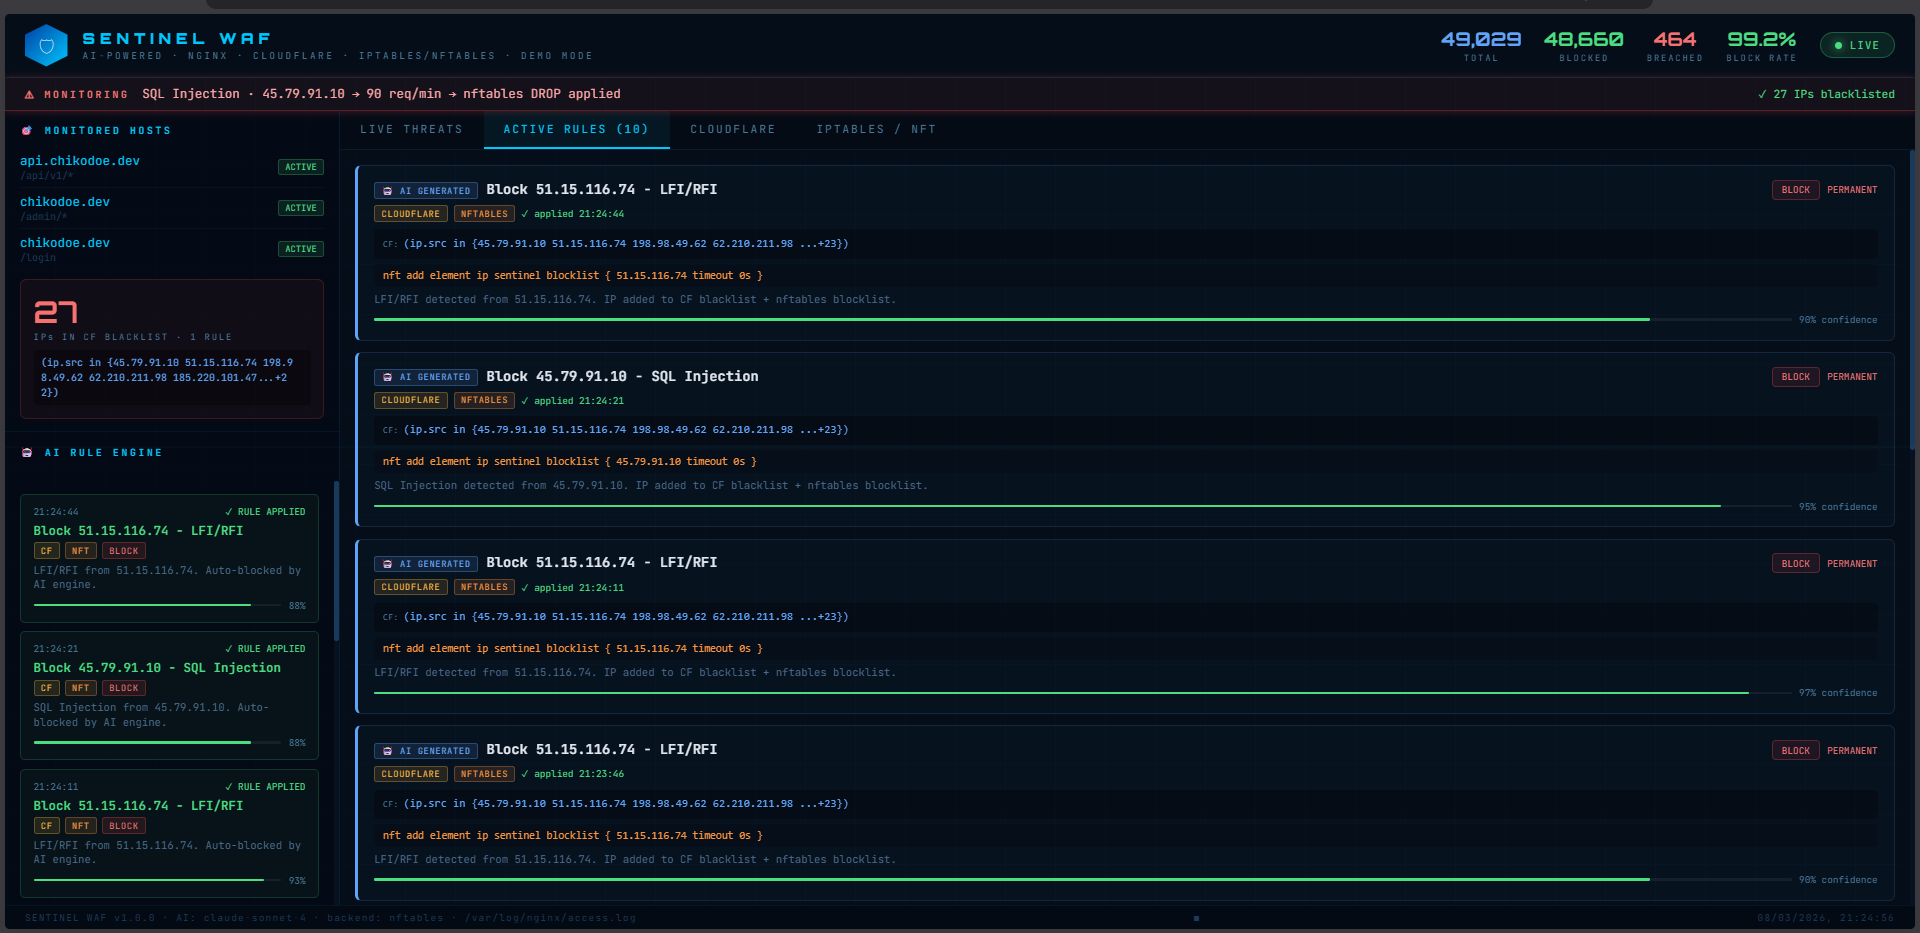 ### Cloudflare 与 iptables 规则
## ✨ 主要功能
| 功能 | 说明 |
|-------|-----------|
| 🔍 **实时日志监控** | 实时追踪 nginx `access.log`,解析每一个传入请求 |
| 🧠 **AI 规则生成** | Claude Sonnet 分析违规行为并生成精确规则 |
| ☁️ **Cloudflare WAF** | 自动推送 WAF 规则,HTTPS 速率限制,通过 API 封禁 IP |
| 🔥 **iptables / nftables** | 在 L3/L4 层封禁,速率限制,自动封禁子网 |
| 📊 **实时仪表盘** | 带 WebSocket 的 React UI,无需刷新即可更新 |
| 🎯 **URL 定向** | 添加想要监控的特定 URL/域名 |
| ⏰ **规则自动过期** | 规则可设置为自动过期(例如:封禁 1 小时) |
| 🛡️ **白名单** | 永远不会被封锁的 IP(你的 IP,监控服务器等) |
| 💾 **持久化规则** | 规则自动保存到磁盘,重启后依然有效 |
## 🏗️ 架构
```
┌─────────────────────────────────────────────────────────────────┐
│ VPS / Server │
│ │
│ [Nginx] ──access.log──► [Log Reader] │
│ │ │
│ detect threat │
│ │ │
│ ▼ │
│ [Threat Engine] │
│ SQL/XSS/RCE/DDoS │
│ │ │
│ breach detected │
│ │ │
│ ▼ │
│ [Claude AI] 🤖 │
│ analyze → generate rules │
│ │ │
│ ┌────────────────────┼────────────────────┐ │
│ ▼ ▼ ▼ │
│ [Cloudflare API] [iptables/nft] [WebSocket] │
│ - WAF rules (L7) - L3/L4 block Dashboard UI │
│ - Rate limit HTTPS - Rate limiting Live updates │
│ - Geo challenge - Subnet block │
└─────────────────────────────────────────────────────────────────┘
```
## 📋 前置条件
在安装之前,请确保你拥有:
- **VPS Ubuntu 20.04+** 或 Debian 11+(裸机)
- **Nginx** 已运行并正在处理流量
- **Node.js 18+**(如果尚未安装,安装程序会自动安装)
- **Cloudflare** 作为你域名的 DNS 代理
- **Anthropic API Key** — 在 [console.anthropic.com](https://console.anthropic.com) 注册
- **Cloudflare API Token** — 具有 `Firewall Services:Edit` 权限
- 对服务器的 **root/sudo** 访问权限
## 🚀 快速安装
### 选项 A —— 单行命令(推荐)
```
git clone https://github.com/ChikoDoe/sentinel-waf.git
cd sentinel-waf
sudo bash install.sh
```
安装程序将自动执行:
- ✅ 如果尚未安装,则安装 Node.js 20
- ✅ 设置 `iptables-persistent` 和 `nftables`
- ✅ 安装所有 npm 依赖项
- ✅ 构建 React 仪表盘
- ✅ 创建 systemd 服务(`sentinel-waf`)
- ✅ 在 8080 端口配置 nginx 反向代理
- ✅ 设置 sudoers 以便无需密码提示即可执行 iptables
安装程序完成后,请继续阅读 [配置](#-konfigurasi)。
### 选项 B —— 手动设置
### AI 规则生成器
### Cloudflare 与 iptables 规则