
⬡ VulnScan
网站漏洞扫描器
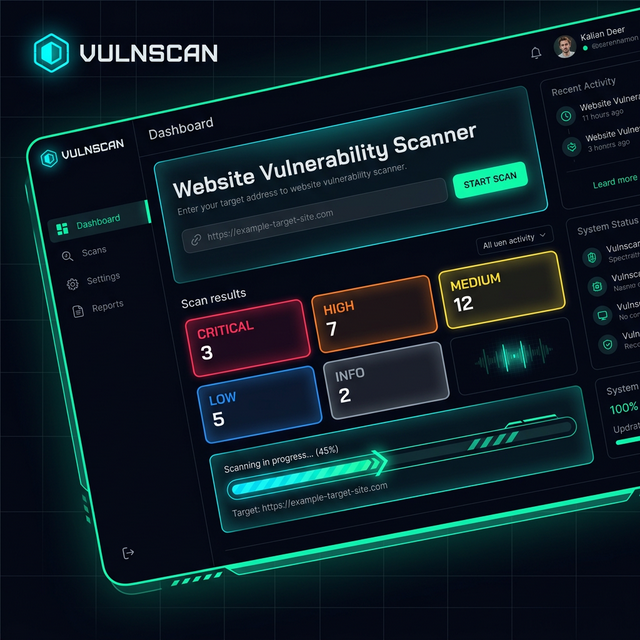
一款全栈网络安全工具,可对任何网站执行 10 项自动化安全检查
并在实时赛博朋克风格的仪表盘中呈现结果。


## 📸 预览
## ✨ 功能概览
### 🔬 10 个安全扫描模块
| # | 模块 | 检查内容 | 严重程度范围 |
|:-:|--------|---------------|:--------------:|
| 1 | 🔒 **Header 分析** | 7 个关键安全标头 (HSTS, CSP, X-Frame-Options, X-Content-Type-Options, XSS-Protection, Referrer-Policy, Permissions-Policy) | `high` → `info` |
| 2 | 🔐 **SSL/TLS 检查** | 证书过期、颁发者验证、弱协议检测 (SSLv3, TLS 1.0/1.1) | `critical` → `info` |
| 3 | 🌐 **端口扫描** | 17 个常见端口 (FTP, SSH, HTTP, HTTPS, MySQL, RDP 等) 及服务识别 | `high` → `info` |
| 4 | 🔍 **技术检测** | Web 服务器, CMS (WordPress, Joomla, Drupal), 框架 (React, Angular, Vue, Django, Laravel), 版本泄露 | `medium` → `info` |
| 5 | 📂 **目录枚举** | 30+ 个敏感路径 (`.git`, `.env`, `/admin`, `/backup`, `/phpmyadmin`, `/swagger.json` 等) | `critical` → `info` |
| 6 | 💉 **SQL 注入** | 基于报错的 SQLi 测试,包含针对 MySQL, Oracle, PostgreSQL, MSSQL, SQLite 模式的 7 个 payload | `critical` → `info` |
| 7 | ⚡ **XSS 检测** | 针对查询参数测试 5 个反射型 XSS payload | `high` → `info` |
| 8 | 🌍 **CORS 错误配置** | 通配符来源、来源反射、通过 `Access-Control-Allow-*` 标头导致的凭据泄露 | `critical` → `info` |
| 9 | 🍪 **Cookie 安全** | Secure 标志、HttpOnly 标志、SameSite 属性分析 | `medium` → `info` |
| 10 | 📡 **信息泄露** | 邮箱泄露、内部 IP 暴露、服务器版本标头、可疑的 HTML 注释 | `medium` → `info` |
### 🎨 赛博朋克 UI
- **深色主题**,搭配霓虹青 / 绿 / 洋红点缀
- **动态网格背景**及扫描激光线
- **实时 SSE 进度** —— 实时观看每个模块的扫描过程
- **风险评分仪表** —— 0-100 的加权严重程度评分
- **可展开的漏洞卡片** —— 点击查看详情及修复建议
- **JSON 导出** —— 一键下载完整的扫描报告
- **完全响应式** —— 支持桌面、平板和移动设备
## 🚀 快速开始
### 前置条件
- **Python 3.11+** (或 Docker)
- **pip** 包管理器
### 选项 1 — 本地运行
```
# Clone the repository
git clone https://github.com/yourusername/vulnerability-scanner.git
cd vulnerability-scanner
# Create virtual environment (recommended)
python -m venv .venv
.venv\Scripts\activate # Windows
# source .venv/bin/activate # macOS/Linux
# Install dependencies
pip install -r requirements.txt
# Launch the scanner
python app.py
```
```
╔══════════════════════════════════════════════════╗
║ 🛡️ Vulnerability Scanner v1.0 ║
║ http://127.0.0.1:5000 ║
╚══════════════════════════════════════════════════╝
```
在浏览器中打开 **http://127.0.0.1:5000**。
### 选项 2 — 使用 Docker 运行 🐳
```
# Build and run (foreground)
docker compose up --build
# Or run in detached mode
docker compose up --build -d
# View logs
docker compose logs -f
# Stop the container
docker compose down
```
在浏览器中打开 **http://localhost:5000**。
### 选项 3 — 部署到云端 (免费) ☁️
[](https://render.com/deploy)
**在 Render 上部署的步骤:**
1. **推送到 GitHub** — 将此项目推送到 GitHub 仓库
2. **访问 [render.com](https://render.com)** — 使用 GitHub 注册/登录
3. **New → Web Service** → 连接你的 GitHub 仓库
4. Render 会自动检测 `Dockerfile` — 点击 **Deploy**
5. 你的应用将在 `https://vulnscan-xxxx.onrender.com` 上线 🎉
## 📁 项目结构
```
vulnerability_scanner/
│
├── app.py # Flask REST API + SSE streaming endpoint
├── scanner.py # Core scanning engine — 10 security modules
├── requirements.txt # Python dependencies (flask, requests, gunicorn)
│
├── templates/
│ └── index.html # Single-page app — hero, progress, results sections
│
├── static/
│ ├── css/
│ │ └── style.css # Cyberpunk theme — custom properties, animations, responsive
│ └── js/
│ └── main.js # Frontend logic — SSE handler, dynamic rendering, export
│
├── Dockerfile # Multi-stage container image (python:3.11-slim + gunicorn)
├── docker-compose.yml # One-command container orchestration
├── .dockerignore # Build context exclusions
└── README.md # You are here
```
## ⚙️ 架构
```
┌─────────────────────────────────────────────────────────┐
│ Browser (UI) │
│ ┌─────────────┐ ┌──────────────┐ ┌───────────────┐ │
│ │ Hero Input │ │ SSE Progress │ │ Results Cards │ │
│ └──────┬──────┘ └──────▲───────┘ └───────▲───────┘ │
│ │ │ │ │
└─────────┼────────────────┼───────────────────┼──────────┘
│ GET │ text/event-stream │ JSON
▼ │ │
┌─────────────────────────────────────────────────────────┐
│ Flask API (app.py) │
│ │
│ / → index.html │
│ /api/scan/stream → SSE endpoint (progress + data) │
│ /api/report/
→ Cached scan results │
│ │
│ │ Spawns thread │
│ ▼ │
│ ┌─────────────────────────────────────────────────┐ │
│ │ Scanner Engine (scanner.py) │ │
│ │ │ │
│ │ 1. check_headers() 6. check_sqli() │ │
│ │ 2. check_ssl() 7. check_xss() │ │
│ │ 3. check_ports() 8. check_cors() │ │
│ │ 4. check_technology() 9. check_cookies() │ │
│ │ 5. check_directories() 10. check_info_disc() │ │
│ │ │ │
│ │ → progress_callback() ──────► Queue ──► SSE │ │
│ └─────────────────────────────────────────────────┘ │
└─────────────────────────────────────────────────────────┘
```
## 📊 风险评分系统
每个漏洞发现都会被分配一个严重程度等级。整体 **风险评分** (0–100) 通过加权求和计算:
| 严重程度 | 权重 | 颜色 |
|:--------:|:------:|:-----:|
| `critical` | **40 分** | 🔴 红色 |
| `high` | **20 分** | 🟠 橙色 |
| `medium` | **10 分** | 🟡 黄色 |
| `low` | **5 分** | 🔵 蓝色 |
| `info` | **0 分** | ⚪ 灰色 |
**风险评分 = Σ (严重程度计数 × 权重)**,上限为 100。
| 分数范围 | 风险等级 | 视觉效果 |
|:-----------:|:----------:|:------:|
| 0 – 39 | ✅ 低风险 | 绿色 → 青色渐变 |
| 40 – 69 | ⚠️ 中风险 | 黄色 → 橙色渐变 |
| 70 – 100 | 🚨 高风险 | 橙色 → 红色渐变 |
## 🔌 API 参考
### `GET /`
提供主扫描器 UI。
### `GET /api/scan/stream?url=`
**Server-Sent Events** 端点。流式传输实时扫描进度。
**事件类型:**
```
// 1. Module list (sent first)
{ "type": "modules", "data": [{ "id": "header_analysis", "name": "Header Analysis" }, ...] }
// 2. Progress updates (sent per module)
{ "type": "progress", "data": { "module": "ssl_tls", "status": "running" } }
{ "type": "progress", "data": { "module": "ssl_tls", "status": "done" } }
// 3. Final results (sent once)
{ "type": "complete", "data": { "url": "...", "risk_score": 45, "results": [...] } }
```
### `GET /api/report/`
根据 ID 返回缓存的扫描报告。
## 🛡️ 扫描模块详情
1. HTTP 安全标头
检查是否存在 7 个关键安全标头:
- `Strict-Transport-Security` (HSTS)
- `Content-Security-Policy` (CSP)
- `X-Frame-Options`
- `X-Content-Type-Options`
- `X-XSS-Protection`
- `Referrer-Policy`
- `Permissions-Policy`
2. SSL/TLS 证书
- 验证证书过期(若少于 30 天则发出警告)
- 识别证书颁发者
- 检测弱协议 (TLS 1.0, 1.1, SSLv3, SSLv2)
- 报告证书验证失败
3. 端口扫描
使用多线程 TCP 连接(10 个工作线程)扫描 17 个常见端口:
`21 (FTP) · 22 (SSH) · 23 (Telnet) · 25 (SMTP) · 53 (DNS) · 80 (HTTP) · 110 (POP3) · 143 (IMAP) · 443 (HTTPS) · 445 (SMB) · 993 (IMAPS) · 995 (POP3S) · 3306 (MySQL) · 3389 (RDP) · 5432 (PostgreSQL) · 8080 (HTTP-Alt) · 8443 (HTTPS-Alt)`
标记有风险的开放端口:FTP(21), Telnet(23), SMB(445), MySQL(3306), RDP(3389), PostgreSQL(5432)
4. 技术检测
通过响应标头和 HTML 正文签名识别技术:
- **服务器:** Apache, Nginx, IIS
- **CMS:** WordPress, Joomla, Drupal
- **框架:** Django, Laravel, ASP.NET, Express, Next.js
- **前端:** React, Angular, Vue.js, jQuery, Bootstrap
- 标记服务器版本信息泄露
5. 目录 / 敏感文件枚举
探测 30+ 个敏感路径,包括:
- 配置文件:`.env`, `.htaccess`, `config.php`, `config.yml`
- 版本控制:`.git`, `.git/config`, `.svn`
- 管理面板:`/admin`, `/wp-admin`, `/phpmyadmin`, `/cpanel`
- API 文档:`/swagger.json`, `/graphql`, `/api/v1`
- 调试信息:`/debug`, `/trace`, `/elmah.axd`, `/server-status`
6. SQL 注入 (基于报错)
使用 7 个 SQLi payload 测试查询参数,并匹配涵盖 MySQL, Oracle, PostgreSQL, MSSQL 和 SQLite 的 18 种数据库错误模式。
7. 跨站脚本攻击 (XSS)
使用 5 个反射型 XSS payload 测试查询参数,包括 `