leestott/On-Call-Copilot-Multi-Agent
GitHub: leestott/On-Call-Copilot-Multi-Agent
基于 Microsoft Agent Framework 的多智能体系统,通过四个并发 Agent 自动化事件分拣、根因分析、沟通起草和事后复盘,加速 On-Call 值班响应流程。
Stars: 38 | Forks: 13
# On-Call Copilot:多 Agent 事件分拣
一个面向开发者的示例,演示了结合 **Foundry Hosted Agents** 和 **Model Router** 的 **Microsoft Agent Framework**。四个专家 Agent **并发** 运行,对事件信号(告警、日志、指标、runbook 摘录)进行分拣,并生成结构化的 JSON 输出——包括根因分析、紧急行动、沟通草案以及事后报告。
## 快速入门
在 5 分钟内于本地运行此示例。
### 1. 前置条件
| 工具 | 是否必需 | 安装 |
|------|----------|---------|
| **Python 3.10+** | 是 | [python.org](https://www.python.org/downloads/) |
| **Azure CLI** (`az`) | 是 | [安装 Azure CLI](https://learn.microsoft.com/cli/azure/install-azure-cli) |
| **Microsoft Foundry 项目** | 是 | [创建 Foundry 项目](https://learn.microsoft.com/azure/ai-foundry/how-to/create-projects) |
| **Microsoft Foundry Model Router 部署** | 是 | [部署 Model Router](https://learn.microsoft.com/azure/ai-foundry/openai/how-to/model-router) |
| **Docker Desktop** | 仅部署时需要 | [docker.com](https://www.docker.com/products/docker-desktop/) |
### 2. 克隆并设置
```
git clone https://github.com/Azure-Samples/On-Call-Copilot-Multi-Agent.git
cd On-Call-Copilot-Multi-Agent
python -m venv .venv
```
激活虚拟环境:
```
# Windows PowerShell
.venv\Scripts\Activate.ps1
# Windows cmd
.venv\Scripts\activate.bat
# Linux / macOS
source .venv/bin/activate
```
安装依赖:
```
pip install -r requirements.txt
```
### 3. 配置环境变量
复制模板并填入你的 Azure 值:
```
# Linux / macOS
cp .env.example .env
# Windows
copy .env.example .env
```
打开 `.env` 并设置 hosted-agent 项目以及 Model Router 项目。它们可以是同一个 Foundry 项目,但这里是单独的变量,以便 hosted agent 可以在一个项目中运行,而推理过程使用另一个项目中的 Model Router 部署。
```
AZURE_AI_PROJECT_ENDPOINT=https://.services.ai.azure.com/api/projects/
AZURE_MODEL_PROJECT_ENDPOINT=https://.services.ai.azure.com/api/projects/
AZURE_OPENAI_ENDPOINT=https://.cognitiveservices.azure.com/
AZURE_OPENAI_CHAT_DEPLOYMENT_NAME=model-router
MODEL_ROUTER_DEPLOYMENT=model-router
```
### 4. 登录 Azure
```
az login
```
### 5. 一键启动(推荐)
启动脚本会处理虚拟环境创建、依赖安装、Azure 登录,并启动 Agent 服务器和浏览器 UI:
```
# Windows PowerShell
.\scripts\start.ps1
# Linux / macOS
bash scripts/start.sh
```
这将启动:
- `http://localhost:8088` 上的 **Agent 服务器**
- `http://localhost:7860` 上的 **浏览器 UI**
**启动脚本选项:**
| 标志 | PowerShell | Bash | 描述 |
|------|------------|------|-------------|
| 仅 Agent 服务器 | `.\scripts\start.ps1 -SkipUI` | `bash scripts/start.sh --skip-ui` | 跳过 UI 服务器 |
| 模拟模式 | `.\scripts\start.ps1 -MockMode` | `bash scripts/start.sh --mock` | 不需要 Azure 凭据 |
| 跳过安装 | `.\scripts\start.ps1 -SkipInstall` | `bash scripts/start.sh --skip-install` | 跳过 `pip install` 步骤 |
### 6. 手动运行服务器(备选)
如果你倾向于分别启动服务器:
```
# Terminal 1 — agent server
python main.py
# 正在监听 http://localhost:8088
# Terminal 2 — browser UI (venv 已激活)
python ui/server.py
# 在 http://localhost:7860 打开
```
该 UI 允许你加载示例事件,将它们发送给 Agent,并跨所有四个 Agent 面板查看结果。
### 7. 使用示例事件进行测试
```
# PowerShell
.\scripts\test_local.ps1 -Demo 1
# Bash
bash scripts/test_local.sh 1
```
或者配合 VS Code 的 REST Client 扩展使用 [scripts/test_local.http](scripts/test_local.http)。
## 工作原理
```
flowchart TD
Client["Client
CLI / curl / Foundry UI"] subgraph Foundry["Foundry Agent Service (Hosted Container)"] Orchestrator["Agent Framework workflow
(ResponsesHostServer)"] subgraph Concurrent["Concurrent execution - asyncio.gather()"] direction LR Triage["Triage Agent
suspected_root_causes
immediate_actions
missing_information
runbook_alignment"] Summary["Summary Agent
summary"] Comms["Comms Agent
comms
(Slack + stakeholder)"] PIR["PIR Agent
post_incident_report
(timeline, impact, prevention)"] end Merge["Merge JSON fragments
+ inject telemetry block"] end ModelRouter["Microsoft Foundry Model Router
(single deployment -
routes to best model
per request complexity)"] Client -->|"POST /responses (Responses input envelope)"| Orchestrator Orchestrator --> Concurrent Triage -->|JSON fragment| Merge Summary -->|JSON fragment| Merge Comms -->|JSON fragment| Merge PIR -->|JSON fragment| Merge Merge -->|"Structured JSON response"| Client Triage -->|Azure OpenAI API calls| ModelRouter ModelRouter -->|response| Triage Summary -->|Azure OpenAI API calls| ModelRouter ModelRouter -->|response| Summary Comms -->|Azure OpenAI API calls| ModelRouter ModelRouter -->|response| Comms PIR -->|Azure OpenAI API calls| ModelRouter ModelRouter -->|response| PIR style Foundry fill:#e8f4fd,stroke:#0078d4,stroke-width:2px style Concurrent fill:#f0f8e8,stroke:#107c10,stroke-width:1px,stroke-dasharray:5 5 style ModelRouter fill:#fff4e5,stroke:#f7630c,stroke-width:2px style Orchestrator fill:#dce9f5,stroke:#0078d4 style Merge fill:#dce9f5,stroke:#0078d4 ``` 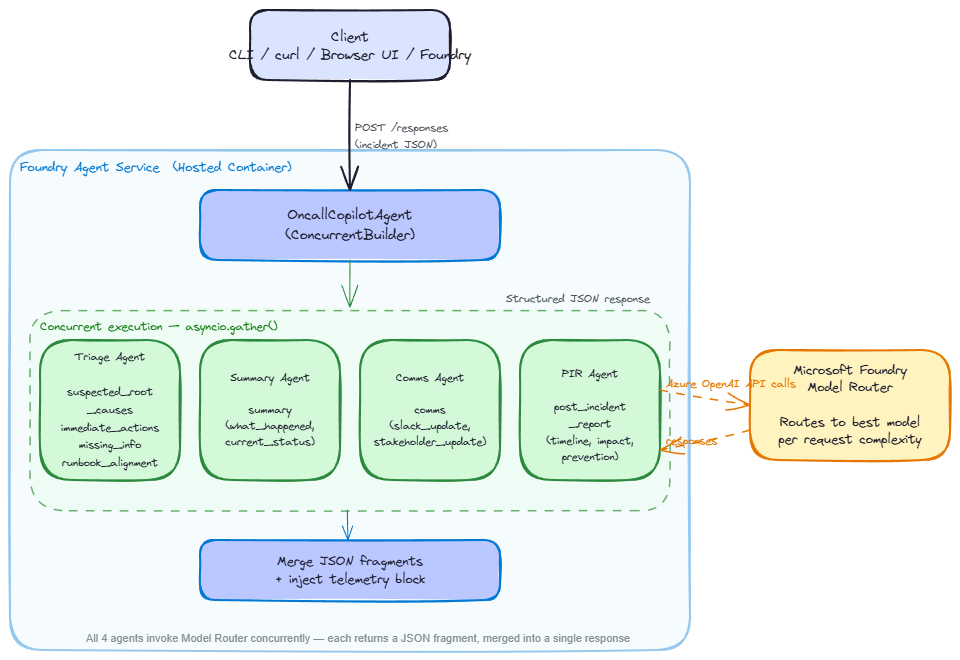 ### 请求流程 1. 通过 Responses API 协议(端口 8088)**接收请求** 2. 托管的 `WorkflowAgent` 接收用户消息 3. 使用来自 `app/agents/` 的专用指令创建四个专家 `Agent` 实例 4. `ConcurrentBuilder` 针对 Model Router 并发调用所有四个专家 5. 每个专家返回包含其输出键的 JSON 片段 6. 响应文本包含用于下游解析的专家 JSON 片段 ### 多 Agent 设计 | Agent | 职责 | 输出键 | |---|---|---| | **Triage** | 根因分析、紧急行动、缺失信息、runbook 匹配 | `suspected_root_causes`, `immediate_actions`, `missing_information`, `runbook_alignment` | | **Summary** | 简明的事件叙述 | `summary` | | **Comms** | Slack 更新、利益相关者简报 | `comms` | | **PIR** | 事后时间线、客户影响、预防措施 | `post_incident_report` | ### 为什么选择 Microsoft Foundry Model Router? Model Router 会根据复杂度自动将每个请求路由到最佳模型——你的代码中不需要模型选择逻辑: | 场景 | 复杂度 | 路由 | |---|---|---| | 简单的告警分拣 | 低 | 更快、更便宜的模型 | | 多信号关联 | 高 | 能力更强的模型 | | 事后综合分析 | 高 | 高能力模型 | ## 运行模式 ### 多 Agent 模式(默认) 使用具有四个并发 Agent 的 Agent Framework。需要 Azure 凭据。 ``` python main.py # http://localhost:8088 ``` ### 模拟模式(不需要 Azure 凭据) 使用带有预设输出的 FastAPI 服务器进行本地 Schema 验证: ``` # Windows PowerShell $env:MOCK_MODE="true"; python -m app.main # Linux / macOS MOCK_MODE=true python -m app.main ``` ### 验证所有场景(模拟模式) ``` python scripts/validate.py # all 5 scenarios python scripts/validate.py --scenario 2 # single scenario ``` ## 场景与演示 ### 演示负载 | # | 文件 | 描述 | |---|------|-------------| | 1 | `scripts/demos/demo_1_simple_alert.json` | 单个 5xx 告警 — 快速分拣 | | 2 | `scripts/demos/demo_2_multi_signal.json` | 3 个告警 + 日志 + 指标 — 多信号关联 | | 3 | `scripts/demos/demo_3_post_incident.json` | 已解决的 SEV1 TLS 证书过期 — 完整的 PIR 综合 | ### 场景负载 | # | 文件 | 严重性 | 描述 | |---|------|----------|-------------| | 1 | [scenario_1_redis_outage.json](scripts/scenarios/scenario_1_redis_outage.json) | SEV2 | Redis 缓存集群无响应 | | 2 | [scenario_2_aks_scaling.json](scripts/scenarios/scenario_2_aks_scaling.json) | SEV1 | Kubernetes 节点池扩容失败 | | 3 | [scenario_3_dns_cascade.json](scripts/scenarios/scenario_3_dns_cascade.json) | SEV1 | DNS 解析失败级联 | | 4 | [scenario_4_minimal_alert.json](scripts/scenarios/scenario_4_minimal_alert.json) | SEV4 | 预发环境的最小化 CPU 告警 | | 5 | [scenario_5_storage_throttle_pir.json](scripts/scenarios/scenario_5_storage_throttle_pir.json) | SEV2 | 存储限流 — 事后审查 | ### 针对已部署的 Agent 运行场景 ``` python scripts/invoke.py # default prompt python scripts/invoke.py --demo 1 # built-in demo python scripts/invoke.py --scenario 2 # built-in scenario python scripts/invoke.py --prompt "db connection pool exhausted" # custom prompt python scripts/run_scenarios.py # all scenarios python scripts/run_scenarios.py --list # list available python scripts/run_scenarios.py --scenario 3 # single scenario ``` ## API 契约 ### Responses 请求信封 Agent Framework 服务器接受 Responses 协议。将事件负载以文本形式放入 `content` 字段中。 ``` { "input": [ { "role": "user", "content": "{\"incident_id\":\"INC-20260217-001\",\"title\":\"API Gateway 5xx spike\",\"severity\":\"SEV1\"}" } ] } ``` ### 事件负载 ``` { "incident_id": "INC-20260217-001", "title": "API Gateway 5xx spike", "severity": "SEV1", "timeframe": { "start": "2026-02-17T03:42:00Z", "end": null }, "alerts": [ { "name": "HighErrorRate", "description": "...", "timestamp": "..." } ], "logs": [ { "source": "order-service", "lines": ["ERROR ...", "WARN ..."] } ], "metrics": [ { "name": "http_5xx_rate", "window": "5m", "values_summary": "..." } ], "runbook_excerpt": "Step 1: Check dashboard. Step 2: ...", "constraints": { "max_time_minutes": 15, "environment": "production", "region": "eastus2" } } ``` ### 输出 Schema ``` { "summary": { "what_happened": "...", "current_status": "..." }, "suspected_root_causes": [{ "hypothesis": "...", "evidence": [], "confidence": 0.0 }], "immediate_actions": [{ "step": "...", "owner_role": "...", "priority": "P0" }], "missing_information": [{ "question": "...", "why_it_matters": "..." }], "runbook_alignment": { "matched_steps": [], "gaps": [] }, "comms": { "slack_update": "...", "stakeholder_update": "..." }, "post_incident_report": { "timeline": [], "customer_impact": "...", "prevention_actions": [] }, "telemetry": { "correlation_id": "...", "model_router_deployment": "...", "selected_model_if_available": null, "tokens_if_available": null } } ``` ## 部署到 Microsoft Foundry ### 部署前提条件 - Azure CLI 2.80+ 和 Azure Developer CLI (`azd`) 1.23.0+ - Docker Desktop - 具有所需权限的 Microsoft Foundry 项目([详情](https://learn.microsoft.com/azure/ai-foundry/agents/how-to/deploy-hosted-agent?view=foundry&tabs=bash#prerequisites)) ### 选项 A:Azure Developer CLI(最快) ``` azd init -t https://github.com/Azure-Samples/azd-ai-starter-basic azd ai agent init -m agent.yaml azd up ``` 验证: ``` az cognitiveservices agent show \ --account-name \
--project-name \
--name oncall-copilot
```
清理:`azd down`
### 选项 B:Python SDK (CI/CD 集成)
```
# 1. 构建并推送容器镜像
docker build --platform linux/amd64 -t oncall-copilot:v1 .
az acr login --name
docker tag oncall-copilot:v1 .azurecr.io/oncall-copilot:v1
docker push .azurecr.io/oncall-copilot:v1
# 2. 为项目 managed identity 在您的 ACR 上授予 "Container Registry Repository Reader" 权限
# 3. 部署
export ACR_IMAGE=".azurecr.io/oncall-copilot:v1"
python scripts/deploy_sdk.py
# 4. 验证
python scripts/verify_agent.py
# 清理
python scripts/deploy_sdk.py --delete
```
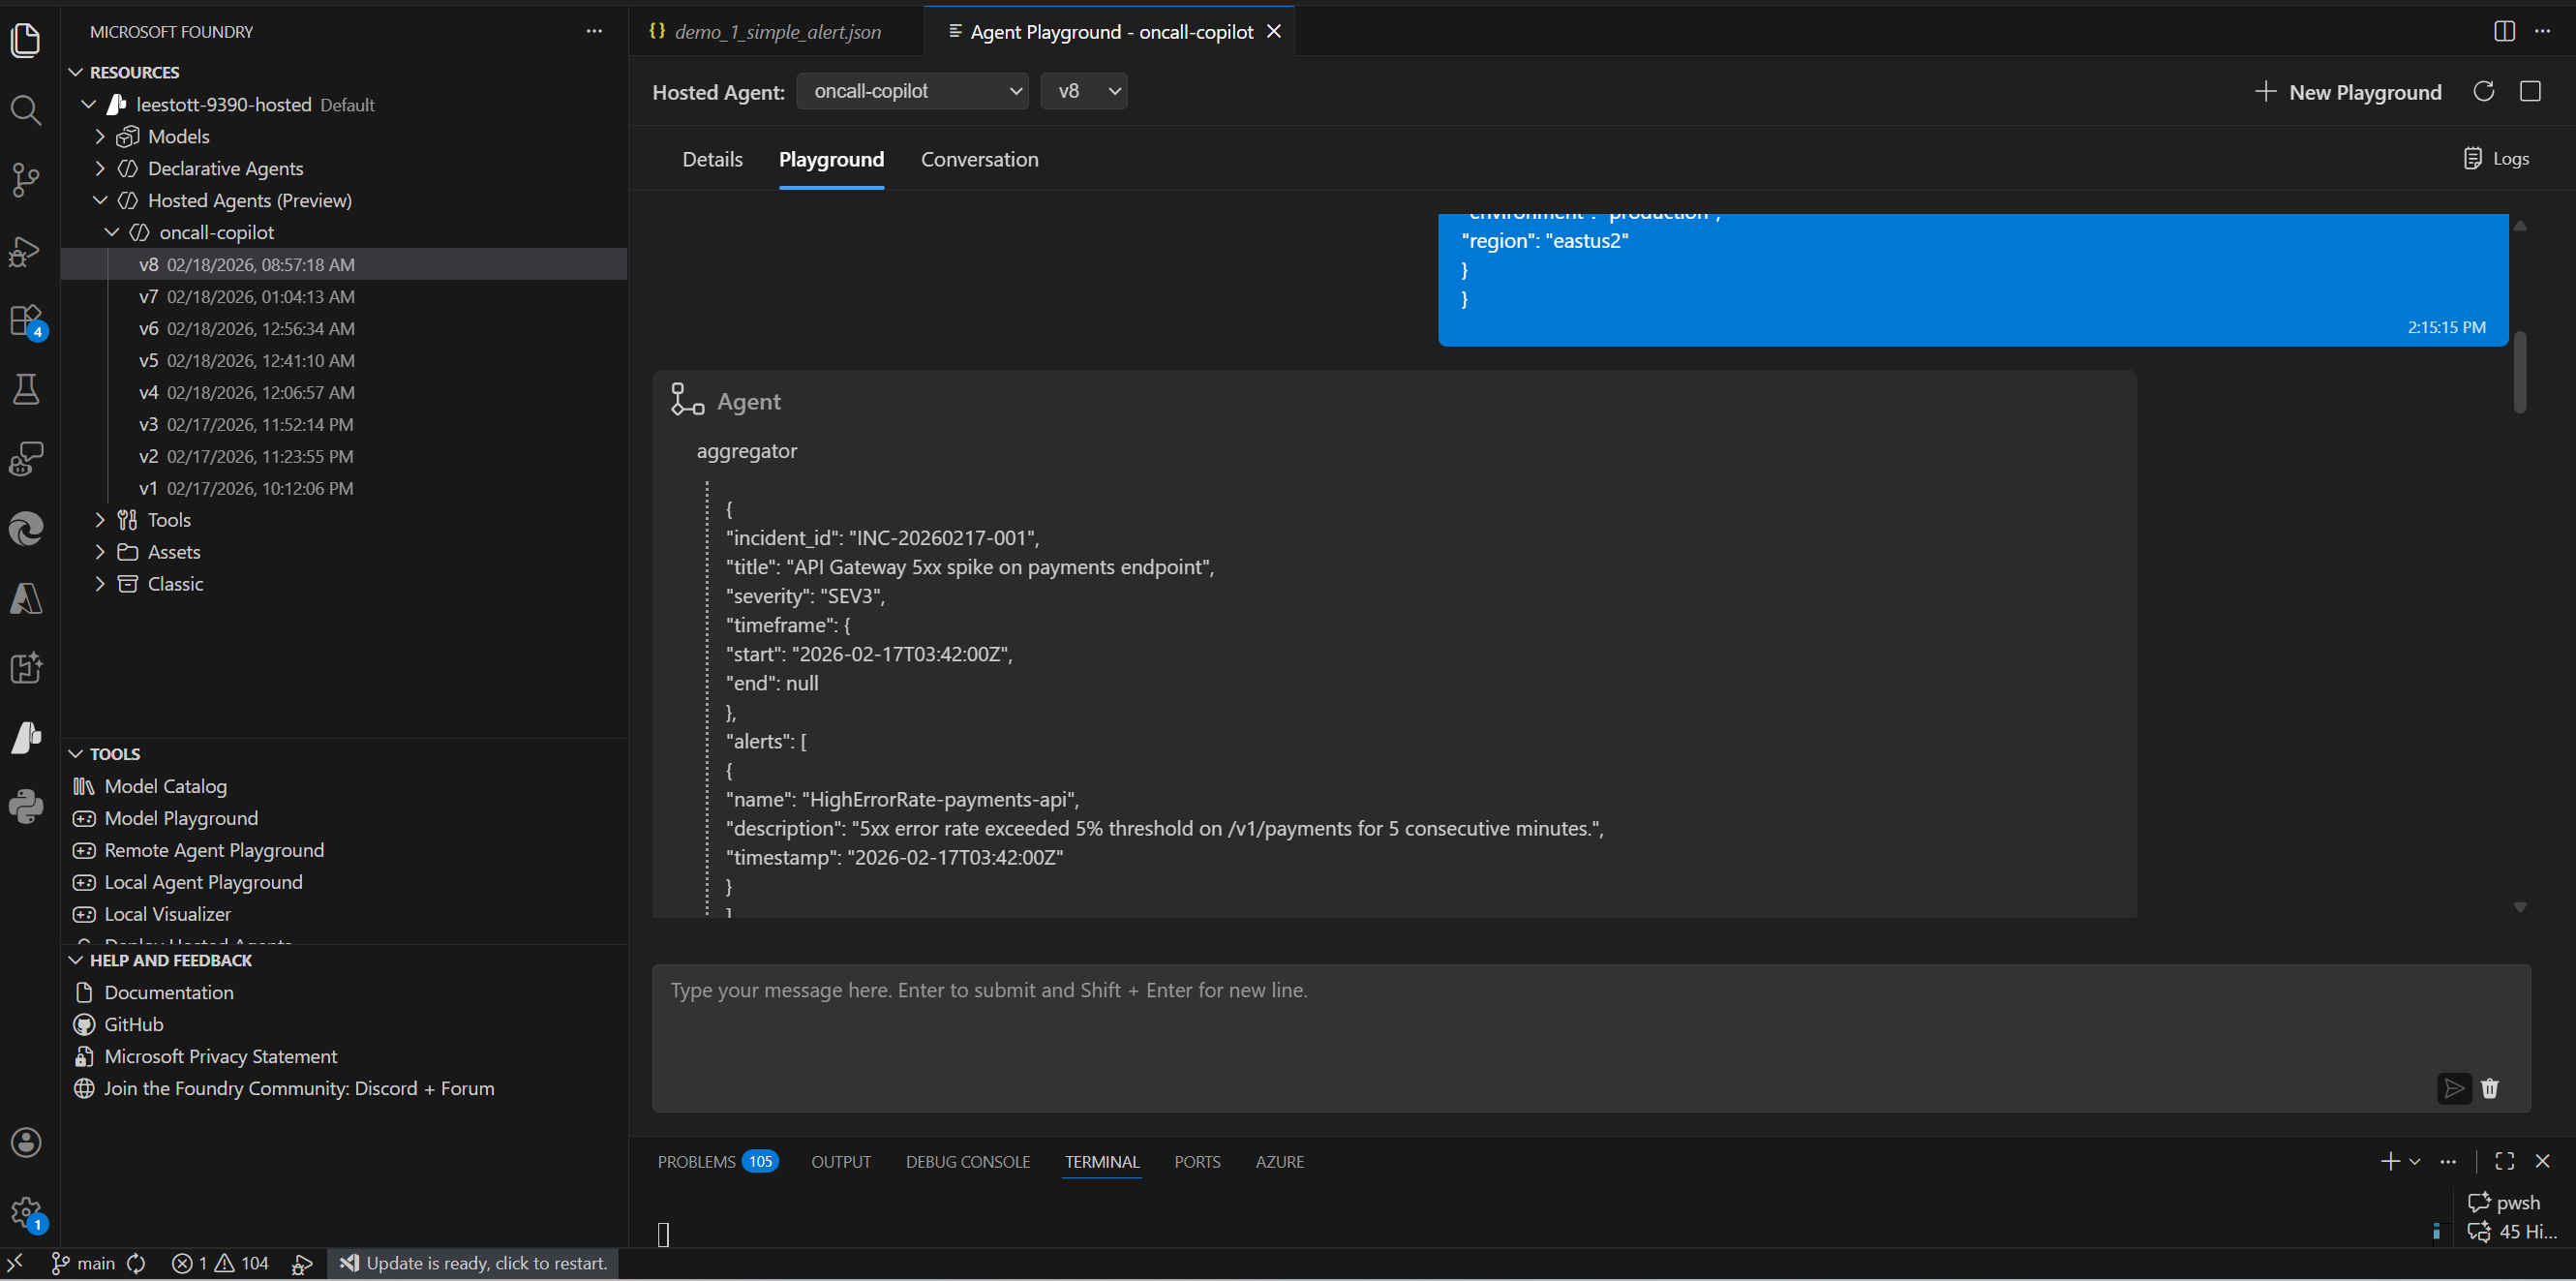
## 使用 Foundry Agent Playground (VS Code)
1. 安装 **Microsoft Foundry** 扩展(在扩展视图中搜索 "Microsoft Foundry" → 安装)
2. 打开命令面板 (`Ctrl+Shift+P`) → **Microsoft Foundry: Set Default Project**
3. 登录并选择你的订阅、资源组和 Foundry 项目
4. 打开任意 demo/scenario JSON 文件,复制内容并粘贴到 Foundry Agent Playground 聊天中
## UI 截图
## 环境变量
| 变量 | 必需 | 描述 |
|---|---|---|
| `AZURE_OPENAI_ENDPOINT` | 是 | Microsoft Model/ AI 服务端点 |
| `AZURE_OPENAI_API_KEY` | 否 | UI 服务器的可选 API 密钥;Agent Framework 服务器使用 Azure 身份 |
| `AZURE_OPENAI_CHAT_DEPLOYMENT_NAME` | 是 | Model Router 部署名称(例如 `model-router`) |
| `MODEL_ROUTER_DEPLOYMENT` | 是 | 脚本和遥测使用的 Model Router 部署名称 |
| `AZURE_AI_PROJECT_ENDPOINT` | 是 | 托管 Agent 的 Foundry 项目端点 |
| `AZURE_MODEL_PROJECT_ENDPOINT` | 是 | 包含 Model Router 部署的 Foundry 项目端点 |
| `AZURE_TENANT_ID` | 推荐 | 本地 CLI 辅助脚本使用的租户 |
| `AZURE_SUBSCRIPTION_ID` | 推荐 | 用于部署元数据的订阅 |
| `AGENT_NAME` | 否 | SDK 脚本的 Agent 名称(默认:`oncall-copilot`) |
| `AGENT_VERSION` | 否 | SDK 脚本的 Agent 版本(默认:`latest`) |
| `ACR_IMAGE` | 否 | `deploy_sdk.py` 使用的 ACR 镜像 URI |
| `MOCK_MODE` | 否 | 设置为 `true` 可在没有 Azure 的情况下进行模拟验证 |
| `LOG_LEVEL` | 否 | 日志级别(默认:`INFO`) |
## 仓库布局
```
On-Call-Copilot-Multi-Agent/
├── main.py # Agent Framework entrypoint (hosted agent)
├── agent.yaml # Hosted Agent definition
├── azure.yaml # azd configuration
├── Dockerfile # linux/amd64 container for Foundry
├── requirements.txt
├── .env.example # Environment variable template → copy to .env
├── app/
│ ├── agents/
│ │ ├── triage.py # Triage Agent instructions
│ │ ├── summary.py # Summary Agent instructions
│ │ ├── comms.py # Comms Agent instructions
│ │ └── pir.py # PIR Agent instructions
│ ├── main.py # FastAPI server (mock mode)
│ ├── mock_router.py # Mock model router for validation
│ ├── schemas.py # Input/output JSON schemas
│ └── telemetry.py # OpenTelemetry + structured logging
├── scripts/
│ ├── demos/ # 3 demo payloads
│ ├── scenarios/ # 5 incident scenarios
│ ├── golden_outputs/ # Expected outputs for schema validation
│ ├── validate.py # Schema validation (mock mode)
│ ├── deploy_sdk.py # Deploy agent via Python SDK
│ ├── invoke.py # Invoke deployed agent
│ ├── run_scenarios.py # Batch scenario runner
│ ├── verify_agent.py # Deployment health check
│ └── test_local.* # Local test scripts (http/sh/ps1)
├── ui/
│ ├── index.html # Browser UI
│ └── server.py # UI server (port 7860)
├── infra/
│ └── main.bicep # Azure infrastructure (Bicep)
└── docs/ # Architecture diagrams, screenshots, blog post
```
## 核心依赖
| 包 | 用途 |
|---|---|
| `agent-framework` | 核心 `Agent` 抽象与工作流集成 |
| `agent-framework-foundry-hosting` | 用于 Foundry 托管 Agent 协议托管的 `ResponsesHostServer` |
| `agent-framework-orchestrations` | 用于四个专家 Agent 的 `ConcurrentBuilder` 编排 |
| `agent-framework-foundry` | 与 Foundry Model Router 集成的 `FoundryChatClient` |
| `azure-identity` | 用于 Azure OpenAI bearer token 的 `DefaultAzureCredential` |
| `python-dotenv` | 在启动时自动加载 `.env` 文件 |
### 了解更多
- [Microsoft Agent Framework](https://learn.microsoft.com/agent-framework/)
- [Model Router](https://learn.microsoft.com/azure/ai-foundry/openai/how-to/model-router)
- [Hosted Agents](https://learn.microsoft.com/azure/ai-foundry/agents/concepts/hosted-agents)
## 可观测性
| 信号 | 实现 |
|---|---|
| **结构化日志** | 通过 Python `logging` 输出 JSON;每个请求记录 `correlation_id`、`incident_id`、`severity` |
| **关联 ID** | 每个请求的 UUID,位于 `X-Correlation-ID` 头和输出 `telemetry` 块中 |
| **OTel spans** | 包裹 `handle_responses`、`validate_input`、`call_model_router`、`validate_output` 的 spans |
| **OTLP 导出** | 设置 `OTEL_EXPORTER_OTLP_ENDPOINT` 以将追踪发送至 Jaeger / Azure Monitor |
## 防护栏
- **机密信息脱敏** — 在凭据模式到达模型之前,基于正则表达式进行清洗
- **避免幻觉** — 当数据不足时,系统提示会设置 `confidence: 0` 并填充 `missing_information`
- **仅限 JSON 输出** — `response_format: json_object` 配合 Schema 验证和回退机制
- **未知项标记** — 对于无法确定的字段使用字面量 `"UNKNOWN"`
## 故障排除
| 错误 | HTTP | 解决方案 |
|---|------|
| `SubscriptionIsNotRegistered` | 400 | 注册订阅提供程序 |
| `InvalidAcrPullCredentials` | 401 | 修复托管标识或注册表 RBAC |
| `UnauthorizedAcrPull` | 403 | 将 `Container Registry Repository Reader` 分配给项目标识 |
| `AcrImageNotFound` | 404 | 更正镜像名称/标签或将镜像推送到 ACR |
| `RegistryNotFound` | 400/404 | 修复注册表 DNS 或网络可达性 |
| 网关 400 "ID cannot be null" | 400 | 避免在提示词中使用 `"Title: CapName."` 模式 |
对于本地验证问题,请设置 `MOCK_MODE=true` 并运行 `python scripts/validate.py`。
## 贡献
有关开发环境设置、代码风格指南和 PR 检查清单,请参阅 [CONTRIBUTING.md](CONTRIBUTING.md)。
## 安全
有关安全策略以及如何报告漏洞,请参阅 [SECURITY.md](SECURITY.md)。
## 许可证
MIT — 详见 [LICENSE](LICENSE)。
CLI / curl / Foundry UI"] subgraph Foundry["Foundry Agent Service (Hosted Container)"] Orchestrator["Agent Framework workflow
(ResponsesHostServer)"] subgraph Concurrent["Concurrent execution - asyncio.gather()"] direction LR Triage["Triage Agent
suspected_root_causes
immediate_actions
missing_information
runbook_alignment"] Summary["Summary Agent
summary"] Comms["Comms Agent
comms
(Slack + stakeholder)"] PIR["PIR Agent
post_incident_report
(timeline, impact, prevention)"] end Merge["Merge JSON fragments
+ inject telemetry block"] end ModelRouter["Microsoft Foundry Model Router
(single deployment -
routes to best model
per request complexity)"] Client -->|"POST /responses (Responses input envelope)"| Orchestrator Orchestrator --> Concurrent Triage -->|JSON fragment| Merge Summary -->|JSON fragment| Merge Comms -->|JSON fragment| Merge PIR -->|JSON fragment| Merge Merge -->|"Structured JSON response"| Client Triage -->|Azure OpenAI API calls| ModelRouter ModelRouter -->|response| Triage Summary -->|Azure OpenAI API calls| ModelRouter ModelRouter -->|response| Summary Comms -->|Azure OpenAI API calls| ModelRouter ModelRouter -->|response| Comms PIR -->|Azure OpenAI API calls| ModelRouter ModelRouter -->|response| PIR style Foundry fill:#e8f4fd,stroke:#0078d4,stroke-width:2px style Concurrent fill:#f0f8e8,stroke:#107c10,stroke-width:1px,stroke-dasharray:5 5 style ModelRouter fill:#fff4e5,stroke:#f7630c,stroke-width:2px style Orchestrator fill:#dce9f5,stroke:#0078d4 style Merge fill:#dce9f5,stroke:#0078d4 ```  ### 请求流程 1. 通过 Responses API 协议(端口 8088)**接收请求** 2. 托管的 `WorkflowAgent` 接收用户消息 3. 使用来自 `app/agents/` 的专用指令创建四个专家 `Agent` 实例 4. `ConcurrentBuilder` 针对 Model Router 并发调用所有四个专家 5. 每个专家返回包含其输出键的 JSON 片段 6. 响应文本包含用于下游解析的专家 JSON 片段 ### 多 Agent 设计 | Agent | 职责 | 输出键 | |---|---|---| | **Triage** | 根因分析、紧急行动、缺失信息、runbook 匹配 | `suspected_root_causes`, `immediate_actions`, `missing_information`, `runbook_alignment` | | **Summary** | 简明的事件叙述 | `summary` | | **Comms** | Slack 更新、利益相关者简报 | `comms` | | **PIR** | 事后时间线、客户影响、预防措施 | `post_incident_report` | ### 为什么选择 Microsoft Foundry Model Router? Model Router 会根据复杂度自动将每个请求路由到最佳模型——你的代码中不需要模型选择逻辑: | 场景 | 复杂度 | 路由 | |---|---|---| | 简单的告警分拣 | 低 | 更快、更便宜的模型 | | 多信号关联 | 高 | 能力更强的模型 | | 事后综合分析 | 高 | 高能力模型 | ## 运行模式 ### 多 Agent 模式(默认) 使用具有四个并发 Agent 的 Agent Framework。需要 Azure 凭据。 ``` python main.py # http://localhost:8088 ``` ### 模拟模式(不需要 Azure 凭据) 使用带有预设输出的 FastAPI 服务器进行本地 Schema 验证: ``` # Windows PowerShell $env:MOCK_MODE="true"; python -m app.main # Linux / macOS MOCK_MODE=true python -m app.main ``` ### 验证所有场景(模拟模式) ``` python scripts/validate.py # all 5 scenarios python scripts/validate.py --scenario 2 # single scenario ``` ## 场景与演示 ### 演示负载 | # | 文件 | 描述 | |---|------|-------------| | 1 | `scripts/demos/demo_1_simple_alert.json` | 单个 5xx 告警 — 快速分拣 | | 2 | `scripts/demos/demo_2_multi_signal.json` | 3 个告警 + 日志 + 指标 — 多信号关联 | | 3 | `scripts/demos/demo_3_post_incident.json` | 已解决的 SEV1 TLS 证书过期 — 完整的 PIR 综合 | ### 场景负载 | # | 文件 | 严重性 | 描述 | |---|------|----------|-------------| | 1 | [scenario_1_redis_outage.json](scripts/scenarios/scenario_1_redis_outage.json) | SEV2 | Redis 缓存集群无响应 | | 2 | [scenario_2_aks_scaling.json](scripts/scenarios/scenario_2_aks_scaling.json) | SEV1 | Kubernetes 节点池扩容失败 | | 3 | [scenario_3_dns_cascade.json](scripts/scenarios/scenario_3_dns_cascade.json) | SEV1 | DNS 解析失败级联 | | 4 | [scenario_4_minimal_alert.json](scripts/scenarios/scenario_4_minimal_alert.json) | SEV4 | 预发环境的最小化 CPU 告警 | | 5 | [scenario_5_storage_throttle_pir.json](scripts/scenarios/scenario_5_storage_throttle_pir.json) | SEV2 | 存储限流 — 事后审查 | ### 针对已部署的 Agent 运行场景 ``` python scripts/invoke.py # default prompt python scripts/invoke.py --demo 1 # built-in demo python scripts/invoke.py --scenario 2 # built-in scenario python scripts/invoke.py --prompt "db connection pool exhausted" # custom prompt python scripts/run_scenarios.py # all scenarios python scripts/run_scenarios.py --list # list available python scripts/run_scenarios.py --scenario 3 # single scenario ``` ## API 契约 ### Responses 请求信封 Agent Framework 服务器接受 Responses 协议。将事件负载以文本形式放入 `content` 字段中。 ``` { "input": [ { "role": "user", "content": "{\"incident_id\":\"INC-20260217-001\",\"title\":\"API Gateway 5xx spike\",\"severity\":\"SEV1\"}" } ] } ``` ### 事件负载 ``` { "incident_id": "INC-20260217-001", "title": "API Gateway 5xx spike", "severity": "SEV1", "timeframe": { "start": "2026-02-17T03:42:00Z", "end": null }, "alerts": [ { "name": "HighErrorRate", "description": "...", "timestamp": "..." } ], "logs": [ { "source": "order-service", "lines": ["ERROR ...", "WARN ..."] } ], "metrics": [ { "name": "http_5xx_rate", "window": "5m", "values_summary": "..." } ], "runbook_excerpt": "Step 1: Check dashboard. Step 2: ...", "constraints": { "max_time_minutes": 15, "environment": "production", "region": "eastus2" } } ``` ### 输出 Schema ``` { "summary": { "what_happened": "...", "current_status": "..." }, "suspected_root_causes": [{ "hypothesis": "...", "evidence": [], "confidence": 0.0 }], "immediate_actions": [{ "step": "...", "owner_role": "...", "priority": "P0" }], "missing_information": [{ "question": "...", "why_it_matters": "..." }], "runbook_alignment": { "matched_steps": [], "gaps": [] }, "comms": { "slack_update": "...", "stakeholder_update": "..." }, "post_incident_report": { "timeline": [], "customer_impact": "...", "prevention_actions": [] }, "telemetry": { "correlation_id": "...", "model_router_deployment": "...", "selected_model_if_available": null, "tokens_if_available": null } } ``` ## 部署到 Microsoft Foundry ### 部署前提条件 - Azure CLI 2.80+ 和 Azure Developer CLI (`azd`) 1.23.0+ - Docker Desktop - 具有所需权限的 Microsoft Foundry 项目([详情](https://learn.microsoft.com/azure/ai-foundry/agents/how-to/deploy-hosted-agent?view=foundry&tabs=bash#prerequisites)) ### 选项 A:Azure Developer CLI(最快) ``` azd init -t https://github.com/Azure-Samples/azd-ai-starter-basic azd ai agent init -m agent.yaml azd up ``` 验证: ``` az cognitiveservices agent show \ --account-name
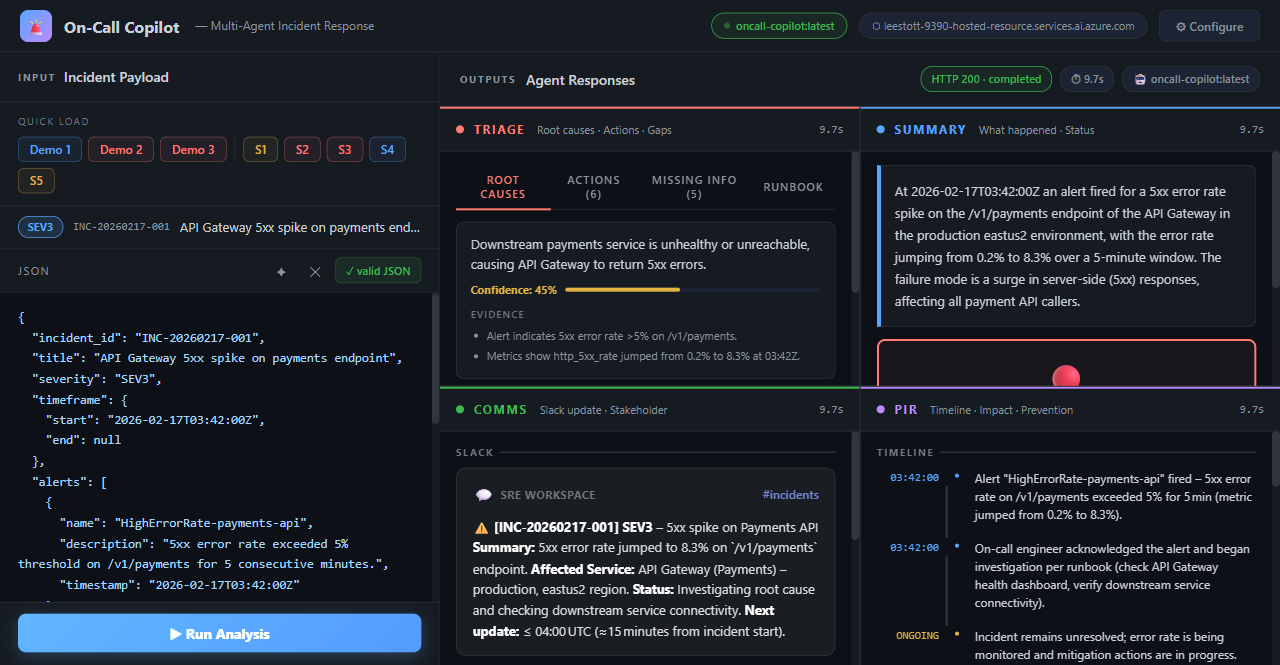
点击展开 UI 截图
### 空白状态 — 带有快速加载预设的事件输入面板  ### 快速加载预设 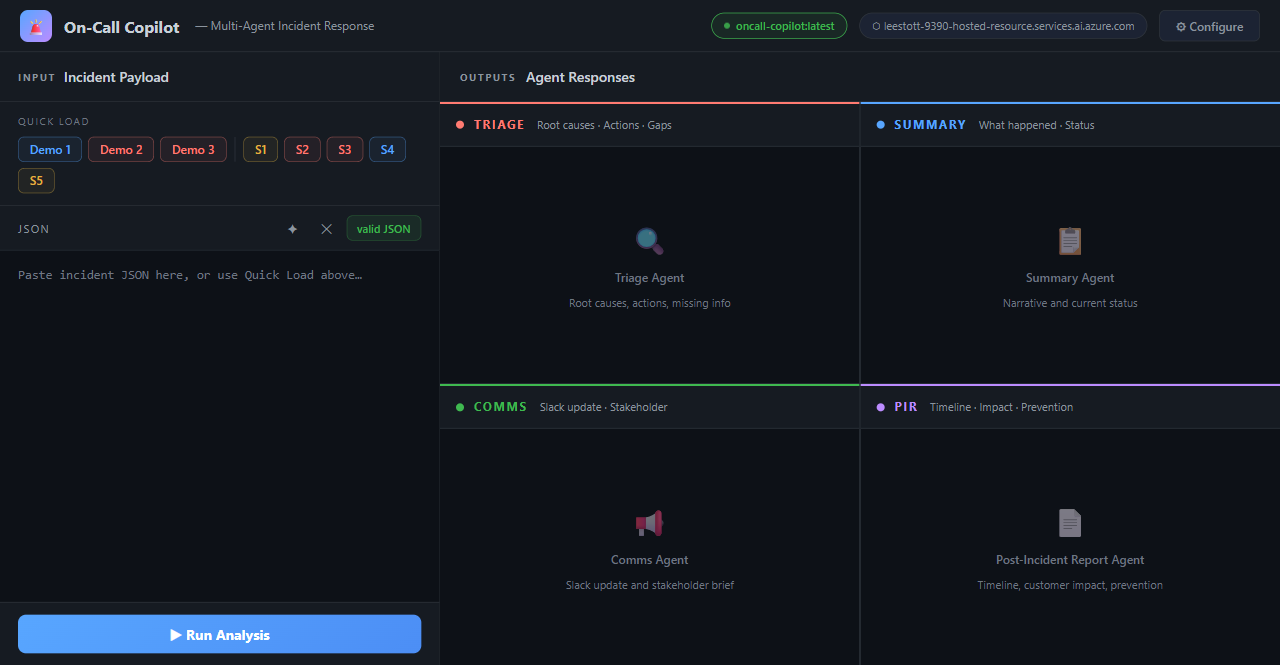 ### 事件已加载 — 带有严重性徽章的可编辑 JSON 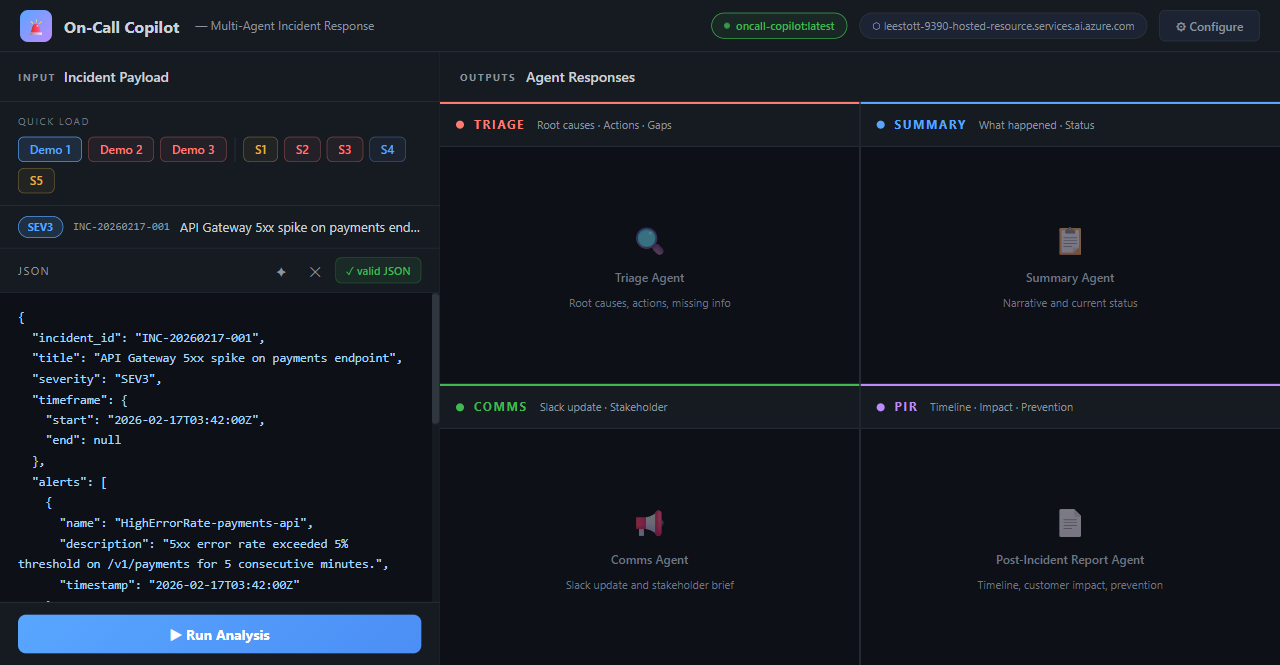 ### 完整结果 — 全部四个 Agent 面板  ### 分拣 — 带有置信度条的根因 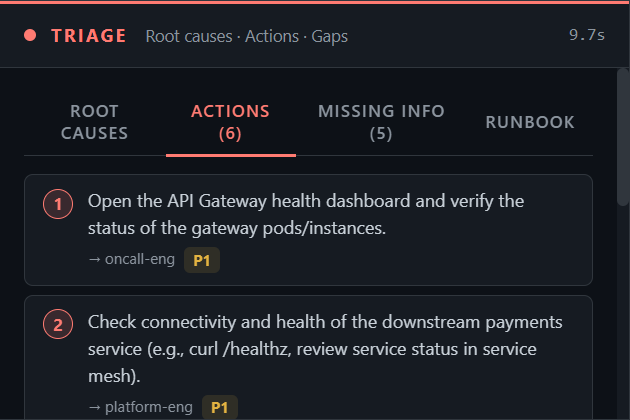 ### 分拣 — 紧急行动 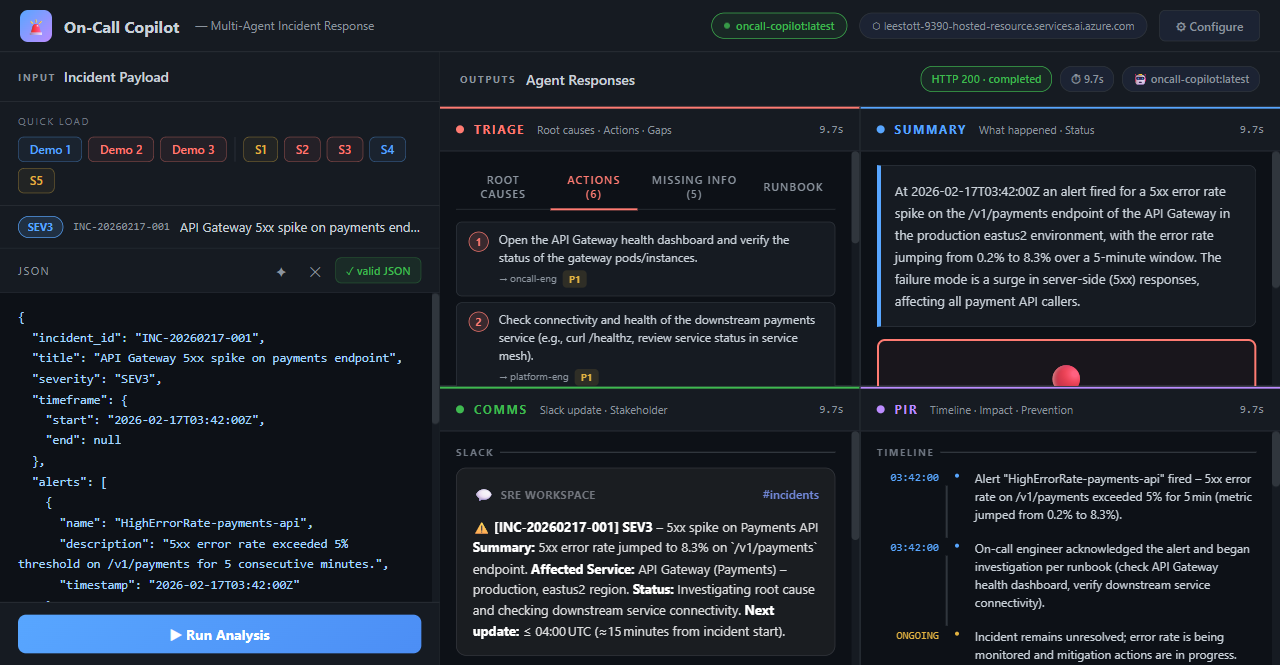 ### 摘要 — 叙述与状态 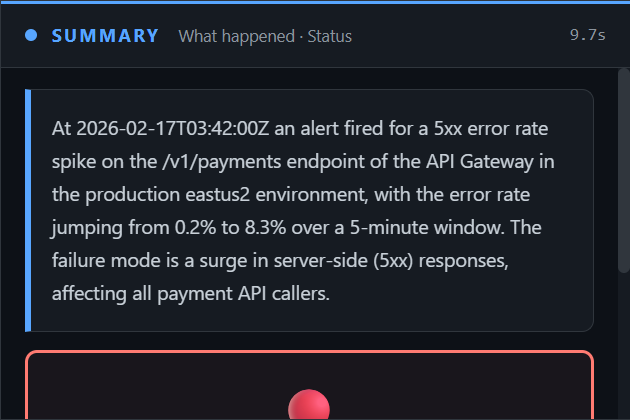 ### 沟通 — Slack 卡片与利益相关者更新 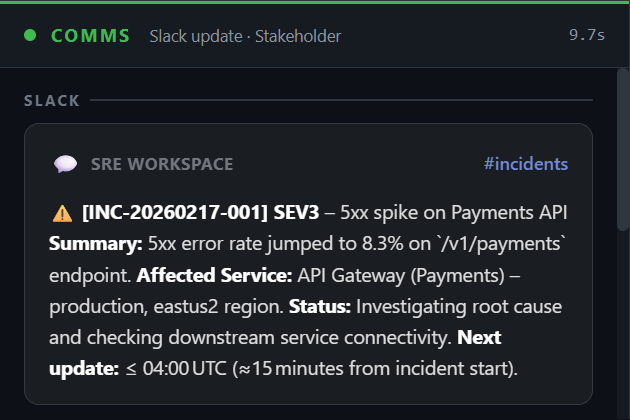 ### 事后报告 — 时间线与预防措施 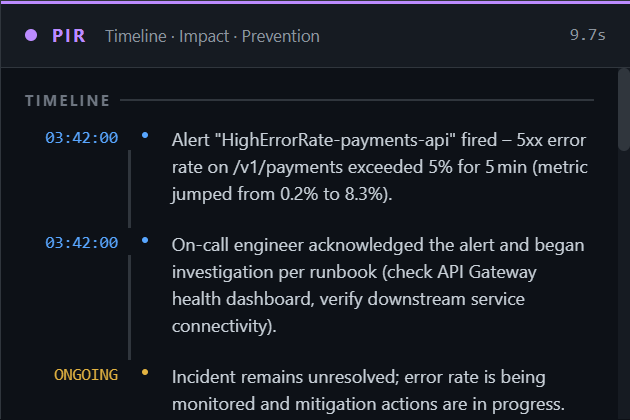 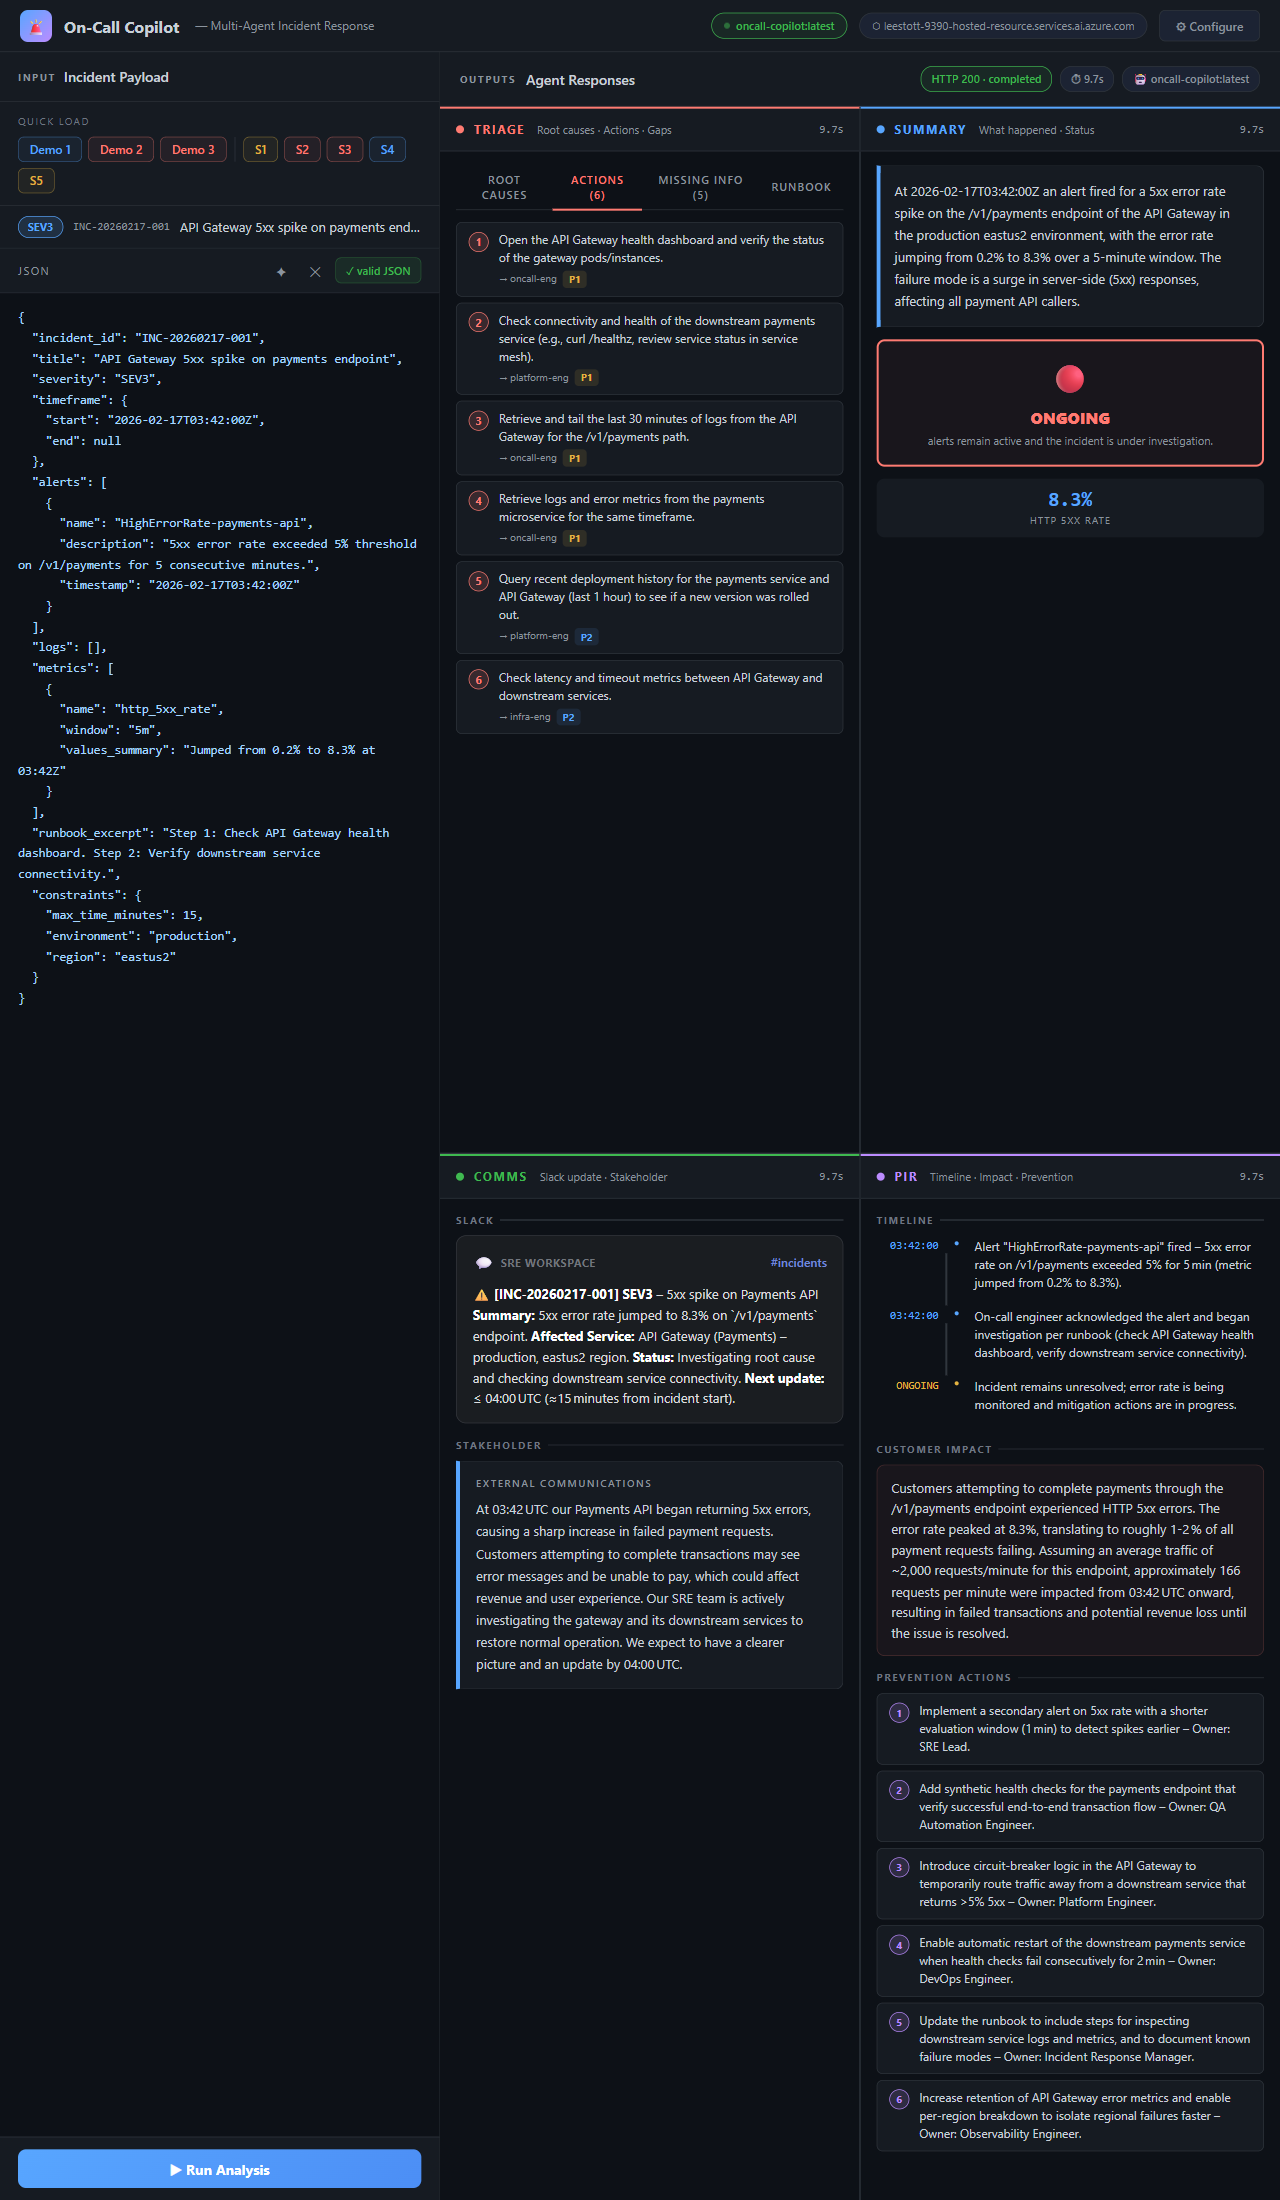标签:AIOps, AI智能体, Azure AI, Azure Foundry, DNS解析, Docker, Microsoft Agent Framework, Model Router, PIR, PyRIT, Python, Slack集成, SRE, 事后复盘, 人工智能, 偏差过滤, 告警分类, 多智能体系统, 安全防御评估, 开源项目, 微软Agent框架, 无后门, 根因分析, 用户代理, 用户模式Hook绕过, 自动化运维, 自动化通报, 请求拦截, 逆向工具