thecnical/aegis-devin
GitHub: thecnical/aegis-devin
一款 AI 驱动的全自主渗透测试平台,将完整攻击安全生命周期(侦察→漏洞→利用→取证→报告)统一到单一 CLI 中。
Stars: 2 | Forks: 0

```
░█████╗░███████╗░██████╗░██╗░██████╗ ██████╗░███████╗██╗░░░██╗██╗███╗░░██╗
██╔══██╗██╔════╝██╔════╝░██║██╔════╝ ██╔══██╗██╔════╝██║░░░██║██║████╗░██║
███████║█████╗░░██║░░██╗░██║╚█████╗░ ██║░░██║█████╗░░╚██╗░██╔╝██║██╔██╗██║
██╔══██║██╔══╝░░██║░░╚██╗██║░╚═══██╗ ██║░░██║██╔══╝░░░╚████╔╝░██║██║╚████║
██║░░██║███████╗╚██████╔╝██║██████╔╝ ██████╔╝███████╗░░╚██╔╝░░██║██║░╚███║
╚═╝░░╚═╝╚══════╝░╚═════╝░╚═╝╚═════╝ ╚═════╝░╚══════╝░░░╚═╝░░░╚═╝╚═╝░░╚══╝
```
### ⚔ Aegis-Devin — AI 自主渗透测试 + 网络取证平台 ⚔
[](https://python.org)
[](LICENSE)
[](https://github.com/thecnical/aegis-devin/actions)
[](https://github.com/thecnical/aegis-devin/releases)
[](https://kali.org)
[](https://pypi.org/project/aegis-devin/)
[](https://github.com/astral-sh/ruff)
[](https://mypy-lang.org)
[](https://github.com/PyCQA/bandit)
[](https://buymeacoffee.com/chandanpandit)
```
┌─────────────────────────────────────────────────────────────────────────┐
│ Aegis-Devin · AI Autonomous Pentest · Network Forensics · Free │
│ Recon → Vuln → Exploit → Post → Forensics → Report │
│ AI selects tools. AI reads output. AI decides next. AI writes report. │
│ 15+ Attack Modules · 10+ WAF Vendors · 100% Free & Open Source │
└─────────────────────────────────────────────────────────────────────────┘
```
```
# 全自主 AI 渗透测试 — 一条命令
aegis ai auto --target example.com --full --format html
# AI 驱动的网络取证 — 捕获 + 分析 + 报告
aegis forensics capture --interface eth0 --ai-analyze
# 针对内部网络的全自主红队
aegis forensics redteam --target 192.168.1.0/24 --full
```
## 资源
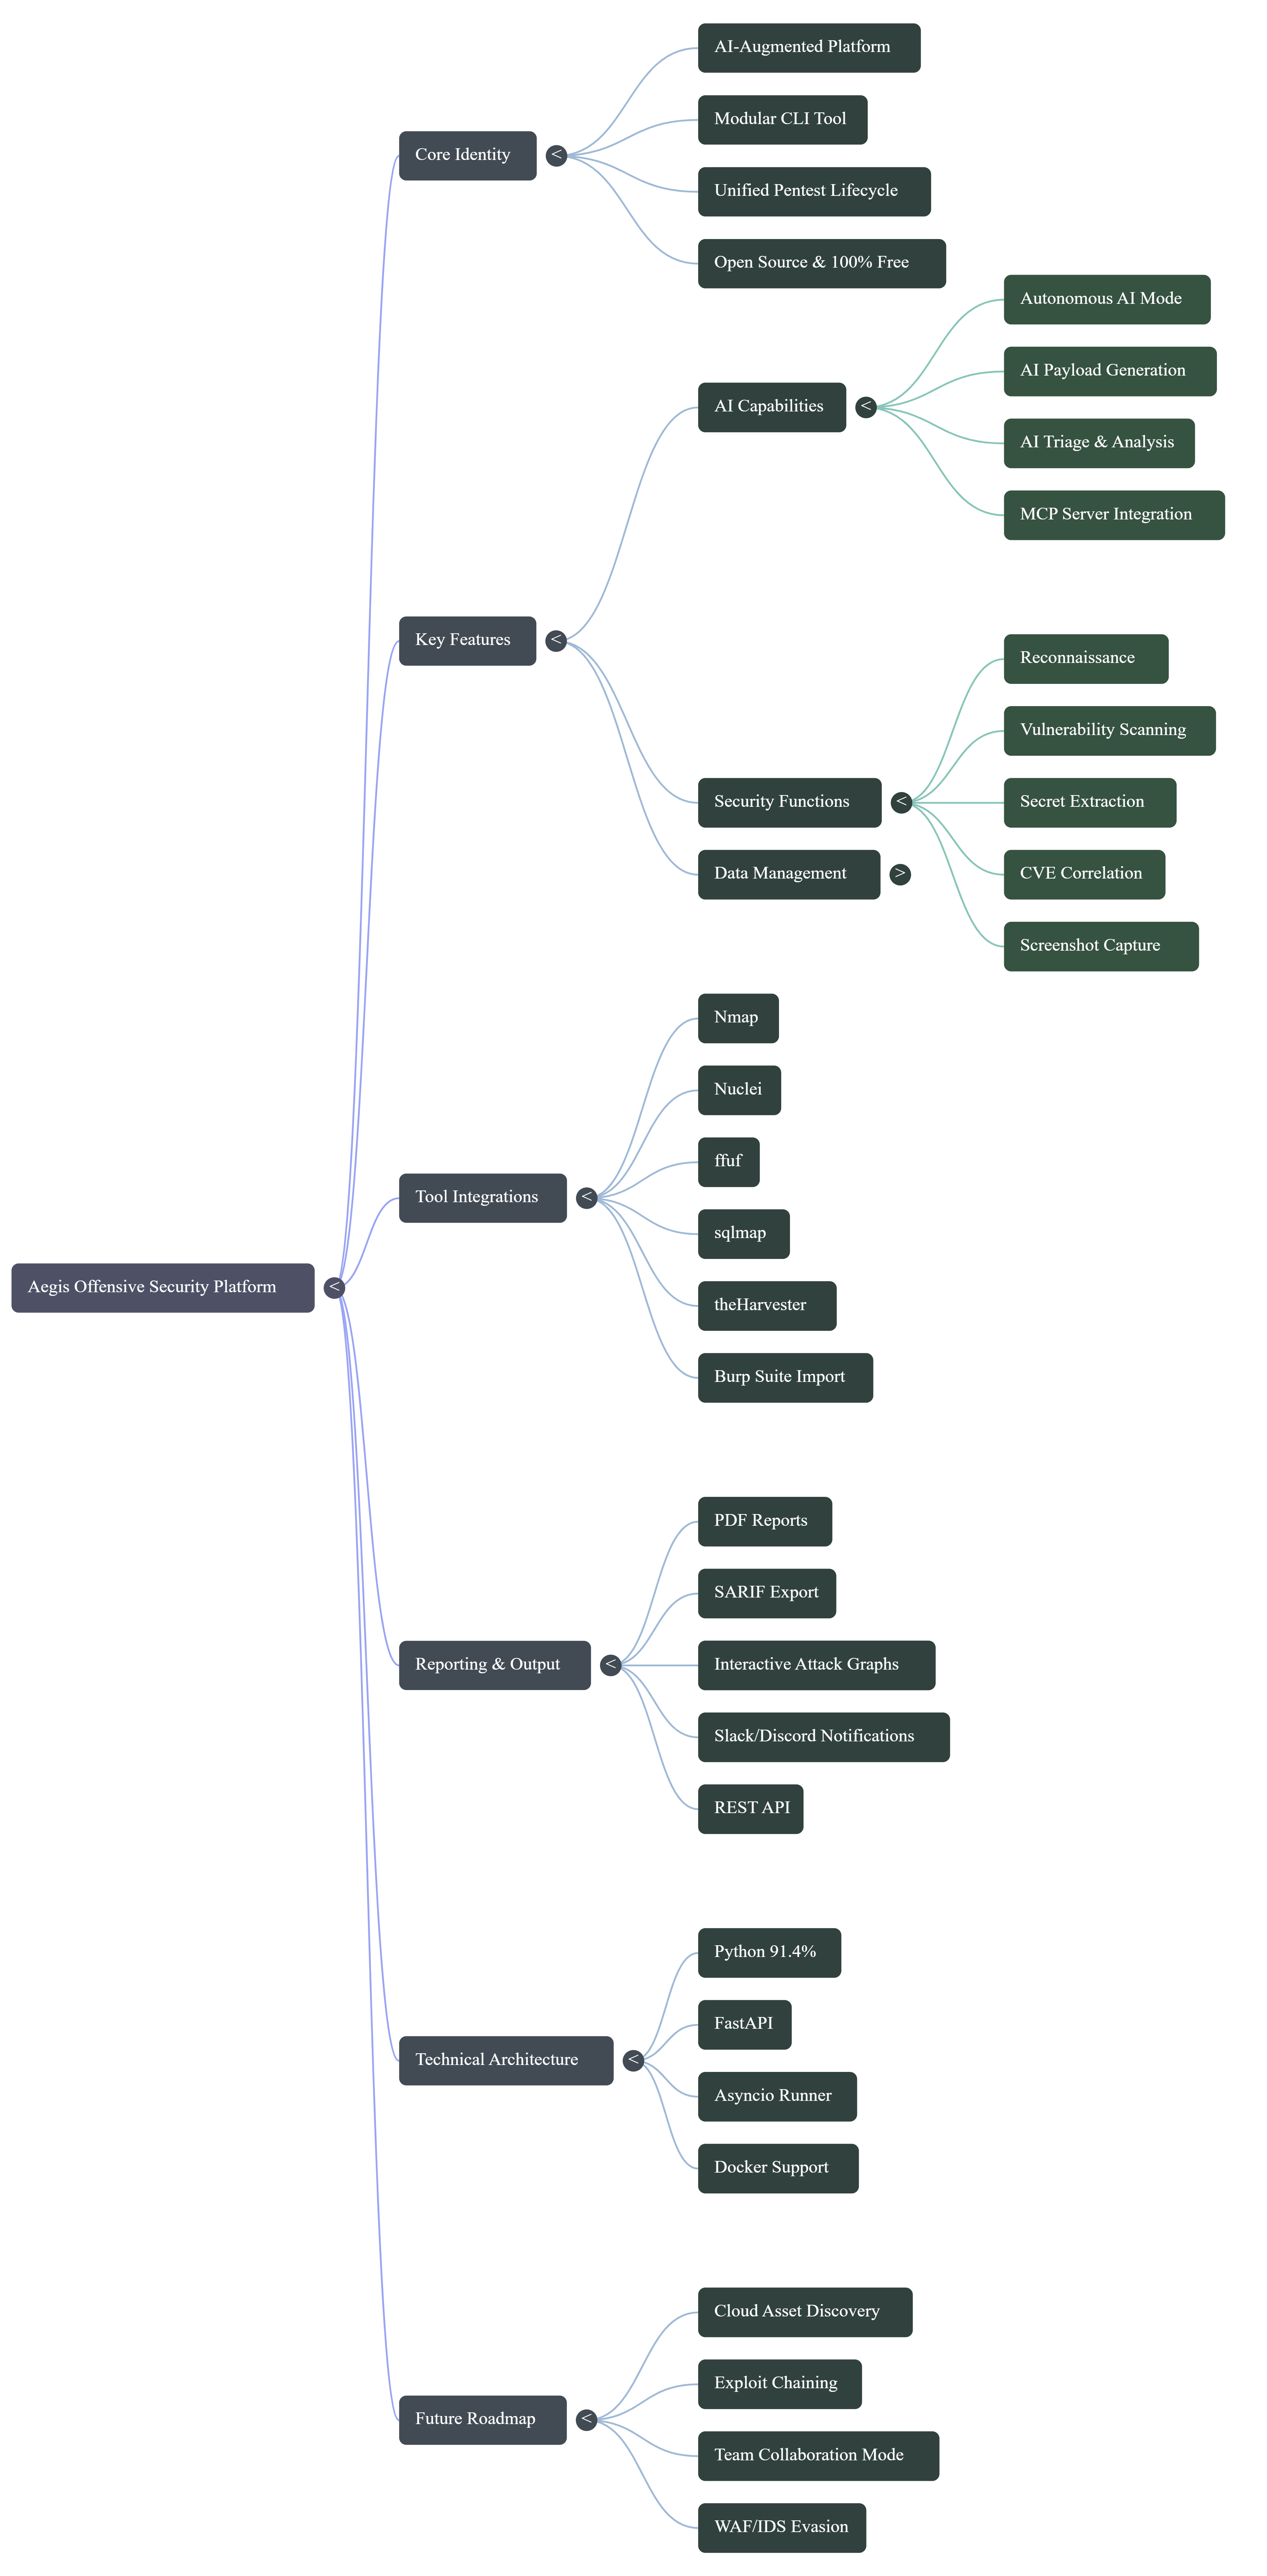
### 架构思维导图
### 演示文稿与白皮书
## 概述
**Aegis** 是一个模块化、AI 驱动的渗透测试平台,它将完整的攻击安全生命周期统一到了一个 CLI 工具中。Aegis 没有使用十几个输出格式互不兼容的独立工具,而是将它们(Nmap、Nuclei、ffuf、sqlmap、theHarvester、subfinder 等)全部封装在一个统一的接口之后,并由共享的 SQLite 数据库、工作空间隔离和 AI 编排提供支持。
来自每个工具的每个发现都会存入同一个数据库。每次扫描都在一个命名的工作空间内运行。每个结果都可以导出为 PDF 报告、用于 GitHub 代码扫描的 SARIF 文件,或用于 CI/CD pipeline 的 JSON 数据流。
```
# 全自主渗透测试 — 侦察、漏洞扫描、AI 分类、报告
aegis ai auto --target example.com --format html
```
### 适用人群?
| 受众 | 使用场景 |
|---|---|
| 渗透测试人员 | 统一的工作流 — 不再有散乱的终端窗口 |
| 漏洞赏金猎人 | 快速的从侦察到报告的 pipeline |
| 红队 | 跨多个目标的并行活动 |
| 安全工程师 | 集成到 CI/CD 中的漏洞扫描 |
| CTF 选手 | AI 辅助的攻击面分析 |
## 功能
| 功能 | 描述 |
|---|---|
| **自主 AI 模式** | 真正的代理循环:nmap → 解析服务 → AI 选择工具 → 运行 → 解析 → AI 下一步行动 |
| **AI Payload 执行** | 生成并实际发送 SQLi/XSS/LFI/SSRF payload,检查响应以进行确认 |
| **HTTP 证据捕获** | 每个 nuclei 发现都存储完整的 HTTP 请求 + 响应状态 + body 片段 |
| **WAF 检测** | 在利用之前检测 10 多家 WAF 供应商(Cloudflare、AWS WAF、Akamai、ModSecurity 等) |
| **Hydra 暴力破解** | 通过 Hydra 针对 SSH、FTP、MySQL、RDP、SMB、HTTP 进行真实的凭证测试 |
| **认证扫描** | 将 `--cookies` 和 `--header` 传递给 nuclei 和 feroxbuster 以进行登录后扫描 |
| **Metasploit 集成** | 自动将 Nuclei 发现映射到 MSF 模块,通过 resource 脚本或 RPC API 运行 |
| **HTTP 请求走私** | 基于原始 socket 的 CL.TE、TE.CL、TE.TE 检测,结合时间和内容分析 |
| **云资产发现** | 通过排列组合 + DNS 检测查找暴露的 S3、Azure Blob、GCP Storage 存储桶 |
| **Active Directory 枚举** | BloodHound、ldapdomaindump、CrackMapExec、匿名 rpcclient 枚举 |
| **OOB SSRF/XXE 检测** | 基于 interactsh 的 DNS/HTTP 回调检测,用于盲 SSRF 和 XXE |
| **机密提取** | `trufflehog` 扫描 JS 文件、git 仓库和本地路径,查找暴露的凭证 |
| **屏幕截图捕获** | `gowitness` 自动对所有发现的 Web 服务进行截图;HTML 报告中包含图像 |
| **攻击路径图** | HTML 报告中包含交互式 D3.js 力导向图 |
| **MCP Server** | 将 Aegis 作为 MCP 工具服务器公开 — Claude、Cursor 可以驱动完整的渗透测试 |
| **Burp Suite 导入** | XXE 安全的 XML 解析,base64 解码,发现与完整的 HTTP 证据一起存储 |
| **CVE 关联** | 查询 NVD API v2,为每个发现存储 CVSS v3.1 分数和向量 |
| **SARIF 导出** | SARIF v2.1.0,包含规则 ID、OWASP URI、GitHub 安全严重性分数 |
| **并行活动** | 基于 `asyncio` 的运行器 — 每个目标都有自己的会话,结果聚合 |
| **PostgreSQL 支持** | 使用 `db_path: postgresql://...` 进行团队/并发使用 |
| **工作空间隔离** | 每次任务都有自己独立的 SQLite 数据库 — 任务间零数据泄露 |
| **范围强制执行** | 在运行任何工具之前,根据范围检查每个目标 |
| **100% 免费** | 不需要付费 API — 所有工具均为开源 |
## 战略愿景
Aegis 建立在自主策略和模块化集成的基础之上。以下思维导图全面概述了该平台的核心身份、关键功能和未来发展方向。
## 文档和战略资源
通过我们专门的安全白皮书和执行演示文稿,探索 Aegis 的理论和战术基础。
| **自主安全白皮书** | **执行战略演示文稿** |
|:---:|:---:|
| [](Aegis_Autonomous_Security.pdf) | [](Aegis_Autonomous_Security.pptx) |
| [📄 下载 PDF](Aegis_Autonomous_Security.pdf) | [📊 下载 PPTX](Aegis_Autonomous_Security.pptx) |
## 架构
```
┌──────────────────────────────────────────────────────────────────┐
│ CLI Layer (Click — main.py) │
│ recon · vuln · exploit · ai · burp · cve · campaign · report │
├──────────────────────────────────────────────────────────────────┤
│ Core Layer (aegis/core/) │
│ AIOrchestrator · CampaignRunner · BurpImporter │
│ CVECorrelator · SARIFExporter · TemplateManager · Notifier │
├──────────────────────────────────────────────────────────────────┤
│ Tools Layer (aegis/tools/) │
│ recon/ · vuln/ · exploit/ · post/ · report/ │
│ Each module is a Click command that writes findings to the DB │
├──────────────────────────────────────────────────────────────────┤
│ Storage Layer (SQLite per workspace) │
│ targets · hosts · ports · findings · evidence │
│ cve_correlations · scan_sessions · scope · api_tokens │
└──────────────────────────────────────────────────────────────────┘
```
**数据流:** 工具运行 → 输出解析 → `db.add_finding()` → AI 甄别 → 生成报告 → 导出 SARIF → 通知 CI/CD。
## 安装
### 选项 1 — 一键安装程序(推荐)
安装所有内容:apt 包、Go、Rust、subfinder、nuclei、trufflehog、gowitness、amass、feroxbuster、webtech 以及 Aegis 本身。
```
git clone https://github.com/thecnical/aegis-devin.git
cd aegis
sudo bash install.sh
```
预览而不做任何更改:
```
sudo bash install.sh --dry-run
```
如果 Aegis 已经安装,请使用内置的 bootstrap 命令:
```
sudo aegis bootstrap --yes
# 如果不需要,跳过 Rust/feroxbuster
sudo aegis bootstrap --yes --skip-rust
# 仅预览
aegis bootstrap --dry-run
```
安装后,打开一个新的终端:
```
aegis doctor # verify all tools are found
aegis configure-keys --interactive # set your free API keys (no YAML editing needed)
aegis ai auto --target example.com # run your first pentest
```
## v2.1.0 的新功能
### 已修复的 Bug
- **`Config not found: config/config.yaml`** — Aegis 现在使用 `AEGIS_PROJECT_DIR`(由包装脚本和 `__main__.py` 注入)解析其配置。从任何目录(`~`、`/tmp` 或任何位置)运行 `aegis` 都能正确找到配置。
- **`aegis doctor` 中的 `0 found, 0 missing`** — 是由于未加载配置引起的。已通过上述路径解析修复。
- **日志目录创建** — `data/logs/` 现在在首次运行时自动创建;如果缺失则不再崩溃。
- **Config not found 刷屏** — 该警告现在每个会话仅打印一次,而不是每次调用 `get()` 时都打印。
### 新命令
| 命令 | 作用 |
|---|---|
| `aegis configure-keys --interactive` | 交互式设置 API 密钥 — 无需手动编辑 YAML |
| `aegis configure-keys --openrouter KEY` | 非交互式设置特定密钥(适用于 CI) |
| `aegis self-update` | 从 git 拉取最新代码(或通过 pip 升级)+ 更新 nuclei 模板 |
| `aegis self-update --dry-run` | 预览将要更新的内容 |
| `aegis uni --yes` | **彻底**从系统中删除 Aegis、所有 Go/Cargo/pip 工具以及包装脚本 |
| `aegis uni --dry-run` | 预览将要删除的所有内容 |
### 改进
- `install.sh` 包装脚本现在注入了 `AEGIS_PROJECT_DIR` 和 `PATH`(Go/Cargo bins),因此打开新终端后可以立即找到所有工具
- `aegis uninstall` 现在还会删除 `/usr/local/bin/aegis` 和 `/usr/local/bin/aegis-mcp` 包装脚本
- 首次运行提示仅显示一次(存储在配置的 `ux.first_run_hint_shown` 下)
### 选项 2 — 手动安装 (Kali Linux)
**1. 系统依赖**
```
sudo apt update
sudo apt install -y python3-pip python3-venv git \
libpango-1.0-0 libpangoft2-1.0-0 libpangocairo-1.0-0 \
libcairo2 libffi-dev libgdk-pixbuf-2.0-0
```
**2. 克隆并创建虚拟环境**
```
git clone https://github.com/thecnical/aegis-devin.git
cd aegis
python3 -m venv .venv
source .venv/bin/activate
```
**3. 安装 Aegis**
```
pip install -e .
```
**4. 创建目录并验证**
```
mkdir -p data/logs
aegis doctor
```
**5. 安装外部工具**
```
aegis install-tools --yes
```
### 选项 3 — PyPI
```
pip install aegis-devin
pip install "aegis-devin[mcp]" # include MCP server support
pip install -e ".[dev]" # development dependencies
```
## 快速开始
```
# 1. 将目标添加到 scope
aegis scope add example.com --kind domain
# 2. 运行侦察
aegis recon domain example.com
# 3. 扫描漏洞
aegis vuln web https://example.com
# 4. 生成报告
aegis report generate example.com --format html
# 5. 或者通过一条命令完成上述所有操作
aegis ai auto --target example.com --format html --full
```
### 无需编辑 YAML 即可设置 API 密钥
```
# 交互模式(提示输入每个密钥)
aegis configure-keys --interactive
# 或者直接设置单个密钥
aegis configure-keys --openrouter sk-or-... --bytez btz-...
# 验证 AI 是否就绪
aegis ai doctor
```
所有提供商都有完全免费的层级 — 无需信用卡:
| 服务 | URL | 用途 |
|---|---|---|
| OpenRouter | https://openrouter.ai/keys | AI 甄别、报告、自动模式 |
| Bytez | https://bytez.com | AI 甄别、报告、自动模式 |
| Shodan | https://shodan.io | OSINT 侦察 |
| NVD | https://nvd.nist.gov/developers | CVE 关联 |
## 完整使用指南
### Hydra 暴力破解(真实凭证测试)
```
# 使用默认凭据测试 SSH(需要 --force 绕过 safe_mode)
aegis vuln net 192.168.1.1 --service ssh --force
# 一次性测试所有服务
aegis vuln net 192.168.1.1 --service all --force
# 使用自定义字典
aegis vuln net 192.168.1.1 --service ssh \
--userlist /usr/share/wordlists/users.txt \
--passlist /usr/share/wordlists/rockyou.txt --force
# 仅检测 WAF(无暴力破解)
aegis vuln net 192.168.1.1 --no-brute --url http://192.168.1.1
```
### HTTP 证据捕获(每个发现都有证据)
```
# Web 扫描 — 为每个发现捕获完整的 HTTP 请求/响应
aegis vuln web https://example.com
# 认证扫描 — 传入 session cookie
aegis vuln web https://example.com --cookies "session=abc123; csrf=xyz"
# 使用自定义认证头(Bearer token、API key 等)
aegis vuln web https://example.com --header "Authorization: Bearer eyJ..."
# 针对特定漏洞类型
aegis vuln web https://example.com --tags "cve,sqli,xss"
```
### WAF 检测
```
# 在运行任何 exploit 之前检测 WAF
aegis vuln net 192.168.1.1 --no-brute --no-smb --url https://example.com
# 在 ai auto 模式下自动运行 WAF 检测
aegis ai auto --target example.com
# 如果检测到 WAF,使用 stealth profile 以减少噪音
aegis --profile stealth vuln web https://example.com
```
### PostgreSQL(团队/并发使用)
```
# 安装 driver
pip install psycopg2-binary
# 创建数据库
createdb aegis
psql aegis -c "CREATE USER aegis WITH PASSWORD 'yourpassword';"
psql aegis -c "GRANT ALL ON DATABASE aegis TO aegis;"
# 更新 config/config.yaml:
# db_path: "postgresql://aegis:yourpassword@localhost:5432/aegis"
```
### 认证扫描(登录后)
```
# 手动登录,获取你的 session cookie,然后扫描
aegis vuln web https://app.example.com/dashboard \
--cookies "sessionid=abc123def456" \
--header "X-CSRF-Token: token123"
# 使用 Bearer token 进行 API 扫描
aegis vuln web https://api.example.com \
--header "Authorization: Bearer eyJhbGciOiJIUzI1NiJ9..." \
--tags "api,auth"
```
### 完全自主渗透测试(端到端)
```
# 1. 设置工作区和 scope
aegis workspace create client-acme
aegis workspace switch client-acme
aegis scope add acme.com --kind domain
aegis scope add 10.10.0.0/24 --kind cidr
# 2. 运行全自主渗透测试
aegis ai auto --target acme.com --full --format html
# 3. 分类与关联
aegis ai triage --session 1
aegis cve correlate --session 1
# 4. 导出用于 CI/CD
aegis sarif export --session 1 --output results.sarif
```
### 可恢复的授权 Web 工作流(阶段 2-7)
```
# 安全的默认编排:discovery -> fingerprint -> mapping -> checks -> validation -> report prep
aegis web-assess --target https://example.com
# 恢复中断的运行
aegis web-assess --target https://example.com --resume-run-id
# CI 模式(确定性排序 + 严格的退出语义)
aegis web-assess --target https://example.com --ci --require-cross-validation
# 显式启用危险探测(仅限自愿开启)
aegis web-assess --target https://example.com --dangerous-checks
```
企业控制:
```
# 创建哈希 API token(仅显示一次)
aegis token create --description "ci-runner"
# 查看审计事件
aegis audit list --limit 50
```
### 凭证收集(后渗透)
```
# 列出 SMB 共享
aegis post creds --target 192.168.1.10
# 深度扫描 — 下载并扫描文件以查找密码/token
aegis post creds --target 192.168.1.10 --deep
```
### 枢纽分析(内部网络)
```
# 通过被攻陷的主机使用 SOCKS5 代理
aegis post pivoting 10.0.0.0/24 --ssh user@192.168.1.10
# 通过代理扫描内部网络
aegis post pivoting 10.0.0.0/24 --ssh user@192.168.1.10 --scan
# 端口转发:通过本地端口 3390 访问内部 RDP
aegis post pivoting 10.0.0.0/24 --ssh user@192.168.1.10 \
--forward 3390:10.0.0.5:3389
```
### Metasploit 集成
```
# 自动将目标的所有发现匹配到 MSF 模块
aegis exploit msf 192.168.1.1 --force
# 运行特定的 MSF 模块(仅检查 — 不进行 exploitation)
aegis exploit msf 192.168.1.1 --module exploit/windows/smb/ms17_010_eternalblue \
--check --force
# 从特定的 finding ID 运行
aegis exploit msf 192.168.1.1 --finding-id 42 --lhost 10.10.10.1 --force
# 使用 Metasploit RPC API(需要:msfrpcd -P yourpassword -S -f)
aegis exploit msf 192.168.1.1 --rpc-host 127.0.0.1 --rpc-pass yourpassword --force
```
### HTTP 请求走私
```
# 测试 CL.TE, TE.CL, TE.TE desync 漏洞
aegis vuln smuggling https://example.com
# 测试特定路径
aegis vuln smuggling https://example.com --path /api/v1/users
# 调整超时时间(越长 = 越敏感的计时检测)
aegis vuln smuggling https://example.com --timeout 20
```
### 云资产发现
```
# 发现暴露的 S3、Azure Blob、GCP Storage bucket
aegis recon cloud example.com
# 跳过特定 provider
aegis recon cloud example.com --no-azure --no-gcp
# 使用自定义 bucket 名称字典
aegis recon cloud example.com --wordlist /path/to/buckets.txt
```
### Active Directory 枚举
```
# 匿名枚举(无需凭据)
aegis recon ad 192.168.1.10 --domain corp.local
# 使用凭据进行完整枚举
aegis recon ad 192.168.1.10 --domain corp.local \
--username administrator --password Password123
# BloodHound 收集完成后,导入 BloodHound GUI:
# bloodhound → Upload Data → 从 data/ad/bloodhound/ 选择 zip
# 运行查询:"Find Shortest Paths to Domain Admins"
```
### OOB SSRF/XXE 检测
```
# 使用 interactsh 自动检测
# 安装:go install github.com/projectdiscovery/interactsh/cmd/interactsh-client@latest
aegis exploit oob https://example.com --force
# 使用自定义回调域名(Burp Collaborator 等)
aegis exploit oob https://example.com --callback your.burpcollaborator.net --force
# 同时测试 XXE(向 endpoint 发送 XML payload)
aegis exploit oob https://example.com --test-xxe --force
# 等待异步回调的时间更长
aegis exploit oob https://example.com --wait 30 --force
```
## 配置
所有设置都位于 `config/config.yaml` 中。Aegis 从不读取环境变量中的密钥。
```
general:
db_path: data/aegis.db
safe_mode: true # abort if target is out of scope
wordlists_path: data/wordlists
api_keys:
shodan: CHANGE_ME # https://shodan.io (free tier available)
openrouter: CHANGE_ME # https://openrouter.ai (free tier available)
bytez: CHANGE_ME # https://bytez.com (free tier available)
nvd: CHANGE_ME # https://nvd.nist.gov/developers/request-an-api-key (free)
notifications:
slack_webhook: ""
discord_webhook: ""
profiles:
default:
timeout: 30
nmap_args: "-sC -sV"
nuclei_rate: 150
web-fast:
timeout: 12
nmap_args: "-sS -Pn"
nuclei_rate: 350
web-deep:
timeout: 90
nmap_args: "-sC -sV -A -O --script=vuln"
nuclei_rate: 80
api-deep:
timeout: 75
nmap_args: "-sV -Pn"
nuclei_rate: 120
stealth:
timeout: 120
nmap_args: "-sS -T2 --randomize-hosts"
nuclei_rate: 20
deep:
timeout: 90
nmap_args: "-sC -sV -A -O --script=vuln"
nuclei_rate: 50
```
使用 `--profile web-deep`(新增)或像 `stealth` 这样的旧版配置文件进行切换。
对于首次引导式配置,请运行 `aegis setup --wizard`。
所有 API 密钥都有免费层级 — 无需付费订阅。
**全局 CLI 标志:**
| 标志 | 默认值 | 描述 |
|---|---|---|
| `--config PATH` | `config/config.yaml` | 配置文件路径 |
| `--profile NAME` | `default` | 扫描配置文件 |
| `--workspace NAME` | 活动工作空间 | 覆盖活动工作空间 |
| `--json` | off | 输出为 JSON |
| `--json-output FILE` | — | 将 JSON 写入文件 |
| `--debug` | off | 启用调试日志记录 |
## 工作空间
每次任务都有自己独立的 SQLite 数据库。工作空间之间没有共享状态。
```
aegis workspace create client-acme # create a new workspace
aegis workspace switch client-acme # switch to it
aegis workspace list # list all workspaces
aegis workspace delete old-engagement # remove a workspace
# 在不切换的情况下覆盖单个命令
aegis --workspace client-acme recon domain acme.com
```
## 范围管理
在运行任何工具之前,`ScopeManager` 会检查目标是否在范围内。如果设置了 `safe_mode: true`,超出范围的扫描会在发出任何网络请求之前中止。
```
aegis scope add acme.com --kind domain
aegis scope add 10.10.0.0/16 --kind cidr
aegis scope add https://api.acme.com --kind url
aegis scope add 192.168.1.5 --kind ip
aegis scope list
aegis scope remove 3
```
## 侦察
```
# 子域名枚举、DNS、对发现的主机进行 Nmap 扫描
aegis recon domain example.com
# CIDR 范围扫描 — 主机、端口、服务
aegis recon network 192.168.1.0/24 --port-scan
# DNS 记录查询
aegis recon dns example.com --types A,MX,TXT,NS,AAAA
# OSINT — 电子邮件、GitHub dorks、Shodan
aegis recon osint example.com --emails --github-dorks
# Secret 扫描 (trufflehog)
aegis recon secrets /path/to/project
aegis recon secrets https://github.com/target/repo --mode git
# 对所有 Web 服务截图 (gowitness)
aegis recon screenshot example.com
aegis recon screenshot . --from-db
```
## 漏洞扫描
```
# 通过 Nuclei templates 进行 Web 漏洞扫描
aegis vuln web https://example.com
# 通过 Nmap NSE 脚本进行网络漏洞扫描
aegis vuln net 192.168.1.1
# 通过 testssl.sh 进行 SSL/TLS 分析
aegis vuln ssl example.com --port 443
# 通过 ffuf 进行 API fuzzing
aegis vuln api https://api.example.com --wordlist data/wordlists/api.txt
```
## 技术检测
Aegis 使用免费的开源工具 — 不需要付费 API 密钥。
| 工具 | 安装 | 备注 |
|---|---|---|
| **webtech** | `pip install webtech` | 通过 headers、HTML、cookies 进行指纹识别 |
| **whatweb** | `sudo apt install whatweb` | Kali Linux 上预装 |
Aegis 首先尝试使用 `webtech`,如果失败自动回退到 `whatweb`。
```
aegis recon domain example.com # tech detection runs automatically
aegis recon domain example.com --no-techdetect # skip if not needed
```
## AI 功能
### 自主模式
```
# 完整渗透测试 — 侦察、漏洞、AI 分类、报告
aegis ai auto --target example.com
# 所有 5 个阶段 + HTML 报告
aegis ai auto --target example.com --full --format html
# Dry run — 查看将要运行的内容而不实际执行
aegis ai auto --target example.com --dry-run
```
### AI 甄别和分析
```
aegis ai triage --session 1 # triage findings from a session
aegis ai summarize --session 1 # executive summary
aegis ai suggest --target acme.com # attack surface suggestions
aegis ai report --target acme.com # generate narrative report section
aegis ai chat # interactive AI chat about findings
aegis ai doctor # validate key/provider/fallback readiness
aegis ai doctor --strict # fail CI/scripting if AI is not ready
```
### AI Payload 生成
在 `aegis ai auto` 期间,侦察完成后,AI 会根据检测到的技术栈自动生成有针对性的 payload(SQLi、XSS、SSRF、LFI、RCE)。Payload 会作为 `medium` 严重性的发现进行存储,类别为 `ai-payload`。使用您免费的 OpenRouter 或 Bytez 密钥。
### 设置向导
```
# 引导式首次运行流程:基础配置 + profile 选择 + 可选的 AI 引导
aegis setup --wizard
```
## MCP Server — AI 代理集成
Aegis 可以作为 [MCP](https://modelcontextprotocol.io) 服务器运行,让 Claude 或 Cursor 等 AI 代理自主驱动完整的渗透测试。
```
pip install mcp
aegis-mcp
```
添加到您的 Claude / Cursor MCP 配置中:
```
{
"mcpServers": {
"aegis": {
"command": "python",
"args": ["-m", "aegis.mcp_server"]
}
}
}
```
可用的 MCP 工具:
| 工具 | 描述 |
|---|---|
| `aegis_recon_domain` | 子域名枚举 + 技术检测 |
| `aegis_vuln_web` | Nuclei Web 漏洞扫描 |
| `aegis_ai_auto` | 完全自主渗透测试 |
| `aegis_get_findings` | 从数据库查询发现 |
| `aegis_generate_report` | 生成报告 |
| `aegis_scope_add` | 将目标添加到范围中 |
| `aegis_secrets_scan` | 扫描暴露的机密 |
## 报告
```
# Markdown 报告
aegis report generate example.com --format md
# 带有 D3.js 攻击路径图的 HTML 报告
aegis report generate example.com --format html
# PDF 报告
aegis report generate example.com --format pdf
# 按最低严重性过滤
aegis report generate example.com --format html --min-severity high
```
HTML 报告包含一个交互式的 D3.js 力导向攻击路径图 — 蓝色节点代表主机,彩色节点代表按严重程度分类的发现,边代表关系。
## Burp Suite 集成
```
# 从 Burp XML 导出中导入 findings
aegis burp import scan.xml
# 不导入进行预览
aegis burp import scan.xml --dry-run
# 列出所有从 Burp 导入的 findings
aegis burp list
```
## CVE 关联
```
# 将 session 中的所有 findings 与 NVD CVEs 关联
aegis cve correlate --session 1
# 直接搜索 NVD
aegis cve search "apache log4j" --max 10
# 列出链接到特定 finding 的 CVEs
aegis cve list --finding 42
```
## 活动
跨多个目标运行并行扫描并跟踪结果。
```
# 创建 campaign
aegis campaign create q4-audit --domain acme.com
# 运行它
aegis campaign run q4-audit --full
# 并行运行针对一系列目标的操作
aegis campaign run-parallel q4-audit --targets targets.txt --max-parallel 5
# 比较两次运行
aegis campaign diff q4-audit
# 生成 campaign 报告
aegis campaign report q4-audit
```
## 通知
```
# 发送测试通知
aegis notify test --channel slack
# 发送 session 中的 findings
aegis notify send --session 1 --min-severity high --channel discord
```
在 `config/config.yaml` 中配置 webhook:
```
notifications:
slack_webhook: "https://hooks.slack.com/services/..."
discord_webhook: "https://discord.com/api/webhooks/..."
```
## SARIF 导出
```
# 将所有 findings 导出为 SARIF v2.1.0
aegis sarif export
# 导出特定 session
aegis sarif export --session 1 --output results.sarif
```
通过 `github/codeql-action/upload-sarif` action 上传到 GitHub 代码扫描,以获取内联 PR 注释。
## 更新
```
# 通过一条命令更新 Aegis + nuclei templates
aegis self-update
# 预览而不做任何更改
aegis self-update --dry-run
# 包含预发布版本(通过 pip 安装时)
aegis self-update --pre
```
自动检测您是通过 git 克隆运行(`git pull` + `pip install -e .`)还是通过 pip 安装运行(`pip install --upgrade aegis-cli`)。
## 卸载
### 快速卸载(单条命令)
```
# 完全移除 — Aegis、所有 Go/Cargo/pip 工具、wrapper scripts
aegis uni --yes
# 预览将要移除的内容(安全,无更改)
aegis uni --dry-run
# 保留你的数据库和报告
aegis uni --yes --keep-data
# 同时保留数据和配置
aegis uni --yes --keep-data --keep-config
```
### 细粒度卸载
```
aegis uninstall --dry-run # preview only
aegis uninstall --yes # remove Aegis and tools
aegis uninstall --yes --remove-data # also delete databases and reports
aegis uninstall --yes --remove-data --remove-config # full clean
```
## 开发
```
git clone https://github.com/thecnical/aegis-devin.git
cd aegis
python3 -m venv .venv && source .venv/bin/activate
pip install -e ".[dev]"
pytest --tb=short # run tests
ruff check . # lint
mypy aegis/ # type check
```
## 路线图
**近期**
- Metasploit 会话管理 — 从 CLI 与打开的 shell 进行交互
- 云资产枚举扩展 — Route53、Azure DNS、GCP DNS 区域传送
- 侦察期间的被动 JS endpoint 提取
- 纯 OOB DNS 模式(不依赖 interactsh)
**中期**
- 自主漏洞利用链 — AI 根据已确认的漏洞选择并链接 exploit
- 自定义 Nuclei 模板生成 — AI 为发现的 endpoint 编写 YAML 模板
- 活动目录攻击路径执行 — 自动运行 BloodHound 建议的攻击路径
- Kerberoasting 和 AS-REP roasting 集成
**研究级**
- 使用 `boofuzz` 进行协议级模糊测试和发现关联
- 使用 AI 生成的混淆 payload 进行 WAF/IDS 绕过
- CVE 到 PoC 的自动映射 — 将 NVD CVE 与 ExploitDB 和 GitHub PoC 相关联
- 针对已确认漏洞的 LLM 生成自定义 exploit 代码
## 贡献
欢迎提交 Pull request。对于重大更改,请先开一个 issue。
在提交 PR 之前,请确保 `ruff check .` 和 `mypy aegis/` 通过。
## 支持
如果 Aegis 在您的任务中节省了时间,或者帮助您学习了攻击安全技术,请考虑支持该项目。
[](https://buymeacoffee.com/chandanpandit)
## 许可证
MIT — 有关详细信息,请参阅 [LICENSE](LICENSE)。标签:AI, CTI, Python, XXE攻击, 威胁模拟, 密码管理, 插件系统, 无后门, 测试用例, 网络调试, 自动化, 自动化代码审查, 计算机取证, 逆向工具
