busi07k/splunkhomelab
GitHub: busi07k/splunkhomelab
一个基于 VirtualBox、Sysmon 与 Splunk Enterprise 的家庭实验室,用于模拟攻击并练习威胁检测。
Stars: 0 | Forks: 0
# Splunk HomeLab
本仓库记录了一个**网络安全家庭实验室**的部署过程,用于模拟攻击和练习威胁检测。该实验室基于**VirtualBox**(Kali Linux 与 Windows 10)搭建,并利用**Sysmon**实现高级遥测,结合**Splunk Enterprise**进行集中化日志分析。
## 第0阶段:实验室前置条件
在配置网络之前,以下环境已在 VirtualBox 中部署完成。
**攻击机:**[Kali Linux 2024.x (VirtualBox 镜像)](https://www.kali.org/get-kali/#kali-virtual-machines)
**靶机:**[Windows 10 (官方 ISO 工具)](https://www.microsoft.com/en-us/software-download/windows10)
**Hypervisor:**[Oracle VirtualBox 7.0](https://www.virtualbox.org/wiki/Downloads)
## 第1阶段:网络
为了模拟一个与企业 Wi-Fi 隔离的真实公司局域网,我创建了一个自定义的 **NAT 网络**。这样,攻击机与靶机可以直接通信,同时通过虚拟网关保持隔离。
### 配置步骤
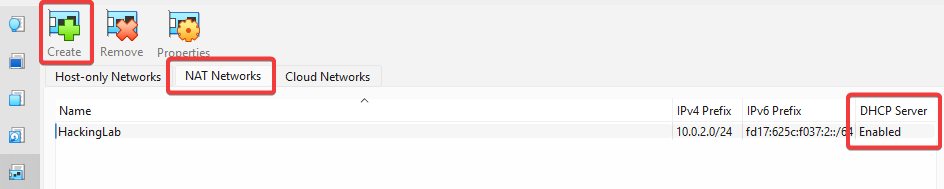
1. 打开 VirtualBox **网络管理器**(`文件` > `工具` > `网络管理器`)。
2. 创建一个名为 `HackingLab` 的新 NAT 网络。
3. **CIDR:**设置为 `10.0.2.0/24` 以定义子网。
4. **DHCP:**启用(用于自动分配 IP)。
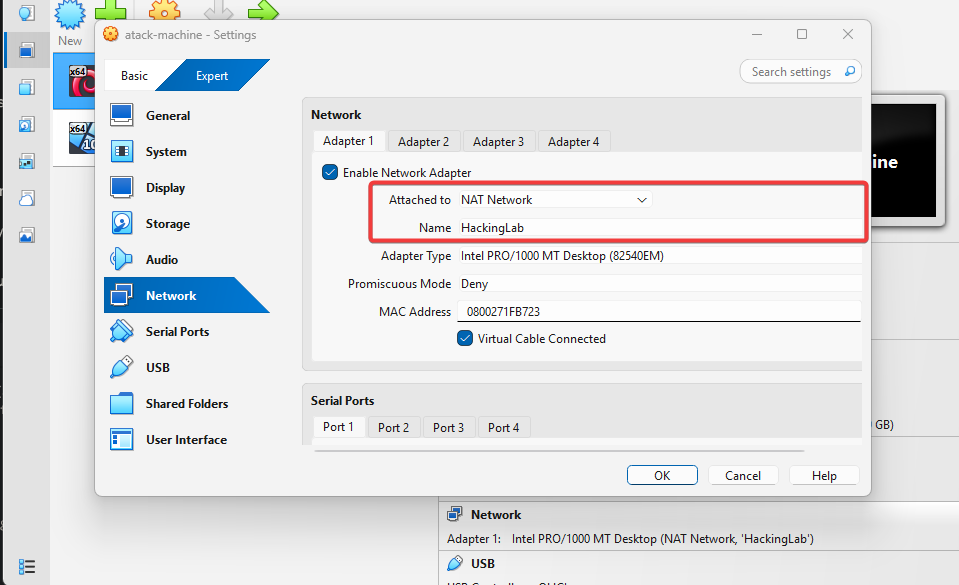
 接下来我们需要将此配置应用到每一台需要连接的机器:
 ## 第2阶段:终端可见性(Sysmon)
标准 Windows 日志通常不足以检测高级威胁。为弥补这一差距,我部署了使用社区加固配置的 **Sysmon**。
### 所用工具
* **代理:**[Sysmon(官方 Microsoft 下载)](https://learn.microsoft.com/en-us/sysinternals/downloads/sysmon)
* **配置:**[SwiftOnSecurity XML 配置](https://github.com/SwiftOnSecurity/sysmon-config)(过滤噪声并映射 MITRE ATT&CK 事件)
### 配置策略
我没有使用默认设置,而是应用了 SwiftOnSecurity 配置,以聚焦关键异常。
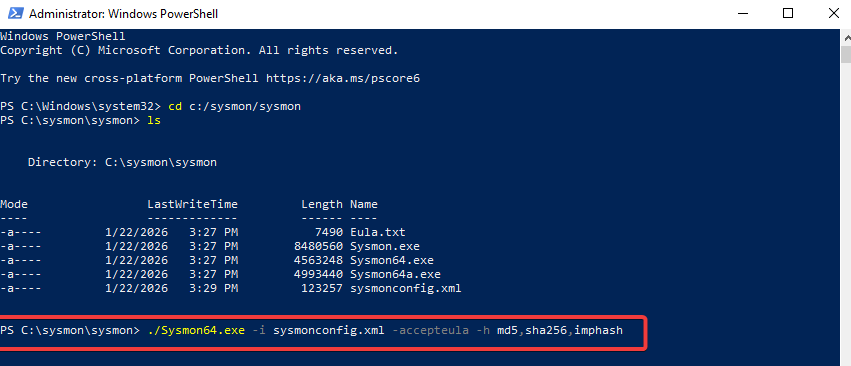
### 部署日志
我以管理员权限通过 PowerShell 安装 Sysmon 作为服务,并启用了哈希算法以跟踪文件完整性。
## 第2阶段:终端可见性(Sysmon)
标准 Windows 日志通常不足以检测高级威胁。为弥补这一差距,我部署了使用社区加固配置的 **Sysmon**。
### 所用工具
* **代理:**[Sysmon(官方 Microsoft 下载)](https://learn.microsoft.com/en-us/sysinternals/downloads/sysmon)
* **配置:**[SwiftOnSecurity XML 配置](https://github.com/SwiftOnSecurity/sysmon-config)(过滤噪声并映射 MITRE ATT&CK 事件)
### 配置策略
我没有使用默认设置,而是应用了 SwiftOnSecurity 配置,以聚焦关键异常。
### 部署日志
我以管理员权限通过 PowerShell 安装 Sysmon 作为服务,并启用了哈希算法以跟踪文件完整性。
 ## 第3阶段:SIEM 摄入( Splunk Enterprise)
随着 Sysmon 生成遥测数据,下一步是将其集中处理。
所用工具
SIEM:Splunk Enterprise(官方下载)
```
Why Splunk? It is the industry standard for analyzing machine data. It turns raw logs into searchable information, allowing us to correlate events and detect threats in real-time (impossible to do with just Event Viewer).
```
挑战:手动配置
标准图形界面方法("添加数据")无法自动检测到 **Microsoft-Windows-Sysmon/Operational** 通道。因此我没有依赖向导,而是在配置文件级别手动配置了输入。
实现步骤:
```
Service Privilege Escalation: I verified that the Splunkd service was running as a low-privilege account (NT SERVICE). I changed it to Local System via services.msc to ensure it had permissions to read the secured Sysmon logs.
Config File Editing: I opened the configuration file C:\Program Files\Splunk\etc\system\local\inputs.conf using Notepad (as Administrator) and manually appended the stanza to force the ingestion of Sysmon logs:
```
```
[WinEventLog://Microsoft-Windows-Sysmon/Operational]
disabled = 0
renderXml = 1
checkpointInterval = 5
current_only = 0
start_from = oldest
index = main
```
(重启:重启 Splunk 服务以加载新配置。)
## 验证(PoC)
为验证数据管道,我执行了一个基础的 SPL 查询。
SPL 查询:
```
index=main sourcetype="XmlWinEventLog:Microsoft-Windows-Sysmon/Operational"
```
## 第4阶段:攻击模拟与检测(可选)
为验证环境,我从 Kali 机器对 Windows 10 目标执行了一次暴力破解攻击(攻击 ID T1110),使用 Hydra 工具。
检测逻辑(SPL):
```
index=main EventCode=4625
| stats count by TargetUserName, IpAddress
| where count > 10
```
注意:该查询会识别来自单一 IP 的多次失败登录尝试,这是自动凭证测试的明显指示。
## 第3阶段:SIEM 摄入( Splunk Enterprise)
随着 Sysmon 生成遥测数据,下一步是将其集中处理。
所用工具
SIEM:Splunk Enterprise(官方下载)
```
Why Splunk? It is the industry standard for analyzing machine data. It turns raw logs into searchable information, allowing us to correlate events and detect threats in real-time (impossible to do with just Event Viewer).
```
挑战:手动配置
标准图形界面方法("添加数据")无法自动检测到 **Microsoft-Windows-Sysmon/Operational** 通道。因此我没有依赖向导,而是在配置文件级别手动配置了输入。
实现步骤:
```
Service Privilege Escalation: I verified that the Splunkd service was running as a low-privilege account (NT SERVICE). I changed it to Local System via services.msc to ensure it had permissions to read the secured Sysmon logs.
Config File Editing: I opened the configuration file C:\Program Files\Splunk\etc\system\local\inputs.conf using Notepad (as Administrator) and manually appended the stanza to force the ingestion of Sysmon logs:
```
```
[WinEventLog://Microsoft-Windows-Sysmon/Operational]
disabled = 0
renderXml = 1
checkpointInterval = 5
current_only = 0
start_from = oldest
index = main
```
(重启:重启 Splunk 服务以加载新配置。)
## 验证(PoC)
为验证数据管道,我执行了一个基础的 SPL 查询。
SPL 查询:
```
index=main sourcetype="XmlWinEventLog:Microsoft-Windows-Sysmon/Operational"
```
## 第4阶段:攻击模拟与检测(可选)
为验证环境,我从 Kali 机器对 Windows 10 目标执行了一次暴力破解攻击(攻击 ID T1110),使用 Hydra 工具。
检测逻辑(SPL):
```
index=main EventCode=4625
| stats count by TargetUserName, IpAddress
| where count > 10
```
注意:该查询会识别来自单一 IP 的多次失败登录尝试,这是自动凭证测试的明显指示。
接下来我们需要将此配置应用到每一台需要连接的机器:
## 第2阶段:终端可见性(Sysmon)
标准 Windows 日志通常不足以检测高级威胁。为弥补这一差距,我部署了使用社区加固配置的 **Sysmon**。
### 所用工具
* **代理:**[Sysmon(官方 Microsoft 下载)](https://learn.microsoft.com/en-us/sysinternals/downloads/sysmon)
* **配置:**[SwiftOnSecurity XML 配置](https://github.com/SwiftOnSecurity/sysmon-config)(过滤噪声并映射 MITRE ATT&CK 事件)
### 配置策略
我没有使用默认设置,而是应用了 SwiftOnSecurity 配置,以聚焦关键异常。
### 部署日志
我以管理员权限通过 PowerShell 安装 Sysmon 作为服务,并启用了哈希算法以跟踪文件完整性。
## 第3阶段:SIEM 摄入( Splunk Enterprise)
随着 Sysmon 生成遥测数据,下一步是将其集中处理。
所用工具
SIEM:Splunk Enterprise(官方下载)
```
Why Splunk? It is the industry standard for analyzing machine data. It turns raw logs into searchable information, allowing us to correlate events and detect threats in real-time (impossible to do with just Event Viewer).
```
挑战:手动配置
标准图形界面方法("添加数据")无法自动检测到 **Microsoft-Windows-Sysmon/Operational** 通道。因此我没有依赖向导,而是在配置文件级别手动配置了输入。
实现步骤:
```
Service Privilege Escalation: I verified that the Splunkd service was running as a low-privilege account (NT SERVICE). I changed it to Local System via services.msc to ensure it had permissions to read the secured Sysmon logs.
Config File Editing: I opened the configuration file C:\Program Files\Splunk\etc\system\local\inputs.conf using Notepad (as Administrator) and manually appended the stanza to force the ingestion of Sysmon logs:
```
```
[WinEventLog://Microsoft-Windows-Sysmon/Operational]
disabled = 0
renderXml = 1
checkpointInterval = 5
current_only = 0
start_from = oldest
index = main
```
(重启:重启 Splunk 服务以加载新配置。)
## 验证(PoC)
为验证数据管道,我执行了一个基础的 SPL 查询。
SPL 查询:
```
index=main sourcetype="XmlWinEventLog:Microsoft-Windows-Sysmon/Operational"
```
## 第4阶段:攻击模拟与检测(可选)
为验证环境,我从 Kali 机器对 Windows 10 目标执行了一次暴力破解攻击(攻击 ID T1110),使用 Hydra 工具。
检测逻辑(SPL):
```
index=main EventCode=4625
| stats count by TargetUserName, IpAddress
| where count > 10
```
注意:该查询会识别来自单一 IP 的多次失败登录尝试,这是自动凭证测试的明显指示。标签:AMSI绕过, NAT 网络, PB级数据处理, Sysmon, VirtualBox, Windows 10, 企业安全, 威胁检测, 安全培训, 安全运维, 家庭实验室, 开源安全工具, 数字取证, 日志采集, 监控, 网络安全, 网络资产管理, 网络隔离, 自动化脚本, 虚拟化, 逆向工程平台, 速率限制, 隐私保护