arthghori/Flutter-Proxy-Unlocker
GitHub: arthghori/Flutter-Proxy-Unlocker
一个基于 Frida 的 Flutter 应用 HTTPS/TLS 流量拦截与安全测试工具。
Stars: 5 | Forks: 1
# Flutter-Proxy-Unlocker
Flutter-Proxy-Unlocker 是一个基于 Frida 的工具包,用于拦截和重定向 Android 及 iOS 上 Flutter 应用的网络流量。它动态发现并 Hook Flutter 引擎内部函数,以绕过 SSL/TLS 证书验证,并将套接字连接透明地重定向到 Burp Suite 代理。它支持 arm64 和 x86_64 架构,无需重新打包应用,仅用于授权的移动安全测试。
## 目录
- [使用方法](#usage)
- [概念验证 (PoC)](#proof-of-concept-poc)
- [注意事项](#note)
- [故障排除](#troubleshooting--still-not-getting-requests-in-burp)
## 使用方法
### Android
```
frida-ps -Uai
```
附加到正在运行的进程
```
frida -Uf com.example.myapp -l FlutterProxy.js
```
### iOS (已越狱)
```
frida-ps -Uai
```
附加到正在运行的进程
```
frida -Uf com.example.myapp -l FlutterProxy.js
```
## 概念验证 (PoC)
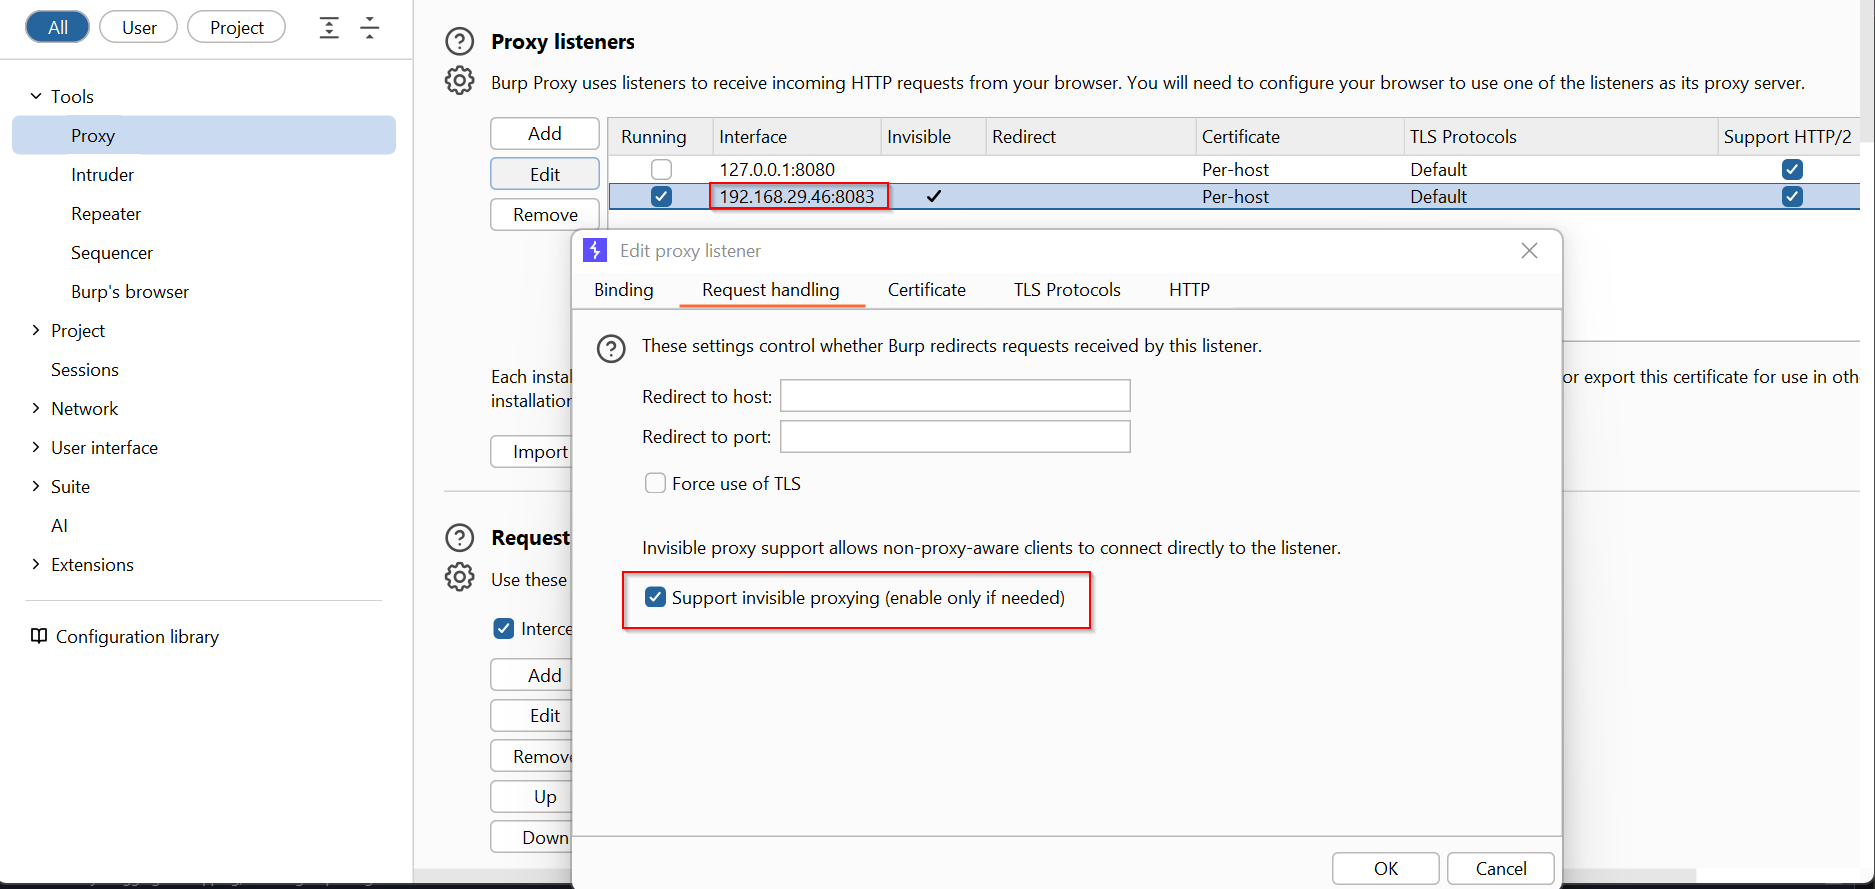
### **步骤 1:在主机上启动 Burp Suite 代理**
打开 Burp Suite 并启用代理监听器。
- 进入 **Proxy → Options → Proxy Listeners**
- 确保监听器处于活动状态(IP `192.168.x.x`,端口 `8080`)
- **勾选复选框:"Support invisible proxying"**
- 这是必需的,因为 Flutter 套接字是原始 TCP,而非浏览器风格的 HTTP
确保你的设备和主机在同一网络中。
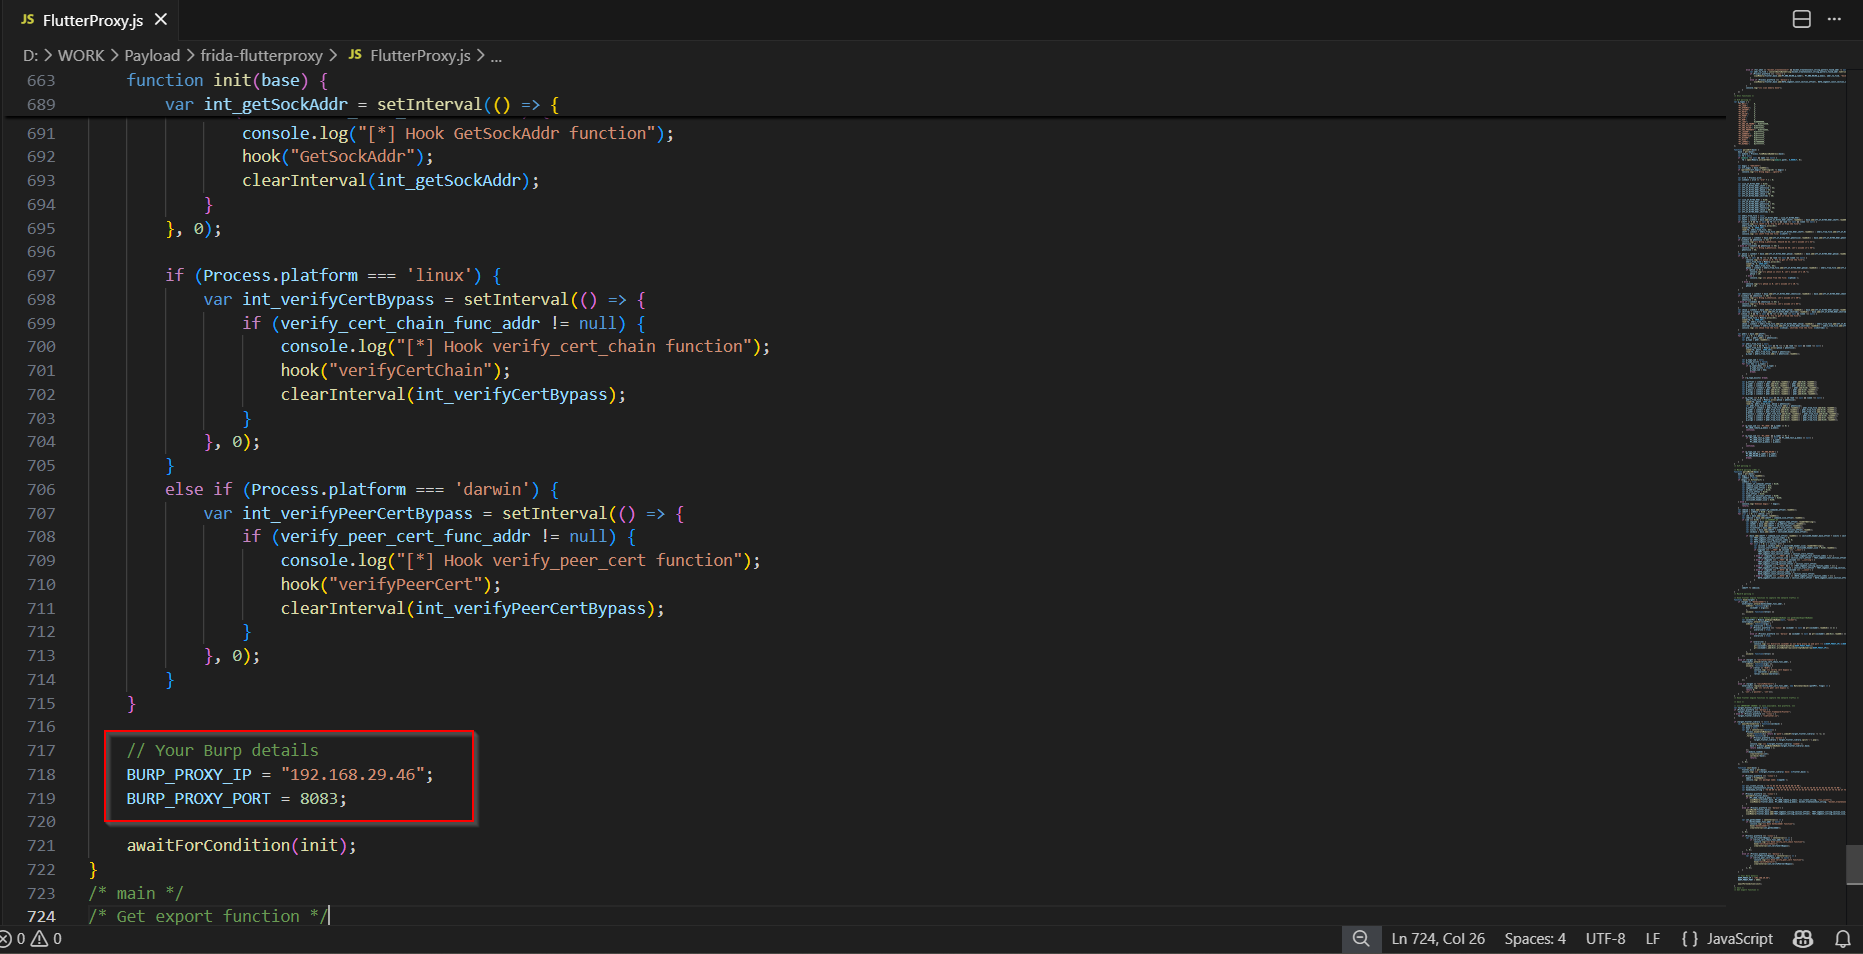
 ### **步骤 2:在脚本中指定 Burp IP 和端口**
在 `FlutterProxy.js` 的**最末尾**,配置你的代理:
```
BURP_PROXY_IP = "192.168.x.x"; // your host machine IP
BURP_PROXY_PORT = 8080; // your Burp proxy port
```
### **步骤 2:在脚本中指定 Burp IP 和端口**
在 `FlutterProxy.js` 的**最末尾**,配置你的代理:
```
BURP_PROXY_IP = "192.168.x.x"; // your host machine IP
BURP_PROXY_PORT = 8080; // your Burp proxy port
```
 ### **步骤 3:将 Frida 附加到 Flutter 应用**
在 CMD/Terminal 中运行以下命令:
```
frida -Uf
### **步骤 3:将 Frida 附加到 Flutter 应用**
在 CMD/Terminal 中运行以下命令:
```
frida -Uf -l FlutterProxy.js
```
https://github.com/user-attachments/assets/f5cec8ce-946e-4792-93ea-9f26934a089d
## 注意事项
## 故障排除:Burp 中仍然没有收到请求?
如果按照上述步骤操作后,Burp Suite 中仍然没有显示请求,请尝试以下方法:
### 步骤 1:检查模拟器网络
```
adb shell ip route
```
记下网络范围(例如 `172.17.100.0/24`)
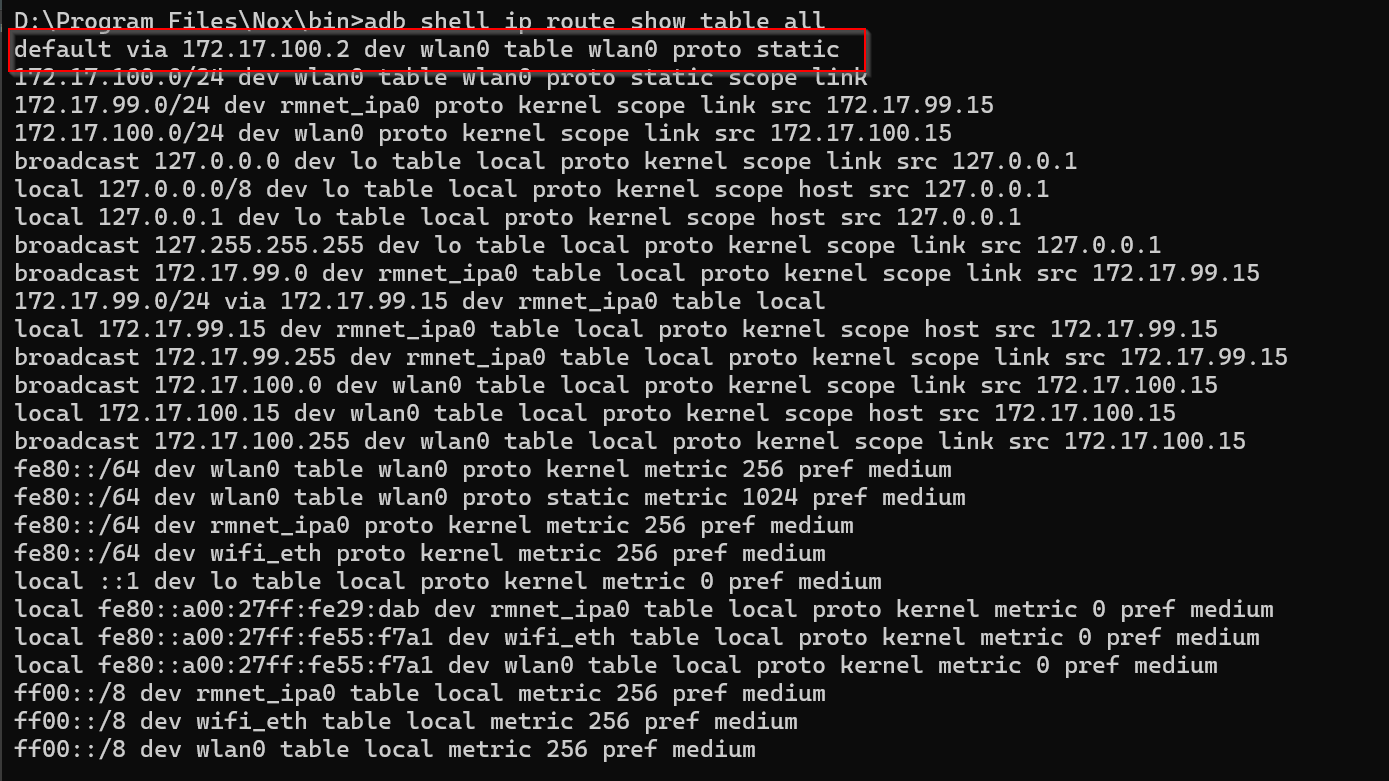
 ### 步骤 2:查找默认网关 IP
```
adb shell ip route show table all
```
查找以 `default via` 开头的行:
```
default via 172.17.100.2 dev wlan0 ← this is your host IP from emulator
```
### 步骤 2:查找默认网关 IP
```
adb shell ip route show table all
```
查找以 `default via` 开头的行:
```
default via 172.17.100.2 dev wlan0 ← this is your host IP from emulator
```
 ### 步骤 3:验证网关是否可达
```
adb shell ping -c 3 172.17.100.2
```
预期输出(成功 ✅):
```
64 bytes from 172.17.100.2: icmp_seq=1 ttl=64 time=2.34 ms
64 bytes from 172.17.100.2: icmp_seq=2 ttl=64 time=1.12 ms
64 bytes from 172.17.100.2: icmp_seq=3 ttl=64 time=1.56 ms
```
如果看到超时 ❌,请检查 Windows 防火墙并允许 Burp Suite/Java 通过。
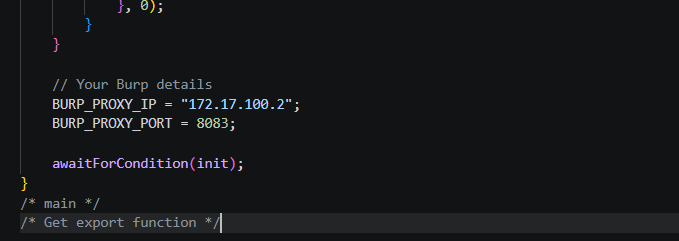
### 步骤 4:使用网关 IP 更新脚本
```
BURP_PROXY_IP = "172.17.100.2"; // default via IP from Step 2
BURP_PROXY_PORT = 8083; // must match your Burp listener port
```
### 步骤 3:验证网关是否可达
```
adb shell ping -c 3 172.17.100.2
```
预期输出(成功 ✅):
```
64 bytes from 172.17.100.2: icmp_seq=1 ttl=64 time=2.34 ms
64 bytes from 172.17.100.2: icmp_seq=2 ttl=64 time=1.12 ms
64 bytes from 172.17.100.2: icmp_seq=3 ttl=64 time=1.56 ms
```
如果看到超时 ❌,请检查 Windows 防火墙并允许 Burp Suite/Java 通过。
### 步骤 4:使用网关 IP 更新脚本
```
BURP_PROXY_IP = "172.17.100.2"; // default via IP from Step 2
BURP_PROXY_PORT = 8083; // must match your Burp listener port
```
 ### 步骤 5:再次运行 Frida
```
frida -Uf com.example.myapp -l FlutterProxy.js
```
你现在应该能在 Frida 控制台中看到:
```
[*] Overwrite sockaddr as our burp proxy ip and port --> 172.17.100.2:8083 ✅
```
请求将出现在 **Burp → Proxy → HTTP History** 中 🎉
### 步骤 5:再次运行 Frida
```
frida -Uf com.example.myapp -l FlutterProxy.js
```
你现在应该能在 Frida 控制台中看到:
```
[*] Overwrite sockaddr as our burp proxy ip and port --> 172.17.100.2:8083 ✅
```
请求将出现在 **Burp → Proxy → HTTP History** 中 🎉
### **步骤 2:在脚本中指定 Burp IP 和端口**
在 `FlutterProxy.js` 的**最末尾**,配置你的代理:
```
BURP_PROXY_IP = "192.168.x.x"; // your host machine IP
BURP_PROXY_PORT = 8080; // your Burp proxy port
```
### **步骤 3:将 Frida 附加到 Flutter 应用**
在 CMD/Terminal 中运行以下命令:
```
frida -Uf
### 步骤 2:查找默认网关 IP
```
adb shell ip route show table all
```
查找以 `default via` 开头的行:
```
default via 172.17.100.2 dev wlan0 ← this is your host IP from emulator
```
### 步骤 3:验证网关是否可达
```
adb shell ping -c 3 172.17.100.2
```
预期输出(成功 ✅):
```
64 bytes from 172.17.100.2: icmp_seq=1 ttl=64 time=2.34 ms
64 bytes from 172.17.100.2: icmp_seq=2 ttl=64 time=1.12 ms
64 bytes from 172.17.100.2: icmp_seq=3 ttl=64 time=1.56 ms
```
如果看到超时 ❌,请检查 Windows 防火墙并允许 Burp Suite/Java 通过。
### 步骤 4:使用网关 IP 更新脚本
```
BURP_PROXY_IP = "172.17.100.2"; // default via IP from Step 2
BURP_PROXY_PORT = 8083; // must match your Burp listener port
```
### 步骤 5:再次运行 Frida
```
frida -Uf com.example.myapp -l FlutterProxy.js
```
你现在应该能在 Frida 控制台中看到:
```
[*] Overwrite sockaddr as our burp proxy ip and port --> 172.17.100.2:8083 ✅
```
请求将出现在 **Burp → Proxy → HTTP History** 中 🎉标签:Android安全测试, arm64, Burp Suite, Dart网络API, Docker支持, Flutter, Flutter引擎, Frida, Google搜索, HTTPS拦截, iOS安全测试, iOS越狱, SSH蜜罐, SSL Pinning绕过, SSL/TLS解密, TCP重定向, TLS拦截, x86_64, 代理工具, 动态Hook, 套接字重定向, 授权安全测试, 插件系统, 数据可视化, 流量代理, 移动应用安全, 移动端渗透测试, 移动端逆向工程, 网络安全测试, 网络流量分析, 自定义脚本, 证书验证绕过, 进程注入, 透明代理