awslabs/aidlc-workflows
GitHub: awslabs/aidlc-workflows
一套可注入主流 AI 编码代理的自适应开发工作流规则框架,通过结构化三阶段方法论在 AI 辅助开发中保障质量与可控性。
Stars: 3176 | Forks: 521
# AI-DLC (AI 驱动的开发生命周期)
AI-DLC 是一个智能软件开发工作流,能够适应您的需求,维持质量标准,并让您始终掌控整个过程。要了解更多关于 AI-DLC 方法论的信息,请阅读这篇[博客](https://aws.amazon.com/blogs/devops/ai-driven-development-life-cycle/)以及其中引用的[方法定义论文](https://prod.d13rzhkk8cj2z0.amplifyapp.com/)。
## 目录
- [通用说明](#common)
- [特定平台设置](#platform-specific-setup)
- [使用方法](#usage)
- [三阶段自适应工作流](#three-phase-adaptive-workflow)
- [核心功能](#key-features)
- [扩展](#extensions)
- [原则](#tenets)
- [前置条件](#prerequisites)
- [故障排除](#troubleshooting)
- [版本控制建议](#version-control-recommendations)
- [其他资源](#additional-resources)
- [生成的 aidlc-docs/ 参考](#generated-aidlc-docs-reference)
- [实验性:AI 辅助设置(Release 下载)](#experimental-ai-assisted-setup-release-download)
- [贡献](#contributing)
- [许可证](#license)
## 通用说明
1. 从 [Releases 页面](../../releases/latest)下载名为 `ai-dlc-rules-v.zip` 的最新 release zip 文件,保存到项目目录**之外**的文件夹中(例如 `~/Downloads`)。
2. 解压该 zip 文件。它包含一个 `aidlc-rules/` 文件夹,其中有两个子目录:
- `aws-aidlc-rules/` — 核心 AI-DLC 工作流规则
- `aws-aidlc-rule-details/` — 由核心规则按条件引用的详细规则
3. 按照下方针对您的编码代理和平台的设置说明进行操作。
## 特定平台设置
- [Kiro](#kiro)
- [Amazon Q Developer IDE 插件](#amazon-q-developer-ide-pluginextension)
- [Cursor IDE](#cursor-ide)
- [Cline](#cline)
- [Claude Code](#claude-code)
- [GitHub Copilot](#github-copilot)
- [OpenAI Codex](#openai-codex)
- [其他代理](#other-agents)
### Kiro
AI-DLC 在您的项目工作区内使用 [Kiro Steering 文件](https://kiro.dev/docs/cli/steering/)。
以下命令假设您将 zip 文件解压到了 `Downloads` 文件夹。如果您使用了其他位置,请将 `Downloads` 替换为您的实际文件夹路径。
在 macOS/Linux 上:
```
mkdir -p .kiro/steering
cp -R ~/Downloads/aidlc-rules/aws-aidlc-rules .kiro/steering/
cp -R ~/Downloads/aidlc-rules/aws-aidlc-rule-details .kiro/
```
在 Windows (PowerShell) 上:
```
New-Item -ItemType Directory -Force -Path ".kiro\steering"
Copy-Item -Recurse "$env:USERPROFILE\Downloads\aidlc-rules\aws-aidlc-rules" ".kiro\steering\"
Copy-Item -Recurse "$env:USERPROFILE\Downloads\aidlc-rules\aws-aidlc-rule-details" ".kiro\"
```
在 Windows (CMD) 上:
```
mkdir .kiro\steering
xcopy %USERPROFILE%\Downloads\aidlc-rules\aws-aidlc-rules .kiro\steering\aws-aidlc-rules\ /E /I
xcopy %USERPROFILE%\Downloads\aidlc-rules\aws-aidlc-rule-details .kiro\aws-aidlc-rule-details\ /E /I
```
您的项目结构应如下所示:
```
/
├── .kiro/
│ ├── steering/
│ │ ├── aws-aidlc-rules/
│ ├── aws-aidlc-rule-details/
```
要验证规则是否已加载:
#### 在 Kiro IDE 中验证
打开 steering 文件面板,确认在 `Workspace` 下看到了 `core-workflow` 条目,如下方截图所示。
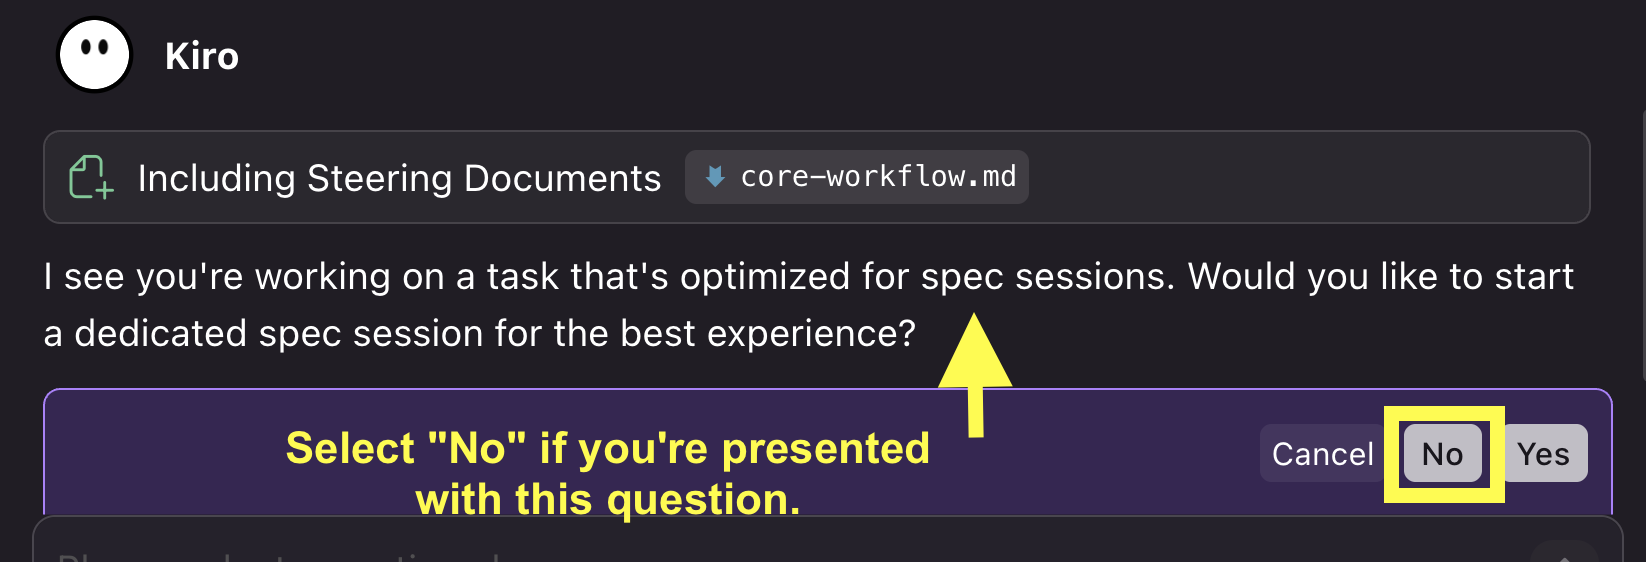
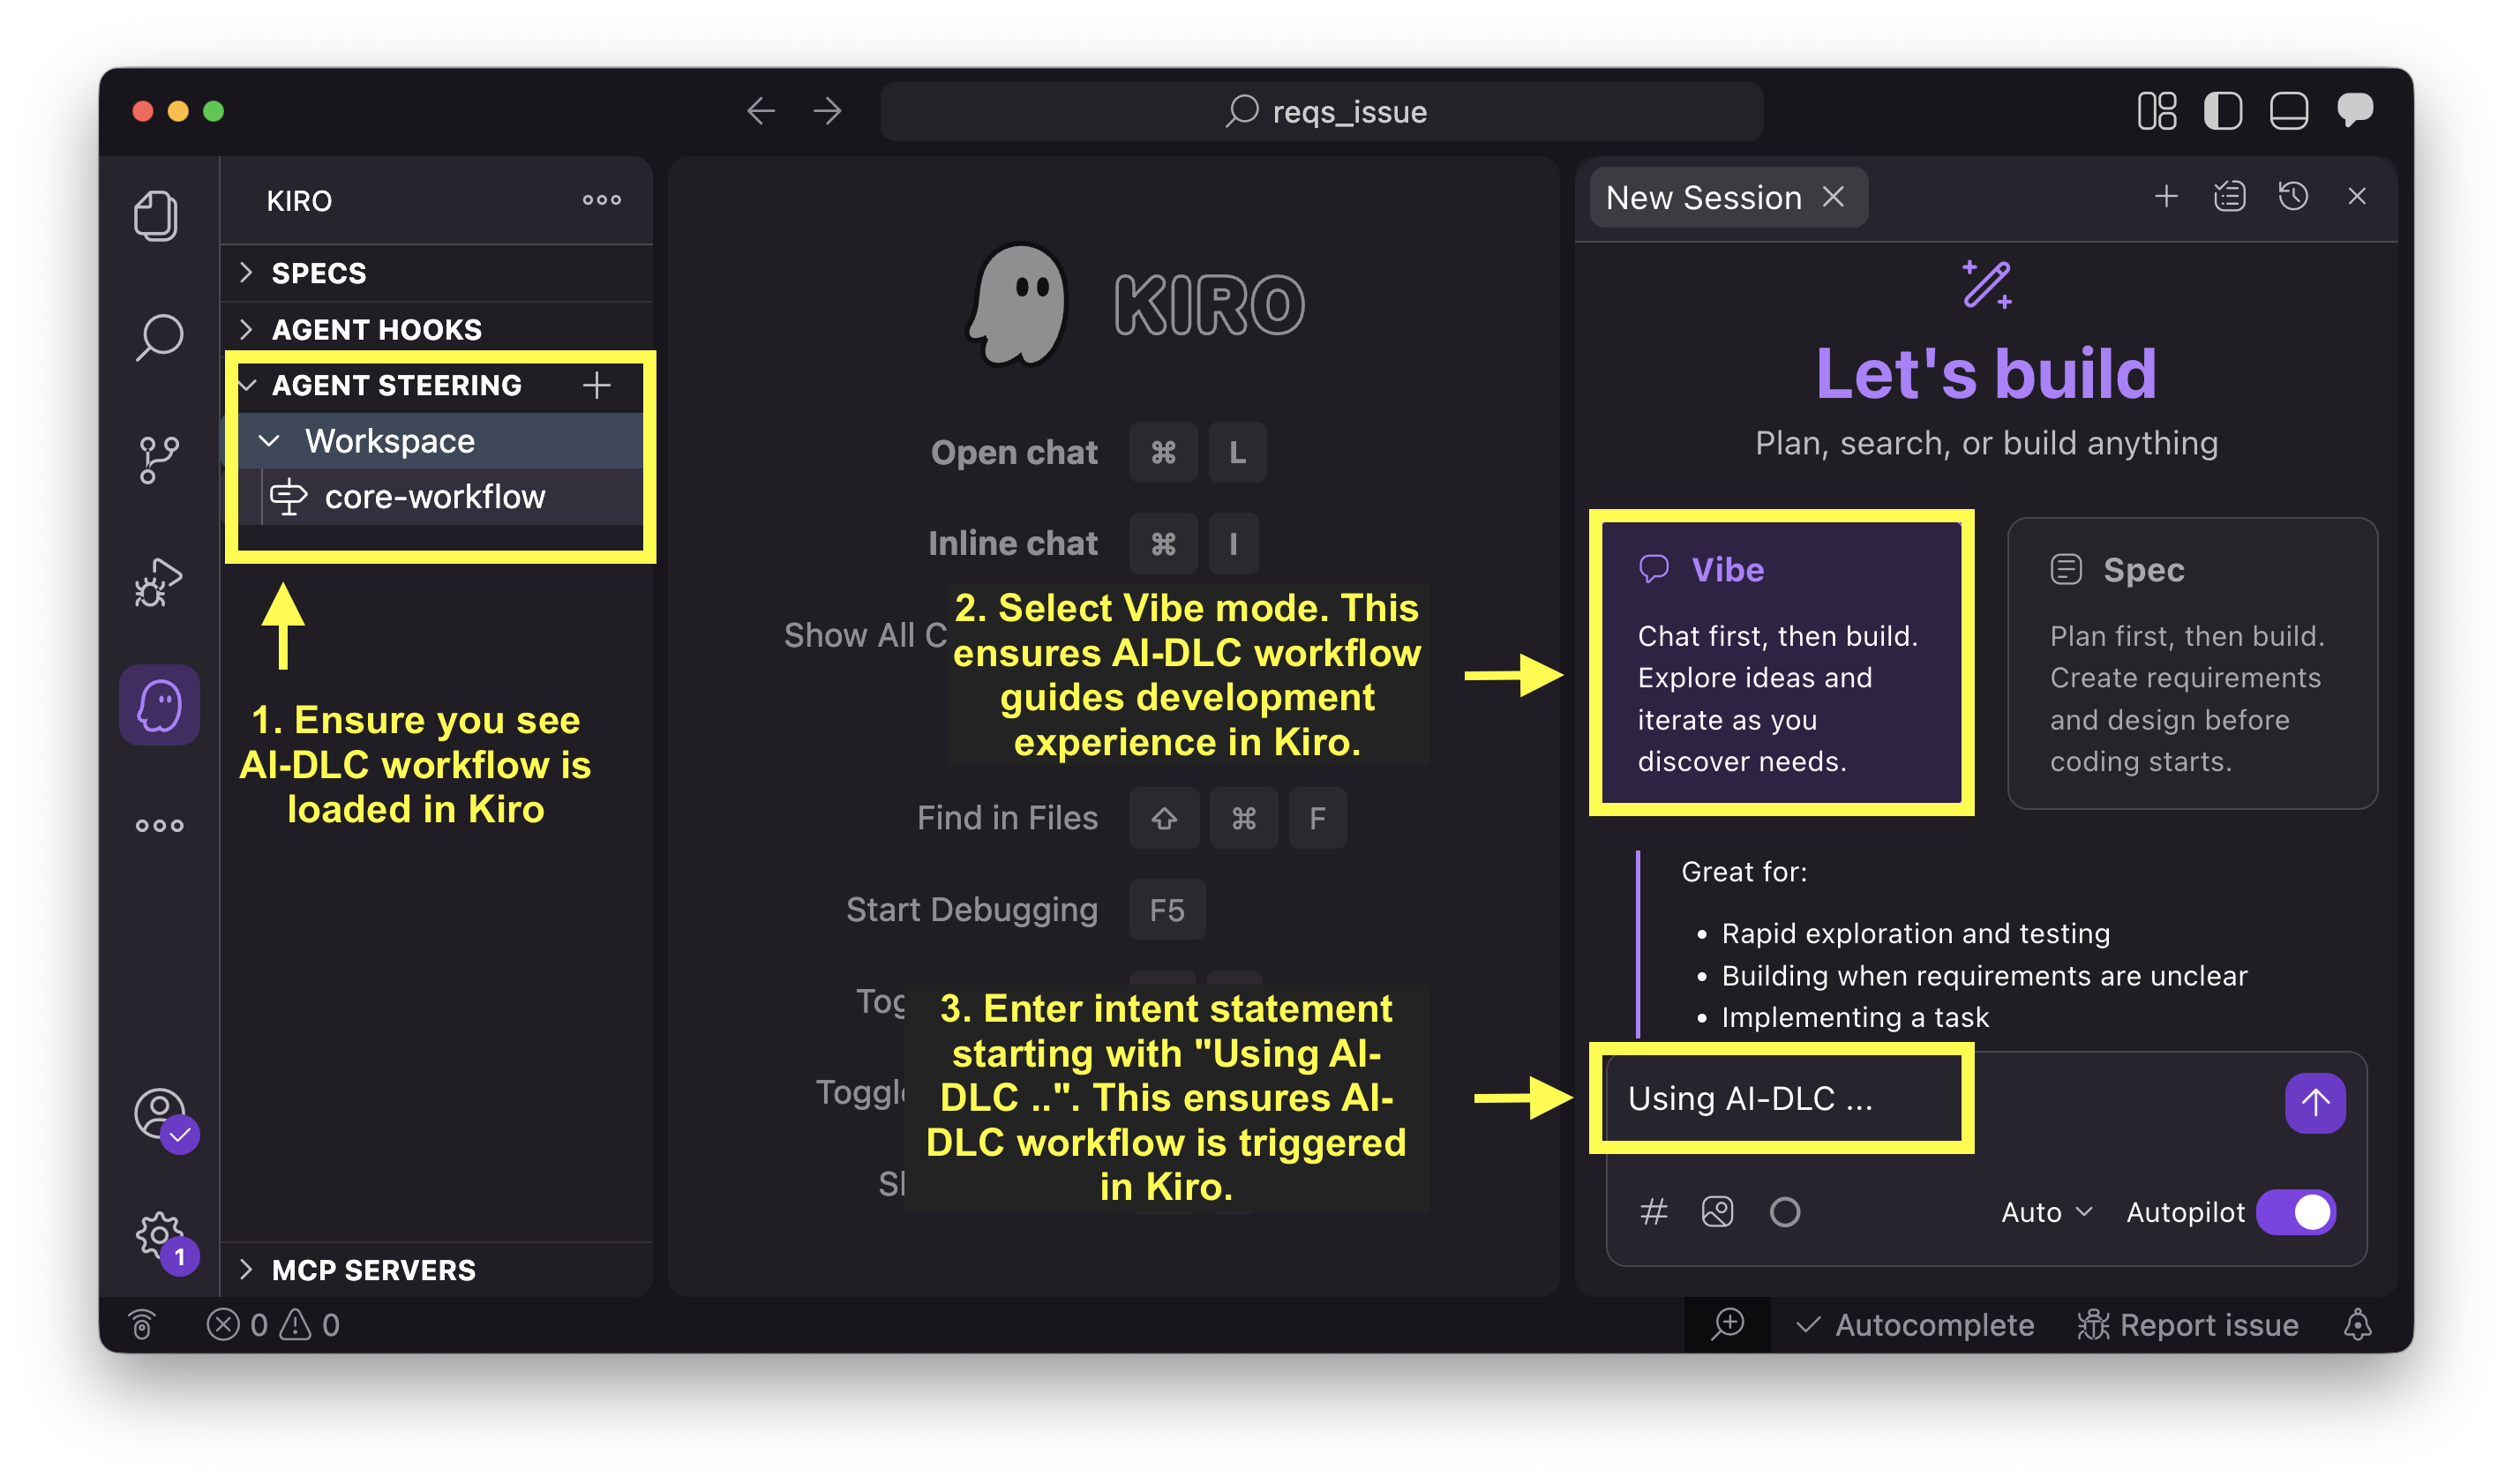 我们在 Kiro 中以 Vibe 模式运行 AI-DLC 工作流。这确保了 AI-DLC 工作流在 Kiro 中指导开发工作流。有时,Kiro 可能会提示您切换到 spec 模式。对此类提示选择 `No` 以留在 Vibe 模式。
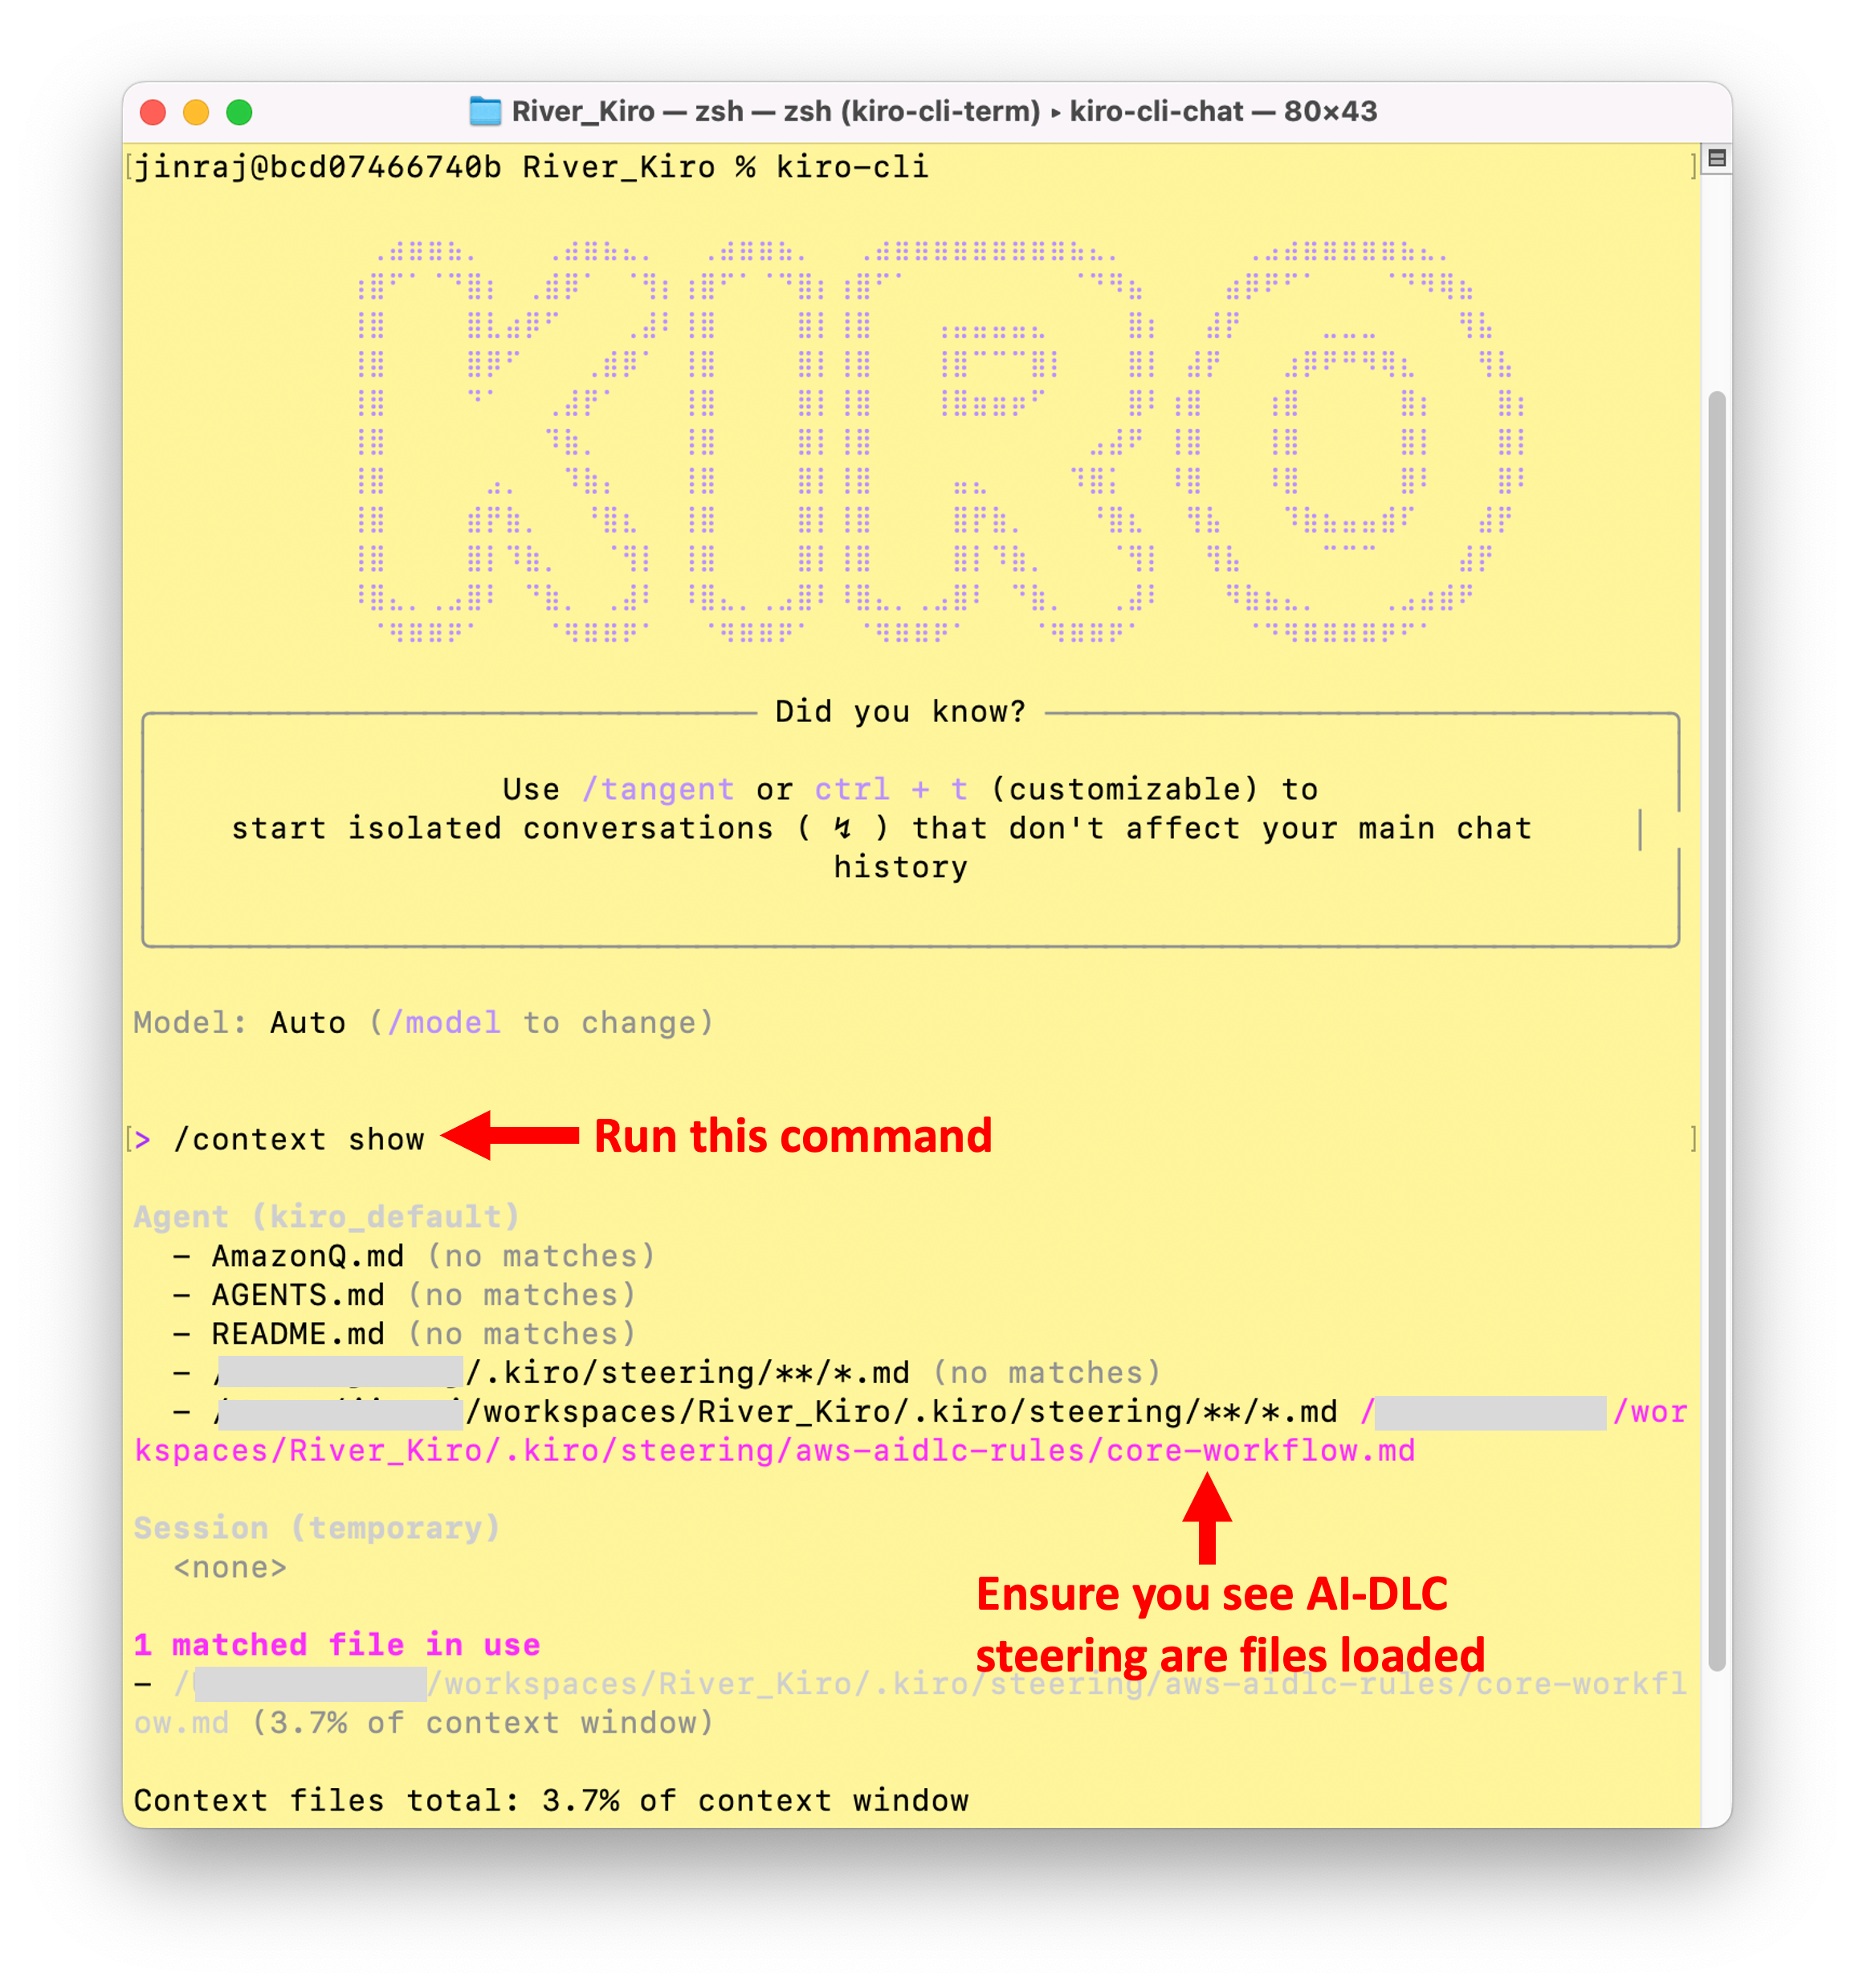
 #### 在 Kiro CLI 中验证
运行 `kiro-cli`,然后运行 `/context show`,并确认存在 `.kiro/steering/aws-aidlc-rules` 的条目。
#### 在 Kiro CLI 中验证
运行 `kiro-cli`,然后运行 `/context show`,并确认存在 `.kiro/steering/aws-aidlc-rules` 的条目。
 ### Amazon Q Developer IDE 插件/扩展
AI-DLC 在您的项目工作区内使用 [Amazon Q Rules](https://docs.aws.amazon.com/amazonq/latest/qdeveloper-ug/context-project-rules.html)。
以下命令假设您将 zip 文件解压到了 `Downloads` 文件夹。如果您使用了其他位置,请将 `Downloads` 替换为您的实际文件夹路径。
在 macOS/Linux 上:
```
mkdir -p .amazonq/rules
cp -R ~/Downloads/aidlc-rules/aws-aidlc-rules .amazonq/rules/
cp -R ~/Downloads/aidlc-rules/aws-aidlc-rule-details .amazonq/
```
在 Windows (PowerShell) 上:
```
New-Item -ItemType Directory -Force -Path ".amazonq\rules"
Copy-Item -Recurse "$env:USERPROFILE\Downloads\aidlc-rules\aws-aidlc-rules" ".amazonq\rules\"
Copy-Item -Recurse "$env:USERPROFILE\Downloads\aidlc-rules\aws-aidlc-rule-details" ".amazonq\"
```
在 Windows (CMD) 上:
```
mkdir .amazonq\rules
xcopy %USERPROFILE%\Downloads\aidlc-rules\aws-aidlc-rules .amazonq\rules\aws-aidlc-rules\ /E /I
xcopy %USERPROFILE%\Downloads\aidlc-rules\aws-aidlc-rule-details .amazonq\aws-aidlc-rule-details\ /E /I
```
您的项目结构应如下所示:
```
### Amazon Q Developer IDE 插件/扩展
AI-DLC 在您的项目工作区内使用 [Amazon Q Rules](https://docs.aws.amazon.com/amazonq/latest/qdeveloper-ug/context-project-rules.html)。
以下命令假设您将 zip 文件解压到了 `Downloads` 文件夹。如果您使用了其他位置,请将 `Downloads` 替换为您的实际文件夹路径。
在 macOS/Linux 上:
```
mkdir -p .amazonq/rules
cp -R ~/Downloads/aidlc-rules/aws-aidlc-rules .amazonq/rules/
cp -R ~/Downloads/aidlc-rules/aws-aidlc-rule-details .amazonq/
```
在 Windows (PowerShell) 上:
```
New-Item -ItemType Directory -Force -Path ".amazonq\rules"
Copy-Item -Recurse "$env:USERPROFILE\Downloads\aidlc-rules\aws-aidlc-rules" ".amazonq\rules\"
Copy-Item -Recurse "$env:USERPROFILE\Downloads\aidlc-rules\aws-aidlc-rule-details" ".amazonq\"
```
在 Windows (CMD) 上:
```
mkdir .amazonq\rules
xcopy %USERPROFILE%\Downloads\aidlc-rules\aws-aidlc-rules .amazonq\rules\aws-aidlc-rules\ /E /I
xcopy %USERPROFILE%\Downloads\aidlc-rules\aws-aidlc-rule-details .amazonq\aws-aidlc-rule-details\ /E /I
```
您的项目结构应如下所示:
```
/
├── .amazonq/
│ ├── rules/
│ │ ├── aws-aidlc-rules/
│ ├── aws-aidlc-rule-details/
```
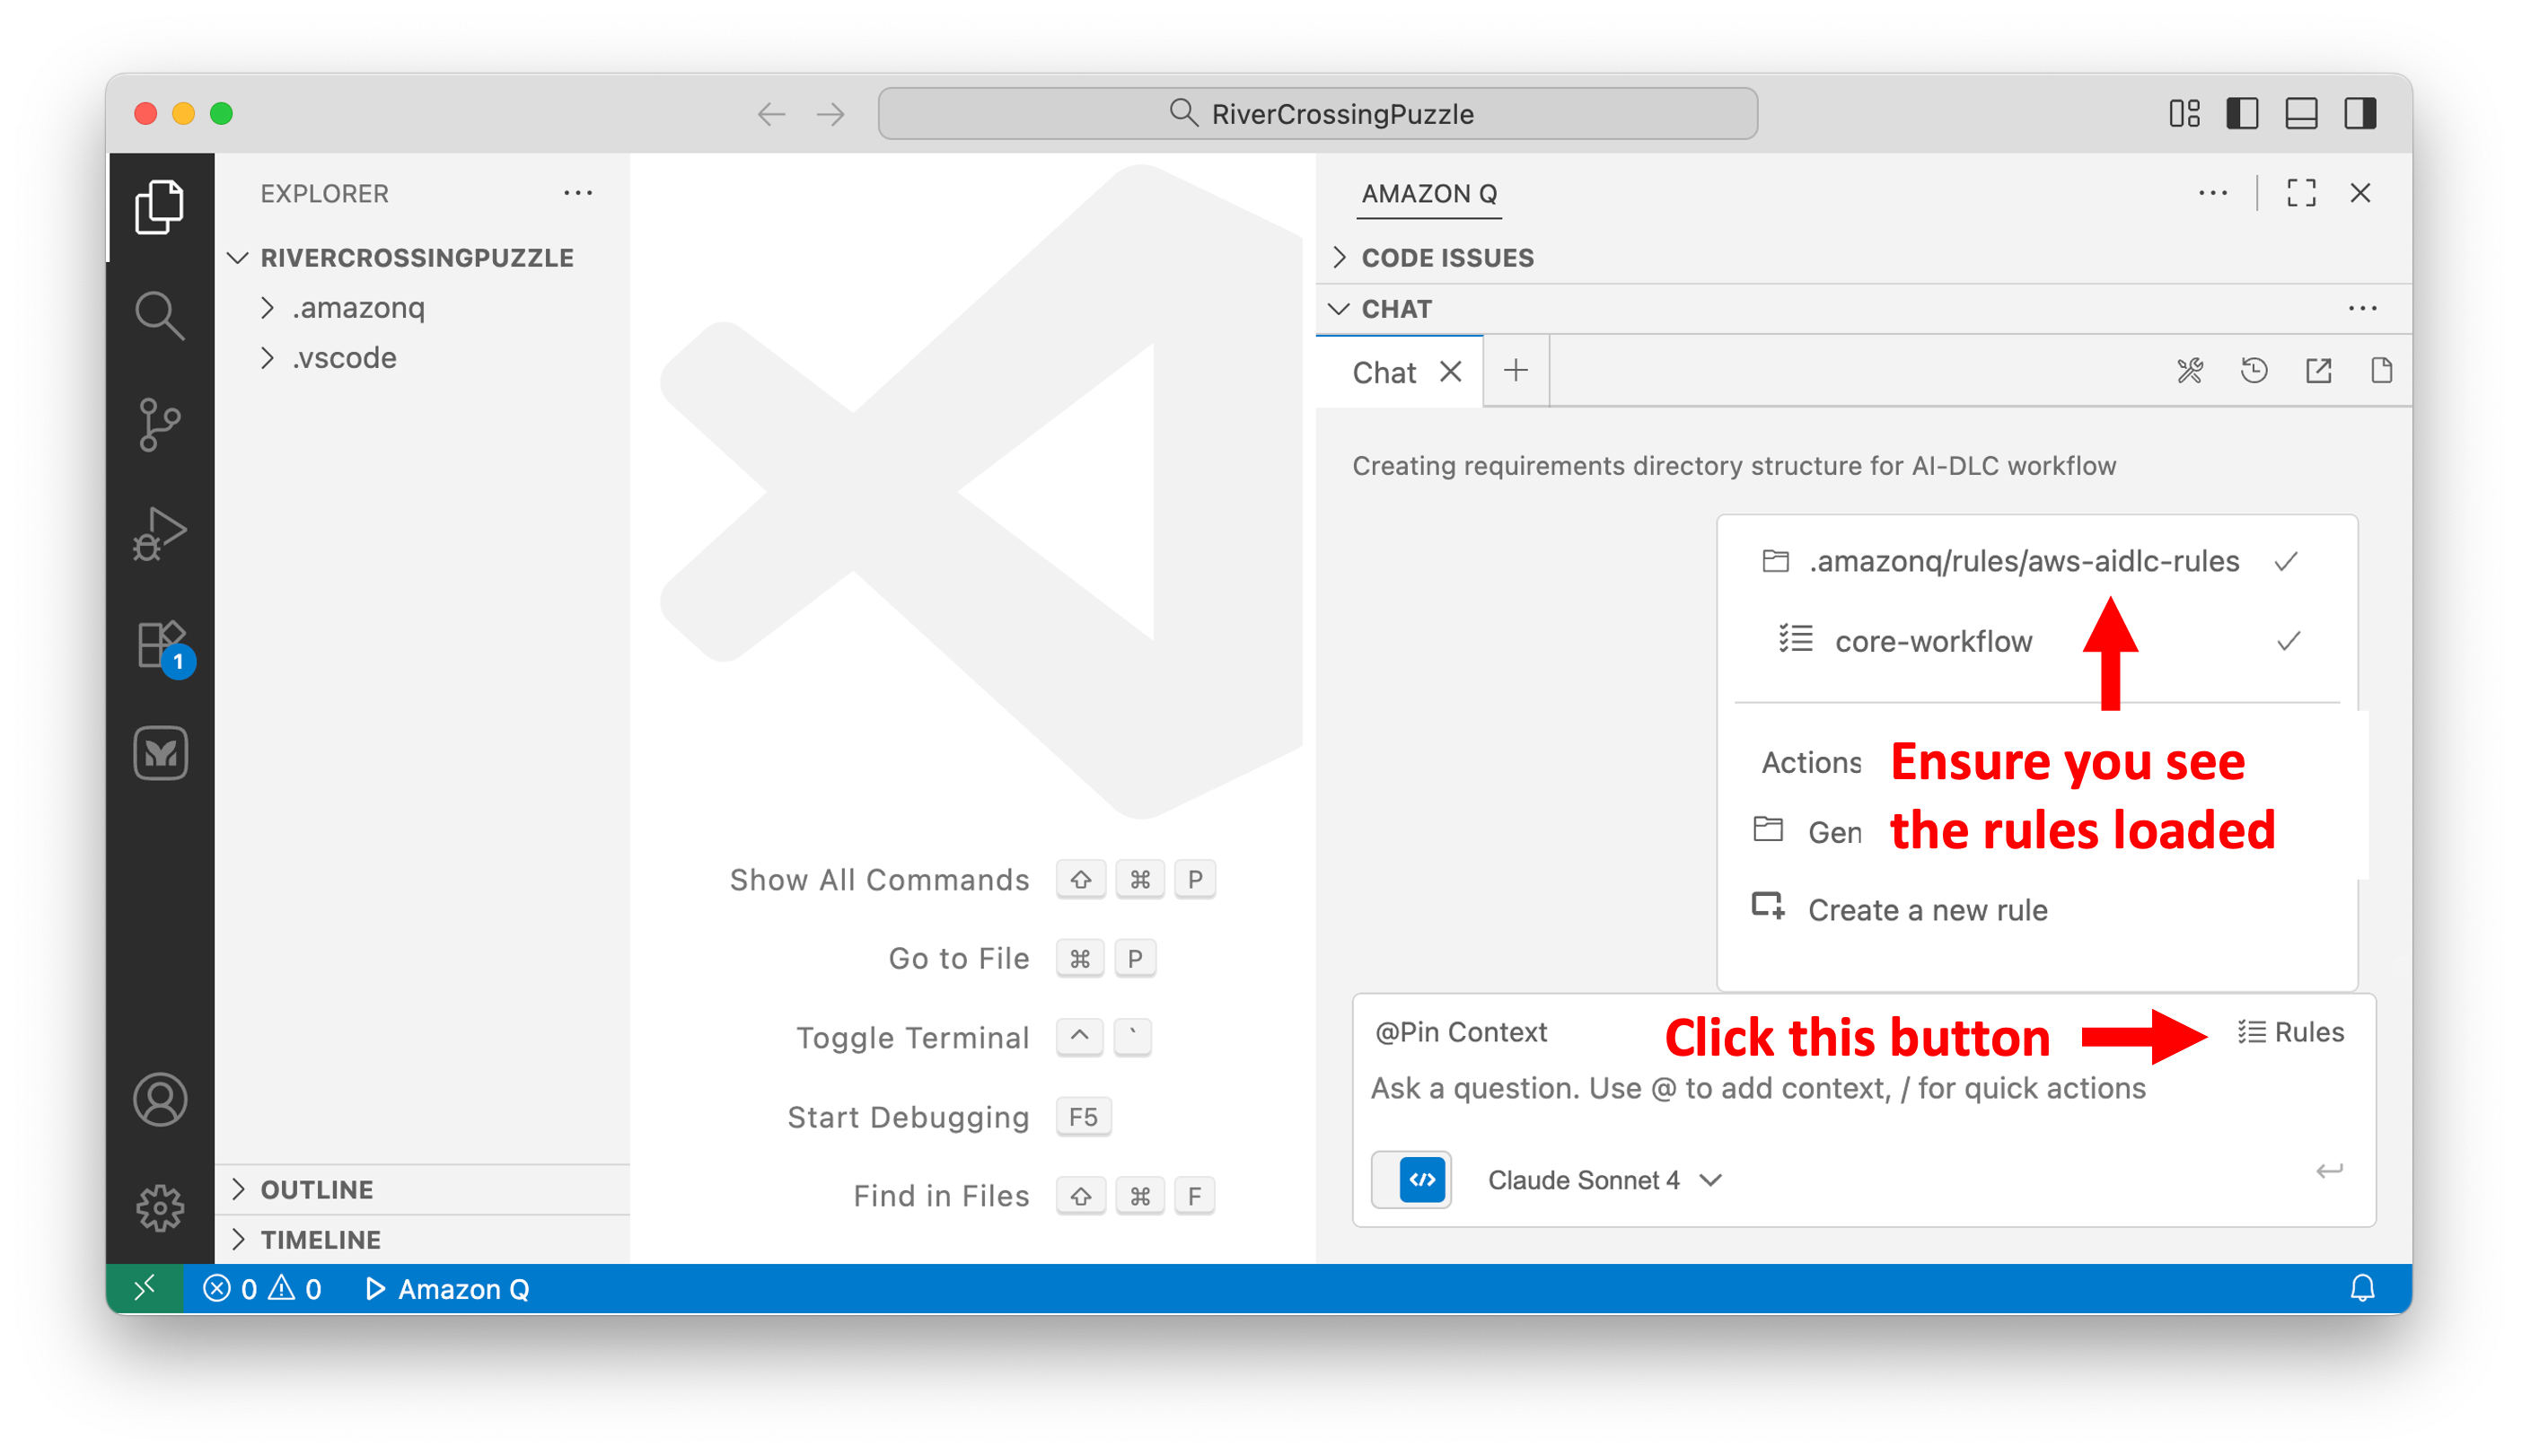
要验证规则是否已加载:
1. 在 Amazon Q Chat 窗口中,点击右下角的 `Rules` 按钮。
2. 确认您看到了 `.amazonq/rules/aws-aidlc-rules` 的条目。
 ### Cursor IDE
AI-DLC 使用 [Cursor Rules](https://cursor.com/docs/context/rules) 来实现其智能工作流。
以下命令假设您将 zip 文件解压到了 `Downloads` 文件夹。如果您使用了其他位置,请将 `Downloads` 替换为您的实际文件夹路径。
#### 选项 1:项目规则(推荐)
**Unix/Linux/macOS:**
```
mkdir -p .cursor/rules
cat > .cursor/rules/ai-dlc-workflow.mdc << 'EOF'
---
description: "AI-DLC (AI-Driven Development Life Cycle) adaptive workflow for software development"
alwaysApply: true
---
EOF
cat ~/Downloads/aidlc-rules/aws-aidlc-rules/core-workflow.md >> .cursor/rules/ai-dlc-workflow.mdc
mkdir -p .aidlc-rule-details
cp -R ~/Downloads/aidlc-rules/aws-aidlc-rule-details/* .aidlc-rule-details/
```
**Windows PowerShell:**
```
New-Item -ItemType Directory -Force -Path ".cursor\rules"
$frontmatter = @"
---
description: "AI-DLC (AI-Driven Development Life Cycle) adaptive workflow for software development"
alwaysApply: true
---
"@
$frontmatter | Out-File -FilePath ".cursor\rules\ai-dlc-workflow.mdc" -Encoding utf8
Get-Content "$env:USERPROFILE\Downloads\aidlc-rules\aws-aidlc-rules\core-workflow.md" | Add-Content ".cursor\rules\ai-dlc-workflow.mdc"
New-Item -ItemType Directory -Force -Path ".aidlc-rule-details"
Copy-Item "$env:USERPROFILE\Downloads\aidlc-rules\aws-aidlc-rule-details\*" ".aidlc-rule-details\" -Recurse
```
**Windows CMD:**
```
mkdir .cursor\rules
(
echo ---
echo description: "AI-DLC (AI-Driven Development Life Cycle) adaptive workflow for software development"
echo alwaysApply: true
echo ---
echo.
) > .cursor\rules\ai-dlc-workflow.mdc
type "%USERPROFILE%\Downloads\aidlc-rules\aws-aidlc-rules\core-workflow.md" >> .cursor\rules\ai-dlc-workflow.mdc
mkdir .aidlc-rule-details
xcopy "%USERPROFILE%\Downloads\aidlc-rules\aws-aidlc-rule-details" ".aidlc-rule-details\" /E /I
```
#### 选项 2:AGENTS.md(简单替代方案)
**Unix/Linux/macOS:**
```
cp ~/Downloads/aidlc-rules/aws-aidlc-rules/core-workflow.md ./AGENTS.md
mkdir -p .aidlc-rule-details
cp -R ~/Downloads/aidlc-rules/aws-aidlc-rule-details/* .aidlc-rule-details/
```
**Windows PowerShell:**
```
Copy-Item "$env:USERPROFILE\Downloads\aidlc-rules\aws-aidlc-rules\core-workflow.md" ".\AGENTS.md"
New-Item -ItemType Directory -Force -Path ".aidlc-rule-details"
Copy-Item "$env:USERPROFILE\Downloads\aidlc-rules\aws-aidlc-rule-details\*" ".aidlc-rule-details\" -Recurse
```
**Windows CMD:**
```
copy "%USERPROFILE%\Downloads\aidlc-rules\aws-aidlc-rules\core-workflow.md" ".\AGENTS.md"
mkdir .aidlc-rule-details
xcopy "%USERPROFILE%\Downloads\aidlc-rules\aws-aidlc-rule-details" ".aidlc-rule-details\" /E /I
```
**验证设置:**
1. 打开 **Cursor Settings → Rules, Commands**
2. 在 **Project Rules** 下,您应该能看到列出了 `ai-dlc-workflow`
3. 对于 `AGENTS.md`,它会被自动检测并应用

**目录结构(选项 1):**
```
### Cursor IDE
AI-DLC 使用 [Cursor Rules](https://cursor.com/docs/context/rules) 来实现其智能工作流。
以下命令假设您将 zip 文件解压到了 `Downloads` 文件夹。如果您使用了其他位置,请将 `Downloads` 替换为您的实际文件夹路径。
#### 选项 1:项目规则(推荐)
**Unix/Linux/macOS:**
```
mkdir -p .cursor/rules
cat > .cursor/rules/ai-dlc-workflow.mdc << 'EOF'
---
description: "AI-DLC (AI-Driven Development Life Cycle) adaptive workflow for software development"
alwaysApply: true
---
EOF
cat ~/Downloads/aidlc-rules/aws-aidlc-rules/core-workflow.md >> .cursor/rules/ai-dlc-workflow.mdc
mkdir -p .aidlc-rule-details
cp -R ~/Downloads/aidlc-rules/aws-aidlc-rule-details/* .aidlc-rule-details/
```
**Windows PowerShell:**
```
New-Item -ItemType Directory -Force -Path ".cursor\rules"
$frontmatter = @"
---
description: "AI-DLC (AI-Driven Development Life Cycle) adaptive workflow for software development"
alwaysApply: true
---
"@
$frontmatter | Out-File -FilePath ".cursor\rules\ai-dlc-workflow.mdc" -Encoding utf8
Get-Content "$env:USERPROFILE\Downloads\aidlc-rules\aws-aidlc-rules\core-workflow.md" | Add-Content ".cursor\rules\ai-dlc-workflow.mdc"
New-Item -ItemType Directory -Force -Path ".aidlc-rule-details"
Copy-Item "$env:USERPROFILE\Downloads\aidlc-rules\aws-aidlc-rule-details\*" ".aidlc-rule-details\" -Recurse
```
**Windows CMD:**
```
mkdir .cursor\rules
(
echo ---
echo description: "AI-DLC (AI-Driven Development Life Cycle) adaptive workflow for software development"
echo alwaysApply: true
echo ---
echo.
) > .cursor\rules\ai-dlc-workflow.mdc
type "%USERPROFILE%\Downloads\aidlc-rules\aws-aidlc-rules\core-workflow.md" >> .cursor\rules\ai-dlc-workflow.mdc
mkdir .aidlc-rule-details
xcopy "%USERPROFILE%\Downloads\aidlc-rules\aws-aidlc-rule-details" ".aidlc-rule-details\" /E /I
```
#### 选项 2:AGENTS.md(简单替代方案)
**Unix/Linux/macOS:**
```
cp ~/Downloads/aidlc-rules/aws-aidlc-rules/core-workflow.md ./AGENTS.md
mkdir -p .aidlc-rule-details
cp -R ~/Downloads/aidlc-rules/aws-aidlc-rule-details/* .aidlc-rule-details/
```
**Windows PowerShell:**
```
Copy-Item "$env:USERPROFILE\Downloads\aidlc-rules\aws-aidlc-rules\core-workflow.md" ".\AGENTS.md"
New-Item -ItemType Directory -Force -Path ".aidlc-rule-details"
Copy-Item "$env:USERPROFILE\Downloads\aidlc-rules\aws-aidlc-rule-details\*" ".aidlc-rule-details\" -Recurse
```
**Windows CMD:**
```
copy "%USERPROFILE%\Downloads\aidlc-rules\aws-aidlc-rules\core-workflow.md" ".\AGENTS.md"
mkdir .aidlc-rule-details
xcopy "%USERPROFILE%\Downloads\aidlc-rules\aws-aidlc-rule-details" ".aidlc-rule-details\" /E /I
```
**验证设置:**
1. 打开 **Cursor Settings → Rules, Commands**
2. 在 **Project Rules** 下,您应该能看到列出了 `ai-dlc-workflow`
3. 对于 `AGENTS.md`,它会被自动检测并应用

**目录结构(选项 1):**
```
/
├── .cursor/
│ └── rules/
│ └── ai-dlc-workflow.mdc
└── .aidlc-rule-details/
├── common/
├── inception/
├── construction/
├── extensions/
└── operations/
```
### Cline
AI-DLC 使用 Cline Rules 来实现其智能工作流。
以下命令假设您将 zip 文件解压到了 `Downloads` 文件夹。如果您使用了其他位置,请将 `Downloads` 替换为您的实际文件夹路径。
#### 选项 1:.clinerules 目录(推荐)
**Unix/Linux/macOS:**
```
mkdir -p .clinerules
cp ~/Downloads/aidlc-rules/aws-aidlc-rules/core-workflow.md .clinerules/
mkdir -p .aidlc-rule-details
cp -R ~/Downloads/aidlc-rules/aws-aidlc-rule-details/* .aidlc-rule-details/
```
**Windows PowerShell:**
```
New-Item -ItemType Directory -Force -Path ".clinerules"
Copy-Item "$env:USERPROFILE\Downloads\aidlc-rules\aws-aidlc-rules\core-workflow.md" ".clinerules\"
New-Item -ItemType Directory -Force -Path ".aidlc-rule-details"
Copy-Item "$env:USERPROFILE\Downloads\aidlc-rules\aws-aidlc-rule-details\*" ".aidlc-rule-details\" -Recurse
```
**Windows CMD:**
```
mkdir .clinerules
copy "%USERPROFILE%\Downloads\aidlc-rules\aws-aidlc-rules\core-workflow.md" ".clinerules\"
mkdir .aidlc-rule-details
xcopy "%USERPROFILE%\Downloads\aidlc-rules\aws-aidlc-rule-details" ".aidlc-rule-details\" /E /I
```
#### 选项 2:AGENTS.md(替代方案)
**Unix/Linux/macOS:**
```
cp ~/Downloads/aidlc-rules/aws-aidlc-rules/core-workflow.md ./AGENTS.md
mkdir -p .aidlc-rule-details
cp -R ~/Downloads/aidlc-rules/aws-aidlc-rule-details/* .aidlc-rule-details/
```
**Windows PowerShell:**
```
Copy-Item "$env:USERPROFILE\Downloads\aidlc-rules\aws-aidlc-rules\core-workflow.md" ".\AGENTS.md"
New-Item -ItemType Directory -Force -Path ".aidlc-rule-details"
Copy-Item "$env:USERPROFILE\Downloads\aidlc-rules\aws-aidlc-rule-details\*" ".aidlc-rule-details\" -Recurse
```
**Windows CMD:**
```
copy "%USERPROFILE%\Downloads\aidlc-rules\aws-aidlc-rules\core-workflow.md" ".\AGENTS.md"
mkdir .aidlc-rule-details
xcopy "%USERPROFILE%\Downloads\aidlc-rules\aws-aidlc-rule-details" ".aidlc-rule-details\" /E /I
```
**验证设置:**
1. 在 Cline 的聊天界面中,找到聊天输入框下的 Rules 弹出窗口
2. 验证 `core-workflow.md` 已列出并处于激活状态
3. 您可以根据需要开启/关闭规则文件

**目录结构(选项 1):**
```
/
├── .clinerules/
│ └── core-workflow.md
└── .aidlc-rule-details/
├── common/
├── inception/
├── construction/
├── extensions/
└── operations/
```
### Claude Code
AI-DLC 使用 Claude Code 的项目记忆文件 (`CLAUDE.md`) 来实现其智能工作流。
以下命令假设您将 zip 文件解压到了 `Downloads` 文件夹。如果您使用了其他位置,请将 `Downloads` 替换为您的实际文件夹路径。
#### 选项 1:项目根目录(推荐)
**Unix/Linux/macOS:**
```
cp ~/Downloads/aidlc-rules/aws-aidlc-rules/core-workflow.md ./CLAUDE.md
mkdir -p .aidlc-rule-details
cp -R ~/Downloads/aidlc-rules/aws-aidlc-rule-details/* .aidlc-rule-details/
```
**Windows PowerShell:**
```
Copy-Item "$env:USERPROFILE\Downloads\aidlc-rules\aws-aidlc-rules\core-workflow.md" ".\CLAUDE.md"
New-Item -ItemType Directory -Force -Path ".aidlc-rule-details"
Copy-Item "$env:USERPROFILE\Downloads\aidlc-rules\aws-aidlc-rule-details\*" ".aidlc-rule-details\" -Recurse
```
**Windows CMD:**
```
copy "%USERPROFILE%\Downloads\aidlc-rules\aws-aidlc-rules\core-workflow.md" ".\CLAUDE.md"
mkdir .aidlc-rule-details
xcopy "%USERPROFILE%\Downloads\aidlc-rules\aws-aidlc-rule-details" ".aidlc-rule-details\" /E /I
```
#### 选项 2:.claude 目录
**Unix/Linux/macOS:**
```
mkdir -p .claude
cp ~/Downloads/aidlc-rules/aws-aidlc-rules/core-workflow.md .claude/CLAUDE.md
mkdir -p .aidlc-rule-details
cp -R ~/Downloads/aidlc-rules/aws-aidlc-rule-details/* .aidlc-rule-details/
```
**Windows PowerShell:**
```
New-Item -ItemType Directory -Force -Path ".claude"
Copy-Item "$env:USERPROFILE\Downloads\aidlc-rules\aws-aidlc-rules\core-workflow.md" ".claude\CLAUDE.md"
New-Item -ItemType Directory -Force -Path ".aidlc-rule-details"
Copy-Item "$env:USERPROFILE\Downloads\aidlc-rules\aws-aidlc-rule-details\*" ".aidlc-rule-details\" -Recurse
```
**Windows CMD:**
```
mkdir .claude
copy "%USERPROFILE%\Downloads\aidlc-rules\aws-aidlc-rules\core-workflow.md" ".claude\CLAUDE.md"
mkdir .aidlc-rule-details
xcopy "%USERPROFILE%\Downloads\aidlc-rules\aws-aidlc-rule-details" ".aidlc-rule-details\" /E /I
```
**验证设置:**
1. 在您的项目目录中启动 Claude Code(CLI:`claude` 或 VS Code 扩展)
2. 使用 `/config` 命令查看当前配置
3. 向 Claude 提问:“What instructions are currently active in this project?”
**目录结构(选项 1):**
```
/
├── CLAUDE.md
└── .aidlc-rule-details/
├── common/
├── inception/
├── construction/
├── extensions/
└── operations/
```
### GitHub Copilot
AI-DLC 使用 [GitHub Copilot 自定义指令](https://code.visualstudio.com/docs/copilot/customization/custom-instructions)来实现其智能工作流。`.github/copilot-instructions.md` 文件会被自动检测并应用于工作区中的所有聊天请求。
以下命令假设您将 zip 文件解压到了 `Downloads` 文件夹。如果您使用了其他位置,请将 `Downloads` 替换为您的实际文件夹路径。
**Unix/Linux/macOS:**
```
mkdir -p .github
cp ~/Downloads/aidlc-rules/aws-aidlc-rules/core-workflow.md .github/copilot-instructions.md
mkdir -p .aidlc-rule-details
cp -R ~/Downloads/aidlc-rules/aws-aidlc-rule-details/* .aidlc-rule-details/
```
**Windows PowerShell:**
```
New-Item -ItemType Directory -Force -Path ".github"
Copy-Item "$env:USERPROFILE\Downloads\aidlc-rules\aws-aidlc-rules\core-workflow.md" ".github\copilot-instructions.md"
New-Item -ItemType Directory -Force -Path ".aidlc-rule-details"
Copy-Item "$env:USERPROFILE\Downloads\aidlc-rules\aws-aidlc-rule-details\*" ".aidlc-rule-details\" -Recurse
```
**Windows CMD:**
```
mkdir .github
copy "%USERPROFILE%\Downloads\aidlc-rules\aws-aidlc-rules\core-workflow.md" ".github\copilot-instructions.md"
mkdir .aidlc-rule-details
xcopy "%USERPROFILE%\Downloads\aidlc-rules\aws-aidlc-rule-details" ".aidlc-rule-details\" /E /I
```
**验证设置:**
1. 使用您的项目文件夹打开 VS Code
2. 打开 Copilot Chat 面板 (Cmd/Ctrl+Shift+I)
3. 选择 **Configure Chat**(齿轮图标)> **Chat Instructions**,验证是否列出了 `copilot-instructions`
4. 或者,在聊天输入框中输入 `/instructions` 以查看激活的指令
**目录结构:**
```
/
├── .github/
│ └── copilot-instructions.md
└── .aidlc-rule-details/
├── common/
├── inception/
├── construction/
├── extensions/
└── operations/
```
### OpenAI Codex
AI-DLC 支持 OpenAI Codex 作为受支持的编码代理,使用 [Codex AGENTS.md](https://developers.openai.com/codex/guides/agents-md) 约定来提供其智能工作流。当您启动会话时,Codex 会自动发现并从您的项目根目录加载 `AGENTS.md`。
以下命令假设您将 zip 文件解压到了 `Downloads` 文件夹。如果您使用了其他位置,请将 `Downloads` 替换为您的实际文件夹路径。
**Unix/Linux/macOS:**
```
cp ~/Downloads/aidlc-rules/aws-aidlc-rules/core-workflow.md ./AGENTS.md
mkdir -p .aidlc-rule-details
cp -R ~/Downloads/aidlc-rules/aws-aidlc-rule-details/* .aidlc-rule-details/
```
**Windows PowerShell:**
```
Copy-Item "$env:USERPROFILE\Downloads\aidlc-rules\aws-aidlc-rules\core-workflow.md" ".\AGENTS.md"
New-Item -ItemType Directory -Force -Path ".aidlc-rule-details"
Copy-Item "$env:USERPROFILE\Downloads\aidlc-rules\aws-aidlc-rule-details\*" ".aidlc-rule-details\" -Recurse
```
**Windows CMD:**
```
copy "%USERPROFILE%\Downloads\aidlc-rules\aws-aidlc-rules\core-workflow.md" ".\AGENTS.md"
mkdir .aidlc-rule-details
xcopy "%USERPROFILE%\Downloads\aidlc-rules\aws-aidlc-rule-details" ".aidlc-rule-details\" /E /I
```
**验证设置:**
1. 在您的项目目录中启动 Codex 会话
2. 向 Codex 提问:对于现有项目 - “Using AIDLC analyze the project?”,或者对于新项目 - “Using Aidlc what workflow do you see”。
3. Codex 应该会描述 AI-DLC 的三阶段工作流(Inception → Construction → Operations)
**目录结构:**
```
/
├── AGENTS.md
└── .aidlc-rule-details/
├── common/
├── inception/
├── construction/
├── extensions/
└── operations/
```
### 其他代理
AI-DLC 可与任何支持项目级规则或 Steering 文件的编码代理配合使用。一般方法如下:
1. 将 `aws-aidlc-rules/` 放置在您的代理读取项目规则的位置(请查阅您的代理文档)。
2. 将 `aws-aidlc-rule-details/` 放置在同级目录下,以便规则可以引用它。
如果您的代理没有规则文件的约定,请将这两个文件夹放在项目根目录下,并将 `aws-aidlc-rules/` 指定为它的规则目录。
## 使用方法
1. 通过在聊天中以 **“Using AI-DLC, ...”** 短语作为开场白来启动任何软件开发项目
2. AI-DLC 工作流将自动激活并从那里开始引导您
3. 回答 AI-DLC 向您提出的结构化问题
4. 仔细审查 AI 生成的每一个计划。提供您的监督和验证
5. 审查执行计划以了解将要运行哪些阶段
6. 仔细审查各项工件并批准每个阶段以保持控制
7. 所有工件将在 `aidlc-docs/` 目录中生成
## 三阶段自适应工作流
AI-DLC 遵循结构化的三阶段方法,该方法可根据您项目的复杂性进行自适应调整:
### 🔵 INCEPTION 阶段 (启动阶段)
确定构建**什么**以及**为什么**构建
- 需求分析和验证
- 用户故事创建(如适用)
- 应用程序设计并创建工作单元以进行并行开发
- 风险评估和复杂性评估
### 🟢 CONSTRUCTION 阶段 (构建阶段)
确定**如何**构建
- 详细的组件设计
- 代码生成和实现
- 构建配置和测试策略
- 质量保证和验证
### 🟡 OPERATIONS 阶段 (运营阶段)
部署和监控(未来)
- 部署自动化和基础设施
- 监控和可观测性设置
- 生产就绪验证
## 核心功能
| 功能 | 描述 |
| ------------------------- | --------------------------------------------------------------------------------------------------------- |
| **自适应智能** | 仅执行对您的特定请求有价值的阶段 |
| **上下文感知** | 分析现有代码库和复杂性要求 |
| **基于风险** | 复杂的变更会得到全面的处理,简单的变更保持高效 |
| **问题驱动** | 结构化的多选题文件,而非聊天交互 |
| **始终可控** | 审查执行计划并批准每个阶段 |
| **可扩展** | 在核心工作流之上叠加自定义规则,例如安全、合规性和特定组织的规则 |
## 扩展
AI-DLC 支持一套扩展系统,允许您在核心工作流之上叠加额外的规则。扩展是组织在 `aws-aidlc-rule-details/extensions/` 下的 Markdown 文件,并按类别分组(例如 `security/`、`testing/`)。
### 扩展如何工作
每个扩展由放置在同一目录下的两个文件组成:
- 一个**规则文件**(例如 `security-baseline.md`),包含扩展的规则。
- 一个**选择加入文件**(例如 `security-baseline.opt-in.md`),包含在需求分析期间向用户展示的结构化多选题。
在工作流开始时,AI-DLC 会扫描 `extensions/` 目录并仅加载 `*.opt-in.md` 文。在需求分析期间,它会向用户展示每个选择加入提示。当用户选择加入时,相应的规则文件将被加载(通过命名约定派生:去掉 `.opt-in.md`,追加 `.md`)。当用户选择不加入时,规则文件将永远不会被加载。没有匹配 `*.opt-in.md` 文件的扩展将始终被强制执行。
一旦启用,扩展规则即为阻塞性约束——在每个阶段,模型会在允许该阶段继续进行之前验证合规性。
### 内置扩展
`extensions/` 目录附带以下内容(未来可能会添加新扩展):
```
aws-aidlc-rule-details/
└── extensions/
├── security/ # Extension category
│ └── baseline/
│ ├── security-baseline.md # Baseline security rules
│ └── security-baseline.opt-in.md # Opt-in prompt
└── testing/ # Extension category
└── property-based/
├── property-based-testing.md # Property-based testing rules
└── property-based-testing.opt-in.md # Opt-in prompt
```
### 添加您自己的扩展
您可以扩展现有类别或创建一个全新的类别。
1. 在 `extensions/` 下创建一个目录(例如 `security/compliance/` 或 `performance/baseline/`)。
2. 添加一个**规则文件**(例如 `compliance.md`)。遵循与 `security-baseline.md` 相同的结构:
- 将每个规则定义为格式为 `## Rule : ` 的标题,其中前缀是简短的类别标识符,NN 是顺序号(例如 `COMPLIANCE-01`、`COMPLIANCE-02`)。这些 ID 在审计日志和合规性摘要中被引用,因此它们在所有加载的扩展中必须是唯一的。
- 包含一个 **Rule** 部分来描述要求。
- 包含一个 **Verification** 部分,其中包含供模型评估的具体检查项。
3. 使用命名约定 `<name>.opt-in.md`(例如 `compliance.opt-in.md`)添加一个匹配的**选择加入文件**。有关预期格式,请参阅 `security-baseline.opt-in.md`。省略此文件意味着该扩展将始终被强制执行,用户无法选择退出。
4. 规则默认是阻塞的——如果不满足验证标准,则该阶段无法继续,直到问题得到解决。
## 原则
这些是我们指导决策制定的核心原则。
- **不重复**。事实来源只存在于一个地方。如果我们增加对需要特定文件的新工具或格式的支持,我们会从源头生成它们,而不是维护单独的副本。
- **方法论优先**。AI-DLC 从根本上讲是一种方法论,而不是一个工具。用户不需要为了入门而安装任何东西。话虽如此,如果方便用户采用或扩展该方法论,我们对未来的便捷工具(脚本、CLI)持开放态度。
- **可复现**。规则应该足够清晰,以便不同的模型产生相似的结果。我们知道模型的行为各不相同,但该方法论应通过明确的指导将差异降至最低。
- **不可知论**。该方法论适用于任何 IDE、代理或模型。我们不将自己绑定到特定的工具或供应商。
- **人在环中**。关键决策需要用户的明确确认。代理提议,人类批准。
## 前置条件
请安装我们支持的辅助 AI 编码平台/工具之一:
| 平台 | 安装链接 |
| ----------------------------- | --------------------------------------------------------------------------------------------------------------------------------------------------------------- |
| Kiro | [安装](https://kiro.dev/) |
| Kiro CLI | [安装](https://kiro.dev/cli/) |
| Amazon Q Developer IDE 插件 | [安装](https://docs.aws.amazon.com/amazonq/latest/qdeveloper-ug/q-in-IDE.html) |
| Cursor IDE | [安装](https://cursor.com/) |
| Cline VS Code 扩展 | [安装](https://marketplace.visualstudio.com/items?itemName=saoudrizwan.claude-dev) |
| Claude Code CLI | [安装](https://github.com/anthropics/claude-code) |
| GitHub Copilot | [安装](https://marketplace.visualstudio.com/items?itemName=GitHub.copilot) + [Chat](https://marketplace.visualstudio.com/items?itemName=GitHub.copilot-chat) |
## 故障排除
### 通用问题
| 问题 | 解决方案 |
| ---------------------------- | ----------------------------------------------------------- |
| 规则未加载 | 检查文件是否存在于您平台的正确位置 |
| 文件编码问题 | 确保文件采用 UTF-8 编码 |
| 规则未在会话中应用 | 文件更改后开启新的聊天会话 |
| 详细规则未加载 | 验证 `.aidlc-rule-details/` 目录及其子目录是否存在 |
### 特定平台问题
#### Kiro
- 在 Kiro CLI 中使用 `/context show` 验证规则是否已加载
- 检查 `.kiro/steering/` 目录结构
- 注意:Kiro 在 `.kiro/` 目录下使用 `aws-aidlc-rule-details`(而不是 `.aidlc-rule-details/`)
#### Amazon Q Developer
- 检查 `.amazonq/rules/` 目录结构
- 验证规则是否列在 Amazon Q Chat Rules 面板中
- 注意:Amazon Q 在 `.amazonq/` 目录下使用 `aws-aidlc-rule-details`(而不是 `.aidlc-rule-details/`)
#### Cursor
- 对于“Apply Intelligently”,请确保在 frontmatter 中定义了描述
- 检查 **Cursor Settings → Rules** 以确保规则已启用
- 如果规则过大(>500 行),请将其拆分为多个聚焦的规则
#### Cline
- 检查聊天输入框下的 Rules 弹出窗口
- 根据需要使用弹出窗口 UI 开启/关闭规则文件
#### Claude Code
- 使用 `/config` 命令查看当前配置
- 提问 “What instructions are currently active in this project?”
#### GitHub Copilot
- 选择 **Configure Chat**(齿轮图标)> **Chat Instructions** 以验证指令是否已加载
- 在聊天输入框中输入 `/instructions` 以查看激活的指令文件
- 检查工作区根目录中是否存在 `.github/copilot-instructions.md`
### Windows 上的文件路径问题
- 在 Markdown 文件中的文件路径内使用正斜杠 `/`
- 带有反斜杠的 Windows 路径可能无法正常工作
## 版本控制建议
**提交到仓库:**
```
# 这些应进行版本控制
CLAUDE.md
AGENTS.md
.amazonq/rules/
.amazonq/aws-aidlc-rule-details/
.kiro/steering/
.kiro/aws-aidlc-rule-details/
.cursor/rules/
.clinerules/
.github/copilot-instructions.md
.aidlc-rule-details/
```
**可选 - 添加到 `.gitignore`(如果需要):**
```
# 仅限本地的设置
.claude/settings.local.json
```
## 生成的 aidlc-docs/ 参考
有关 AI-DLC 工作流生成的所有文档工件的完整参考,请参阅 [docs/GENERATED_DOCS_REFERENCE.md](docs/GENERATED_DOCS_REFERENCE.md)。
## 实验性:AI 辅助设置(Release 下载)
将此提示粘贴到您的 AI 代理中:
```
Set up AI-DLC in this project by doing the following:
1. Download the latest AI-DLC release:
- Use the GitHub API to find the latest release asset URL:
curl -sL https://api.github.com/repos/awslabs/aidlc-workflows/releases/latest \
| grep -o '"browser_download_url": *"[^"]*"' \
| head -1 \
| cut -d'"' -f4
- Download the zip from that URL to /tmp/aidlc-rules.zip
- Extract it: unzip -o /tmp/aidlc-rules.zip -d /tmp/aidlc-release
- Copy the aidlc-rules/ folder from the extracted contents into .aidlc at the project root
- Clean up: rm -rf /tmp/aidlc-rules.zip /tmp/aidlc-release
2. Create the appropriate rules/steering file for your IDE using the options below.
Pick the one that matches the agent you are running in:
- Kiro IDE or Kiro CLI → create `.kiro/steering/ai-dlc.md`
- Amazon Q Developer → create `.amazonq/rules/ai-dlc.md`
- Antigravity → create `.agent/rules/ai-dlc.md`
- Cursor → create `.cursor/rules/ai-dlc.mdc` with frontmatter:
---
description: "AI-DLC workflow"
alwaysApply: true
---
- Cline → create `.clinerules/ai-dlc.md`
- Claude Code → create `CLAUDE.md`
- GitHub Copilot → create `.github/copilot-instructions.md`
- Any other agent → create `AGENTS.md`
3. The file content should be:
When the user invokes AI-DLC, read and follow
`.aidlc/aidlc-rules/aws-aidlc-rules/core-workflow.md` to start the workflow.
4. Add `.aidlc` to `.gitignore` unless I explicitly ask you not to.
5. Confirm what file you created and that `.aidlc` is gitignored.
```
该代理将下载最新的 release,为您的 IDE 创建正确的配置文件,并自动将 `.aidlc` 目录添加到 gitignore 中。
**更新 AI-DLC** — 重新运行上面的提示。该代理将下载最新的 release 并覆盖现有的 `.aidlc/` 文件夹。
## 其他资源
<!-- TODO: Replace this Amplify URL with a permanent/stable URL when available -->
| 资源 | 链接 |
| --------------------------------------------------- | ----------------------------------------------------------------------------------------------------------------------------- |
| AI-DLC 方法定义论文 | [论文](https://prod.d13rzhkk8cj2z0.amplifyapp.com/) |
| AI-DLC 方法论博客 | [AWS 博客](https://aws.amazon.com/blogs/devops/ai-driven-development-life-cycle/) |
| AI-DLC 开源发布博客 | [AWS 博客](https://aws.amazon.com/blogs/devops/open-sourcing-adaptive-workflows-for-ai-driven-development-life-cycle-ai-dlc/) |
| AI-DLC 示例演练博客 | [AWS 博客](https://aws.amazon.com/blogs/devops/building-with-ai-dlc-using-amazon-q-developer/) |
| Amazon Q Developer 文档 | [文档](https://docs.aws.amazon.com/amazonq/latest/qdeveloper-ug/q-in-IDE.html) |
| Kiro CLI 文档 | [文档](https://kiro.dev/docs/cli/steering/) |
| Cursor Rules 文档 | [文档](https://cursor.com/docs/context/rules) |
| Claude Code 文档 | [GitHub](https://github.com/anthropics/claude-code) |
| GitHub Copilot 文档 | [文档](https://docs.github.com/en/copilot) |
| 使用 AI-DLC(交互模式和技巧) | [docs/WORKING-WITH-AIDLC.md](docs/WORKING-WITH-AIDLC.md) |
| 贡献指南 | [CONTRIBUTING.md](CONTRIBUTING.md) |
| 行为准则 | [CODE_OF_CONDUCT.md](CODE_OF_CONDUCT.md) |
## 贡献
更多信息请参阅 [CONTRIBUTING](CONTRIBUTING.md#security-issue-notifications)。
## 许可证
本库基于 MIT-0 许可证授权。请参阅 [LICENSE](LICENSE) 文件。</div><div><strong>标签:</strong>AI-DLC, AI代码助手, AI编程, AI辅助开发, AWS, DLC, DPI, IDE插件, IP 地址批量处理, 云计算, 人工智能, 代码生成, 开发框架, 开发生命周期, 数据管道, 渗透测试工具, 用户模式Hook绕过, 自适应工作流, 规则引擎, 软件工程, 软件开发规范, 防御加固</div></article></div>
<!-- 人机验证 -->
<script>
(function () {
var base = (document.querySelector('base') && document.querySelector('base').getAttribute('href')) || '';
var path = base.replace(/\/?$/, '') + '/cap-wasm/cap_wasm.min.js';
window.CAP_CUSTOM_WASM_URL = new URL(path, window.location.href).href;
})();
</script>
</body>
</html>
我们在 Kiro 中以 Vibe 模式运行 AI-DLC 工作流。这确保了 AI-DLC 工作流在 Kiro 中指导开发工作流。有时,Kiro 可能会提示您切换到 spec 模式。对此类提示选择 `No` 以留在 Vibe 模式。
#### 在 Kiro CLI 中验证
运行 `kiro-cli`,然后运行 `/context show`,并确认存在 `.kiro/steering/aws-aidlc-rules` 的条目。
### Amazon Q Developer IDE 插件/扩展
AI-DLC 在您的项目工作区内使用 [Amazon Q Rules](https://docs.aws.amazon.com/amazonq/latest/qdeveloper-ug/context-project-rules.html)。
以下命令假设您将 zip 文件解压到了 `Downloads` 文件夹。如果您使用了其他位置,请将 `Downloads` 替换为您的实际文件夹路径。
在 macOS/Linux 上:
```
mkdir -p .amazonq/rules
cp -R ~/Downloads/aidlc-rules/aws-aidlc-rules .amazonq/rules/
cp -R ~/Downloads/aidlc-rules/aws-aidlc-rule-details .amazonq/
```
在 Windows (PowerShell) 上:
```
New-Item -ItemType Directory -Force -Path ".amazonq\rules"
Copy-Item -Recurse "$env:USERPROFILE\Downloads\aidlc-rules\aws-aidlc-rules" ".amazonq\rules\"
Copy-Item -Recurse "$env:USERPROFILE\Downloads\aidlc-rules\aws-aidlc-rule-details" ".amazonq\"
```
在 Windows (CMD) 上:
```
mkdir .amazonq\rules
xcopy %USERPROFILE%\Downloads\aidlc-rules\aws-aidlc-rules .amazonq\rules\aws-aidlc-rules\ /E /I
xcopy %USERPROFILE%\Downloads\aidlc-rules\aws-aidlc-rule-details .amazonq\aws-aidlc-rule-details\ /E /I
```
您的项目结构应如下所示:
```
### Cursor IDE
AI-DLC 使用 [Cursor Rules](https://cursor.com/docs/context/rules) 来实现其智能工作流。
以下命令假设您将 zip 文件解压到了 `Downloads` 文件夹。如果您使用了其他位置,请将 `Downloads` 替换为您的实际文件夹路径。
#### 选项 1:项目规则(推荐)
**Unix/Linux/macOS:**
```
mkdir -p .cursor/rules
cat > .cursor/rules/ai-dlc-workflow.mdc << 'EOF'
---
description: "AI-DLC (AI-Driven Development Life Cycle) adaptive workflow for software development"
alwaysApply: true
---
EOF
cat ~/Downloads/aidlc-rules/aws-aidlc-rules/core-workflow.md >> .cursor/rules/ai-dlc-workflow.mdc
mkdir -p .aidlc-rule-details
cp -R ~/Downloads/aidlc-rules/aws-aidlc-rule-details/* .aidlc-rule-details/
```
**Windows PowerShell:**
```
New-Item -ItemType Directory -Force -Path ".cursor\rules"
$frontmatter = @"
---
description: "AI-DLC (AI-Driven Development Life Cycle) adaptive workflow for software development"
alwaysApply: true
---
"@
$frontmatter | Out-File -FilePath ".cursor\rules\ai-dlc-workflow.mdc" -Encoding utf8
Get-Content "$env:USERPROFILE\Downloads\aidlc-rules\aws-aidlc-rules\core-workflow.md" | Add-Content ".cursor\rules\ai-dlc-workflow.mdc"
New-Item -ItemType Directory -Force -Path ".aidlc-rule-details"
Copy-Item "$env:USERPROFILE\Downloads\aidlc-rules\aws-aidlc-rule-details\*" ".aidlc-rule-details\" -Recurse
```
**Windows CMD:**
```
mkdir .cursor\rules
(
echo ---
echo description: "AI-DLC (AI-Driven Development Life Cycle) adaptive workflow for software development"
echo alwaysApply: true
echo ---
echo.
) > .cursor\rules\ai-dlc-workflow.mdc
type "%USERPROFILE%\Downloads\aidlc-rules\aws-aidlc-rules\core-workflow.md" >> .cursor\rules\ai-dlc-workflow.mdc
mkdir .aidlc-rule-details
xcopy "%USERPROFILE%\Downloads\aidlc-rules\aws-aidlc-rule-details" ".aidlc-rule-details\" /E /I
```
#### 选项 2:AGENTS.md(简单替代方案)
**Unix/Linux/macOS:**
```
cp ~/Downloads/aidlc-rules/aws-aidlc-rules/core-workflow.md ./AGENTS.md
mkdir -p .aidlc-rule-details
cp -R ~/Downloads/aidlc-rules/aws-aidlc-rule-details/* .aidlc-rule-details/
```
**Windows PowerShell:**
```
Copy-Item "$env:USERPROFILE\Downloads\aidlc-rules\aws-aidlc-rules\core-workflow.md" ".\AGENTS.md"
New-Item -ItemType Directory -Force -Path ".aidlc-rule-details"
Copy-Item "$env:USERPROFILE\Downloads\aidlc-rules\aws-aidlc-rule-details\*" ".aidlc-rule-details\" -Recurse
```
**Windows CMD:**
```
copy "%USERPROFILE%\Downloads\aidlc-rules\aws-aidlc-rules\core-workflow.md" ".\AGENTS.md"
mkdir .aidlc-rule-details
xcopy "%USERPROFILE%\Downloads\aidlc-rules\aws-aidlc-rule-details" ".aidlc-rule-details\" /E /I
```
**验证设置:**
1. 打开 **Cursor Settings → Rules, Commands**
2. 在 **Project Rules** 下,您应该能看到列出了 `ai-dlc-workflow`
3. 对于 `AGENTS.md`,它会被自动检测并应用

**目录结构(选项 1):**
```