smart-mcp-proxy/mcpproxy-go
GitHub: smart-mcp-proxy/mcpproxy-go
一款为 AI Agent 提供智能工具聚合、Token 优化与安全隔离的 MCP 协议代理桌面应用。
Stars: 257 | Forks: 35
# MCPProxy – AI Agent 智能代理
**MCPProxy** 是一款开源桌面应用程序,通过智能工具发现、大量 token 节省以及针对恶意 MCP 服务器的内置安全隔离,为 AI agent 提供强力加持。
### **📚 [阅读文档](https://docs.mcpproxy.app/)**
[](https://youtu.be/2aKrgJnbbcw)
🌐 访问 mcpproxy.app


System Tray - Upstream Servers System Tray - Quarantine Management
## 为什么选择 MCPProxy?
- **突破 API 限制** – 联合数百个 MCP 服务器,同时绕过 Cursor 的 40 个工具限制和 OpenAI 的 128 个函数上限。
- **节省 token 并加速响应** – Agent 只需加载一个 `retrieve_tools` 函数,而不是数百个 schema。研究表明可实现约 99% 的 token 减少和 **43% 的准确率提升**。
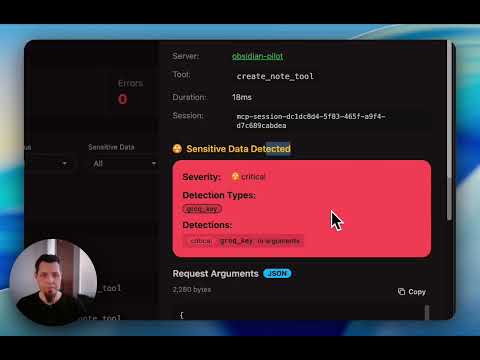
- **高级安全防护** – 自动隔离可阻止工具投毒攻击,直到您手动批准新服务器。
- **离线可用且跨平台** – 支持 macOS(Intel 和 Apple Silicon)、Windows(x64 和 ARM64)以及 Linux(x64 和 ARM64)的原生二进制文件,并提供系统托盘 UI。
## 快速开始
### 1. 安装
**macOS(推荐 - DMG 安装包):**
下载适用于您架构的最新 DMG 安装包:
- **Apple Silicon (M1/M2):** [下载 DMG](https://github.com/smart-mcp-proxy/mcpproxy-go/releases/latest) → `mcpproxy-*-darwin-arm64.dmg`
- **Intel Mac:** [下载 DMG](https://github.com/smart-mcp-proxy/mcpproxy-go/releases/latest) → `mcpproxy-*-darwin-amd64.dmg`
**Windows(推荐 - 安装程序):**
下载适用于您架构的最新 Windows 安装程序:
- **x64 (64-bit):** [下载安装程序](https://github.com/smart-mcp-proxy/mcpproxy-go/releases/latest) → `mcpproxy-setup-*-amd64.exe`
- **ARM64:** [下载安装程序](https://github.com/smart-mcp-proxy/mcpproxy-go/releases/latest) → `mcpproxy-setup-*-arm64.exe`
安装程序会自动:
- 将 `mcpproxy.exe`(核心服务)和 `mcpproxy-tray.exe`(系统托盘应用)安装到 Program Files
- 将 MCPProxy 添加到系统 PATH 以便命令行访问
- 创建开始菜单快捷方式
- 支持静默安装:`.\mcpproxy-setup.exe /VERYSILENT`
**其他安装方法:**
macOS (Homebrew):
```
brew install smart-mcp-proxy/mcpproxy/mcpproxy
```
手动下载(所有平台):
- **Linux**: [AMD64](https://github.com/smart-mcp-proxy/mcpproxy-go/releases/latest/download/mcpproxy-latest-linux-amd64.tar.gz) | [ARM64](https://github.com/smart-mcp-proxy/mcpproxy-go/releases/latest/download/mcpproxy-latest-linux-arm64.tar.gz)
- **Windows**: [AMD64](https://github.com/smart-mcp-proxy/mcpproxy-go/releases/latest/download/mcpproxy-latest-windows-amd64.zip) | [ARM64](https://github.com/smart-mcp-proxy/mcpproxy-go/releases/latest/download/mcpproxy-latest-windows-arm64.zip)
**预发布版本(最新功能):**
想体验最新功能?下载 `next` 分支的预发布版本:
1. 前往 [GitHub Actions](https://github.com/smart-mcp-proxy/mcpproxy-go/actions)
2. 点击最近一次成功的 "Prerelease" 工作流运行
3. 从 **Artifacts** 下载:
- `dmg-darwin-arm64` (Apple Silicon Macs)
- `dmg-darwin-amd64` (Intel Macs)
- `versioned-linux-amd64`, `versioned-windows-amd64` (其他平台)
- **macOS**: [Intel](https://github.com/smart-mcp-proxy/mcpproxy-go/releases/latest/download/mcpproxy-latest-darwin-amd64.tar.gz) | [Apple Silicon](https://github.com/smart-mcp-proxy/mcpproxy-go/releases/latest/download/mcpproxy-latest-darwin-arm64.tar.gz)
任何安装了 Go 1.22+ 的环境:
```
go install github.com/smart-mcp-proxy/mcpproxy-go/cmd/mcpproxy@latest
```
### 2. 运行
```
mcpproxy serve # starts HTTP server on :8080 and shows tray
```
### 3. 添加服务器
编辑 `mcp_config.json`(见下文)。或者**让 LLM** 添加服务器(见 [文档](https://mcpproxy.app/docs/configuration#adding-servers))。
### 4. 连接到您的 IDE/AI 工具
📖 **[完整设置指南](docs/setup.md)** - 针对 Cursor, VS Code, Claude Desktop 和 Goose 的详细说明
## 将代理添加到 Cursor
### 一键安装到 Cursor IDE
[](https://mcpproxy.app/cursor-install.html)
### 手动安装
1. 打开 Cursor 设置
2. 点击 "Tools & Integrations"
3. 添加 MCP 服务器
```
"MCPProxy": {
"type": "http",
"url": "http://localhost:8080/mcp/"
}
```
## 最小化配置 (`~/.mcpproxy/mcp_config.json`)
```
{
"listen": "127.0.0.1:8080", // Localhost-only by default for security
"data_dir": "~/.mcpproxy",
"enable_tray": true,
// Search & tool limits
"top_k": 5,
"tools_limit": 15,
"tool_response_limit": 20000,
// Optional HTTPS configuration (disabled by default)
"tls": {
"enabled": false, // Set to true to enable HTTPS
"require_client_cert": false,
"hsts": true
},
"mcpServers": [
{ "name": "local-python", "command": "python", "args": ["-m", "my_server"], "protocol": "stdio", "enabled": true },
{ "name": "remote-http", "url": "http://localhost:3001", "protocol": "http", "enabled": true }
]
}
```
### 关键参数
| 字段 | 描述 | 默认值 |
|-------|-------------|---------|
| `listen` | 代理监听地址 | `127.0.0.1:8080` |
| `data_dir` | 配置、数据库和日志文件夹 | `~/.mcpproxy` |
| `enable_tray` | 显示原生系统托盘 UI | `true` |
| `top_k` | `retrieve_tools` 返回的工具数量 | `5` |
| `tools_limit` | 返回给客户端的最大工具数量 | `15` |
| `tool_response_limit` | 自动截断超过 N 个字符的响应(`0` 表示禁用) | `20000` |
| `tls.enabled` | 使用本地 CA 证书启用 HTTPS | `false` |
| `tls.require_client_cert` | 启用双向 TLS (mTLS) 进行客户端认证 | `false` |
| `tls.certs_dir` | TLS 证书的自定义目录 | `{data_dir}/certs` |
| `tls.hsts` | 发送 HTTP 严格传输安全标头 | `true` |
| `docker_isolation` | Docker 安全隔离设置(见下文) | `enabled: false` |
### CLI 命令
**主要命令:**
```
mcpproxy serve # Start proxy server with system tray
mcpproxy tools list --server=NAME # Debug tool discovery for specific server
mcpproxy trust-cert # Install CA certificate as trusted (for HTTPS)
```
**管理命令:**
```
# 单服务器操作
mcpproxy upstream list # List all servers with status
mcpproxy upstream restart # Restart specific server
mcpproxy upstream enable # Enable specific server
mcpproxy upstream disable # Disable specific server
mcpproxy upstream logs # View server logs (--tail, --follow)
# 批量操作(多服务器)
mcpproxy upstream restart --all # Restart all configured servers
mcpproxy upstream enable --all # Enable all servers
mcpproxy upstream disable --all # Disable all servers
# 健康诊断
mcpproxy doctor # Run comprehensive health checks
```
**管理服务架构:**
所有管理操作(CLI、REST API 和 MCP 协议)共享统一的服务层,提供:
- **配置门控**:遵循 `disable_management` 和 `read_only_mode` 设置
- **事件集成**:向系统托盘和 Web UI 实时更新
- **批量操作**:高效的多服务器管理,包含部分失败处理
- **一致行为**:所有接口具有相同的验证和错误处理
**Serve 命令标志:**
```
mcpproxy serve --help
-c, --config path to mcp_config.json
-l, --listen listen address for HTTP mode
-d, --data-dir custom data directory
--log-level trace|debug|info|warn|error
--log-to-file enable logging to file in standard OS location
--read-only enable read-only mode
--disable-management disable management features
--allow-server-add allow adding new servers (default true)
--allow-server-remove allow removing existing servers (default true)
--enable-prompts enable prompts for user input (default true)
--tool-response-limit tool response limit in characters (0 = disabled)
```
**Tools 命令标志:**
```
mcpproxy tools list --help
-s, --server upstream server name (required)
-l, --log-level trace|debug|info|warn|error (default: info)
-t, --timeout connection timeout (default: 30s)
-o, --output output format: table|json|yaml (default: table)
-c, --config path to mcp_config.json
```
**调试示例:**
```
# 列出工具并启用 trace 日志以查看所有 JSON-RPC 帧
mcpproxy tools list --server=github-server --log-level=trace
# 列出工具并为慢速服务器设置自定义超时
mcpproxy tools list --server=slow-server --timeout=60s
# 以 JSON 格式输出工具以便脚本处理
mcpproxy tools list --server=weather-api --output=json
```
## 🔐 Secret 管理
MCPProxy 使用操作系统的原生 keyring 提供安全的 secret 管理功能,用于存储敏感信息,如 API key、token 和凭证。
### ✨ **主要功能**
- **操作系统原生安全**:使用 macOS Keychain、Linux Secret Service 或 Windows Credential Manager
- **占位符扩展**:自动解析配置文件中的 `${keyring:secret_name}` 占位符
- **全局访问**:Secret 在所有 MCPProxy 配置和数据目录间共享
- **CLI 管理**:提供完整的命令行界面用于存储、检索和管理 secret
### 🔧 **管理 Secret**
**存储一个 secret:**
```
# 交互式提示(推荐用于敏感值)
mcpproxy secrets set github_token
# 从命令行(安全性较低 - 在 shell 历史记录中可见)
mcpproxy secrets set github_token "ghp_abcd1234..."
# 从环境变量
mcpproxy secrets set github_token --from-env GITHUB_TOKEN
```
**列出所有 secret:**
```
mcpproxy secrets list
# 输出:在 keyring 中发现 3 个 secret:
# github_token
# openai_api_key
# database_password
```
**检索一个 secret:**
```
mcpproxy secrets get github_token
```
**删除一个 secret:**
```
mcpproxy secrets delete github_token
```
### 📝 **在配置中使用占位符**
在您的 `mcp_config.json` 中使用 `${keyring:secret_name}` 占位符:
```
{
"mcpServers": [
{
"name": "github-mcp",
"command": "uvx",
"args": ["mcp-server-github"],
"protocol": "stdio",
"env": {
"GITHUB_TOKEN": "${keyring:github_token}",
"OPENAI_API_KEY": "${keyring:openai_api_key}"
},
"enabled": true
},
{
"name": "database-server",
"command": "python",
"args": ["-m", "my_db_server", "--password", "${keyring:database_password}"],
"protocol": "stdio",
"enabled": true
}
]
}
```
**占位符扩展适用于:**
- ✅ 环境变量(`env` 字段)
- ✅ 命令参数(`args` 字段)
- ❌ 服务器名称、命令、URL(静态字段)
### 🏗️ **Secret 存储架构**
**存储位置:**
- **macOS**: Keychain Access (`/Applications/Utilities/Keychain Access.app`)
- **Linux**: Secret Service (GNOME Keyring, KDE Wallet, 等)
- **Windows**: Windows Credential Manager
**服务名称:** 所有 secret 都存储在服务名 `"mcpproxy"` 下
**全局范围:**
- ✅ Secret 在**所有 MCPProxy 实例间共享**,无论:
- 配置文件位置(`--config` 标志)
- 数据目录(`--data-dir` 标志)
- 工作目录
- ✅ 相同的 secret 适用于不同的项目和设置
- ⚠️ **无隔离** – 所有 MCPProxy 实例访问同一个 keyring
### 🎯 **多项目最佳实践**
如果您在多个项目或环境中使用 MCPProxy,请使用具有描述性的 secret 名称:
```
# 特定环境 secret
mcpproxy secrets set prod_database_url
mcpproxy secrets set dev_database_url
mcpproxy secrets set staging_api_key
# 特定项目 secret
mcpproxy secrets set work_github_token
mcpproxy secrets set personal_github_token
mcpproxy secrets set client_a_api_key
```
然后在您的配置中引用它们:
```
{
"mcpServers": [
{
"name": "work-github",
"env": {
"GITHUB_TOKEN": "${keyring:work_github_token}"
}
},
{
"name": "personal-github",
"env": {
"GITHUB_TOKEN": "${keyring:personal_github_token}"
}
}
]
}
```
### 🔍 **安全注意事项**
- **加密存储**:Secret 由 OS keyring 加密
- **进程隔离**:其他应用程序在没有适当权限的情况下无法访问 MCPProxy secret
- **无文件存储**:Secret 绝不会写入配置文件或日志
- **审计追踪**:OS keyring 可能提供访问日志(因平台而异)
### 🐛 **故障排除**
**未找到 Secret:**
```
# 验证 secret 是否存在
mcpproxy secrets list
# 检查确切的 secret 名称(区分大小写)
mcpproxy secrets get your_secret_name
```
**Keyring 访问被拒绝:**
- **macOS**: 在 `系统偏好设置 > 安全性与隐私 > 隐私 > 辅助功能` 中授予 MCPProxy 访问权限
- **Linux**: 确保您的桌面会话具有活跃的 keyring 服务
- **Windows**: 以适当的用户权限运行 MCPProxy
**占位符未解析:**
```
# 测试 secret 解析
mcpproxy secrets get your_secret_name
# 检查日志中的 secret 解析错误
mcpproxy serve --log-level=debug
```
## 🐳 Docker 安全隔离
MCPProxy 为 stdio MCP 服务器提供 **Docker 隔离**,通过在每个独立的容器中运行服务器来增强安全性:
### ✨ **主要安全优势**
- **进程隔离**:每个 MCP 服务器在独立的 Docker 容器中运行
- **文件系统隔离**:服务器无法访问容器外的宿主机文件系统
- **网络隔离**:可配置的网络模式以提供额外的安全性
- **资源限制**:内存和 CPU 限制防止资源耗尽
- **自动运行时检测**:自动检测 Python、Node.js、Go、Rust 环境
### 🔧 **工作原理**
1. **运行时检测**:自动检测服务器类型(uvx→Python, npx→Node.js 等)
2. **容器选择**:映射到包含所需工具的适当 Docker 镜像
3. **环境传递**:通过安全的环境变量传递 API key 和配置
4. **Git 支持**:使用包含 Git 的完整 Docker 镜像,以便从代码库安装软件包
### 📝 **Docker 隔离配置**
添加到您的 `mcp_config.json`:
```
{
"docker_isolation": {
"enabled": true,
"memory_limit": "512m",
"cpu_limit": "1.0",
"timeout": "60s",
"network_mode": "bridge",
"default_images": {
"python": "python:3.11",
"uvx": "python:3.11",
"node": "node:20",
"npx": "node:20",
"go": "golang:1.21-alpine"
}
},
"mcpServers": [
{
"name": "isolated-python-server",
"command": "uvx",
"args": ["some-python-package"],
"env": {
"API_KEY": "your-api-key"
},
"enabled": true
// Docker isolation applied automatically
},
{
"name": "custom-isolation-server",
"command": "python",
"args": ["-m", "my_server"],
"isolation": {
"enabled": true,
"image": "custom-python:latest",
"working_dir": "/app"
},
"enabled": true
}
]
}
```
### 🎯 **自动运行时检测**
| 命令 | 检测到的运行时 | Docker 镜像 |
|---------|------------------|--------------|
| `uvx` | Python with UV package manager | `python:3.11` |
| `npx` | Node.js with npm | `node:20` |
| `python`, `python3` | Python | `python:3.11` |
| `node` | Node.js | `node:20` |
| `go` | Go language | `golang:1.21-alpine` |
| `cargo` | Rust | `rust:1.75-slim` |
### 🔐 **安全特性**
- **环境变量**:API key 和 secret 被安全地传递到容器
- **Git 支持**:完整镜像包含 Git,用于从仓库安装软件包
- **无 Docker-in-Docker**:现有的 Docker 服务器自动免于隔离
- **资源限制**:防止失控进程消耗系统资源
- **网络隔离**:容器在隔离的网络环境中运行
### 🐛 **Docker 隔离调试**
```
# 检查哪些服务器正在使用 Docker 隔离
mcpproxy serve --log-level=debug --tray=false | grep -i "docker isolation"
# 监控由 MCPProxy 创建的 Docker 容器
docker ps --format "table {{.Names}}\t{{.Image}}\t{{.Status}}"
# 查看特定服务器的容器日志
docker logs
```
## 🔄 Docker 恢复
MCPProxy 包含**智能 Docker 恢复**功能,可自动检测并处理 Docker 引擎停机:
### ✨ **主要功能**
- **自动检测**:以指数退避方式每 2-60 秒监控 Docker 健康状态
- **优雅重连**:Docker 恢复时自动重新连接所有基于 Docker 的服务器
- **系统通知**:原生通知让您随时了解恢复进度
- **容器清理**:关闭时移除孤立容器
- **零配置**:开箱即用,具有合理的默认值
### 🔧 **工作原理**
1. **健康监控**:持续检查 Docker 引擎可用性
2. **故障检测**:检测 Docker 何时变得不可用(暂停、停止、崩溃)
3. **指数退避**:从 2 秒检查开始,退避到 60 秒以节省资源
4. **自动重连**:Docker 恢复后,所有受影响的服务器将重新连接
5. **用户通知**:系统通知告知您恢复状态
### 📢 **通知**
MCPProxy 在 Docker 恢复期间显示原生系统通知:
| 事件 | 通知 |
|-------|-------------|
| **恢复开始** | "Docker engine detected offline. Reconnecting servers..." |
| **恢复成功** | "Successfully reconnected X server(s)" |
| **恢复失败** | "Unable to reconnect servers. Check Docker status." |
| **重试尝试** | "Retry attempt X. Next check in Y" |
###🐛 **Docker 恢复故障排除**
**Docker 恢复后服务器未重连:**
```
# 1. 检查 Docker 是否正在运行
docker ps
# 2. 检查 mcpproxy 日志
cat ~/.mcpproxy/logs/main.log | grep -i "docker recovery"
# 3. 验证容器标签
docker ps -a --filter label=com.mcpproxy.managed
# 4. 通过系统托盘强制重连
# 系统托盘 → 强制重连所有服务器
```
**关闭时容器未清理:**
```
# 检查孤立容器
docker ps -a --filter label=com.mcpproxy.managed=true
# 必要时手动清理
docker ps -a --filter label=com.mcpproxy.managed=true -q | xargs docker rm -f
```
**Docker 恢复耗时过长:**
- Docker 恢复使用指数退避(2秒 → 60秒间隔)
- 这是有意为之,以避免在 Docker 离线时浪费资源
- 您可以通过系统托盘菜单强制立即重连
## OAuth 认证支持
MCPProxy 为需要用户授权的 MCP 服务器(如 Cloudflare AutoRAG, Runlayer, GitHub 等)提供**无缝 OAuth 2.1 认证**:
### ✨ **主要功能**
- **零配置 OAuth**:自动检测和配置大多数 OAuth 服务器
- **RFC 8707 资源自动检测**:自动从服务器元数据发现资源参数
- **符合 RFC 8252**:动态端口分配,用于安全的回调处理
- **PKCE 安全**:Proof Key for Code Exchange,增强安全性
- **自动启动浏览器**:打开默认浏览器进行身份验证
- **动态客户端注册**:向 OAuth 服务器自动注册客户端
- **Token 管理**:自动 token 刷新和存储
### 🔄 **工作原理**
1. **添加 OAuth 服务器**:在配置中配置支持 OAuth 的 MCP 服务器
2. **自动检测**:MCPProxy 检测 OAuth 要求并自动配置参数
3. **浏览器打开**:您的默认浏览器打开 OAuth 提供商的登录页面
4. **动态回调**:MCPProxy 在随机端口上启动本地回调服务器
5. **Token 交换**:授权码自动交换为访问令牌
6. **准备就绪**:服务器立即可用于工具调用
### 📝 **OAuth 配置示例**
#### 零配置 OAuth(推荐)
对于大多数 OAuth 服务器(包括 Runlayer, Cloudflare 等),**不需要 OAuth 配置**。MCPProxy 自动:
- 通过 401 响应检测 OAuth 要求
- 发现受保护资源元数据 (RFC 9728)
- 自动注入 RFC 8707 `resource` 参数
```
{
"mcpServers": [
{
"name": "runlayer-slack",
"url": "https://oauth.runlayer.com/api/v1/proxy/YOUR-UUID/mcp"
},
{
"name": "cloudflare_autorag",
"url": "https://autorag.mcp.cloudflare.com/mcp",
"protocol": "streamable-http"
}
]
}
```
就是这样 —— **不需要 `oauth` 块**。MCPProxy 自动处理一切。
#### 显式 OAuth 配置
在以下情况下使用显式配置:
- 自定义 OAuth scope
- 覆盖自动检测的参数
- 使用预注册的客户端凭据
- 支持具有非标准要求的提供商
```
{
"mcpServers": [
{
"name": "github-enterprise",
"url": "https://github.example.com/mcp",
"protocol": "http",
"oauth": {
"scopes": ["repo", "user:email", "read:org"],
"pkce_enabled": true,
"client_id": "your-registered-client-id",
"extra_params": {
"resource": "https://api.github.example.com",
"audience": "github-enterprise-api"
}
}
}
]
}
```
**OAuth 配置选项**(均为可选):
- `scopes`:要请求的 OAuth scope(如果未指定则自动发现)
- `pkce_enabled`:启用 PKCE 以增强安全性(默认:`true`,推荐)
- `client_id`:预注册的客户端 ID(如果为空则使用动态客户端注册)
- `client_secret`:客户端密钥(可选,用于机密客户端)
- `extra_params`:额外的 OAuth 参数(覆盖自动检测的值)
### 🔍 **OAuth 诊断**
检查 OAuth 状态和自动检测的参数:
```
# 查看特定服务器的 OAuth 状态
mcpproxy auth status --server=runlayer-slack
# 查看所有启用 OAuth 的服务器
mcpproxy auth status --all
# 运行包含 OAuth 问题的健康诊断
mcpproxy doctor
```
### 🔧 **OAuth 调试**
启用调试日志以查看完整的 OAuth 流程:
```
mcpproxy serve --log-level=debug --tray=false
```
检查日志以获取 OAuth 流程详情:
```
tail -f ~/Library/Logs/mcpproxy/main.log | grep -E "(oauth|OAuth)"
```
### 📂 **工作目录配置**
通过为 stdio MCP 服务器指定工作目录来解决项目上下文问题:
```
{
"mcpServers": [
{
"name": "ast-grep-project-a",
"command": "npx",
"args": ["ast-grep-mcp"],
"working_dir": "/home/user/projects/project-a",
"enabled": true
},
{
"name": "git-work-repo",
"command": "npx",
"args": ["@modelcontextprotocol/server-git"],
"working_dir": "/home/user/work/company-repo",
"enabled": true
}
]
}
```
**优势**:
- **项目隔离**:基于文件的服务器在正确的目录上下文中运行
- **多项目**:同一 MCP 服务器类型用于不同项目
- **上下文分离**:工作和个人项目隔离
**基于工具的管理**:
```
# 添加带有工作目录的服务器
mcpproxy call tool --tool-name=upstream_servers \
--json_args='{"operation":"add","name":"git-myproject","command":"npx","args_json":"[\"@modelcontextprotocol/server-git\"]","working_dir":"/home/user/projects/myproject","enabled":true}'
# 更新现有服务器的工作目录
mcpproxy call tool --tool-name=upstream_servers \
--json_args='{"operation":"update","name":"git-myproject","working_dir":"/new/project/path"}'
```
## 🔐 可选 HTTPS 设置
MCPProxy 默认使用 HTTP 以便于设置。HTTPS 是可选的,主要用于生产环境或需要更严格的安全性时。
**💡 注意**:大多数用户可以使用 HTTP(默认),因为它可以与所有支持的客户端(包括 Claude Desktop、Cursor 和 VS Code)完美配合。
### 快速 HTTPS 设置
**1. 启用 HTTPS**(选择一种方法):
```
# 方法 1:环境变量
export MCPPROXY_TLS_ENABLED=true
mcpproxy serve
# 方法 2:配置文件
# 编辑 ~/.mcpproxy/mcp_config.json 并设置 "tls.enabled": true
```
**2. 信任证书**(一次性设置):
```
mcpproxy trust-cert
```
**3. 使用 HTTPS URL**:
- MCP endpoint: `https://localhost:8080/mcp`
- Web UI: `https://localhost:8080/ui/`
### Claude Desktop 集成
对于 Claude Desktop,将此添加到您的 `claude_desktop_config.json`:
**HTTP(默认 - 推荐):**
```
{
"mcpServers": {
"mcpproxy": {
"command": "npx",
"args": [
"-y",
"mcp-remote",
"http://localhost:8080/mcp"
]
}
}
}
```
**HTTPS(需信任证书):**
```
{
"mcpServers": {
"mcpproxy": {
"command": "npx",
"args": [
"-y",
"mcp-remote",
"https://localhost:8080/mcp"
],
"env": {
"NODE_EXTRA_CA_CERTS": "~/.mcpproxy/certs/ca.pem"
}
}
}
}
```
### 证书管理
- **自动生成**:首次 HTTPS 启动时创建证书
- **多域支持**:适用于 `localhost`、`127.0.0.1`、`::1`
- **信任安装**:使用 `mcpproxy trust-cert` 添加到系统 keychain
- **证书位置**:`~/.mcpproxy/certs/` (ca.pem, server.pem, server-key.pem)
### HTTPS 故障排除
**证书信任问题**:
```
# 重新信任证书
mcpproxy trust-cert --force
# 检查证书位置
ls ~/.mcpproxy/certs/
# 测试 HTTPS 连接
curl -k https://localhost:8080/api/v1/status
```
**Claude Desktop 连接问题**:
- 确保 `NODE_EXTRA_CA_CERTS` 指向正确的 ca.pem 文件
- 配置更改后重启 Claude Desktop
- 验证 HTTPS 是否已启用:`mcpproxy serve --log-level=debug`
## 了解更多
* 文档:[配置](https://mcpproxy.app/docs/configuration)、[功能](https://mcpproxy.app/docs/features)、[使用](https://mcpproxy.app/docs/usage)
* 网站:
* 发布:
## 贡献 🤝
我们欢迎 issue、功能想法和 PR!Fork 本仓库,创建一个功能分支,然后提交 pull request。请参阅 `CONTRIBUTING.md`(即将推出)了解指南。
System Tray - Upstream Servers System Tray - Quarantine Management
标签:API优化, CISA项目, Cursor, DLL 劫持, EVTX分析, LLM工具网关, MCP, OpenAI, Tool Poisoning Attack, 中间件, 代理服务, 令牌节省, 内存规避, 大语言模型, 安全隔离, 工具发现, 工具链管理, 开源, 日志审计, 桌面应用, 系统托盘, 网络安全, 请求拦截, 防护, 隐私保护